How to Set DNS Nameserver on Ubuntu 20.04
What is DNS Nameserver?
DNS translates text-based domain names into numeric IP addresses. By default, most networks are configured to work with the DNS servers provided by the Internet service provider. However, you can change the DNS Nameserver with the following instructions.
In this tutorial, we will tell you 2 ways to change DNS Nameservers:
- Change DNS Nameserver using graphical interface
- Change DNS Nameserver using command line
The need to start training
- Ubuntu 20.04 (both methods also work on Ubuntu 18.04 and later).
- Terminal access
- Sudo permissions and access
Change DNS Nameserver with graphical interface
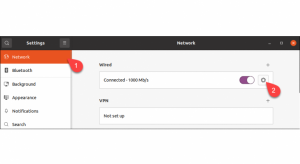
1. Run itda Settings and click on the Network tab in the left menu.
2. Click the gear icon next to the connection you want to launch.

Note: To change the wireless connection settings, select the Wi-Fi tab.
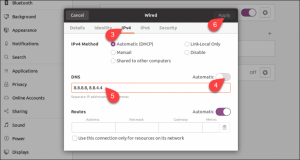
3. In the window that opens, go to the IPv4 tab.
4. Now to turn off the automatic configuration, turn off the Automatic switch.
5. Enter new addresses to change DNS. (The example below is Google’s public DNS address.)
6. Finally, click on Apply.

The system was easily configured to work with the new DNS servers.
Note: If you want to set up IPv6 DNSs, go to the IPv6 tab and enter them there. IPv6 address format is different from IPv4. For example, Google’s IPv6 DNS servers are: 2001:4860:4860::8888 and 2001:4860:4860::8844.
Change DNS using the command line
If for any reason you don’t want to use the graphical interface, you can change the DNS settings with the Netplan command line tool.
1. Navigate to the Netplan directory using the following command:
cd /etc/netplan
2. List the contents of the directory with the ls command to see the name of the yaml file.
Once you see the desired file name, open it with the nano text editor:
sudo nano 01-network-manager.yaml
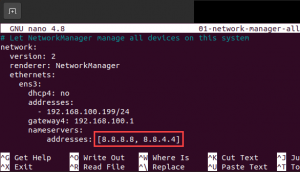
Internet connections are listed in the Ethernet section of the file. If there are wireless connections, you can find them in the wifi section. Netplan stores the current DNS configuration parameters in the nameservers sub-sections of each section.

Replace the addresses you want to use. Then save the changes and exit.
3. Apply the changes you made in the config file:
sudo netplan apply
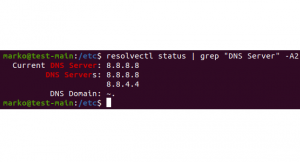
If the operation is successful, there is no output. To check if the system has successfully applied the changes, type this command:
systemd-resolve --status | grep 'DNS Servers' -A2
You should see output like this:

What is the reason for changing DNS in Ubuntu?
In most cases, your default DNS settings will provide optimal performance. However, in some cases, it is necessary to change your DNS.
Large companies with better infrastructure are usually more capable of providing DNS service. If your ISP is unreliable or drops frequently, changing your DNS provider can be the best solution.
Some DNS providers offer filters that prevent phishing sites from accessing your computer.
Sometimes ISPs block content at the DNS level. So changing DNS may help you to access some restricted websites.
Conclusion
In this tutorial, you learned how to set DNS Nameserver in Ubuntu. We hope it was useful for you.


