


How to Use Fail2ban to Secure SSH on CentOS 7
This tutorial will teach you how to install Fail2Ban on CentOS 7. One of the best ways to increase the security of your CentOS 7 server is to install this tool.
No server is completely safe from attacks. Therefore, we have to use some additional features to increase the security of our VPS. We can do this by installing Fail2Ban.
What is Fail2Ban?
Fail2Ban is software that protects Linux-based web servers against brute-force, DDoS, and DOS attacks. This software provides useful security measures for CentOS Linux servers.
Fail2Ban works by monitoring system logs and banning hackers based on multiple failed login attempts. Once unauthorized access is detected, Fail2Ban directly uses iptables and firewalls to block their IP addresses.
Before starting the Fail2Ban installation, you must have root access to the server via an SSH client such as PuTTY (on Windows) or Terminal (macOS and Linux).
How to Use Fail2ban to Secure SSH on CentOS 7
To install Fail2Ban, we need to go through 3 steps:
- EPEL repository installation
- Copy configuration files
- Configure and configure Fail2Ban
Step 1: Install the EPEL repository
First, you need to download the EPEL (Extra Packages for Enterprise Linux) repository, which includes Fail2Ban for CentOS 7. Run the following command:
sudo yum install epel-release
Once you’ve done that, you can install Fail2Ban with this command:
sudo yum install fail2ban
Then enable and start the service by typing these commands:
sudo systemctl enable fail2ban
sudo systemctl start fail2ban
Second step: copy the configuration files
After installing Fail2Ban on CentOS 7, we need to transfer configuration files. The Fail2Ban configuration file is stored in /etc/fail2ban/jail.conf. But this file may be deleted by updating the package. We strongly recommend moving the content to a local configuration file called jail. local. For this, we use the cp command:
sudo cp /etc/fail2ban/jail.conf /etc/fail2ban/jail.local
You can now make changes to the Fail2Ban configuration. Any value you define in jail. local overrides the value already in jail. conf.
Third step: Configure and configure Fail2Ban
Now it’s time to configure the local configuration file using the nano text editor:
sudo nano /etc/fail2ban/jail.local
In this file, find the DEFAULT section. This section contains the global settings that the service will apply to Fail2Ban:
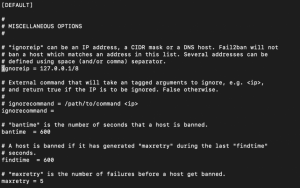
- ignoreip – If you want an IP or DNS address not to be restricted (not banned), you can write in front of ignoreip. You can enter more than one entry by separating them with a space.
- bantime – the length of time you want a host not to access your server. (Seconds)
- findtime – time limit in which logging should be done. It will be banned if the host does not log in during this period (the number of times we specify in maxretry).
- maxretry – Maximum number of attempts by the host to access the server.
You can change the values according to your need. After making changes, save the configuration file with the shortcut CTRL+X.
You need to restart Fail2Ban to apply the changes:
sudo systemctl restart fail2ban
Fail2Ban is now up and running on your CentOS 7 server. Consider a few points when using this service:
To monitor the status of Fail2Ban jails, you can use this command:
sudo fail2ban-client status
To block an IP address, you can simply use the following command:
sudo fail2ban-client set <jailname> unbanip <ipaddress
Remember to replace the information inside the brackets with your own information.
Conclusion
Installing Fail2Ban improves the security of your CentOS 7 server. This tool helps prevent attackers from trying to access your server.
Don’t miss our offers if you are planning to buy a Linux virtual server with security and strong hardware.
&nb