
Master Mikrotik IKEv2 Setup: Secure VPN Connection Made Easy
These days, the use of the IKEV2 encryption protocol to set up a VPN between two computers, two sites, and a remote office branch has increased because the IKEV2 protocol is relatively new and has very good capabilities for building a virtual private network and sending and receiving information securely and encrypted.
The easiest way to set up an IKEV2 server is to use Mikrotik routers. Along with Winbox software and RouterOS operating system, Mikrotik routers give you many features in terms of VPN, Firewall, and proxy server, and you can easily install and set up an SSH or web server and Telnet on them, and a local access license for each user. gave
Today, most network engineers and professionals have started using Mikrotik hardware and software to meet their needs, such as routing in the network and setting up all kinds of servers, including web servers, VPN servers, proxy servers, file servers, firewalls, etc..
If you are unfamiliar with these concepts and are interested in taking computer network training, we suggest you visit the following site to learn these concepts in a simple and practical language.
Mikrotik servers give you the highest stability and security, have high boot speed, and a series of automatic processes to get things done. These servers can be installed in a few minutes, and a series of commands can be given to them so that these tasks can be done with high speed and stability without the need to log in multiple times and in a row or restart processes.
Setting up Mikrotik servers is also simple, and most of the time, you can copy these settings from one system to another. For this reason, in recent years, many businesses or network professionals have been interested in setting up a VPN with Mikrotik servers, and the relatively new IKEV2 VPN protocol has shone brightly. In this article, we first want to have a look at some concepts and protocols, and then check the installation steps of the IKEV2 protocol on Mikrotik.
Familiarity with Mikrotik, Mikrotik router, Winbox, and RouterOS
If you have been in the world of network and security and Internet hardware, you have probably heard and seen these expressions. Some say Mikrotik is hardware, and others consider Mikrotik an operating system and software. One article talks about the Mikrotik server, and another article says Mikrotik router or network settings in the Mikrotik software!
We must say that almost all these terms and concepts are correct. Initially, in 1996, two MIT students from “Latvia” in Eastern Europe developed and marketed the Mikrotik operating system. This operating system was based on the Linux kernel, but its biggest advantage was the ability to install on ordinary PCs based on Microsoft Windows.
What are IKE and IKEv2 protocols?
Internet Key Exchange, or IKE, is an IPSec-based tunneling protocol that provides a secure VPN communication channel and defines automatic authentication and negotiation for IPSec SAs in a secure manner.
The first version of this VPN protocol (IKEv1) was introduced in 1998, and the second version (IKEv2) was released 7 years later.
If you want to get acquainted with various types of secure protocols, we have a thoroughly professional tutorial for you, which we have provided a link to.
Features of the IKEv2 protocol
Why use IKEv2:
- 256-bit data encryption
- It implements IPSec for security
- Stable Connection
- MOIKE support, which guarantees better speed
Security: IKEv2 uses a server authentication certificate, meaning that no action will be taken until the requester’s identity is known. This feature will prevent DDOS attacks.
Speed: Complex architecture and an efficient IKEv2 messaging system can improve performance. In addition, its connection speed is significantly faster, especially due to the built-in NAT traversal, which significantly speeds up the passage of firewalls and connection establishment.
Pros of IKEv2 protocol
- Faster than PPTP and L2TP
- It supports high-quality encryption methods
- High stability
- Phone support
- Easy setup
Disadvantages of the IKEv2 protocol
Perhaps the only negative point of this protocol is the use of UDP port 500, which will block some firewalls.
Mikrotik IKEv2 Setup Guide
Modern operating systems (such as Windows 7 and newer) support the IKEv2 standard. Internet Key Exchange (IKE or IKEv2) is a protocol that establishes a security association within the IPsec protocol suite. Compared to IKE version 1, IKEv2 includes improvements such as support for Mobility via the MOBIKE standard and greater reliability. Mikrotik IKEv2 setup allows you to manage anonymous and secure internet traffic of devices connected to your router and unblock geo-restricted content. This article will examine how to set up IKEv2 in Macrotik.
Advantages of setting up IKEv2 on Mikrotik
The main performance advantage of IKEv2 over L2TP/IPsec VPNs is that L2TP assigns only one source IP per client, whereas IKEv2 has no restrictions. If, for example, three Windows laptops connected to the same Internet connection point (WiFi hotel or hotspot) are trying to connect to the company’s VPN, only the last connected device will succeed. It means just a laptop. However, this problem can be solved using one mobile hotspot for each laptop, but the source IP will change. Also, this option is not always available.
IKEv2 VPNs don’t have this problem with L2TP VPNs, so you can connect as many clients as you want to the endpoint. IKEv2 is much more difficult to configure for the first time than L2TP/IPsec and even more difficult for first-time OSX users.
Mikrotik’s 6.41 release channel has an issue that results in a local issuer certificate invalidation error. Sometimes IKEv2 connects well with exactly one code. However, when using version 6.41, in many cases, you will encounter the error “local issuer certificate depth 0” in the Mikrotik Log in the IPsec section. Use the BugFix/Stable channel (currently 6.393) to fix this issue.
Licensing management
The MikroTik router is becoming a licensing authority that can sign the TLS server certificate and the licenses for the connected devices. This means connected computers are authenticated by the device, not by username and password. You must configure Radius authentication if you prefer to have the username and password in the Machine Permissions header. To issue a license, you can follow the example code below:
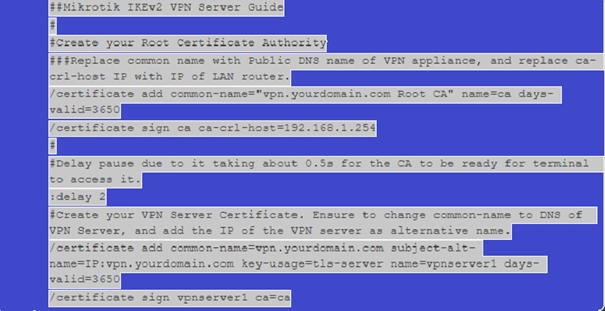
The default key expiration is 365 days (1 year), so set it to 3650 (10 years) to avoid validity issues. Set the VPN provider’s DNS address as the common name. For example, vpn.yourdomain.com. In this example, CA-Crl-Host is set as the LAN IP address of the device. In this way, we create a licensing management center that allows the issuance of licenses and certificates.
Configuring IKEv2 settings in Mikrotik
Mikrotik’s IKEv2 setup tutorial aims to have clients connect their VPN to a subnet to obtain their IP address from a DHCP server on the main LAN. Also, it allows you to manage the subnet of VPN clients with custom rules if needed, which is very useful for access control or traffic shaping.
How to set up IKEv2 in Mikrotik
As mentioned, IKEv2 is the protocol used to set up a security association in the IPsec protocol suite. Setting up IKEv2 on Mikrotik can generally be summarized in three steps:
- Set up manual VPN settings
- Configuring the IKEv2 Connection in Mikrotik
- Learn how to send the required traffic through the VPN tunnel
Launch the manual VPN settings
Before setting up a VPN on the Mikrotik router, you must create IKEv2 settings on the KeepSolid desktop. For this, it is enough to go through a few simple steps. First, log in to your User Office system. Then press the Manage option to use KeepSolid VPN Unlimited services and follow these steps in order:
- Select device: Select one of the devices in the provided list or add a new device to it. If you don’t have free slots, delete one of the previous devices.
- Choose your server location: KeepSolid VPN Unlimited offers a wide variety of servers. Choose your desired location server from these servers.
- Select your desired VPN protocol: Specify your device platform to use the IKEv2 protocol.
- Configure: Press the Generate option to get all the data needed to set up the VPN connection. These data include login data, password, server address, etc., which will be available as text and QR codes. It is also recommended to download the configuration file to use IKEv2 on Windows and OpenVPN® on any platform.
How to configure IKEv2 Connection in Mikrotik
Configuring the IKEv2 connection in Mikrotik is complicated and requires careful attention. However, if you learn the setup and configuration steps and execute them correctly, you will not face many problems. To configure an IKEv2 connection in Mikrotik, proceed as follows:
- Log in to your Mikrotik WebFig
- Open the Files option and add the certificate you created earlier in your office.
- Import your certificate from System è Certificates è Import. In the drop-down menu in front of the Only File section, select the added certificate and click on the Import option.
- Add a new profile to your Mikrotik router from IP è IPsec è Profiles è Add New.

1. Fill in the profile fields
At this stage, you must enter the information required to create a new profile for the Mikrotik router in the specified fields. To correctly configure the ikrv2 Connection, the desired information must be entered correctly and as follows:
- Name: Choose a custom name for your new VPN profile
- Hash algorithms: sha512
- Encryption algorithm: AES-256
- DH group: modp3072
- Review suggestions: obey
- Lifetime: Do not change the default 1d 00:00:00
- DPD Interval: 120
- Maximum DPD failure: 5

2. Create a new offer
Go to the Proposals tab on the same IPsec page and click Add New. To avoid technical problems, the fields presented to you in this step must be filled in a certain way. Fill in the relevant fields as follows:
- Check the Enabled option
- Name: Choose a custom name
- Author algorithms: sha512
- Encryption algorithms: AES-256 GCM
- PFS group: modp3072
3. Create a group
At this point, go to the Groups tab and press the Add New option. Enter the name of the new group and click OK. Now you need to create an IPsec policy on your Mikrotik router. Go to the Policies tab and click on the Add New option. Fill in the fields as follows and click OK:
- Check the Enabled option
- Name: Choose a custom name
- Src Address: Do not change the default 0.0.0.0/0
- Dst Address: Do not change the default 0.0.0.0/0
- Protocol: 255 (all)
- Template: Tick the option
- Group: Default (make sure it’s the same option you created in step 6)
- Operation: Encryption
- IPsec protocols: esp
- Offer: Select the offer you have already created
4. Choose a configuration name and create an IPsec peer
Go to the Mode Configs tab in the same IPsec section and press Add New. Enter the configuration name and click Apply è OK. Create an IPsec peer on the IPsec è Peers tab. Click on the Add New option. After entering the following information, click on Apply and OK:
- Name: Choose a custom name
- Address: Enter the IP address of the selected VPN server (you can find it in the IP field of the settings you created)
- Profile: Select the created profile
- Send INITIAL_CONTACT: This option must be checked

5. Identification
After you have gone through all the mentioned steps, you need to create a new identity. To do this, first, select the Add New option through the IPsec è Identities tab, then fill in the provided fields in this order and select Apply è OK.
- Check the Enabled option.
- Peer: Select the peer you added earlier
- Compilation method: eap
- EAP methods: MS-CHAPv2
- License: Select the IKEv2 license you uploaded earlier
- Remote license: none
- Username: Enter the information for the manual VPN setup configuration login field
- Password: Enter the manual configuration settings password
- Policy template group: Select the created policy
- ID Type: Automatic
- Remote ID Type: Auto
- Compliance via: Remote ID
- Mode Configuration: Select the name of the configuration you added earlier
- Create Policy: Depending on the port

6. Check the Connection
The established connections can be checked through the Active Peers and Installed SAs tabs in the IPsec section. To send all traffic to the tunnel, you must create a list of addresses in your local network. To do this, select the Add New option through Firewall è Address Lists. In the Name field, select your local network and type the IP address and prefix length of the network in the Address field.
Now you need to assign this list to your mode configuration. To do this, go to IPsec è Mode Configs è KeepSolid-VPN, and select the list you just created from the drop-down menu in front of the Src field. Select Address List. Don’t forget to disable the FastTrack rule through Firewall è Filter Rules.
To get more technical information, you can use the training for setting up IKEv2 in Mikrotik provided in the tutorial, and benefit from the necessary training for setting up IKEv2 on the Mikrotik router.
Learn how to send the required traffic through the VPN tunnel
After completing all these steps to set up IKEv2 on Mikrotik, it should learn to send only the traffic it needs through the VPN tunnel. To do this, do the following steps correctly and in order:
- Create a connection-token from IPsec Address è Mode Configs è Add/Edit
- Through Firewall è Address Lists, click the Add New option to add the required IP address to the address list. You can add a different IP address with the same Address List name.
- Select the Mangle option from the Firewall page to create a new Mangle rule. Select the Add New option and fill in the available fields.

Filling the token connection field
If you followed the steps mentioned correctly, you should fill in the required fields to add a new Mangle rule. Just like the other fields mentioned in the ikev2 setup guide in Mikrotik, this field should also be filled with specific information:
- Check the Enabled option
- Chain: prerouting
- Dst Address List: Add the address list you added earlier
- Operation: mark the Connection
- New connection token: Select the connection token added in the first step
The important thing is that if you have FastTrack enabled, you need to edit the rule. Selecting your connection mark in the relevant Connection Mark field is enough, and click on the OK option. This completes the setup of IKEv2 on the Mikrotik router.
It should be noted that if you are interested in computer networks, their application, benefits, and security, you can gain expertise in your field of interest by referring to the extracurricular activities and training provided in computer networks training.
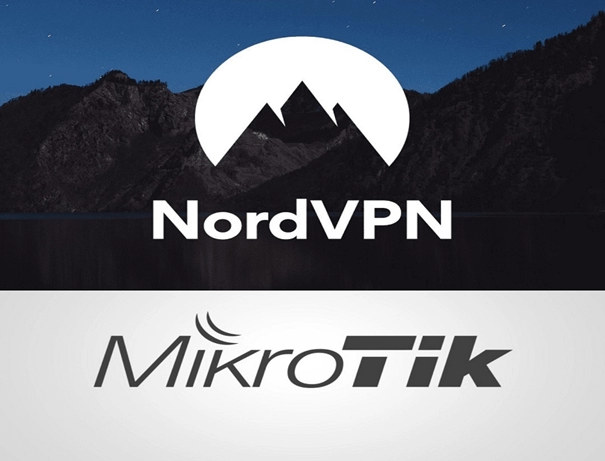
We are setting up IKEv2 on Mikrotik using Nord Vpn.
MikroTik routers with RouterOS user interface version 6.45 or later allow creating an IKEv2 EAP VPN tunnel to a NordVPN server. To set up IKEv2 on Mikrotik using Nord VPN, you can do this:
- Open the RouterOS configuration terminal
- Run the /tool fetch url=”https://downloads.nordcdn.com/certificates/root.der and /certificate import file-name=root.der commands and install the NordVPN root CA license
- Go to https://nordvpn.com/servers/tools/ and find the recommended half server host for you.
- Now you need to set up the IPsec tunnel. It would be best if you created a separate Phase 1 profile and Phase 2 proposal configuration to avoid conflict with existing or future IPsec configurations. While it
- is possible to use the default policy template to create a policy, it is best to create a new group and template to separate this configuration from other IPsec configurations.
- Create a new configuration login mode with responder = no that requests configuration parameters from the server.
- Create peer and identity configurations. In the username and password parameters, specify your NordVPN credentials.
- Now choose what you want to send through the VPN tunnel. First of all, you need to create a new IP/Firewall/Address list that includes your local network.
- Then assign the newly created IP/Firewall/Address directory to the mode-config configuration.
- Ensure that the correct source NAT rule is dynamically generated when creating the tunnel.
Specialized work requires specialized training.
In this article, we learned how to set up IKEv2 in Mikrotik, but don’t forget that doing this is a rather specialized task. Therefore, if you intend to do your job in the best possible way, it is better to learn the necessary training first.
One of the ways to learn how to set up IKEv2 in Mikrotik is to refer to the tutorial and view the provided tutorials. In extracurriculars, in addition to the mentioned training, you can benefit from computer basics training, software training, network security training, and various other trainings. Do not forget that specialized training is the key to success.
FAQ
What is IKEv2 and why use it on Mikrotik?
IKEv2 is a modern VPN protocol offering robust security, fast reconnection, and strong encryption—ideal for Mikrotik-based networks.
Do I need any special license or module to run IKEv2 on Mikrotik?
No, Mikrotik RouterOS includes support for IKEv2 by default; just enable and configure the proper settings.
What are common mistakes when configuring IKEv2 on Mikrotik?
Mismatched IPsec proposals or encryption settings Incorrect peer or identity definitions Firewall rules blocking IPSec traffic