How to Reduce Background Noise on Your Microphone in Windows
In this article, I intend to speak about reducing background noise on the mic in Windows. Whether you are calling on Skype or in online business meetings, your laptop’s internal microphone plays an important role. The microphone is so sensitive that it quickly picks up background noise to be a distraction during a crucial online voice or video call. This problem is also present when recording sound.
So, how can we eliminate the annoying background noise problem of the internal laptop microphone in Windows 10? Stay with us to guide you.
How to remove internal microphone background noise in Windows
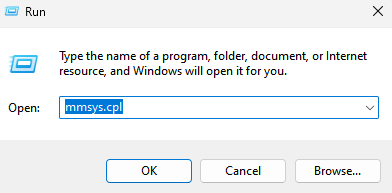
Step 1: Press Windows key + R to open the Run dialog. Now copy and paste mmsys.cpl into the run command box.
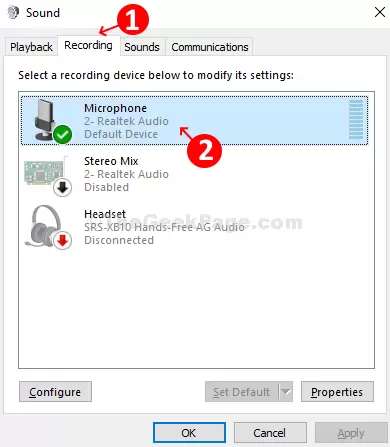
Step 2: In the Sound pop-up window, click on the Recording tab and double-click Microphone.
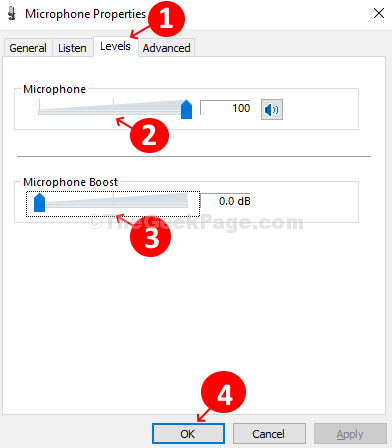
Step 3: In the new window (Microphone Properties), click the Levels tab, find the Microphone tool, drag the slider up to maximize the value, and, under the Microphone Boost tool, drag the slider down to set it to 0 dB. Click OK to save the changes.
Now right-click anywhere on the desktop and click Refresh. This! Now, remove the background noise from the microphone on your Windows 10 laptop.
Now check again; if your problem is solved, that’s better; if not, try the following steps.
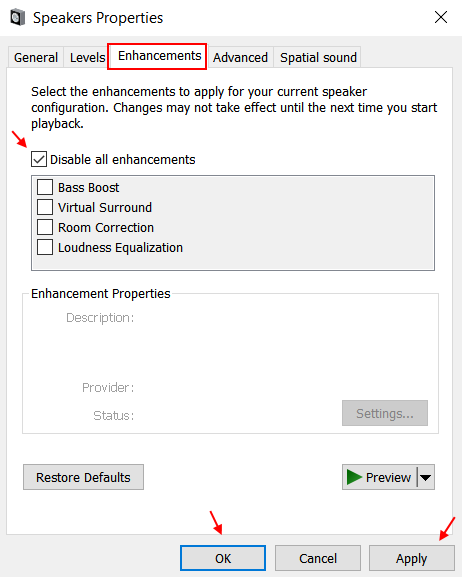
Step 6: Click on the Enhancements tab.
Step 7: Check the Disable all Enhancements option.
If the problem persists, then try the steps below.
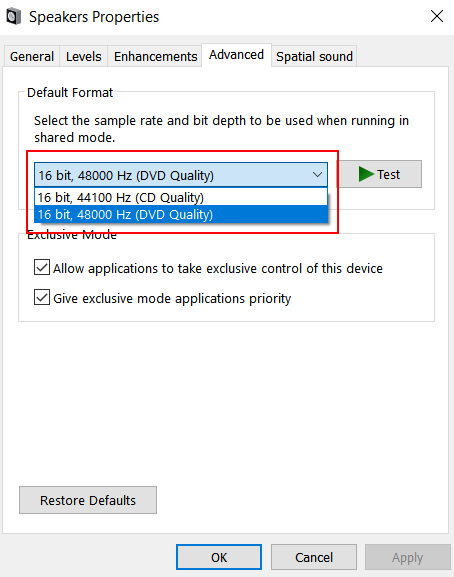
Step 8: Click on the Advanced option.
Step 9: Select different sample rates and bit depths from the drop-down menu and test if each is suitable.
The Second Method is to turn off the communication in the sound control panel
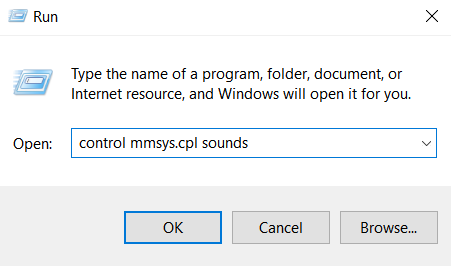
Step 1: Press the Windows key + R together to open RUN.
Step 2: Now write control mmsys. Click the “Cpl ” sound in the box, then click OK.
The second method is to turn off Communication in the sound control panel
Step 1: Press the Windows key + R together to open RUN.
Step 2: Now write control mmsys. Click the “Cpl ” sound in the box, then click OK.

2 Software to remove sound noise after recording
1- ISOTOPE RX software
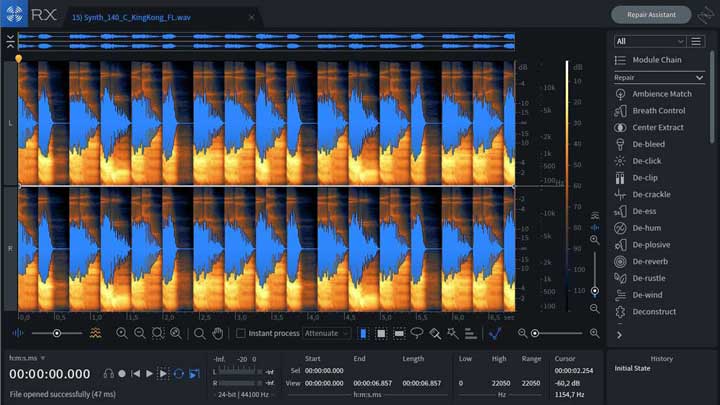
This is one of the noise removal software programs in the market that many people use because of its ability to remove the most annoying recorded sounds and turn them into clearer and quieter sounds.
It has many fans worldwide, from newcomers to almost professionals.
This software is ahead of others in solving problems others cannot solve.
The RX7 has a set of features that make it the best audio editing tool; these features include:
- Dialogue Contour: With Dialogue Contour, you can tone down the voice in a conversation to smooth and refine the recording.
- Dialog de-reverb: With de-reverb, you can remove reverberant signal content from conversations thanks to the implementation of a new machine learning-based algorithm.
De-rustle: As the name suggests, de-rustle removes all forms of annoying rustling from your conversation. An example of noise canceling is a body or cliMicrophonephone, called a lapel microphone. - Dialog isolation: This feature helps you remove background noise and makes conversations more evident.
- Breath control: Sometimes, when recording, our breath is caught by the microphone, which is heard as noise. The breath control feature detects and removes such sounds in voice recordings and dialogues.
- Sound de-bleeding: The de-bleed feature prevents sound from leaking from your headphones. There have been complaints that the RX6 (predecessor RX7) can be problematic, as it sometimes crashes when you click the track, leaving you with no choice but to force quit. There have been no such complaints about the RX7 (at least so far).
2- Audacity software
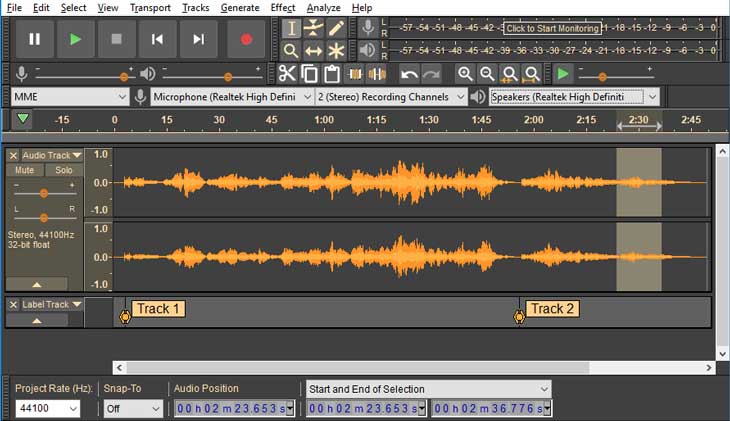
Audacitan’s open-sour-source source, cross-platform software is compatible with Mac, Windows, and Linux systems.
Once downloaded, this noise removal software can be used by anyone looking to do the most basic type of editing and modification of audio files, so whether you’re a startup entrepreneur looking to launch, a podcaster, or a spoken word artist looking to break into the performing arts, Audacity is for you.
Some features of this software that make it attractive are:
- Ease of use: Although some may consider its user interface to be old, it is easy to use due to the location of its essential editing tools in the main menu bar, and its learning curve is very gentle.
- Noise Reduction: All you have to do is highlight the part of the audio you need to smooth for this program to do what you want. The tool then examines the highlighted area and automatically removes any unwanted distracting sounds before they affect them. This feature lets you preview and decide if you are happy with the edits.
- Free: This software is free, and you don’t have to pay. So, if you are a newbie confused by the information about different editing software and don’t know which one to choose, it is better to try Audacity first.
This program introduces you to the basics of audio editing and equips you with the knowledge to decide which audio editing software to turn to at the right time.
However, this tool has drawbacks; sometimes, you may not be able to launch it or crash while using it.
Also, the result from this tool may not be as good as paid software of the same category.
FAQ
How do I use Windows settings to reduce mic background noise?
Open the Sound control panel, adjust mic levels and boost, disable enhancements, and try different sample rates to improve noise levels.
Can software help reduce mic background noise?
Yes—audio editing tools and noise suppression software like Audacity or advanced noise removal programs can reduce noise after recording.
What physical adjustments help reduce background noise?
Using a quieter room, placing the mic closer to your mouth, and using a directional mic or pop filter can significantly cut unwanted noise.