How to Create an Email on an Android phone
If you use an Android phone, you must have realized how much easier it is to check emails with your phone. Even if you have several personal and business emails, it is easy to manage them on your phone. Creating a personal email using the default Android email application, Gmail, is very easy and simple; Most business emails use a custom email address that requires manual configuration.
This article will teach you how to create Gmail and custom business email addresses on Android devices. This way, you can easily access your emails anywhere and anytime from your phone.
Gmail tutorial on Android
To use Google services, including Gmail, your Android phone will ask you to sign in to your Google Account; This means that when you first turn on and launch your phone after your purchase, you will be automatically logged in to your main Google Account.
In addition, you can create a Gmail and use it to send and receive your emails. Before you start building Gmail, make sure you have the latest version of the Gmail app installed on your phone:
1. Open the Google Play Store from the home screen of your Android phone or tablet.
2. Enter Gmail in the search bar, then tap Update. If you do not see this option, you are currently using the latest version of Gmail, and you do not need to update.
Note that Android email applications’ appearance may differ on different phones. If your phone is Samsung, the Samsung Mail app will be the default email application for your phone.
The following steps are general guidelines for building Gmail on an Android phone, But some parts of different phones may have slight differences.
1. Open the Gmail application.
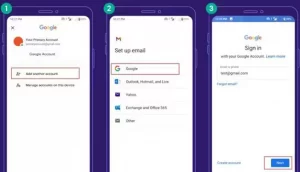
2. Click on the Google Account icon at the top right of the page. Then select the Add another account option to create a new Gmail for yourself.
3. On the Email Settings page, select Google.
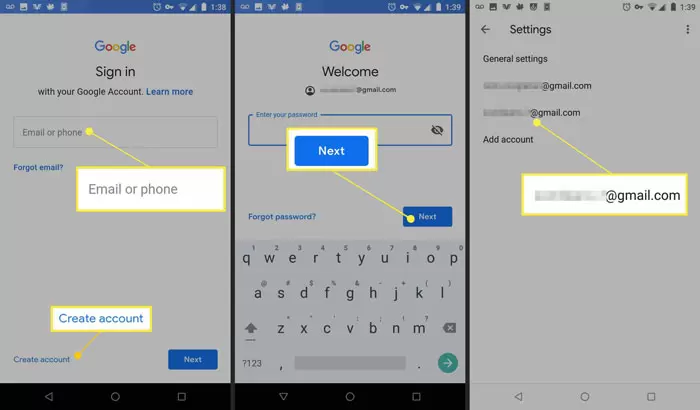
4. Enter your secondary Gmail address in the Sign-in field and tap Next.
5. Enter your password, and tap Next again.
6. At this point, Google will ask you if you want to add a phone number to increase the security of your Gmail? We recommend that you do this. Tap the Yes, I’m in button.
7. By doing this, you will see the Google Terms of Service page. On this page, could you select the I Agree to option?
Now you can manage your primary and secondary email on an Android phone at the same time. In addition, you can use Gmail as the main platform to manage all the emails related to your business.
How to create a business email on Android
Custom email addresses use a unique domain name instead of the usual extensions of email providers such as Gmail or Outlook. For example, an email in the form of “Username@mybusiness.com” allows visitors to identify the name of a business or website easily. The best way to create these types of emails is to use the settings in Gmail. By doing this, you no longer need to define a separate email for your personal or business activities. Creating this type of email is free, and the user interface is familiar to you.
Note that the steps for setting up a work email on Android platforms can vary depending on the provider and the type of control panel you use. In this article, we are working with “Hostinger’s CPanel.”
1- Find email settings
To make settings in the Android operating system, you must first find your email account details. If your business uses “Hostinger” email hosting, you can see it in the “CPanel” dashboard.
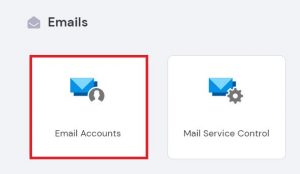
1- Log in to your “Hostinger” account. Then follow this path:
Emails -> Email Accounts
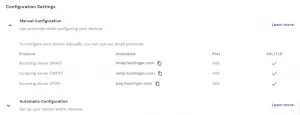
2. In the sidebar, tap Configuration settings.
3. In this section, find the Manual Configuration drop-down menu, which includes special email protocols such as IMAP, SMTP, and POP. Copy the name of the protocol, host, and port you want to use.
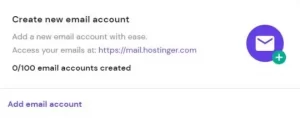
4- If you do not have a personal email address, you can create a personal email from the Create new email account section by selecting the Add email account option.
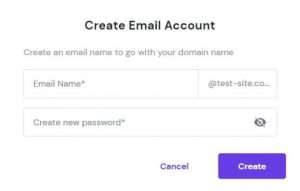
5. Create a new email by entering the email name in the appropriate field. Then define the password and click the Create button.
2- Add and make settings related to a serious email account
Once you have configured your email details, it’s time to configure your email account on your Android platform.
1- Open the Gmail application. Tap the Menu icon in the upper left corner of the screen and select Settings.
2. On the Settings page, tap Add account.
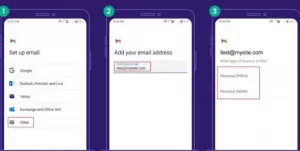
3- Now, you will see a window called Set up email, from which you must specify your email service. Since we will create a personal email, we have to select the Other option.
4. Now, enter the full name of your email address and tap Manual Setup.
5. In this step, you will be asked what type of account you want to create. You must specify the type of your email protocol. We recommend using the IMAP protocol because it allows you to synchronize your email inbox through several different devices. To do this, select Personal (IMAP).
6- Fill in the box related to the password and then click Next.
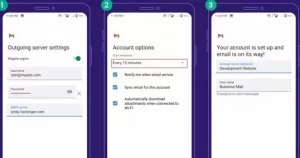
7- It is time to make settings related to the input server. At this stage, the username and password boxes are filled in automatically based on the exact details.
8- Specify your IMAP server and port number. You can use the information on the Email Accounts page registered in CPanel. The Server section must be set to imap.hostinger.com and port 993.
9- Go back to the input server settings page again, and click on the drop-down menu under Security type. Select SSL / TLS (Verify All Licenses) and then click Next.
10- This time, you must specify the output server settings. Username and password boxes are filled in automatically based on your information.
11- In the Outgoing server settings page, enter smtp.hostinger.com in the SMTP Server box and click Next.
12- On the Account options page, make the Sync frequency settings and other things you want, such as Sync email for this account, and then click Next.
13- Finally, fill in the Your name box. The title you write in this section is the same name displayed to the recipient by your account when sending the message. You can also create a username via Account name, which is not required. Finally, click Next to complete your operation.