


How Increase the Phone Memory?
Are you frustrated with the internal memory of your Android phone and have no place to store information? In this article, we will teach you how to increase the internal memory space of your Android phone without rooting.
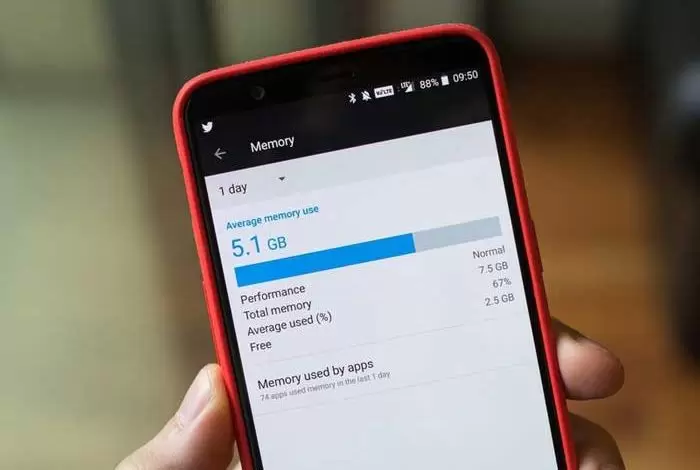
The full internal memory of the phone bothers us all. You may be able to free up some space by uninstalling programs, but this will not be a permanent solution. Every time you try to update a program, you get in trouble, or if you try to install a new program, you get more annoyed. If your smartphone has an SD card slot, you may be able to slightly increase the internal storage space by moving some apps to the memory card.
Before I begin, I want to warn you that the speed and storage capacity of your microSD card is less than the internal memory of the device. So I always recommend buying a good performance SD card with faster writing speed. You need at least a Class 10 SD card.
How to increase the internal memory of Android phones and tablets
To increase the storage space on your Android smartphone, follow the following strategies carefully. It would help if you implemented these without any problems because these tricks work 100%.
1. Increase Android internal memory (6.0 Marshmallow onwards)
From the Marshmallow version onwards (Android 6.0 Marshmallow, 7.0 Nuggets, and Android O to be released in the future), Android supports using a microSD card as internal storage, albeit with some limitations. So you can transfer some but not all applications to the microSD card. You can also save photos directly from the camera to the microSD card.
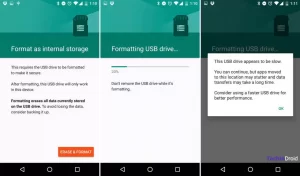
When using a micro SD card as an internal memory plug-in, you must format it in a specific format compatible with Android. This process has two effects. First, you will lose all the information stored on the microSD card. Secondly, you can not use it on other devices as before.
To increase the internal memory, you must first format it as internal memory. This way, you can increase the internal memory without root and computer.
to do this:
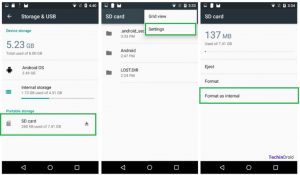
Go to Settings> storage and USB> SD Card. Once logged in, click on the three dots (you will find them in the upper right corner) and select “Settings.” From the options, select Format as the interior. On the next screen, click Delete and Format.
At the end of the formatting process, you will be asked, “Do you want to transfer the data we already have on internal storage,” which means “Do you want to transfer the data you already have on the internal storage?”. It is better to do this manually later and choose programs that you do not use much because everything hosted on the SD card runs slower…
You can now transfer some applications to the SD card. Programs that allow this,
There are options in Storage in the program information for this purpose.
2- Increase the internal memory of Android 5.1.1 Lollipop with root
Tools and downloads
Micro SD card (minimum class 10)
Download and install MiniTool Partition for Windows, and you can also use GParted on Linux.
Install Link2SD from Google Play.
Before start:
The smartphone must be rooted. If you do not have root permission on the device, you can not do this trick. You should also make a backup so that you do not lose your data.
How to increase Android internal memory?
You must reset the device to factory settings, resulting in which data and applications will be lost. In this method, we use the link2sd application (download link) to increase the internal memory of the Android phone.
Go to Settings> Backup and Restore> Factory Data Reset to do this.
1. Now, insert the SD card into the card reader and connect it to your personal computer.
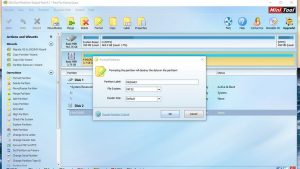
2- Now download the MiniTool software from here. In MiniTool Partition, click on your microSD card drive. It is very easy to find due to its capacity. Be careful not to touch your computer hard drive.
3. Now select the Delete option to erase the SD partition, create a new partition in the FAT32 file system, and set it as the main partition.
4. Then click on “Apply.”
5. Then, on the right side in the Operations section, click on Split Partition.
6- Divide the microSD card into two partitions. One for internal things (apps) and one for external information (like photos and other files).
7. Now select the smallest partition you have created, click on Format partition, and enter the Ext3 file system.
Note: If you have a 32 GB SD card, you can split it into 8 and 12 GB. 8 GB for applications and 12 GB for storing photos and files, which should act as external memory.
8. Right-click on the partition, and then in the Modify drop-down menu, click Set Partition as Primary. Now you should see a page like this:
9. Click Apply in the upper left corner of the MiniTool partition. Keep in mind that this process takes a few minutes. In the meantime, you can go and make coffee for yourself!
10- Do not insert the SD card into the smartphone after doing this. Leave it aside for now. Restart your smartphone, but do not save any apps.
11. Open the Super User app and update the SU binary (you can also update the SuperSU app via Google Play.)
12- Turn off your smartphone and insert the microSD card.
13- Turn on the phone, go to Google Play without any other updates and install and open the Link2SD (internal memory) application.
14- A message will appear asking you what is the file system of the second partition of the SD card, click on Ext2 and restart the phone.
15. Open Link2SD again and then under Settings, tap Installation Location and select Internally.
16. In Auto Link2SD settings, click Auto Link. It would be best if you kept this option enabled.
And over! In the next installation, you will see a notification telling you that the installed application is connected to the SD card.
The last point is not to remove the SD card from the phone while on and turn off the smartphone beforehand.
Another method (increasing memory with the help of cloud or Internet cloud space)
I hope this guide helps you create unlimited internal memory for your Android phone and tablet.