
What Is PuTTY — Advantages, Disadvantages, and Installation Tutorial
PuTTY is a free terminal emulator, serial interface, and network file transfer program. It supports protocols such as SCP, SSH, Telnet, and rlogin.
The name PuTTY does not have a specific meaning, although TTY refers to a terminal in the Unix operating system and stands for Teletype. PuTTY was originally for Windows but was later ported to other operating systems, such as Linux.
Official PuTTY ports are available for some Unix-like platforms, classic Mac OS, and Mac OS X, and unofficial versions are available for platforms such as Symbian and Windows Mobile.
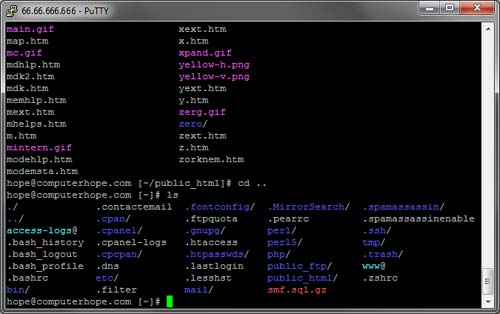
Simon Tatham wrote it, and it is currently in beta. This emulator is a text user interface for computers that allows them to run supported protocols, including SSH and Telnet, remotely. The image below shows an example of an SSH connection using PuTTY.
Terminal: The technology by which the user can easily communicate with various systems on the server.
PuTTY program history
PuTTY was first developed in 1998 and, as mentioned, was originally designed for Windows. Later, in 2000, the program became an SSH-2 client protocol. Then, software interfaces were provided to connect this emulator with other operating systems such as Linux, Windows Mobile, Mac OS, Mac Phone, etc.
Why is it essential to use PuTTY?
PuTTY is a multi-platform application that can be run on most operating systems. It can be configured for any type of server and provides features such as port transfer and public keys. With the help of the PuTTY software interface, it is also possible to transfer large files that can not be sent via email or other messengers.
Advantages and disadvantages of using PuTTY
- The most important advantages of PuTTY are the following:
- PuTTY provides certain features, especially when working remotely.
- It is easier to configure and more stable than other similar programs.
- As soon as the connection is restored after disconnection, the remote connection and file or text transfer can be resumed.
- PuTTY has an easy-to-use graphical user interface.
- PuTTY supports remote secure terminal configuration changes.
- PuTTY supports some terminal control sequences, such as the Linux console sequence, that are not supported by xterm.
The following disadvantages can also be listed for PuTTY:
- Only the username in the session can be saved.
- Interfaces such as WinSCP must be used to transfer non-text files.
- The PuTTY emulator is not compatible with some Cisco networking equipment.
- The copy-and-paste option is disabled when the connection is established.
Learn how to use PuTTY.
In this section, we teach you how to use PuTTY for Windows and how to configure, build, and save profiles. You can download the PuTTY software version for the Windows platform here.
Run PuTTY and connect to a server.
After installing the program, run it. After running, a window called PuTTY Configuration will open. This window has a configuration page on the left, the Host Name (or IP address) field, and other options in the middle, and a page for storing session profiles at the bottom right.
First, you need to enter the domain name and IP address of the host you want to connect to in the Host Name field and click Open. An example of a domain name is students.example.edu, and an example of an IP address is 78.99.129.32.
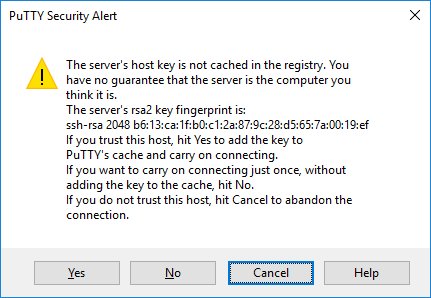
Security alert box
After connecting to the server for the first time, you will see the PuTTY Security Alert box. This security alert is normal when you first connect to a server. To close the security alert box, just click Yes.
Terminal window and login documents
After closing the security alert box, the terminal window opens. By default, this window has a black background. You will first be asked for your username and password. Once logged in, you can type in the terminal window. In this case, you are connected to the server, and everything you type in the desired window will be sent to the server. The server response will also be displayed in the same window. You can run any text-based application using the window on the server. You can also type the word exit on the command line to exit the window.

Options for configuring and saving profiles
The initial configuration window contains many options. Most of them are not needed in everyday use.
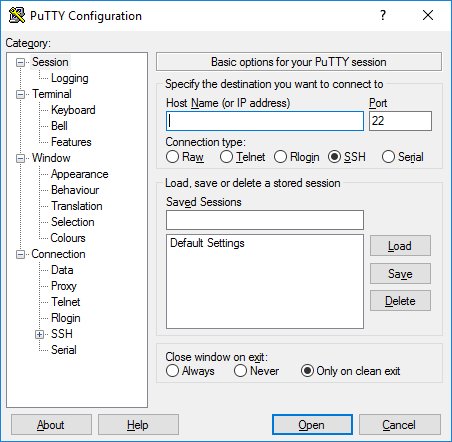
Field Port
The Port field specifies the TCP / IP port for the connection. For SSH, this field contains the port on which the SSH server runs. Under normal circumstances, the number 22 is written in this field.
Connection Type field
Under normal circumstances, do not change the content of this field. The SSH option is the default.
Load field, save, or delete a stored session.
This section allows you to save the settings as named profiles. To create a new profile, enter your new profile name in the Saved Sessions box and click Save. The hosts’ names and other settings you have applied will appear in this new profile.
Field: Close window on exit
Finally, the Close window on exit field settings determines whether the terminal window closes automatically after disconnecting from the server. The default option for this field is Only on clean exit, which usually does not need changing.
Left panel configuration tabs
The left page, titled Category, has more options. Terminal and Window options do not need changing, and we will not explain them here. Connection options are more important, and we will briefly explain them in this section.
In the Connection option on the Category page, the Data and Proxy options are for entering the username and specifying the type of proxy connection. It is better not to connect to the Internet without using the SOCKS proxy on the Proxy page. The Telnet, Rlogin, and Serial categories also have options for each of these protocols and are rar.
However, SSH classification is important, and some people can use it. If the user wishes to use the public key authentication method, they must enter the SSH category. The SSH category is opened by clicking on the [+] sign. Kex (Exchange Key), Host Keys, and Cipher options do not need changing. Another subcategory (Auth) in this section opens a page called Options controlling SSH authentication.
To activate the public key authentication method, you must create an SSH key and enter it in the Browse section of the Authentication parameters box at the bottom right of the page. This method is not for most users but only for admins to ensure the optimal performance of SSH keys.
Active Directory Authentication (GSSAPI / Kerberos)
One of the cool features of PuTTY is that it supports Active Directory (SSO). Technically, this method uses the Kerberos protocol and operates through a programming interface called GSSAPI. In the SSH protocol, this mechanism is GSSAPI authentication.
Corporate users who use the Kerberos authentication method (for example, through Centrify or Quest Authentication services called Vintela) may also want to use the individual login feature. GSSAPI authentication settings can be in the SSH / Auth section. Note that you have to open the Auth tree menu again by clicking on the [+] sign to see the GSSAPI options.
One of PuTTY’s cool features is that it supports Active Directory (SSO). Technically, this method uses the Kerberos protocol and operates through a programming interface called GSSAPI. In the SSH protocol, this mechanism is GSSAPI authentication.
Corporate users who use the Kerberos authentication method (for example, through Centrify or Quest Authentication services called Vintela) may also want to use the individual login feature. GSSAPI authentication settings can be in the SSH / Auth section. Note that you have to open the Auth tree menu again by clicking on the [+] sign to see the GSSAPI options.
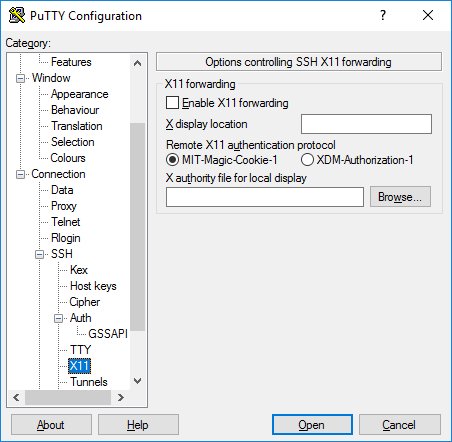
X11 Server Send Options
X11 is a protocol for running graphical applications on Linux and Unix operating systems. This protocol supports the execution of graphical applications remotely on an external network. PuTTY does not run on the X11 server (on the graphical display side) but can be used with other products that support the X server and its performance on Windows. One common alternative to X11 is using XMing, specifically for Windows.
To use an X11 server, check the Enable X11 forwarding box and enter the phrase localhost: 0.0 in the X display location box. You do not need to change other settings. This link (http://www.geo.mtu.edu/geoschem/docs/putty_install.html) provides additional explanations and video tutorials.
Tunneling options
The final category for configuration options is the Tunnels category. This category is for setting up SSH tunneling and SSH port forwarding. This panel can be used to determine the forwarding settings for the connection. Forwarding settings are in the profile.
To add a local forwarding (i.e., the TCP / IP port on the local computer is going to a remote port on that computer or going to another computer accessed by the remote computer), the source port in Write the Source port field and the destination host and its associated port (for example www.dest.com:80) in the Destination field and select the Local option. Then click on Add.
To add remote forwarding (i.e., a TCP / IP port on the remote computer is a port on the local computer or goes to another computer accessed by the local computer), re-open the Source port field. Specify the destination on the computer and fill in the Destination field on the computer accessible via the local computer (on your desktop).
Normally, you do not need to check the Local ports accept connections from other hosts fields for local and remote ports. However, you should check these fields to see if the connection to the forwarded port is from a higher network instead of a local host. There may be a security risk in this situation, but usually, in cases where SSH tunneling is present, this risk is not a problem. But you should know that anyone with access to a local computer can also connect to the forwarded port. In some cases, port forwarding is also used to bypass firewalls.
Conclusion
PuTTY is a useful, easy-to-use interface that allows you to remotely connect to another server and run text files and text-based applications. This emulator also supports most operating systems, and it is very easy to connect to and log in to the server. The configuration of this simulator interface is simple, and most of the default options remain unchanged during the configuration process. Because this interface allows you to send text remotely, it can connect to computers based on the Microsoft operating system.
FAQ
What is PuTTY used for?
PuTTY is a free, open‑source terminal emulator and network client that supports SSH, Telnet, SCP, and rlogin to connect securely to remote servers.
What are the main advantages of PuTTY?
It is free and open source, stable, easy to configure, lightweight, portable, and supports secure protocols and remote terminal control.
What are common disadvantages of PuTTY?
PuTTY only saves the username in session settings, requires external tools for file transfer, may lack compatibility with some network devices, and can have limited copy/paste functionality during active sessions.