
MikroTik Bandwidth Test Tool and How to Use It: Practical Guide
When it comes to bandwidth speed test, speed test is the first tool that comes to our mind, but this tool can be used to test the speed of Windows, Linux or mobile devices, and to test the bandwidth speed in Mikrotik, you need to use other internal tools such as Bandwidth Test use.
Bandwidth Test is a powerful traffic management tool that Mikrotik administrators can use to measure the download and upload speed of network connections more accurately. This tool has become very popular due to features such as high accuracy, real-time speed measurement, the possibility of testing locally within the network, etc.
Of course, in order to use the Bandwidth Test or so-called best tool, you must follow a series of rules so that the IP address of your Mikrotik router is among the allowed IPs for testing the bandwidth speed in Mikrotik. If you don’t have any information in this field, don’t worry. In this article, we provide you with all the necessary information for speed testing in Mikrotik.
If you care about the quality and speed of your network connections and would like the results and output of the Bandwidth Test tool to be enjoyable for you, you should first consider buying a Mikrotik virtual server with high hardware power and optimal bandwidth. If you have enough confidence in this field and the bandwidth of the network is such that the amount of data transferred through the Mikrotik router can be controlled, you can easily plan and execute various tasks related to the Mikrotik router.
Comparison of bandwidth and network power
Bandwidth and throughput are two different terms in the network field, comparing the two can help to better understand the function of the Bandwidth Test tool.
Bandwidth refers to the amount of data that can be transferred from one point to another in a unit of time. This value is expressed in bits per second (bps) by bytes per second (Bps).
In fact, it is the bandwidth that shows the maximum capacity of the network connection, and when buying a Mikrotik virtual server, you must be aware of the maximum amount of data that you can transfer from one point to another at a certain time.
In contrast, data throughput deals with facts rather than maximums and defaults and shows the amount of data that is transferred from one point to another in real-time. This power may be lower than the bandwidth and factors such as interference, delay, and network errors are involved in reducing this power.
So we conclude that the bandwidth indicates the maximum capacity of the network, which is used if all the conditions are optimal and there is no delay or interference, but the power indicates the amount of data transferred in the operational and real conditions of the network.
Usually, with the increase of bandwidth, the power of the network also improves, but remember that there are various factors that cause the amount of power to always be lower than the bandwidth.
It is here that by using tools such as Bandwidth Test, the average and current status of throughput or power can be calculated, and through its output information, bottlenecks that cause limitations in network transmission and reduce bandwidth or data transmission power in a network identified Shunde.
Getting to know Mikrotik’s Bandwidth Test tool
Bandwidth shows the maximum ability to transfer data from one point to another, and this feature has a great impact on the Mikrotik router’s performance.
In fact, the size of the bandwidth has a great impact on network performance, traffic management, data transfer, the amount of delay in data transfer (Latency), etc., and this makes network administrators very sensitive to testing the bandwidth speed in Mikrotik. to be
This is where Mikrotik’s Bandwidth Test tool comes into play.
This tool is present by default in the Mikrotik Winbox router and it allows you to accurately measure the download and upload speed of your network and after discovering the bottlenecks (bottlenecks), the necessary improvements to improve the network performance. apply
This tool shows live speed test results and includes information about lost packets, data transmission, and reception speeds, and average data transmission and reception speeds.
But what method does he use to calculate these values?
To test bandwidth with Bandwidth Test, you need a server and a client to use it to run bandwidth tests and perform the necessary calculations to measure the amount of data sent/received through it.
You can use 3 methods for this:
- Use servers that are ready for bandwidth testing as servers and your Mikrotik router as clients.
- Use the Mikrotik Bandwidth Test Windows client to test the Mikrotik server.
- Use one Mikrotik as a server and another Mikrotik as a client.
So, you have many ways to test the bandwidth in Mikrotik and you just need to run the Bandwidth Test tool in different ways.
Now that you are fully familiar with this tool and how it works, it is time to learn how to test the bandwidth speed in Mikrotik with the Bandwidth Test tool:
Activation of the btest server function to test Mikrotik’s bandwidth speed
Before you start testing the speed and power of your Mikrotik, it is better to activate the BTest server function so that other remote devices such as Windows devices that use the Bandwidth Test client can connect to your Mikrotik router and perform the necessary tests in Evaluate the amount of data sent/received and bandwidth.
In effect, you create a btest server on your Mikrotik device so that bandwidth tests can be run between your device and remote devices on the network. Bandwidth evaluation, router connection test with other devices, server performance test and using clients in other devices to test bandwidth and as a result, manage and optimize network performance are among the most important reasons for activating btest server.
Of course, this feature is enabled by default, but to ensure this, it is better to go through the following steps:
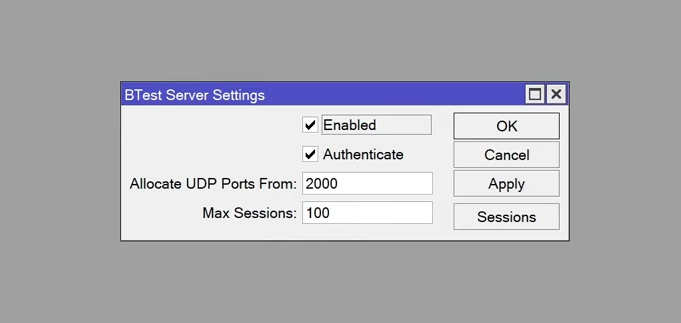
Enter your Mikrotik Winbox and select BTest server from the tools menu.
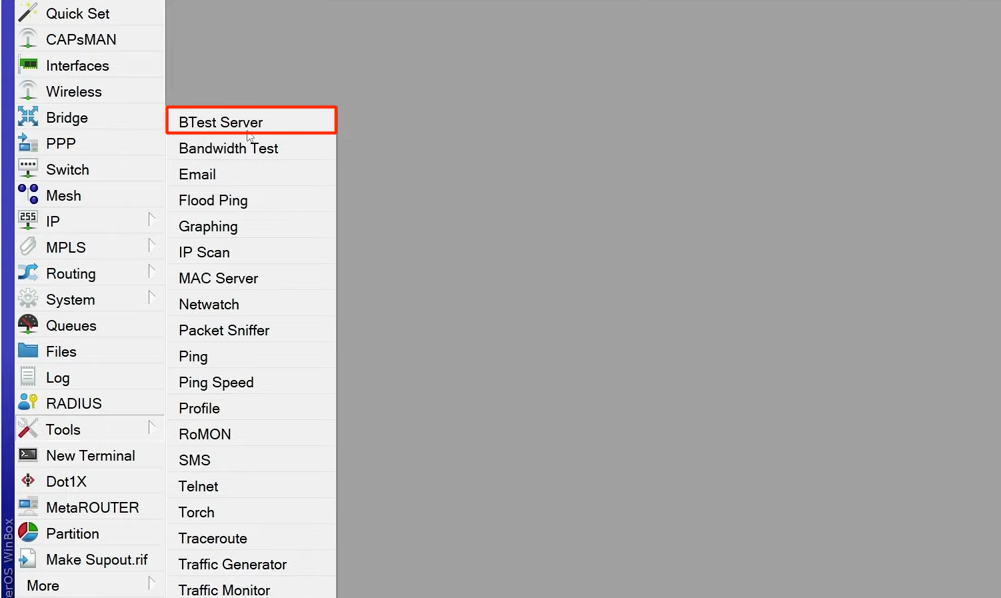
Check Enabled and Authenticate.
Authenticate is included with the purpose of enabling authentication to start bandwidth testing in Mikrotik, and if you do not check this option, any user can test your Mikrotik bandwidth without the need for credentials (username and password). can be dangerous. So, if malware notices this issue, it can connect to your MikroTik and start multiple bandwidth test sessions, consuming your server’s resources and reducing network throughput to a great extent. For this reason, you must check the Authenticate option.
Click Install and use the fping command in Linux with examples
Keep the other two fields in their default state and click Apply and OK.
If you want to see the devices that are currently connected to your Mikrotik server, just click on the sessions button from the BTest window.
Bandwidth speed test using public Bandwidth Test server
In this method, your Mikrotik router acts as a client and connects to a public btest server to run the bandwidth test.
There are many public servers for testing public bandwidth in Mikrotik, we have brought 3 of them for you to try any one you want:
Server 1) is the best option
IPv4: 23.162.144.120
IPv6: 2605:6340:0:1b::4
username: MikrotikBtest
password: MikrotikBtest
Limitations
Maximum time for each test: 10 minutes
Interval between each test: 27 hours
* If you run a test for more than 10 minutes, you will not be able to use this server for bandwidth testing for 7 days (or maybe more).
* If you don’t wait 27 hours between both tests and act sooner, you won’t be able to use this server for bandwidth testing for 7 days (or maybe more).
* If during this 7-day restriction period, you still test the bandwidth with this server, your 7-day restriction will be reset.
* Repeated and unsuccessful logins with the old password and username of this server (btest/btest) may limit your IP address for 7 days.
Server 2)
IP Address: 103.161.184.37
username: mid
password: midtest
Server 3)
IP Address: 87.121.0.45
username: netra
password: netra
Now that you have the IP address of the server and user information to connect to the public bandwidth test server, just follow the steps below:
Open Winbox and click on Bandwidth Test from the Tools menu.
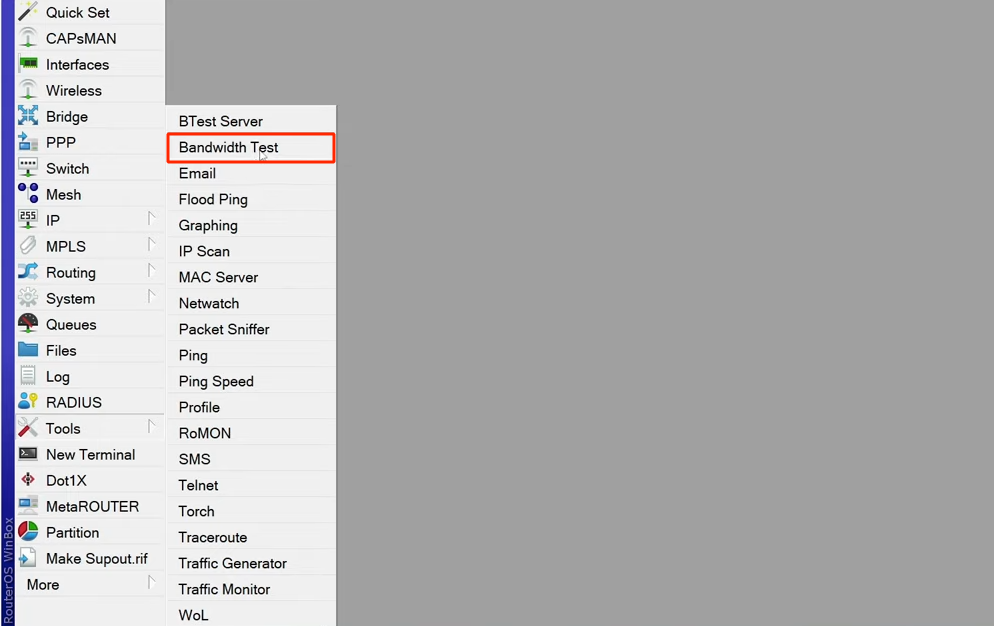
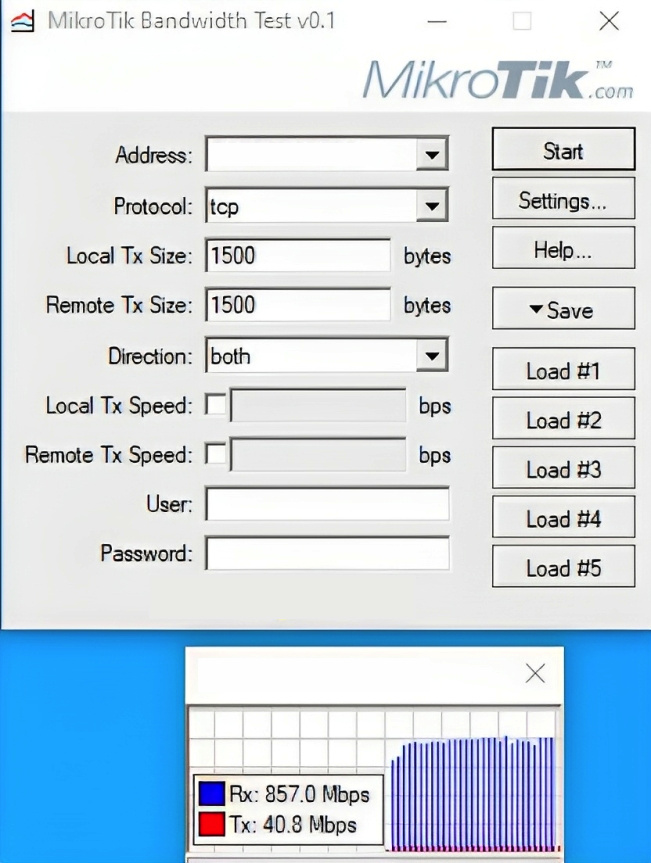
Complete the fields of the Bandwidth Test window as follows:
Test to: public server IP address (for example, 23.162.144.120)
Protocol: The desired protocol for bandwidth testing (tcp or udp), preferably tcp
Direction: choosing the direction of data flow for bandwidth test (send, receive or both)
User: public server username (MikrotikBtest)
Password: public server password (MikrotikBtest)
After you complete these fields, you can click on the start button to start the bandwidth test operation in Mikrotik.
By checking the bottom box of this window, which appears as blue (sending data) and red (receiving data) and numerical charts, you can see the power of your network in real time.
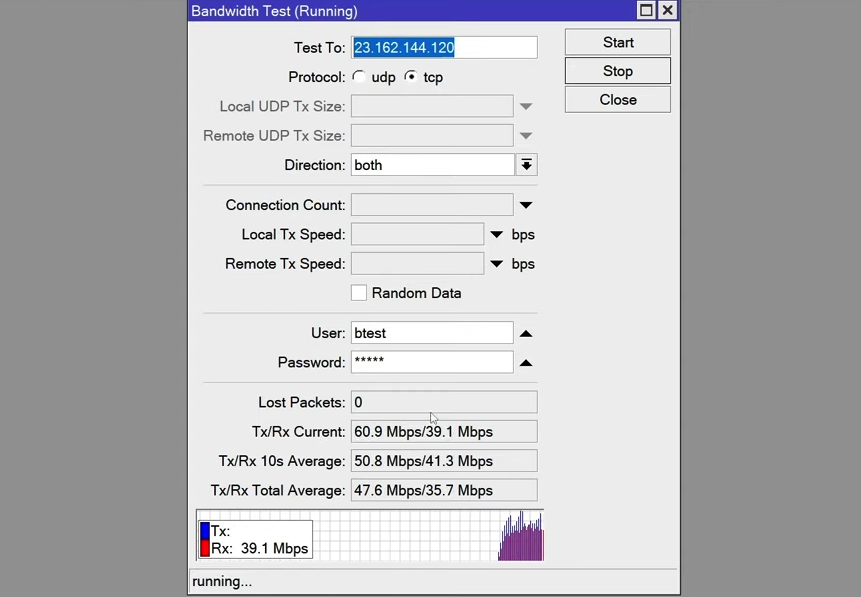
If you want to make changes to the fields, for example only see the receive data, just click stop and change the direction to receive and click start again to update the data according to your change.
Running Bandwidth Test Windows client to test bandwidth speed
In this method, you must activate the best server feature of your Mikrotik server so that when running the client, enter the IP address of your Mikrotik, which is the BTest server, in the address field.
So, if you have passed this step, you must first download and install the Windows version of Bandwidth Test.
Then, run this program and enter the necessary fields to run the bandwidth speed test in Mikrotik.
Address: IP address of Mikrotik
Protocol: The desired protocol for testing bandwidth (TCP or UDP), preferably TCP
Direction: Select the data flow direction for the bandwidth test (send, receive or both)
If you checked the Authenticate option when activating the btest server, which was our recommendation, enter the Mikrotik username and password in the user and password fields. Otherwise, you do not need to complete these two fields.
Finally, click on start to see the amount of data sent and received.
Network power test between two Mikrotik
If you want to do this test between two Mikrotik and see how much bandwidth is between these two routers, just use one of the routers as the btest server and the other as the client.
In this way, perform the btest server activation operation for the first server so that the other device (here Mikrotik router) can connect to it to perform the bandwidth test.
Then, open the Winbox of another Mikrotik router select the Bandwidth Test option from the tools menu, and enter the address of the first Mikrotik in the test to field, if Authenticate is activated, enter the username and password of this Mikrotik. to connect to it successfully.
Finally, you can click on start and see the results of this test.
Bandwidth speed test in Mikrotik using terminal
If you are looking for a faster and shorter way, you can use the terminal instead of the graphical interface and carry out these steps in the form of commands.
To do this, just follow the steps below:
Enter Winbox and open a new terminal by clicking on new terminal.
Enter the following command to enter the tools menu:
/tools
Then, run the following command:
bandwidth-test address=address_ip
This IP address can be one of the public test addresses or another Mikrotik address that you want to use as a bandwidth test server.
This command, which only deals with the IP address of the server, proceeds with the defaults (udp protocol and receive direction with admin username and no password) and if authentication (username and password) is not active on the Mikrotik server with Success starts displaying the output.
But if you want to set this command’s different options and see the output based on these settings, just enter the above command. This time, after the IP address, enter a blank space to see the different options of this command.
There are many options such as direction and user that you can include in the command to see your desired output.
For example, if you want to enter the username and password and change the direction to both and the protocol to tcp, you can change the above command as follows:
bandwidth-test address=address_ip user=username password=pass protocol=tcp direction=both
Yes, in this way, you were able to test the bandwidth in Mikrotik using the terminal. The information obtained from this test greatly impacts discovering the limitations and weaknesses of your network, and if you act intelligently, you can optimize your network performance.
Conclusion
Network bandwidth testing in Mikrotik is one of the most essential tasks that every network administrator should be familiar with. If you perform the Mikrotik speed test correctly and in principle, the information obtained from this test can have a great impact on the process of discovering and identifying bottlenecks, and by timely discovering these bottlenecks and fixing them, you can maximize the performance of your network. And make the actual power of your network closer to the bandwidth.
FAQ
What is the MikroTik Bandwidth Test Tool?
It’s a built‑in RouterOS utility that measures throughput between two MikroTik routers to assess network performance.
How do I start a bandwidth test?
Run the tool on one router as a server and initiate a client test from another device with the destination’s IP and protocol settings.
What do the test results show?
Results include connection speed, packet loss, and jitter, helping you identify throughput capacity and potential network issues.