


Mask tutorial in Photoshop (in simple language)
Layers are probably one of the most important features in Photoshop. In our opinion, you will not understand the power of Photoshop until you fully understand how and why you can use the mask.
The term mask is not immediately understood by someone outside the realm of graphic design. The simplest definition is that a mask is a way to apply something to a very specific part of an image.
There are two types of masks: clipping masks and layer masks. The two tools are conceptually closely related but very different in use. Let’s start by discussing the mask layer, which is usually what people come to when they hear about Photoshop masks.
Mask layer
A mask layer is the part you apply to another layer to control the transparency of that layer. Where opacity controls the transparency of the entire layer, it gives you a more precise control mask in very specific areas. If you want the whole layer to be 30%, you reduce the opacity, if you want only the left side of a layer to be 30%, use a mask.
When you add a mask to a layer, it covers everything with an invisible gray scale canvas. There are ways to see it that we will explore later, but we only know that, as a general rule, using a mask on one layer does not cause an immediate difference in vision, unless you have an active choice at the time.
On this invisible canvas, you can paint white, black or any gray surface between each other. The color you choose tells Photoshop how much transparency to create pixels at that point. White means 100% opacity and black means 0% opacity.
With this account, try to imagine what the following mask does for the layer:
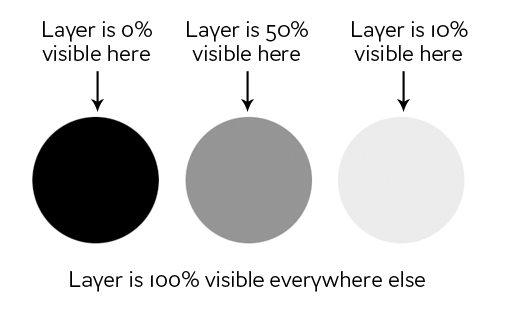
As you can see, if our mask with the three circles shown above was completely white, we would have a layer that is fully visible in all white areas, and we would have transparent points in the circles. If we apply this mask on a layer, the result is as follows:
clipping masks
These types of masks are very similar to the mask layer but use only one layer to determine the transparency of the other. In this scenario, you place two layers on top of each other, with the bottom layer determining the high transparency.
But instead of using black and white values, clipping masks easily take transparency from the layers used to make them, the bottom layer. If there are opaque areas and some clear areas in the bottom layer, a clipping mask can apply these values to the top layer.
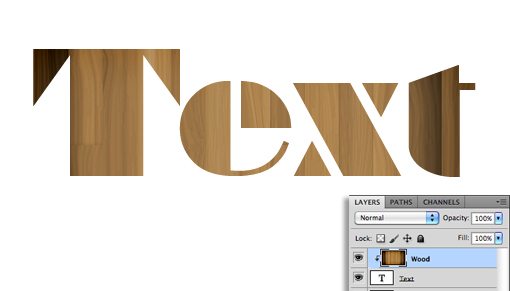
This is difficult to explain without an example, but when you look at it in practice, you realize. Let’s use the two layers shown below and say that our goal here is to cut or “clip” the wooden layer in the shape of letters. Note that at this stage the wood is the bottom layer and the text is the top layer.
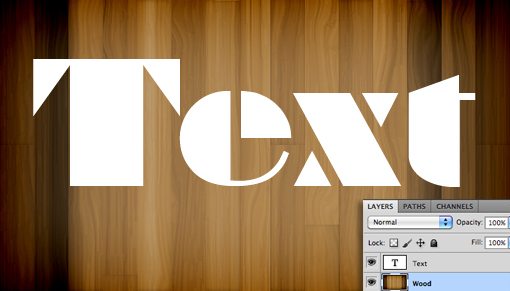
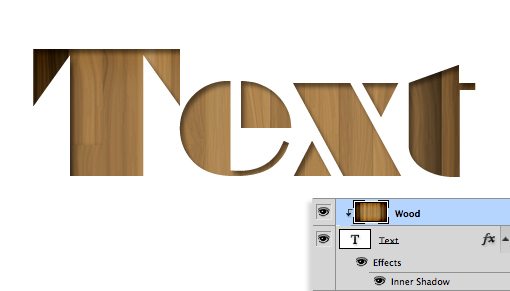
To get the effect you want, just change the position of the layers so that the stick is at the top of the page, then go to the Layers menu at the top of your page and select “Create Clipping Mask” (Command-Option-G). Now we have the work we wanted. Where the text layer was opaque, it is now the matte wood layer, and where the text layer was transparent, it is now the transparent wood layer.
There are some very interesting functions here.
You can still position and make changes on both layers independently. By dragging the layer of wood, you place its texture inside the letters while the letters themselves are fixed.
Also, you can apply layer effects to the composition through the bottom layer. For example, what happens if we select a text layer and add an Inner Shadow?
Clipping masks are fun and practical, but the fact is that using a mask layer is very common. The above information should be sufficient for clipping masks, so from now on we will focus only on the function of the mask layer.
How do I make a mask layer?
Now that we have a thorough understanding of the types of masks and the differences between them, we will see how to create a mask layer and work with it.
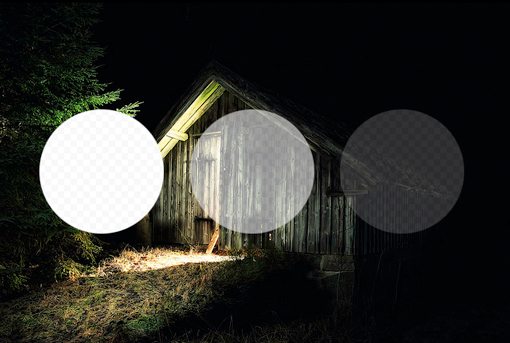
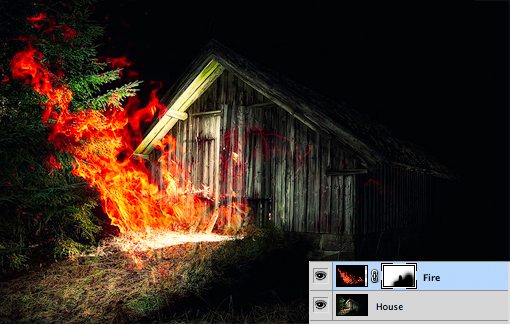
The first thing we need is two layers. We use the following two images. The image of the cottage is at the bottom and the fire is at the top.
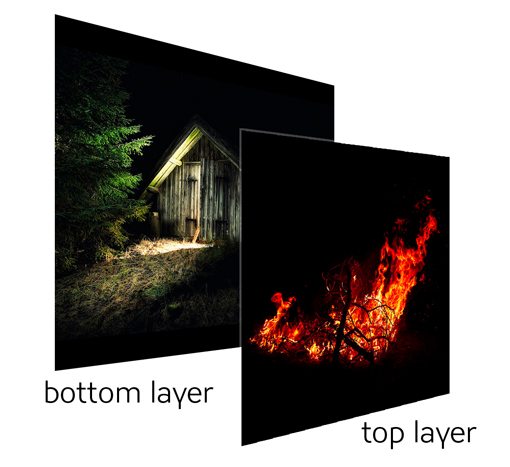
The general idea here is to take some fire, not all of it, and place it on the hut. The first step, as you can see above, is to accumulate the two images and adjust the fire layer blend mode on the Screen. This makes all the black pixels transparent, which combines the two images well.

With one change, now a very decent picture! Let’s just say we want to have this fire just near the door.
To do this, we need to add a mask to the fire layer. Select the fire layer and click on the mask icon shown in the image below.
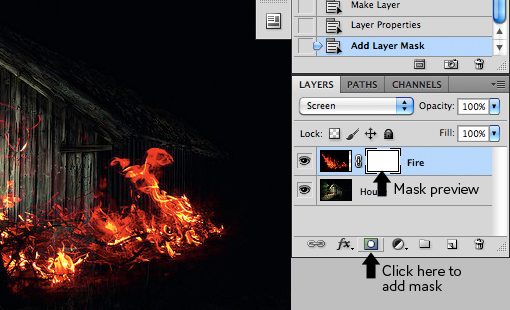
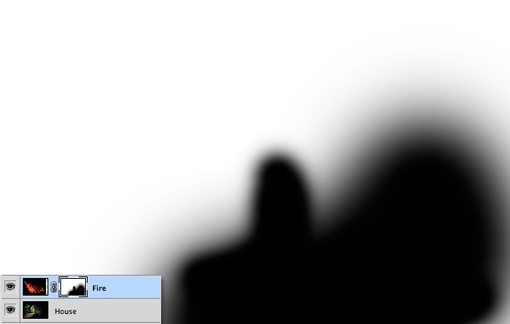
Now, using the mask in the LAYERS panel, take a soft black brush and paint the parts of the fire that we do not want to see. By doing this, the fire begins to disappear. To turn it over, simply paint it white.
As you can see in the image below, with just a little painting, the fire becomes more focused on the part of the image that was previously added, making it look naturally natural.
To see the actual mask, select the Option-Click option in the small mask preview in the LAYERS panel, or press the Alt and Click keys (click Shift to hide the mask completely). After painting a part of the fire, it creates the following:
Note that we are not limited to hard edges. The beauty of masks is that you can do anything you want with them as long as you can paint them in gray. This means you can color, clone, create and fill selections, copy and paste, and more on the main canvas.
Why not just erase?
After learning how to use a mask for the first time, most novices think, “I can do all this with an eraser.” Is wrong! In fact, once you learn to apply the mask, you should not choose the eraser again because it is very destructive.
What is meant by destructive? Think about what happens when you use the eraser tool: it erases the pixels. Note that the eraser does not hide the pixels until you want to restore them, but “destroys” the pixels. The changes you make by deleting parts of a layer are permanent and cannot be undone later.
This is just a horrible way to work. With each new version of Photoshop, more and better ways to create non-malicious edits are added, meaning that they do not alter the original pixel data. For example, filters were a permanent and destructive change, but now with smart filters, you can always go back and adjust the blur or even remove it.
This concept created masks many years ago.
With a mask, you not only have the ability to make substantial decisions about the transparency of a layer or group of layers, even better, you have the freedom to go back and modify or delete it whenever you want. do. If we had cleared the fire in the example above, it would have disappeared forever, and restoring it would require re-inserting the layer.
However, since we used the mask, all we have to do is fill the mask with white paint and all the details of the fire will return immediately.
To use a real mask, imagine that you want to change your appearance for Halloween. You have two options: the first is to have plastic surgery to permanently change your face to look like a scary creature, and the second is to wear a mask. In this scenario, the eraser is plastic surgery. This is a bad choice when you are not sure if the changes are permanent. It is better to go with a mask instead.
Advanced mask techniques
The above information is a complete guide for beginner masks. In fact, you might think that masks are so simple that you don’t need to talk about them.
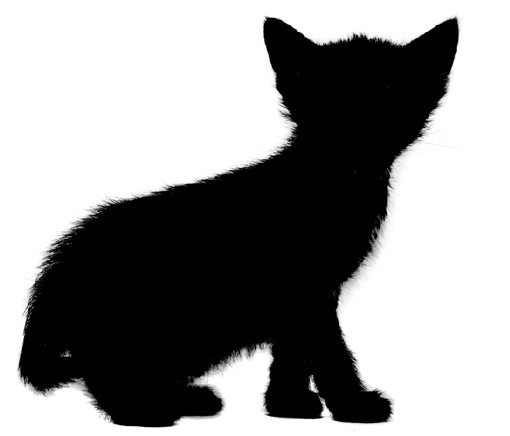
However, mask techniques from simple to complex are really fast. To erase large parts of the image, it is easy to paint some parts of the image, but what if you want to do something more complex? For example, let’s say we want to get a cat out of its white background.
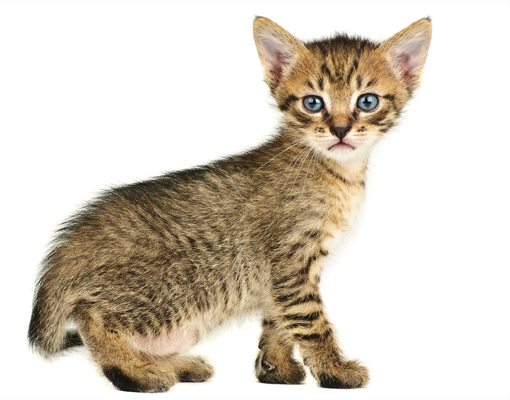
Furry animals make masking masks difficult. All the details of fine hair mean that the choice will be accurate and time consuming. The Magic Wand or even the Pen Tool is of no use to us here. So how do we create a mask like the image below?
Channel change
The good news about cat images is that there is a lot of conflict with working with them. The key is to make a good mask, find the contrast and know how to pull it out. Here we have a relatively dark cat on a light white background, which means that all we have to do is how to use our knowledge and turn the existing contrast into a proper mask.
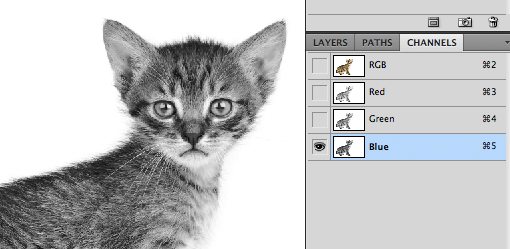
The first step in a project like this is to jump to the CHANNELS panel and search for the most contrast channel. So in this example, we want a channel with the darkest cat and the brightest background, which looks like a blue channel.
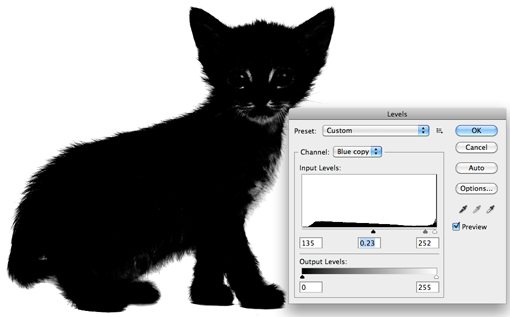
Copy the blue channel, select it and press L to open Levels Adjustment. Darken the shadows and midtones so that there is a lot of contrast as shown below. Be careful not to get too far with this setting. Magnify the details of the hair at the edge of the fur and make sure you do not destroy them too much. This step does not have to be completely black and white, some dark grays are also acceptable.
At this stage, you will face one of the most difficult stages of the whole job.
The goal is to get as close to the black as you can to the cat. Easy for face and other random spots near the center, just grab a black brush and fill them. But what about the edge of the hair?
One of the best ways to do this seems to be to use a few potential candidates: Dodge and Burn Tools. The reason for this is that they can accurately target a certain area of gray. We set up the Dodge Tool to target highlights and the Burn tool to target shadows and a medium-sized soft brush to drag to the edges of the image, adjusting shadows and highlights until we see the detail. We like to adjust.
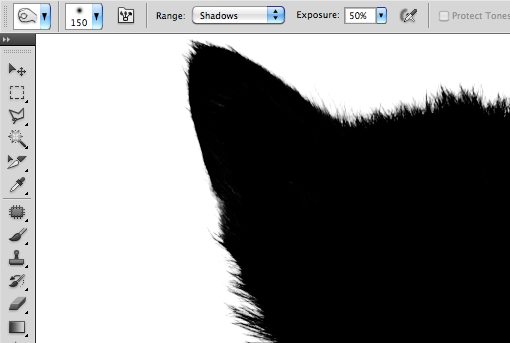
It may seem like a compact job, and for some images it is, but in fact the Dodge and Burn tools feel like magic when you use them, and you do a lot of the work. We could see a beautiful ghost in just a minute or two.
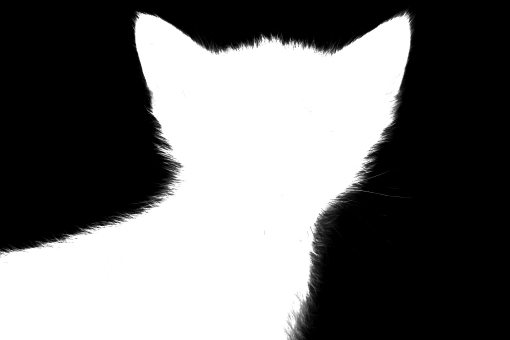
Then press Shift-I to reverse the channel. That means the cat should be white and the background should be black like the image below. Remember that in the mask, the white color is opaque and transparent.

Convert channel to mask
Now that we have a channel that shows exactly what we want from the mask, how do we convert it? There are several ways to do this, but the easiest way is to just click on the channel to download a selection. Once selected, return to your cat layer and click the New Mask button.

Remove the mask
As you can see, despite a super precise mask, we still have white margins on the edges. If you do not know what to do, getting rid of it can literally take hours. To get started, we can use the new Masks Palette in conjunction with Refine Edge to make some settings for the masks.
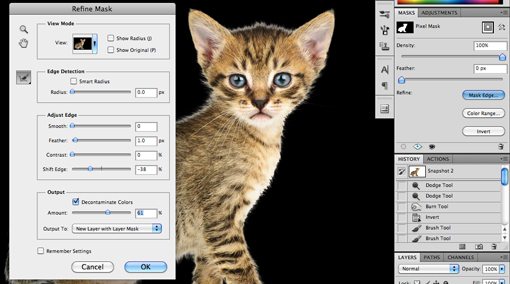
These tools are used properly. We will not cover them closely now, as this will take a long time, but we encourage you to play with all the controls to see what they do. Often with these sliders you can arrange the rough edges in a few seconds, but in the cat example it didn’t really get the result we wanted, so we canceled it altogether.
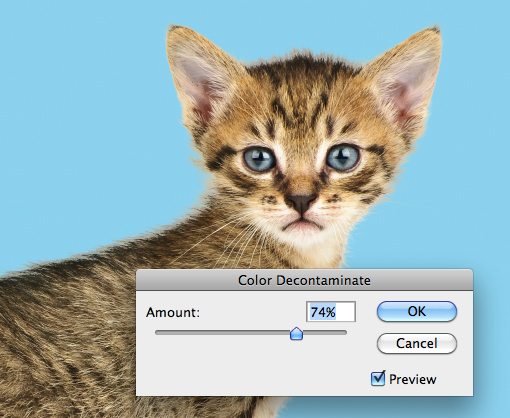
Instead, go to the Layer menu at the top of the page and select Matting> Color Decontaminate. This is an almost hidden recipe that has the ability to deliver amazing results. As you can see in the image below, it took a long time for the halo to subside.
Note that this command is actually malicious, so you should always copy your layer before using it.

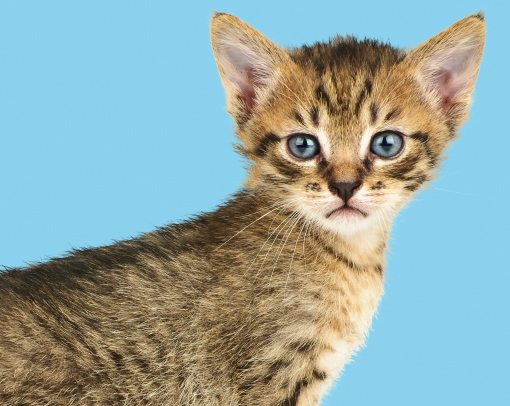
From here, things get trickier, and this is where the true magic begins! This mask makes everything look beautiful and the clone replaces the unnatural colors with the colors in the cat’s skin in other places. Compare the back and head of the cat in the image below with the image above to see the improvement.
End
From here, things get trickier, and this is where the true magic begins! With sophisticated masks like these, there is always room for improvement, but you will find that as the skill level increases, the point of reduction in efficiency becomes easier and easier.
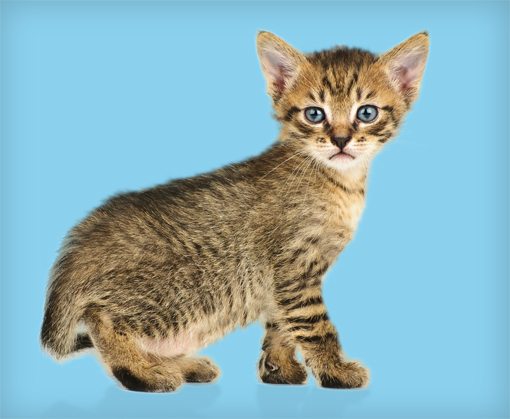
The technique we talked about is that it shows you how the mask works. There are many different types of images for the mask, so there are a million different tricks and techniques to discover along the way that can be mixed and matched based on each project. The exercise is complete, just be bold and never be intimidated by a masking task that seems too complicated. Take one step at a time and find ways to pull out the details you need.
Conclusion
In short, there are two main types of masks in Photoshop: layer masks and clipping masks. Mask layers use grayscale to assign transparency levels to specific parts of a layer or group of layers, while clipping masks use layer transparency to define another layer or group of layers.
Also, although the mask is used in a simple sense, it requires a lot of training and practice to master.