How to Install Nextcloud on a Windows Server: Complete Step‑by‑Step Guide
If you intend to use unlimited and more private space instead of using storage spaces such as Dropbox or OneDrive after purchasing your own Windows virtual server, you will most likely go to Nextcloud.
Nextcloud is an open-source, private cloud space for storing files and information. You have complete control over the information stored on this platform, and no third party has control over it. If you plan to use this program on Windows, you can install Nextcloud on the Windows server in two ways: through Docker Desktop or a Linux distribution and Apache web server.
In addition to storing files and information, Nextcloud is a platform and workspace where you can share files with others, organize meetings, and manage tasks.
Nextcloud is basically a client-side application through which the user connects to the server. This program is also used as a database to respond to millions of users.
This program can be used on all platforms, i.e. Linux, Windows, Mac, Android, and iOS. By reading this article, you will learn 2 methods of installing Nextcloud on a Windows server.
Prerequisites for installing Nextcloud on a Windows server
To install Nextcloud on Windows with both methods, we must have a number of prerequisites, which are:
- 64-bit system
- At least 8 GB of RAM
- Quad-core CPU
- No network restrictions by CGNAT
- Public domain with the port opening capability
- Windows 10 or 11 or Windows Server
How to install Nextcloud on Windows
In general, we need a Linux kernel to install Nextcloud. If you can’t install Nextcloud on Linux, you can install one of its distributions on Windows.
There are two ways to install Nextcloud on Windows Server: installing Nextcloud All-in-One or using Apache web root and a Linux distribution. For the first method, we will need Docker Desktop, and for the second method, we will need some programming knowledge.
If you are not familiar with the Linux environment and programming, it is better to use the first method; If the second method is the most suitable method for programmers.
Installing Nextcloud on Windows via Docker Desktop
This method installs Nextcloud on the Windows server by installing Nextcloud All-in-One, a Docker, with the help of Docker Desktop.
In this method, we are going to complete the process of installing Nextcloud on Windows and the domain of the site without the need for the Apache web server. Just follow the steps below carefully.
Step 1: Install Docker Desktop
Download and install Docker Desktop. Check both options at this stage of installation.
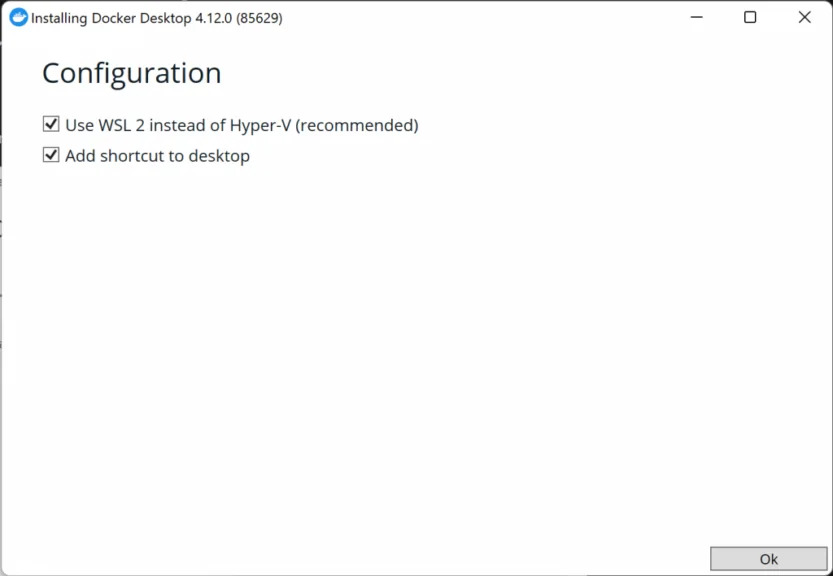
Open the app.
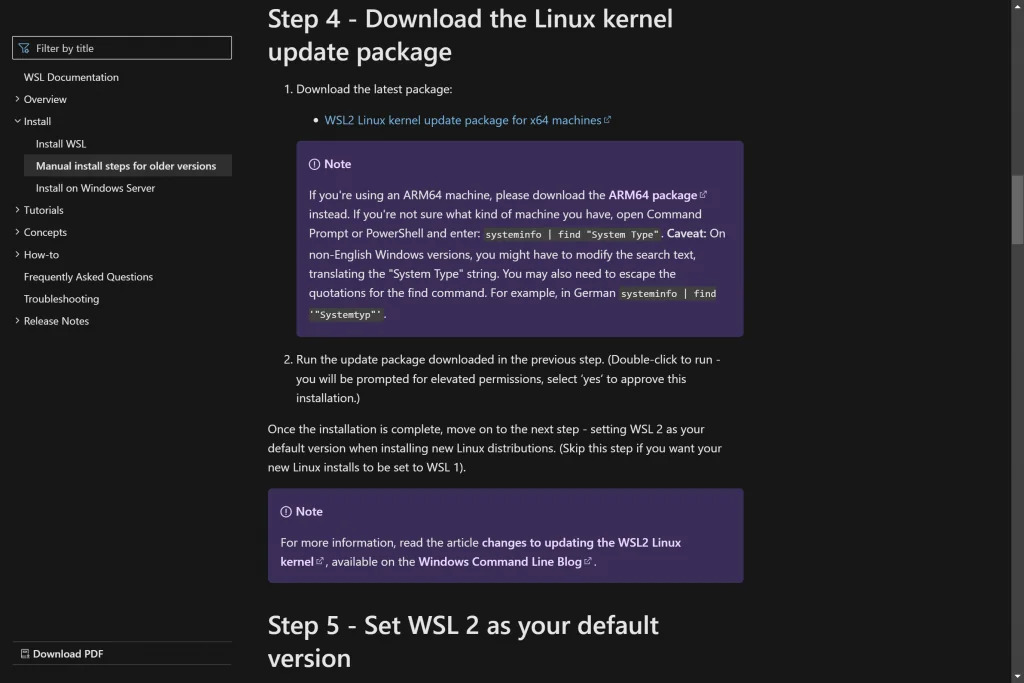
Second step: Download the WSL2 Linux kernel package update
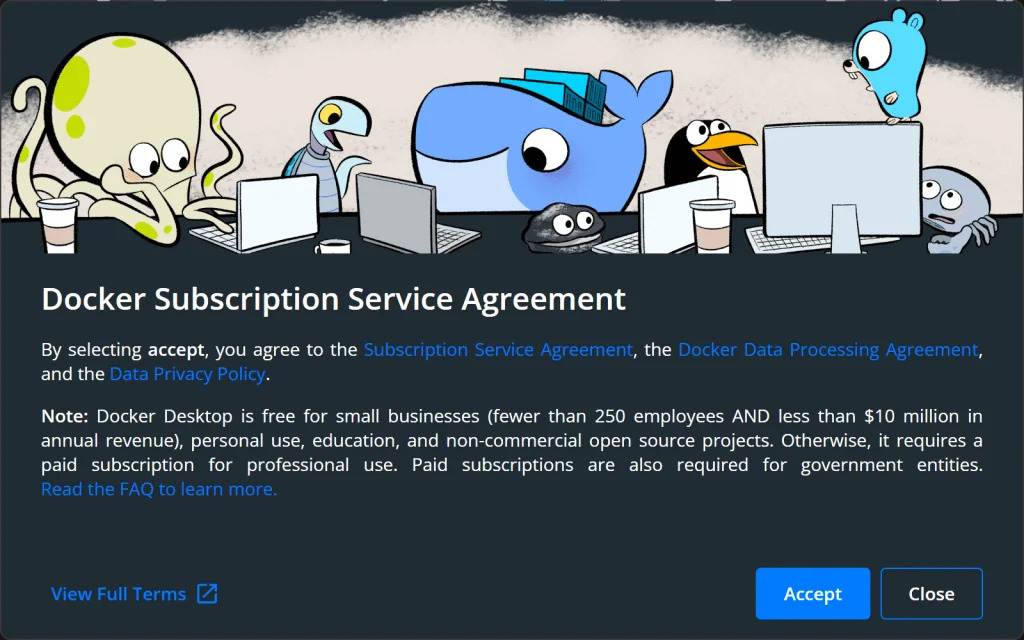
After clicking the Accept button, you will see the following screen. Click on the link you see on the page.

On the page you see, click on the first link to download the latest WSL2 Linux kernel package update.
WSL stands for Windows Subsystem for Linux and means Windows Linux Subsystem.
After downloading the ‘wsl_update msi’ file, install it.
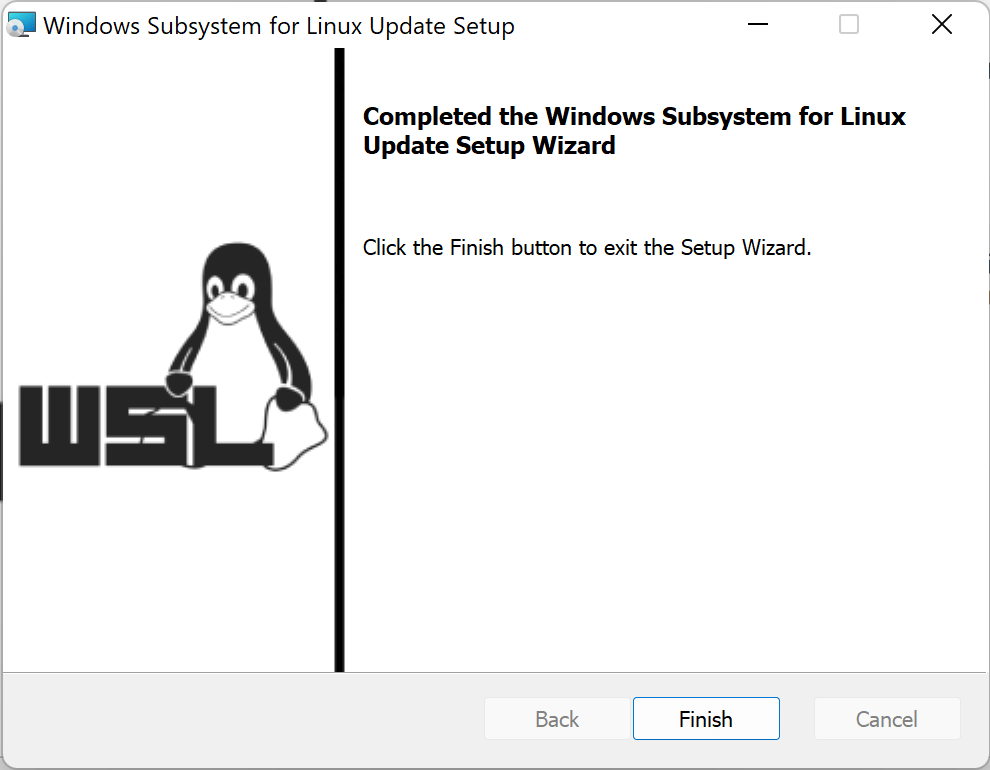
Now click Restart on the following page to restart the Docker desktop.

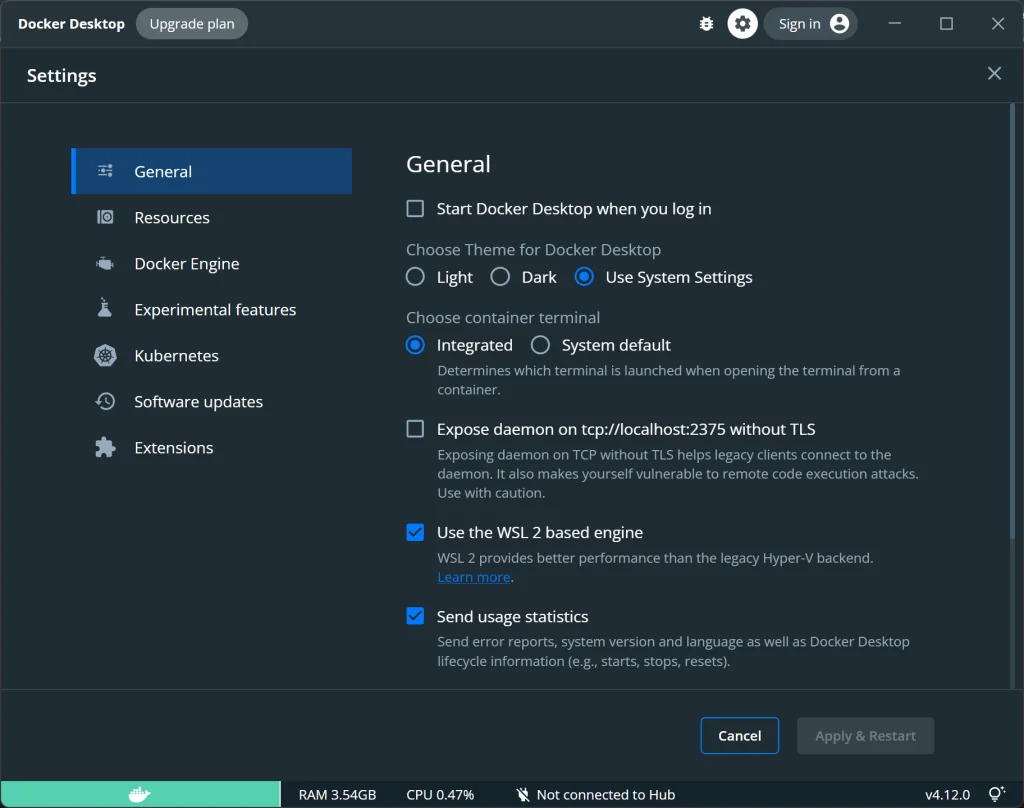
Third step: Docker Desktop settings in Windows
At this stage, after entering the Docker Desktop environment, go to the settings section and check the first square on the right so that the program will run when you log in to the system.
Step 4: Install Nextcloud AIO
After successfully installing Docker Desktop, you can install Nextcloud AIO on a Windows server. To do so, enter the terminal and run Nextcloud with the following command.
Note: Replace /run/desktop/mnt/host/c/ncdata, which is equivalent to C:\ncdata in your Windows host, with the actual path.
docker run ^
--sig-proxy=false ^
--name nextcloud-aio-mastercontainer ^
--restart always ^
--publish 80:80 ^
--publish 8080:8080 ^
--publish 8443:8443 ^
--volume nextcloud_aio_mastercontainer:/mnt/docker-aio-config ^
--volume //var/run/docker.sock:/var/run/docker.sock:ro ^
-e NEXTCLOUD_DATADIR="/run/desktop/mnt/host/c/ncdata" ^
nextcloud/all-in-one:latest
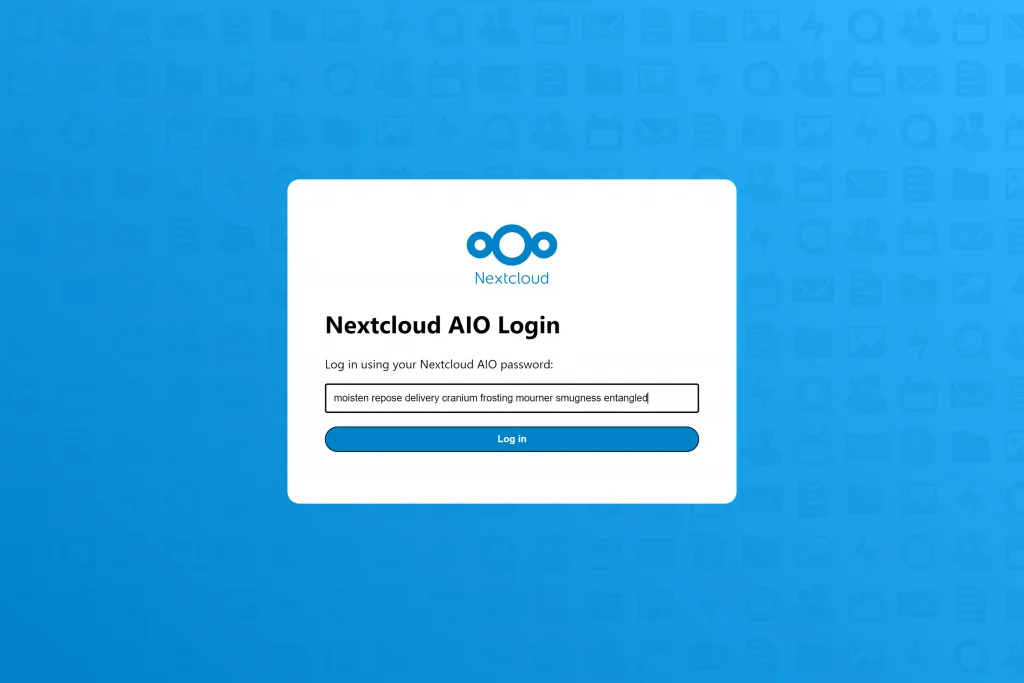
Now enter the system browser and go to the link https://localhost:8080. After accepting the certificate, you will go to the following page.
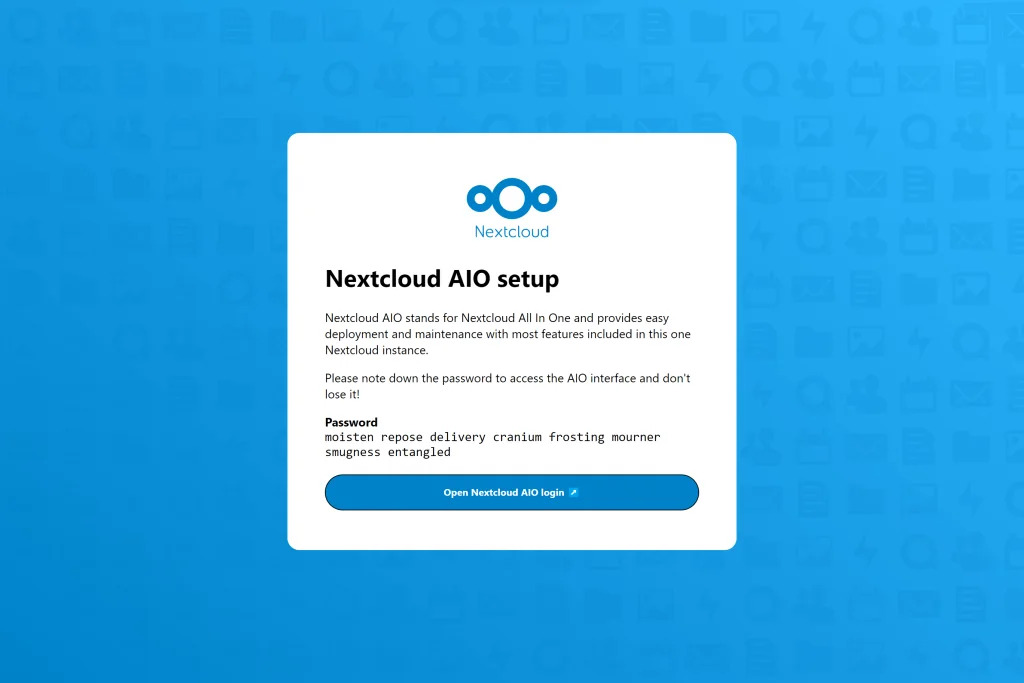
Click on Open Nextcloud AIO login and login with your Nextcloud password.
Now you can see the Nextcloud dashboard.
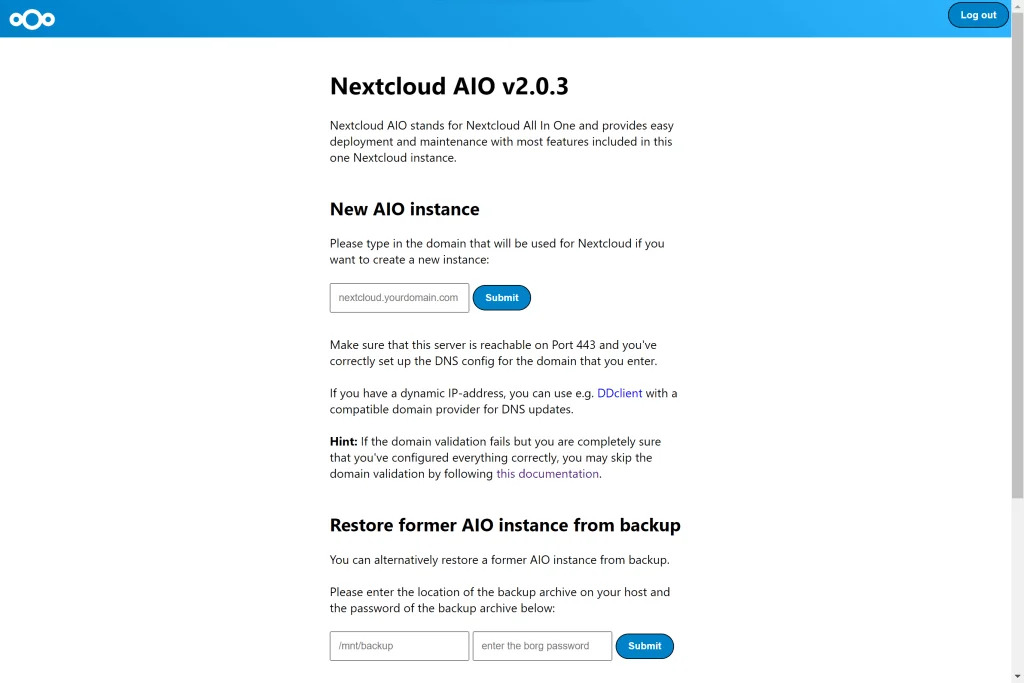
Step five: Setting Nextcloud on the site
Enter your site’s domain address in the empty field. Then, set DNS to display the site’s public IP. Finally, connect ports 433/TCP, 3478/udp, and 3478/TCP to Windows.
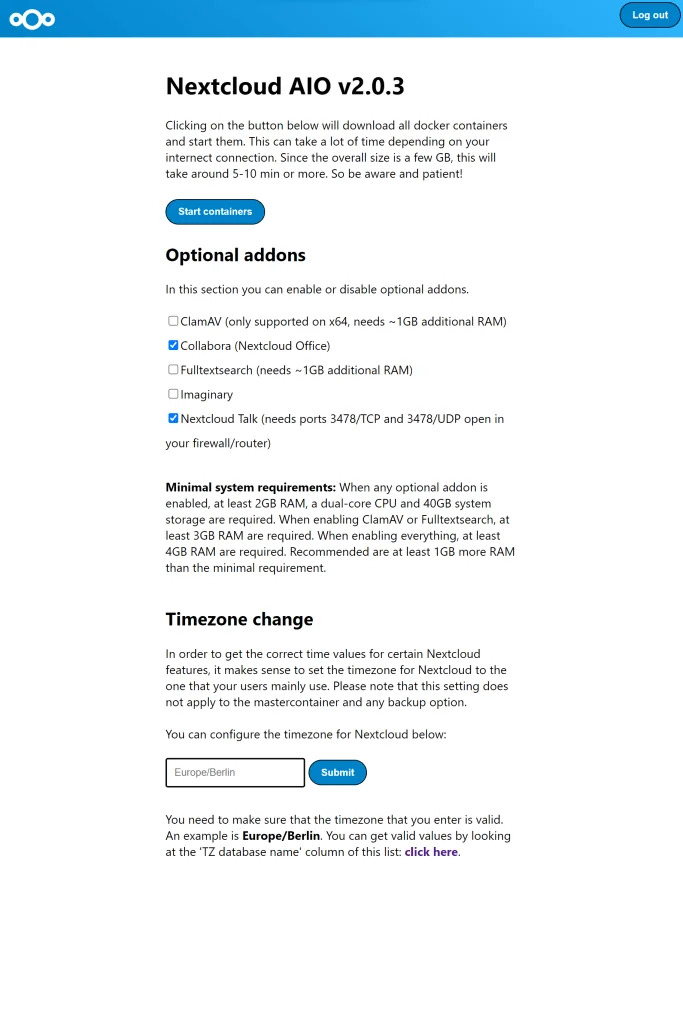
After setting these things correctly, you can proceed to the next step. In this step, you can set optional add-ons and a time zone. Then click on Start containers to download and run containers.
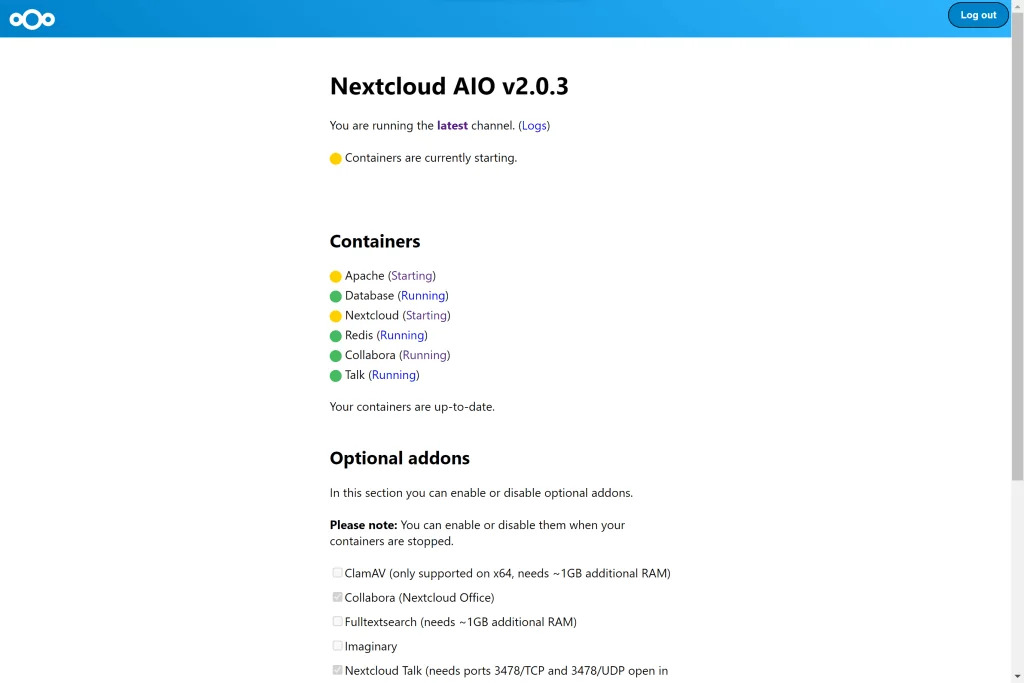
After the containers are completely downloaded, you will see the following image, which shows them starting to install and run.
After installing and running Containers, you will see the following image.
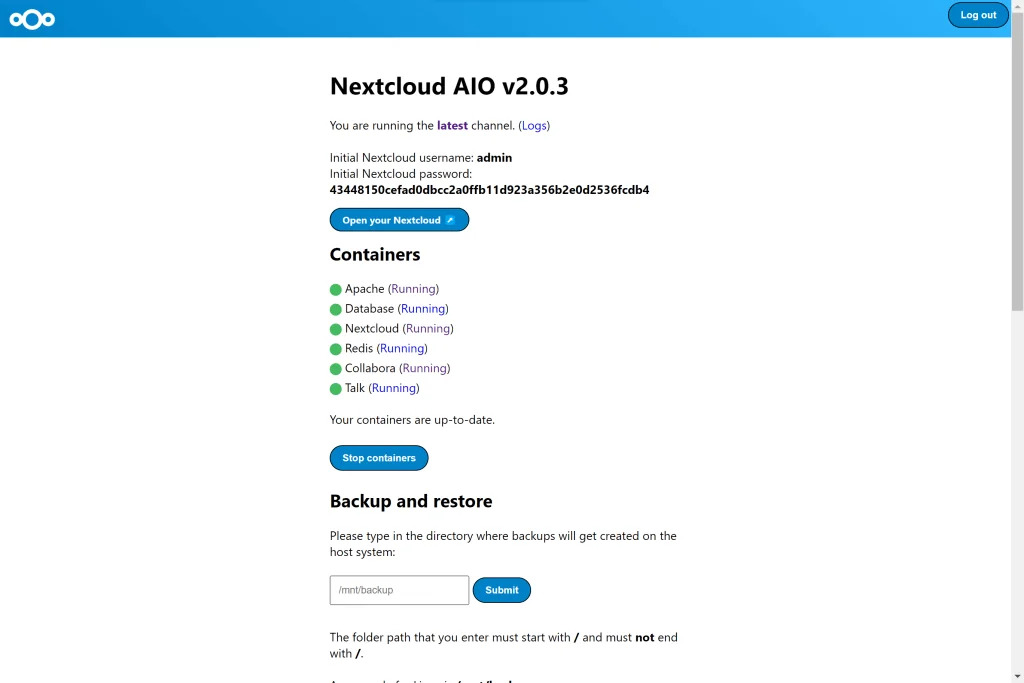
Now you can enter Nextcloud with your username and password through the link below.
http://localhost/nextcloud
Installing Nextcloud on Windows via WSL and Apache web server
WSL stands for Windows Subsystem for Linux and means Windows Linux Subsystem. By installing WSL on Windows, you can use the command line and other Linux privileges.
In this method, we want to install Nextcloud on the Windows server using WSL2 and Apache web root.
Step 1: Run Powershell
Run Powershell or Windows terminal in administrator mode.
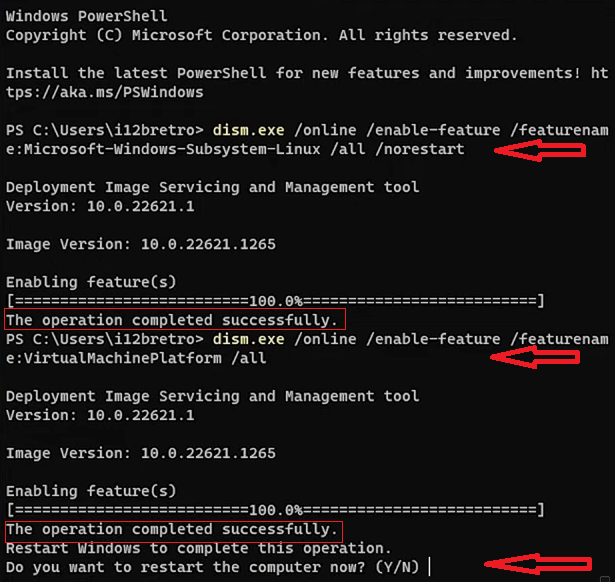
Second step: activation of WSL and virtual machine
We activate the WSL and virtual machine by running the following commands in the terminal:
dism.exe /online /enable-feature /featurename:Microsoft-Windows-Subsystem-Linux /all /norestart

dism.exe /online /enable-feature /featurename:VirtualMachinePlatform /all
After both features are enabled and the question appears, type y and press enter to reboot the system.
Third step: Use WSL2
After restarting the system, enter the terminal in administrator mode and run the following commands in order to upgrade the WSL version to WSL2 and use it:
Enable-WindowsOptionalFeature -Online -FeatureName VirtualMachinePlatform
wsl --set-default-version 2
ProgressPreference
= 'SilentlyContinue'; Invoke-WebRequest
https://wslstorestorage.blob.core.windows.net/wslblob/wsl_update_x64.msi
-OutFile .\wsl_update_x64.msi
ProgressPreference = 'Continue'
.\wsl_update_x64.msi
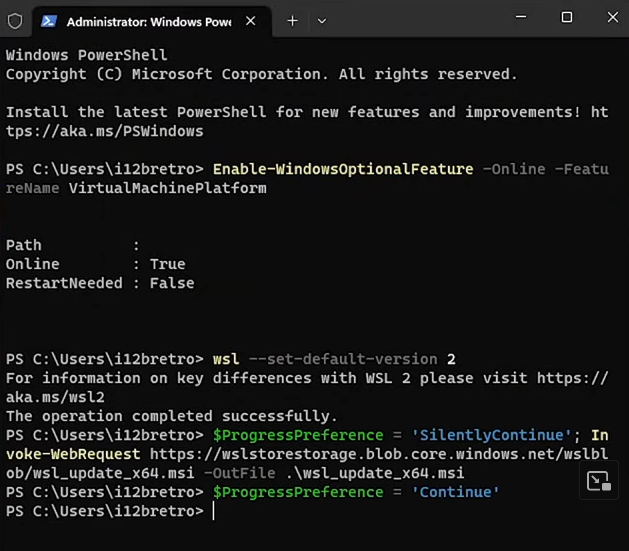
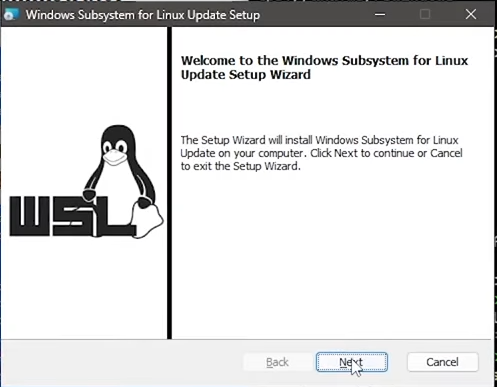
After running the last code, you will enter the WSL update installation environment. Follow the steps until the installation is complete.
Step 4: Install the Linux distribution
Now exit the terminal and enter the Microsoft Store DNS . Search and install one of the Linux distributions in the Search section. In this tutorial, we will install the Debian distribution.
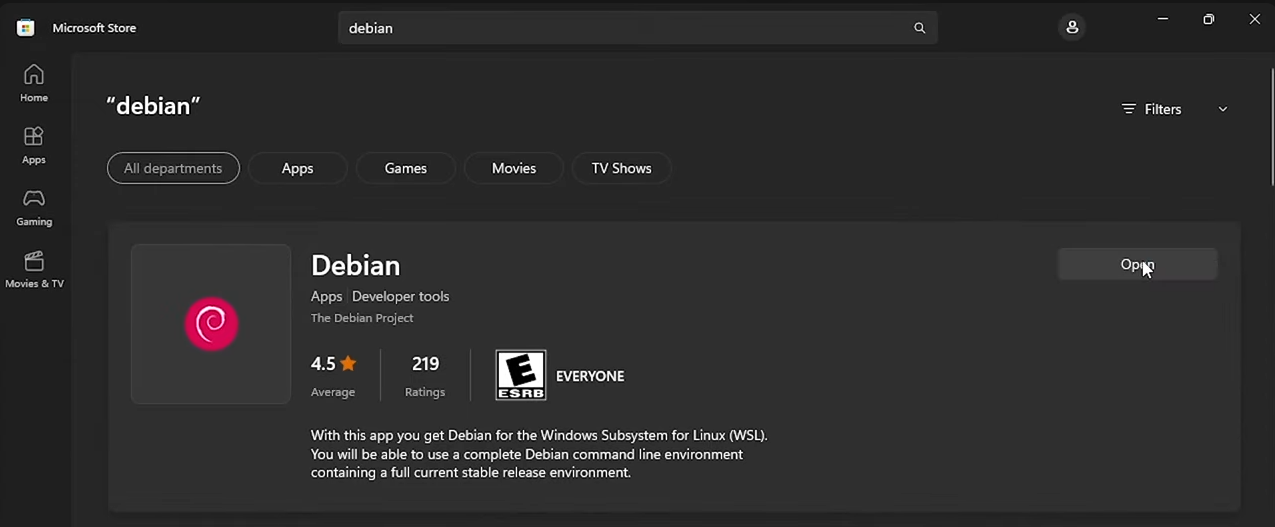
Run Debian after installation is complete. After fully loading, Debian will ask you to create a user account in the Linux environment with a name and password. Enter the username and password of your choice.

Step 5: Install Nextcloud
This step consists of several parts that you need to do to install Nextcloud:
Installing the required updates and packages
Run the following commands in the Debian environment:
sudo apt update
sudo apt upgrade -y
sudo apt install unzip wget -y
sudo apt install apache2 mariadb-server mariadb-client -y
sudo
apt install php7.4 libapache2-mod-php7.4 php7.4-mysql php-common
php7.4-cli php7.4-common php7.4-json php7.4-opcache php7.4-readline
php7.4-intl php7.4-json php7.4-gd php7.4-mbstring php7.4-mysql
php7.4-xml php7.4-zip php7.4-curl -y
sudo service mariadb start
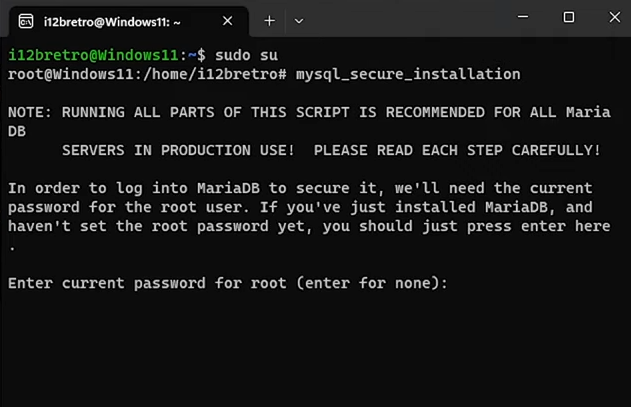
sudo su
mysql_secure_installation
Database settings and root account
After executing the last command, press Enter to log in as the root user. In this section, we will set the access of other users and topics.
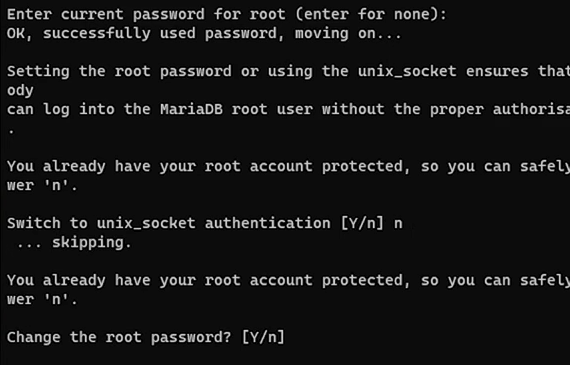
In this step, enter N so that the process does not switch to socket authentication mode:

Type Y and press Enter to set a root password. Enter the password twice to set it.
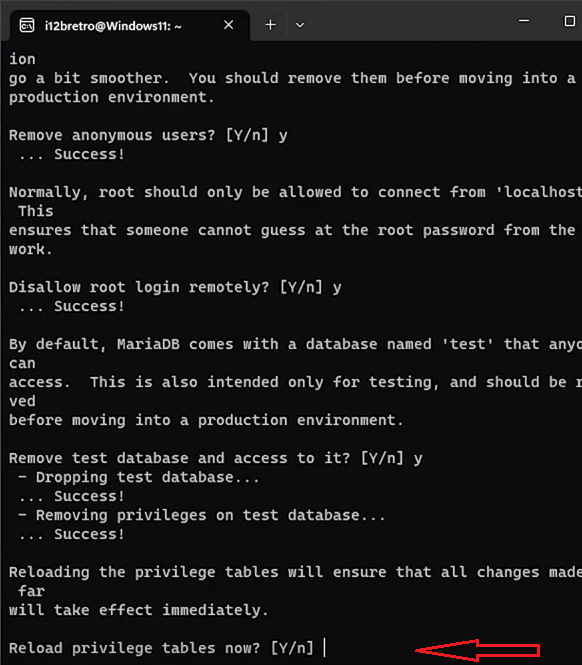
At this point, enter Y and press Enter to block other users’ access. Then enter Y and run to disable the root user’s remote login. Continue to enter Y to delete the test database.
At the end, enter the letter Y and press enter to reload the privilege tables:
Login to MySQL
Log in to MySQL using the following command and the password you set:
mysql -u root -p
Create Nextcloud database and database user
Now run the following commands in order to create the Nextcloud database and the database user:
CREATE DATABASE nextclouddb;
GRANT ALL ON nextclouddb.* to 'nextcloud_rw'@'localhost' IDENTIFIED BY 'N3xtCl0ud!';
FLUSH PRIVILEGES;
EXIT;
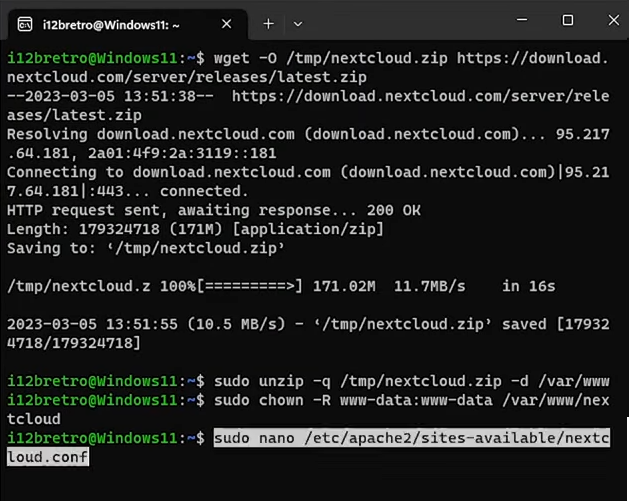
Download Nextcloud on Apache webroot
We download and extract Nextcloud in Apache web root through the following commands:
wget -O /tmp/nextcloud.zip https://download.nextcloud.com/server/releases/latest.zip
sudo unzip -q /tmp/nextcloud.zip -d /var/www
sudo chown -R www-data:www-data /var/www/nextcloud
sudo nano /etc/apache2/sites-available/nextcloud.conf
After entering the last command, you will enter the nextcloud.conf file editor, which is the new site settings file.
Setting nextcloud.conf
Enter the following codes inside it:
Alias /nextcloud "/var/www/nextcloud/"
<directory /var/www/html/nextcloud/>
Options +FollowSymlinks
AllowOverride All
Require all granted

Dav off

SetEnv HOME /var/www/nextcloud
SetEnv HTTP_HOME /var/www/nextcloud
</directory>
Press CTRL+O, then Enter and finally CTRL+X to write the codes to the file.
Site activation
After going to the terminal, enter the following codes to activate the site and reload Apache 2 to apply the changes.
sudo a2ensite nextcloud
sudo a2enmod rewrite headers env dir mime dav
sudo service apache2 restart
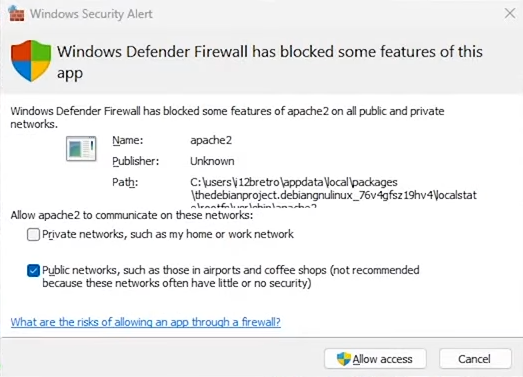
If you encounter a firewall warning, select the allow access option.
Completing the installation of nextcloud on Windows
To complete the installation of Nextcloud on the Windows server, enter the following address in your browser:
http://DNSorIP/nextcloud
You will see the nextcloud installation page at this address.
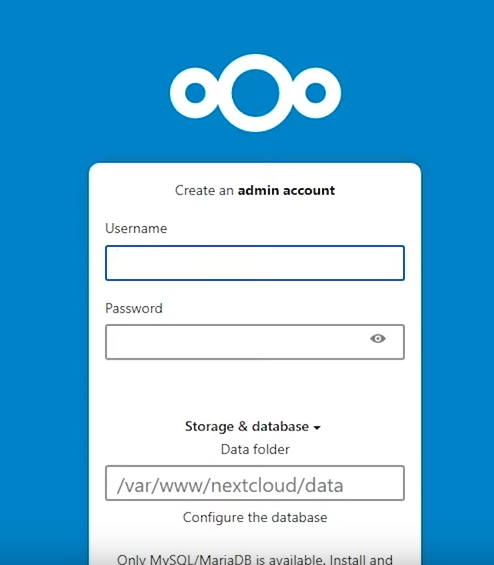
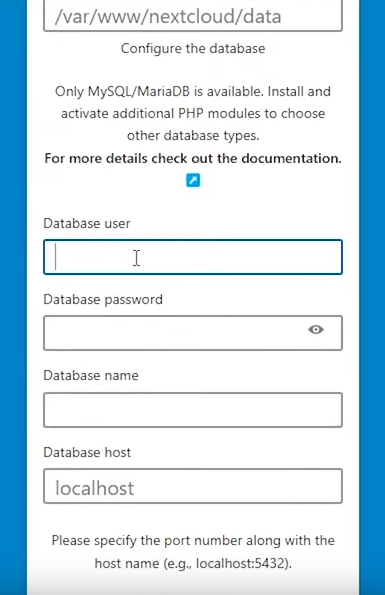
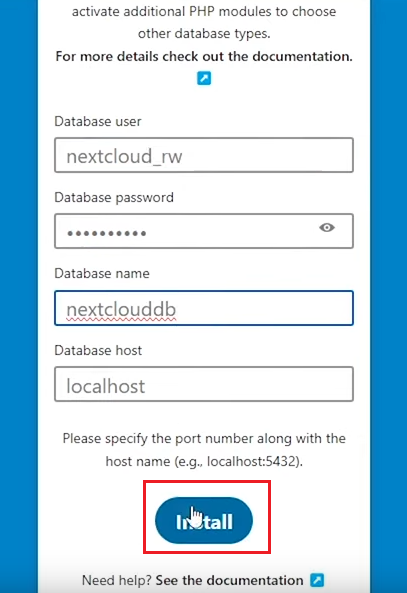
Enter the selected username and password. Click on the storage & database link to view the rest of the page. Then fill in the blanks with the following information:
username: nextcloud_rw
password: N3xtCl0ud!
database name: nextclouddb
database host: localhost
Click Install to install nextcloud. Then enter its environment.
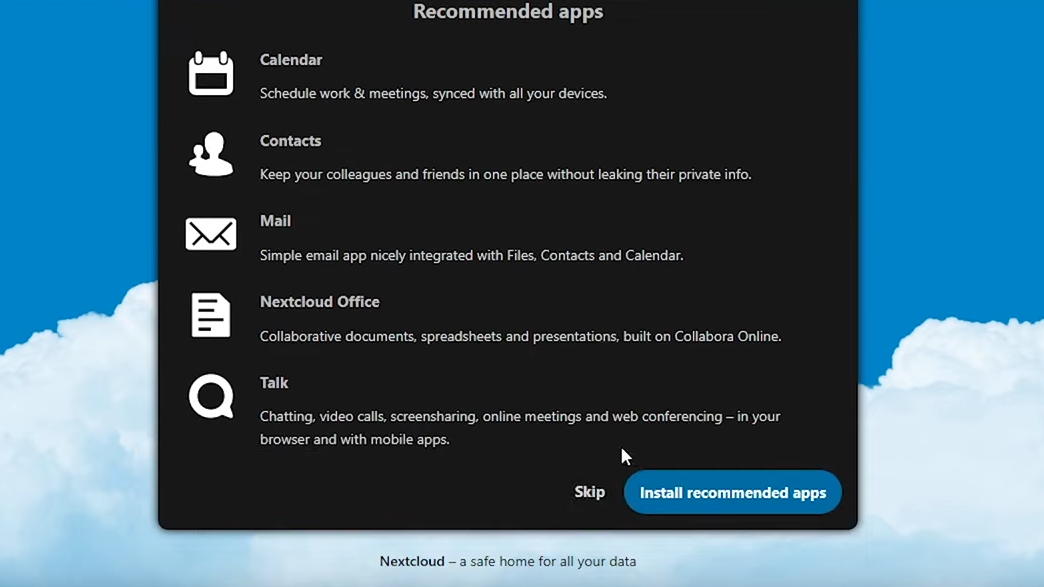
In this section, you can install the recommended programs.
Welcome to the Nextcloud environment in WSL!
Conclusion
Nextcloud is an information storage space that has both a paid version and a free version, and its features go beyond just a storage space. Unlike other storage spaces, this platform has no volume limitations.
Depending on your preference, you can choose either Docker Desktop or the Apache web server to install Nextcloud on a Windows server.
We have thoroughly reviewed both methods of installing Nextcloud on a Windows server. By writing your questions in the comments section, you help our experts to provide answers as quickly as possible.
FAQ
Can I install Nextcloud directly on Windows?
Nextcloud doesn’t natively support direct installation on Windows — you install it using Docker or a Linux subsystem.
What’s the simplest way to run Nextcloud on Windows?
Using Docker Desktop and the Nextcloud All‑in‑One container lets you install and run Nextcloud with minimal Linux knowledge.
Do I need a database to install Nextcloud?
Yes — when installing via Linux (WSL + Apache), you set up MariaDB or another supported database before running Nextcloud.