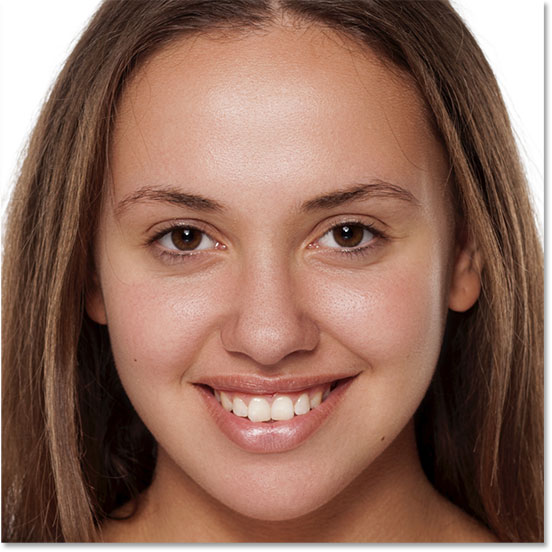
How to smooth and flawless facial skin in Photoshop?
flawless , we will teach you step by step how to remove freckles, moles, pimples and blemishes on the face and body in Photoshop software. This is also called retouching.
Step 1 Make a copy of the image
An image that recently opened in Photoshop is displayed in the Layers panel in the Background layer. Before smoothing the skin, start by removing any unwanted stains. To protect the original image, work on a separate layer.
Press and hold the Alt key on the keyboard, click on the Background layer, make a copy of the Background layer and drag it to the New Layer icon at the bottom of the Layers panel.
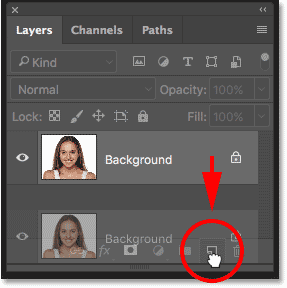
Repeat Background layer.
In the Duplicate Layer dialog box, name the layer “Spot Healing” and then click OK.

Name the layer “Spot Healing”
A copy of the image appears on a new layer called “Spot Healing” at the top of the page
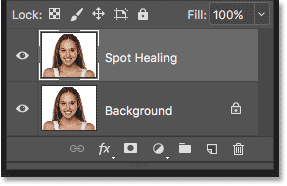
The initial cleansing of the skin is now done on a separate layer.
Step 2: Select the Spot Healing brush from the toolbar

Select Spot Healing
Step 3: Set the Spot Healing brush to “Content-Aware”
Make sure Type is set to Content-Aware in the options bar

Content-Aware must be selected by default.
Step 4 Click on Skin Blemish to remove blemishes
Click on the Spot Healing brush to remove unwanted skin blemishes. Photoshop instantly “improves” blemishes by replacing problem tissue with skin-friendly tissue from the environment. For best results, choose a brush that is slightly larger than the stain. To resize your stylus, press the right bracket key (]) on your keyboard to make the brush larger, or the left bracket key ([) to make it smaller. If the stains are not completely removed in the first test, press Ctrl + Z on the keyboard to neutralize the operation, then resize your brush if necessary and click on the same stains to try again.
If we look at the image of a woman’s forehead, we see that something like a large pimple is located to the right of the center. I put the Spot Healing brush on it and choose a brush that is a little bigger than spontaneous.
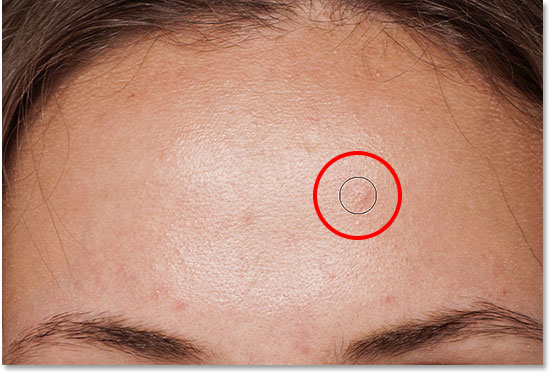
Place the brush on the skin spots.
To remove stains, click on the stain with the Spot Healing brush. Photoshop analyzes the area I clicked on, finds good skin texture from the area around it, and then blends a good texture that matches the color and the main color of the area. Like magic, stains are gone:
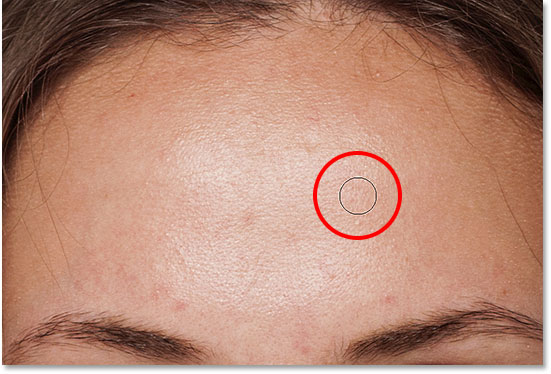
Click to improve spots.
I do the same with another stain on the forehead, choosing the Spot Healing brush just a little bigger than the area that needs healing:

Put the brush on the second stain
I click on the stain again and Photoshop removes it immediately:
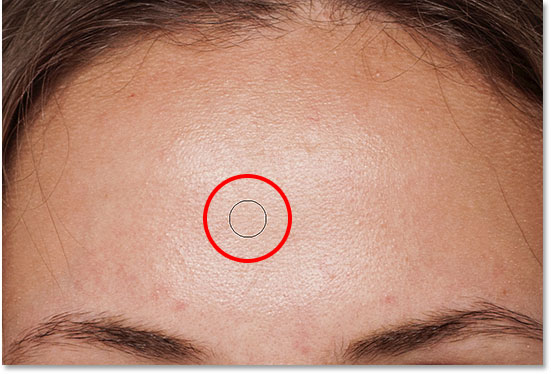
The second stain is gone.
After a few more clicks to clear the remaining spots on the forehead, the skin looks much softer:
The spots have been removed from his forehead.
Eliminate blemishes and not facial features
As you retouch your skin, keep in mind that while it is good for temporary problems such as acne or other minor skin conditions, it is usually not appropriate to remove permanent features such as moles or even certain scars, as these are part of the personality. Are individual. After all, the purpose of image retouching is to help people look their best, not to make them look like someone else.
Initial skin cleansing
Continue working around the face to remove any remaining spots. Here is a comparison of what a woman’s skin looks like at the beginning (left) and after a quick retouch with a healing brush (right). In most photos, this initial skin cleansing should not take more than a few minutes.
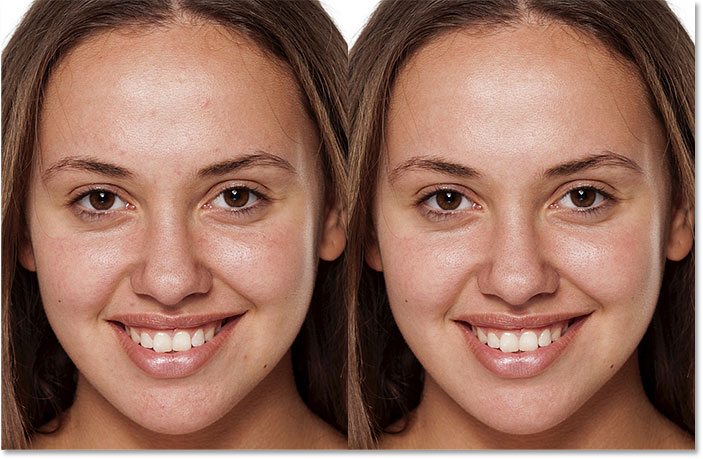
Left before retouching and right after initial skin retouching.
Step 5: Make a copy of the “Spot Healing” layer
By removing the spots, we see the skin smoothing and softening, and it is still better to work on a separate layer. In the Layers panel, press and hold the Alt key on the keyboard, click on the “Spot Healing” layer, make a copy of the “Spot Healing” layer and drag it down on the new layer icon.
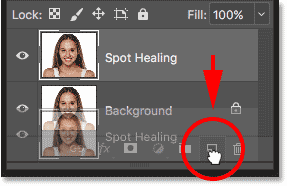
Duplicate the “Spot Healing” layer.
In the Duplicate Layer dialog box, name the layer “Smooth Skin” and click OK:
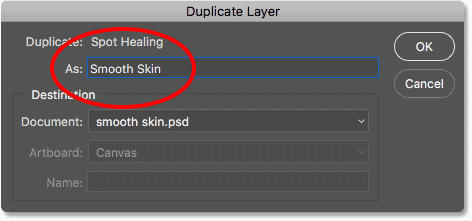
Now we have the main image in the Background layer, the first skin retouching is on the “Spot Healing” layer and a new “Smooth Skin” layer is on top of them.
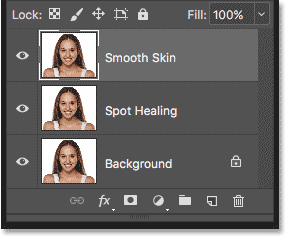
The “Smooth Skin” layer appears above the “Spot Healing” layer.
Step 6: Apply the High Pass filter
To smooth the skin, we will use the High Pass Photoshop filter. Select Filter in Other from the menu and then select High Pass:
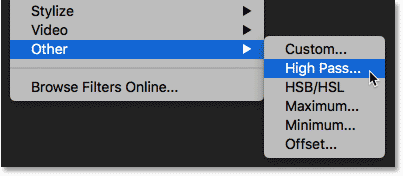
Go to the High Pass filter
The High Pass filter marks the edges and highlights them, and the Radius option at the bottom of the High Pass dialog box controls the “thickness” of the raised edge. In other words, when Photoshop detects an edge, the Radius value tells it how many pixels are on each side of it as part of the edge. Low radius values only highlight the best details of the image. But to make sure we don’t soften these important details, we also need to highlight the areas around them, which means we need a larger amount of Radius. For normal shooting, a 24 pixel radius works well:
Going to Filter> Other> High Pass.
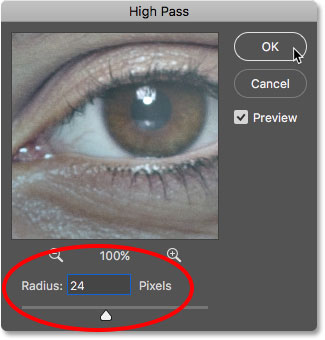
Set the Radius value to 24 pixels.
If your subject is blurry, or working on a lower resolution image, a radius of less than 18 pixels or even 12 pixels may work better. But why these special values? Because for the next step it is important to choose the value of Radius so that it can be easily divided into 3. For example, 24 is divisible by 3, 8, 18 is divisible by 3, 6, and 12 is divisible by 3, 4.
Click OK to close the High Pass dialog box. Your image will be mostly gray. Solid gray areas are non-edged areas with minor details such as skin, while large, high-contrast halos highlight the edges.

Result after applying the High Pass filter
Step 7: Apply the transparent Gaussian filter
We need to erase the effect of the High Pass filter. It may seem inflexible, but in fact, blurring helps the skin to come out more properly. Go to the Filter menu, select Blur, and then select Gaussian Blur:
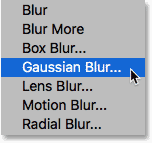
Go to Filter> Blur> Gaussian Blur.
In the Gaussian Blur dialog box, set the Radius value to exactly one-third of the value used for the High Pass filter. In my case, I set the High Pass radius to 24 pixels, so I set the Gaussian Blur radius to one-third, which is 8 pixels. Click OK to close the dialog box:
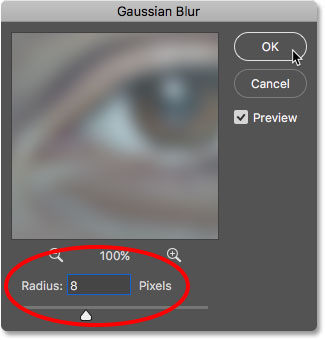
Adjust the Gaussian Blur radius to one third of the High Pass radius
Despite the blur, the High Pass effect now looks smoother and more detailed:

Result after applying the Gaussian Blur filter
Step 8: Change the Layer Blend Mode to Linear Light
In the Layers panel, change the “Smooth Skin” layer blend mode from Normal to Linear Light:
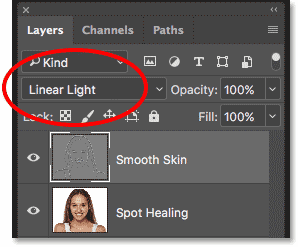
Change the layer composition mode.
This mixes the High Pass result with the image, creating a high-contrast, over-sharp effect. It may sound scary, but don’t worry.
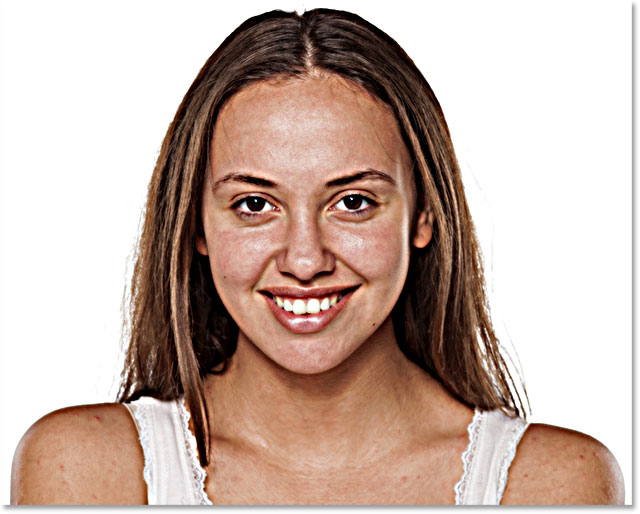
The image after changing the blend mode of the Smooth Skin layer to Linear Light
Step 9: Invert the layer
Go to the Image menu, select Settings, and then select Invert:
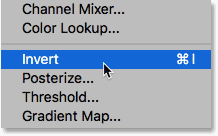
Go to Image> Adjustments> Invert
With the inverted layer, the image looks too sharp, chaotic and blurry, strange and with big ugly halos around everything:
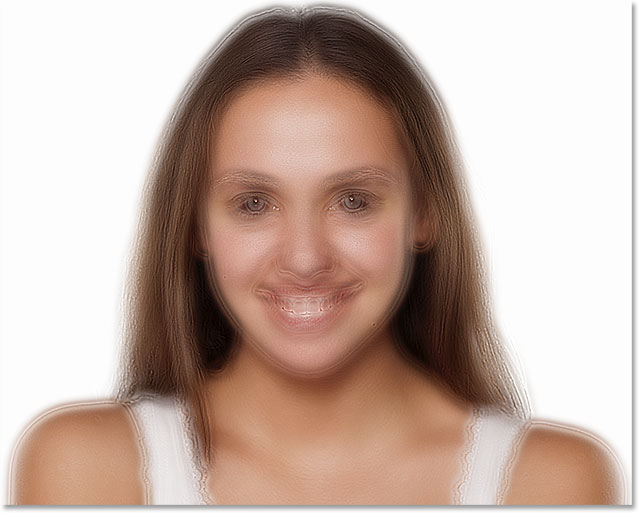
Result after inverting layer “.” Smooth Skin
Step 10: Open Blending Options
To reduce the halo effect, click on the Layer Styles icon at the bottom of the Layers panel:
![]()
Click on the Layer Styles icon.
Select Blending options from the top of the list:
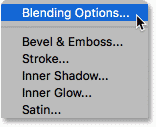
Open Blending options.
Step 11: Drag the “Blend If” slides
In the Layer Style dialog box, search for the Blend If slider at the bottom. There are two sets in the slider, one called “This Layer” and the other under it called “Underlying Layer”. We need higher sliders (those labeled “This Layer”):
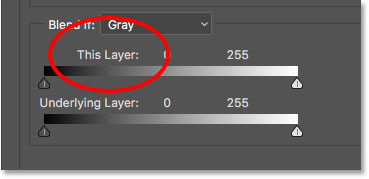
Sliding Blend If
Notice the slider below each gradient bar. These sliders control how the “Smooth Skin” layer is combined with the image below it based on the brightness of the layer. The bar slider on the left is used to mix the darker areas of the layer, and the slider on the right mixes the lighter areas:
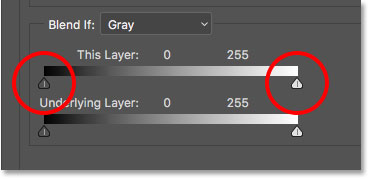
Dark sliders (left) and light right
Reduce the halo of light
Start by lowering the lighter halos. Press and hold the Alt key on your keyboard, click the slider on the right and start dragging it to the left. Holding down the Alt key tells Photoshop to split the slider in half so that only the left side of the slider moves while dragging while the right is in place. When you drag a slider, look at your image and you will see lighter halos. Slide the slider almost completely to the left to reduce it as much as possible:
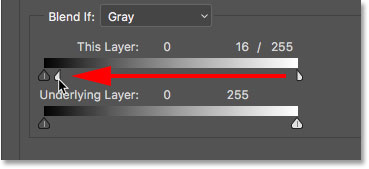
Drag the left half of the slider to the right.
This is the result after dragging the first slider. Most light halos are now gone, or at least much less so. Only darker halos remain:
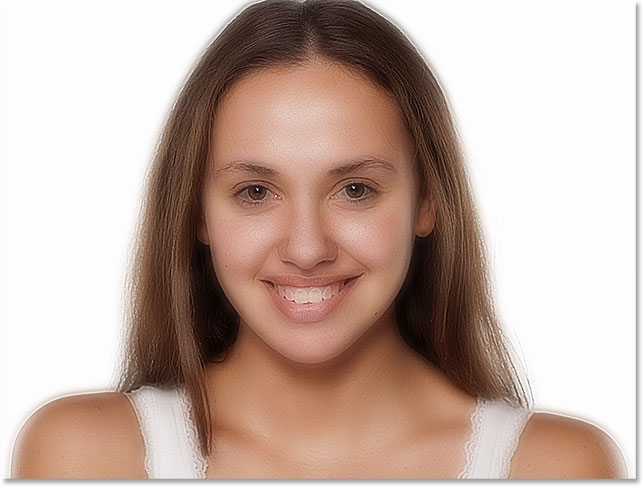
Lighter halos disappear after sliding the slider on the right.
Reduce dark halos
To reduce dark halos, press and hold the Alt key, click on the slider on the left, and drag half of it to the right. You have to drag almost completely to the right again to eliminate most of the dark halos. When you are done with the Layer Style dialog box, click OK:
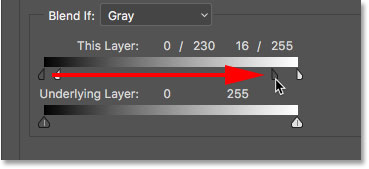
Drag the right half of the slider to the left.
My image after dragging both sliders is as follows. Her skin looks very smooth, but there are other flaws in the image. We will solve the following problem:

The darker halos disappear after dragging the slider on the left
Step 12: Add a layer mask
To limit the smoothing effect only on the skin, add a layer mask. Return to the Layers panel, press and hold the Alt key on your keyboard, and click the Add Layer Mask icon:
![]()
Add a layer mask while holding down Alt.
A small black mask image appears on the “Smooth Skin” layer. In this case, the smoothing effect is hidden from view, so we can use it only where we need it:
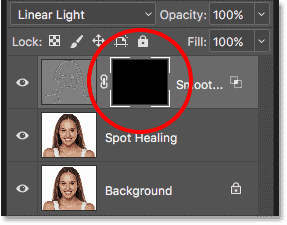
The black mark of the mask is added to the “Smooth Skin” layer.
Step 13: Select the Brush tool
From the toolbar, select the Brush Tool:

Select the brush tool.
Step 14: Set your brush color to white
Make sure the foreground color of the brush is set to white. You can see your current foreground and background colors in the swatch color charts at the bottom of the toolbar. swatch In the upper left is the Foreground color. If not set to white, press the letter D on your keyboard to quickly set the colors to default:

The foreground color (brush color) should be white.
Step 15: Paint on the skin
Before you start painting, check your brush options in the options bar. Make sure Blend Mode is set to Normal, Opacity is 100% and Flow is 100%:

Make sure the Mode, Opacity and Fill options are all set to their defaults.
Then apply the brush on the skin to determine its smoothing effect. A soft edge brush will work best. We already know that we can change the size of the brush from the keyboard using the left and right bracket keys. To change the brush stiffness, add the Shift key, press Shift and the left bracket key to soften the brush, or press Shift and the right bracket key to make the brush stiffer.
Example: Pulling a brush to reveal smooth skin
I start by drawing a brush on my forehead. Because we paint on the layer and not on the image itself, we do not see the color of the brush as we paint. Instead, we reveal the smoothing effect in the areas we have painted:
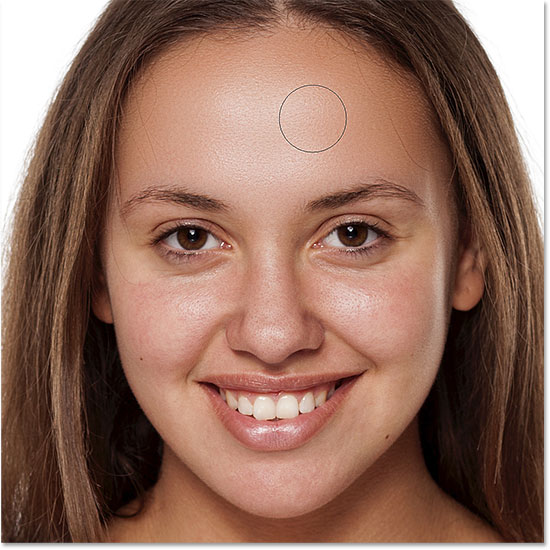
Return the smooth skin to the woman’s forehead.
Next, I apply it on her nose, cheeks and around her eyes to correct the skin surface in those areas. Adjust the size of your brush as you wish so that you do not paint on the color details that need to stay sharp. If an error occurs on an area, press the letter X on your keyboard to set your brush to black, and then draw on this error to hide the smoothing effect. Press X again to turn your brush white and continue painting to soften the skin:
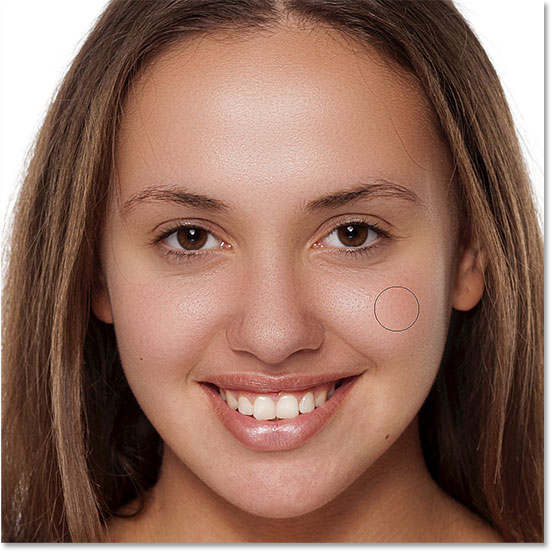
Emollient effects are more pronounced, but only on the skin.
Finally, to smooth and soften those areas, I paint around the mouth and above the chin, while at the same time you have to be careful to avoid painting his lips:

Softening of the skin is evident in the lower parts of the face.
View the mask layer
To see exactly where you drew, press and hold the Alt key and click on the Layers mask on the Layers panel:
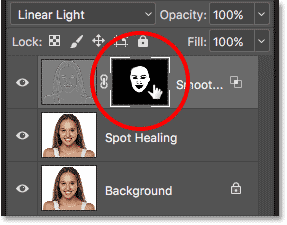
Hold Alt and click on the layer mask thumbnail.
This will change your view from image to layer mask. The white areas on the mask are where you smoothed out to repair the skin, and the black areas are where the smoothing effect is hidden. Viewing the mask is a great way to make sure there are no stains and you can paint directly on the mask if necessary. To return to your image, press and hold Alt again and click on the mask layer thumbnail:

Use the mask view to search for lost areas.
Step 16: Decrease the Opacity Layer.
At this stage we have softened the skin, but the effect is very strong. To reduce it, reduce the opacity of the “Smooth Skin” layer. In general, the amount of blur between 40 to 60% works best, but it depends on your image. I set 50%:
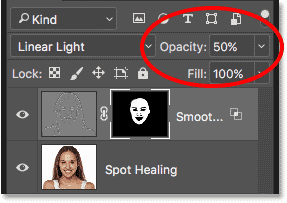
Reduce the opacity of the skin emollient effect by up to 50%.
Our job is done! Here, after reducing the opacity of the layer, the final result is determined. Her skin looks great now:


