How to Change Screen Brightness in Windows 11
If You Have Windows 11 Installed On Your Laptop, Tablet, Or All-In-One Computer, You Can Easily Change The Screen Brightness Of Your Internal Screen With A Few Taps Or Clicks. And How To Do It.
How to change the screen brightness using the quick settings
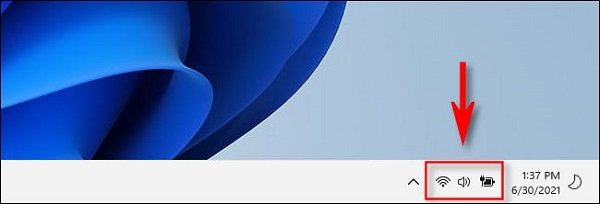
First, click the Quick Settings button in your taskbar; this button is hidden and is located where you see the WiFi icons, speakerphone, and battery in the right corner.
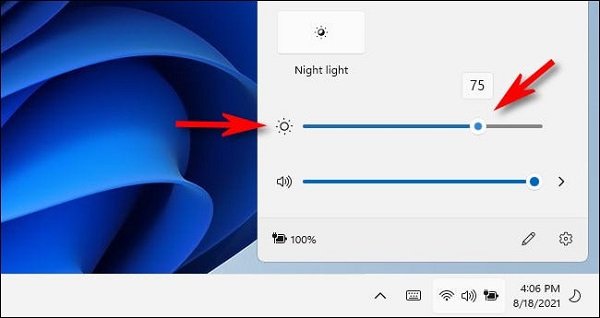
When the Quick Settings menu appears, find the “Light” slider with the sun symbol next to it. Click or tap it, then drag the brightness slider to increase or decrease your screen’s brightness.
The sun icon will get bigger or smaller as you move the slider. When you place the slider the way you want, you can close it by clicking anywhere outside the menu or re-selecting the Quick Settings button in the taskbar.
How to change the screen brightness in Windows settings
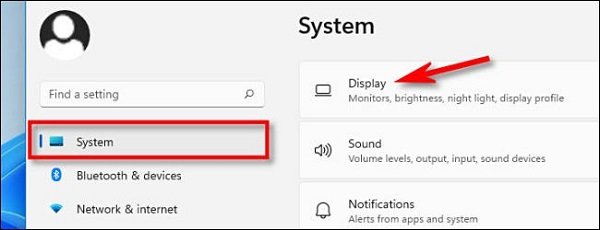
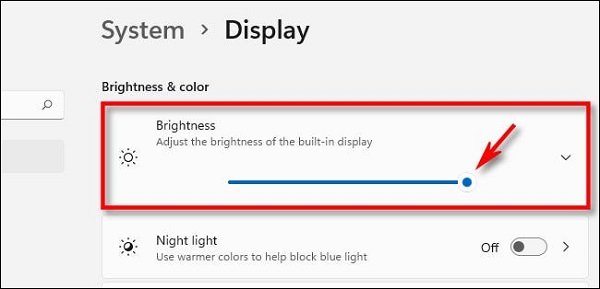
You can adjust the brightness of your internal screen using Windows settings. First, activate the settings by pressing Windows + I on your keyboard. Once opened, click “System” in the sidebar, then select “Display.”
Go to the “Brightness & Color” section in System Display settings. In the “Brightness” section, use the slider to adjust the brightness of your internal screen.
Close the settings when you are done. To reset the brightness, go to Settings > System > Display, or use the Quick Settings menu.
If the light slider is gray
If you do not have a built-in screen (such as a laptop or tablet), the brightness slider will not be available in Quick Settings and will be grayed out. In this case, you must use your monitor’s physical controls to change the screen’s brightness.
FAQ
How can I change brightness in Windows 11?
Go to Settings → System → Display, then move the brightness slider to adjust to your preference.
Is there a faster way to change brightness?
Yes — use the Quick Settings panel (click the network/volume/battery icon in the taskbar) and adjust brightness directly from the brightness slider.
Will changing brightness affect battery life or comfort?
Yes — lower brightness can save battery on laptops and reduce eye strain in low-light conditions.