
How to Restore Cisco IOS Equipment With TFTP
Network Experts Recommend That The Best Way To Get Acquainted With Network Equipment And Troubleshoot Devices Is To Do Tasks And Configurations Practically, Because You Can Never Get Practical Concepts With Theoretical Knowledge Alone.
Of course, it is recommended that this be done on equipment nearing the end of its life when the warranties are no longer valid.
When Cisco switches or routers have a problem, the best option is to recover or troubleshoot the console cable, but sometimes circumstances require us to look for other solutions.
One significant problem for network administrators is recovering or upgrading the IOS operating system on Cisco devices.
This article examines how to solve this problem using tftpdnld in a familiar environment. If the device’s operating system runs without issues, you are lucky; this guide is for you if you encounter a problem.
We recommend backing up iOS first so you have a reliable backup in case the original fails. Several articles describe restoring IOS to cyberspace equipment.
However, this article outlines the steps for users without the necessary technical experience.
To follow this article to the end, you need a terminal simulator to see the Cisco device’s output. I often use TeraTerm (free) or PuTTY (free), or SecureCRT (excellent but not free).
1. Connect to your device using the settings manually:
Baud rate: 9600 (bits per second)
Data bits: 8
Parity: none
Stop bits: 1
Flow control: none
If the router is connected directly to the network, the flash drive likely has no IOS file. Use the dir Flash command to ensure this is in a familiar environment. If you do not see the file named xxxxx.bin, it means that the IOS does not exist.
2. The next step is configuring a TFTP server that controls transferring the IOS to the router.
For the convenience of a free TFTP server on the Internet by Philip Junin at http://tftpd32.jounin.net/Built in 32 and 64-bit versions available. Ensure that the above server is installed and set up by the router and accessible through the network.
Connect an Ethernet cable to the FastEthernet 0.0 router interface. If, as mentioned, you have made a backup of Cisco IOS, you are now ready to do the following.
If not, you need to find another way to get IOS. If you plan to do the above steps in an enterprise environment, there is likely a SmartNet agreement (or support) between your organization and Cisco.
If you purchased your device from a reputable company, you can use Cisco Support Services. Cisco has put the IOS files ready on its website for registered customers. Once iOS is in the leading TFTP directory, you can perform a recovery operation.
You can quickly check the current environment settings within the familiar environment by running the set command and going back to the previous step. The above solution allows you to access the set of locations that are important to you.
The return values are as follows:
IP_ADDRESS = 10.1.10.100 (IP address used by the router)
IP_SUBNET_MASK = 255.255.0.0 (Mask used by the router)
DEFAULT_GATEWAY = 10.1.10.1 (optional)
TFTP_SERVER = 10.1.10.120 (IP address of your TFTP server machine)
TFTP_FILE = xxxxxxxxxxxxxxx.bin
The easiest way to enter the IOS file name is to check the TFTP root folder on your TFTP server. To make it easier to work in the TFTP root folder in TFTPD, click the Show Dir button (Figure 1). After doing this, click the Explorer button (Figure 2).
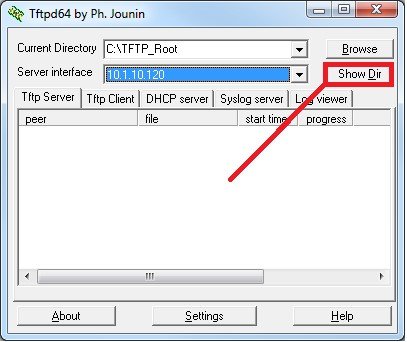
figure 1
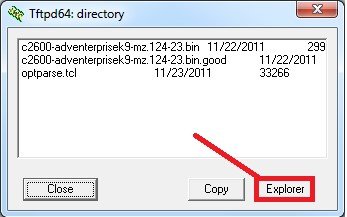
figure 2
Doing so will open a File Explorer instance with the selected TFTP Root folder. Locate the iOS file (.bin) and click it once to select it. Then right-click the file, copy its name, and paste it into Familiar. If you do not use this method to copy the file name, there is an option to enter the file name manually, but the error occurs when typing a lot.
After entering the required information, run the “tftpdnld” command again in the common directory. You will see a confirmation message listing the newly entered values. If they are correct, type “y” and press Enter.
rommon x> tftpdnld
IP_ADDRESS: 10.1.10.200
IP_SUBNET_MASK: 255.255.0.0
DEFAULT_GATEWAY: 10.1.1.1
TFTP_SERVER: 10.1.10.120
TFTP_FILE: c2600-adventerprisek9-mz.124-23.bin
A message appears that you should only use the above command for post-disaster recovery. Otherwise, all the data stored on all existing partitions of the flash drive will be erased! Do you want to continue? Press the Y key.
y / n: [n]: (Invoke this command for disaster recovery only. WARNING: all existing data in all partitions on Flash will be lost! Do you wish to continue? y / n: [n] 🙂
If everything goes well, you will see the output from Figure 3 in your console window.
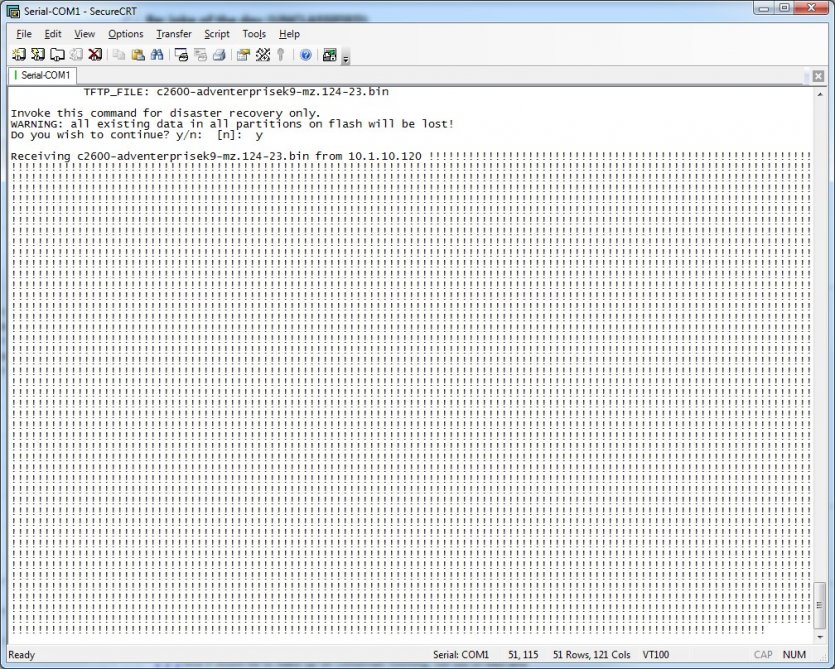
Figure 3
Next, you should see a confirmation message (indicating that the file is being copied) similar to what you saw in the TFTP server window (Figure 4). When the copy is complete (which takes only two minutes or less using this method), the following lines are displayed:
File reception completed. Copying file c2600-adventerprisek9-mz.124-23.bin to flash. Erasing Flash at 0x604c0000
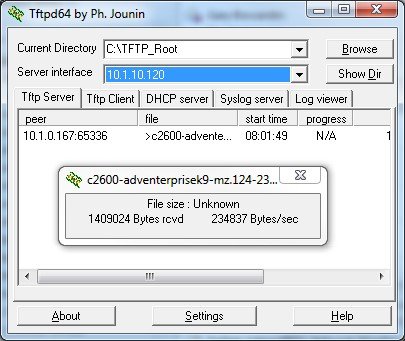
Figure 4
At this point, the flash memory is cleared automatically. Depending on the flash drive’s size, this process takes two to five minutes.
After clearing the Flash, a message is displayed.
Program flash location 0x60020000
Flash is now loaded using the iOS file. This process is time-consuming on some devices. After completing it, you will return to the standard notification.
Type the reset command to boot the device from the copied IOS file. If the IP addresses shown in this article differ from yours, you must use the correct IP address when entering the instructions.
The critical thing to remember is that the TFTP server IP address and the IP address used inside the room to identify the device must be on the same network. Set the port number and other items.
FAQ
What is the purpose of using TFTP to restore Cisco IOS?
TFTP is used to transfer the IOS image file to Cisco network equipment to recover or upgrade the operating system.
How do you restore Cisco IOS using TFTP?
Set up a TFTP server, connect the device to the network, enter ROMmon or recovery mode, and push the IOS image file to the device.
What should you check after the IOS restore?
Verify the new IOS image loads correctly, ensure proper configuration, and confirm the device boots normally.