Common Windows 11 Problems — And Simple Solutions
The Official Version Of Windows 11 Has Finally Been Released, But This Version, Like Many Early Windows Versions, Has Problems. This Guide can help You Debug And Troubleshoot Common Problems.
Microsoft has finally released the most notable version of Windows in the last ten years: Windows 11. This new version features significant changes, such as a user interface with rounded corners and transparent elements. The design of the Start menu and Taskbar is also different.
The Action Center section has been replaced by two new interfaces: Notification Center and Quick Settings.
You can also find the new version of Settings. Several new features, such as widgets, chats from Microsoft Teams, Snap layouts and Snap groups, Auto HDR, and Direct Storage, have also been added to improve the user experience.
Although Microsoft has already released the final version of Windows for debugging and bug fixes before the official release, the new version also includes several code changes that can lead to unknown issues, such as hardware and driver compatibility issues.
Because Windows 11 requires a complete reinstallation, computers face problems, many of which are not caused by the operating System. Instead, the upgrade process may cause issues with drivers, incompatible programs, device drivers, custom settings, or hardware.
In this Windows 11 Guide, we will share some errors that occur after installing Windows 11 and their solutions.
Solve familiar Windows 11 problems.
You usually encounter two types of problems in Windows 11. During or after the upgrade, you may experience issues with storage, capabilities, activation, and updates not directly related to the new operating System.
Some problems are directly related to the new version. For example, installing Windows may be due to a compatibility issue with a particular program or hardware. These problems may be related to drivers and security software, such as antivirus software.
Since Windows 11 is based on Windows 10, you will encounter similar installation problems. This Guide covers common problems with upgrading to Windows 11 and troubleshooting steps during and after installation, which are as follows:
- How to troubleshoot system prerequisites in Windows 11
- How to troubleshoot Windows Update in Windows 11
- How to fix USB flash drive problems when installing Windows 11
- How to fix setup problems in Windows 11 installation
- Installation Assistant troubleshooting method in Windows 11 installation
- How to fix error code 0xC1900101 in the upgrade to Windows 11
- How to fix error code 0x80070070 in an upgrade to Windows 11
- How to fix error code 0x80070002 0x20009 and an upgrade to Windows 11
- How to fix error code 0xC19900107 in the upgrade to Windows 11
- How to fix error code 0x800F0923 in Windows 11 installation
- How to solve the black screen problem in Windows 11
- How to fix the mistake of completing the installation of Windows 11
- How to fix Ethernet adapter and WiFi problems in Windows 11
- How to solve the problem of VirtualBox not working in Windows 11
- How to solve Intel Killer networking problems in Windows 11
- How to solve the problem of the Coc Coc browser not working in Windows 11
- How to fix error 0x8007007F Installation Assistant in Windows 11
- Tips to minimize installation problems in Windows 11
How to troubleshoot system prerequisites in Windows 11
One of the most significant problems with the new version of Windows is the prerequisites for the new System. Many users are confused because these prerequisites differ significantly from the previous version, and it is unclear which devices are compatible.
Official Windows 11 Prerequisites
The following list shows the minimum installation requirements for Windows 11:
- Processor: A single GHz processor or a System on a Chip (SoC)
- RAM: 4 GB
- Storage memory: 64 GB
- System firmware: UEFI with Secure Boot enabled
- Graphics: Compatible with DirectX 12 or higher with WDDM 2.0 driver
- TPM: Version 2.0
- Screen quality: High-quality (720p), more than 9 inches in diameter, eight bits per color channel.
Check the hardware for running Windows 11
Follow these steps to verify the basic hardware requirements in Windows 10:
1. Open Settings.
2. Click System.
3. Click About.
4. Check CPU type, RAM, and system type.
Note: RAM must be more than 4 GB, and the processor must be of the eighth generation of Intel or newer, or AMD Zen 2 and above. Also, the system type should be 64-bit because Windows will no longer be released as 32-bit.
5. Click on Storage.
6. Check that the hard drive is more significant than 64 GB.

You can check the device’s hardware specifications on the manufacturer’s support website. After reviewing the hardware specifications, ensure that TPM version 2 is enabled. The new version of Windows also requires Secure Boot. You can also run a PC health check to ensure Windows 11 is installed on your computer. This tool can tell you which parts are compatible and which are incompatible.
How to troubleshoot Windows Update in Windows 11
Windows Update is recommended for downloading and installing Windows 11, but sometimes, errors may prevent updates.
Fix PC error does not currently meet system requirements
If you get a message like this: “This PC does not currently meet Windows 11 system requirements,” it means that one or more of the required components are missing, and you cannot continue the installation until the problem is resolved.
Usually, in the setup section, you will see descriptions of problems that prevent upgrades. For example, you have the following reasons:
- The system disk must be 64 GB or larger, and the required system partition must be 64 GB or larger. You need to upgrade your hard drive if your device has limited capacity.
- PC must support TPM 2.0. If your device is new, it probably supports this feature, but it may be turned off, or you may be using version 1.2, or the computer may not have a security module.
In addition to the above reasons, Windows 11 Stop may also be caused by Secure Boot issues. If you have a device with UEFI and TPM 2.0, you must also have Secure Boot capability.
Fixes disk space prerequisites
To check the storage space in Windows 10, follow these steps:
1. Open Settings.
2. Click on Storage.
3. Under the Storage section, check the amount of memory on the drive.
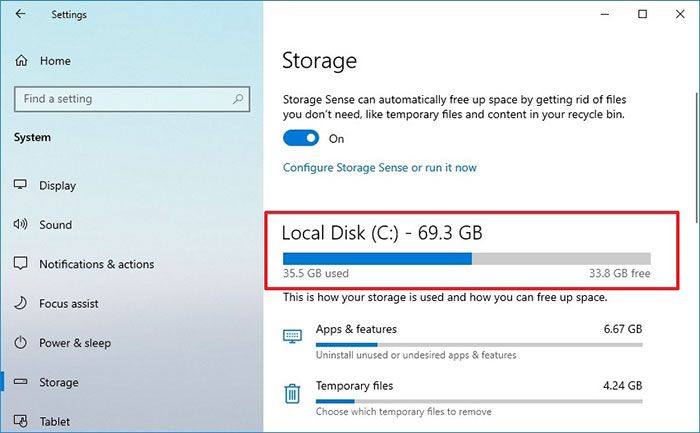
You must upgrade your storage memory if your drive is under 64 GB. Here, the System refers to the maximum capacity, not the free memory available.
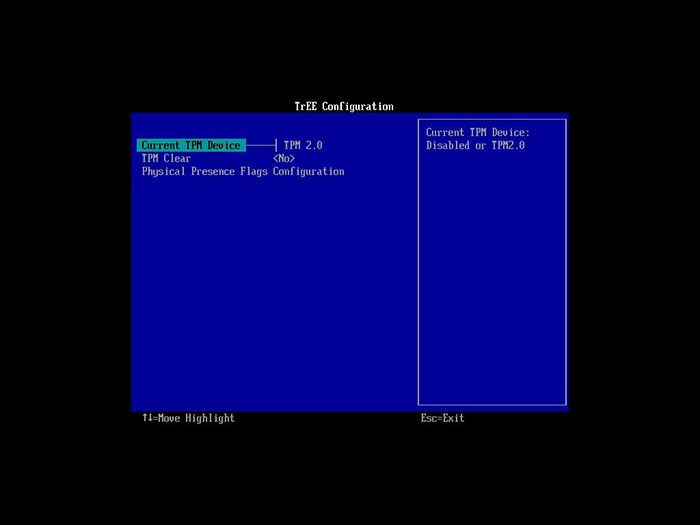
Fixes TPM 2.0 prerequisites
To check and activate the TPM 2.0 module in Windows 10, follow these steps:
Warning: Improperly changing settings can prevent the computer from starting up. Only change the motherboard settings when necessary.
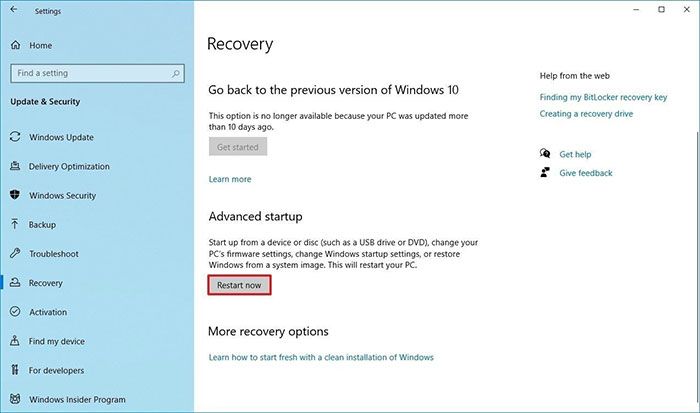
1. Open Settings.
2. Click Update & Security.
3. Click Recovery.
4. Under the Advanced Startup section, click the Restart Now button.
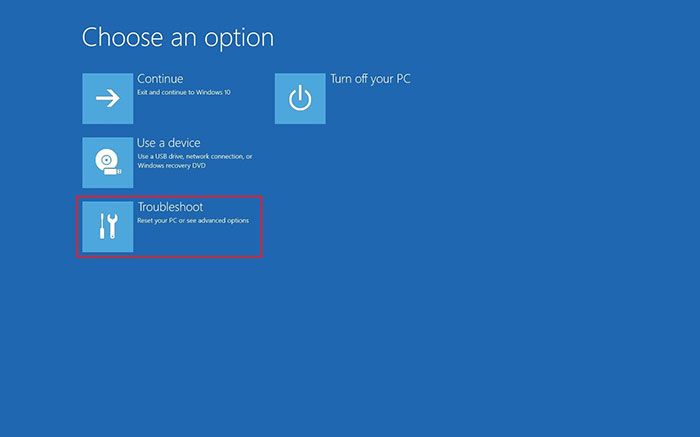
5. Click on Troubleshoot.
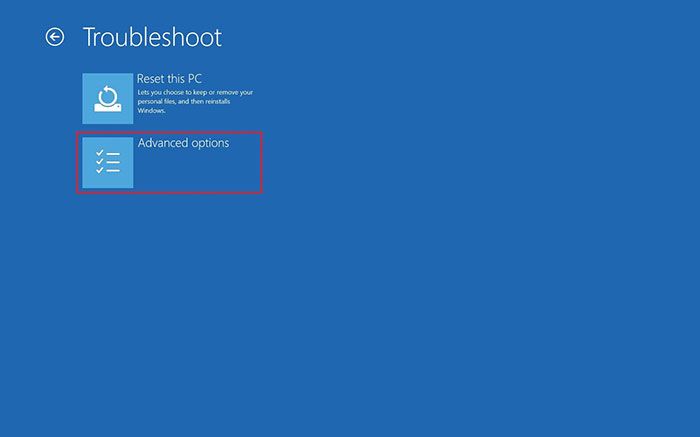
6. Click Advanced Options.
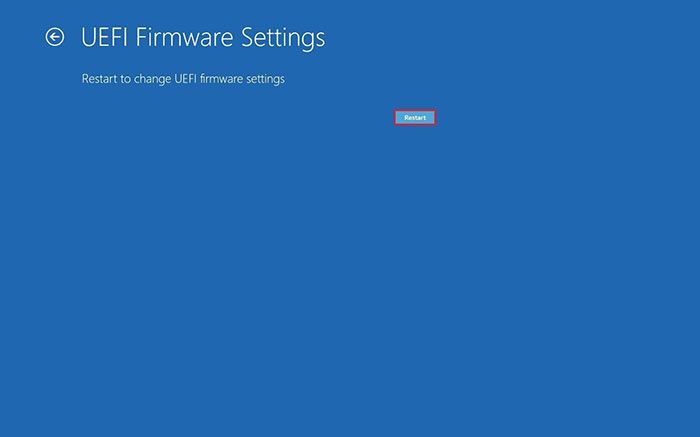
7. Click on the UEFI Firmware settings option.

Note: This option will not be available if you have a legacy BIOS.
8. Click the Restart button.
9. Open the security settings page.
Note: UEFI settings vary by manufacturer and computer model. As a result, you should check the manufacturer’s support website for details on security settings.
10. Select the Trusted Platform Module (TPM) option and press Enter.
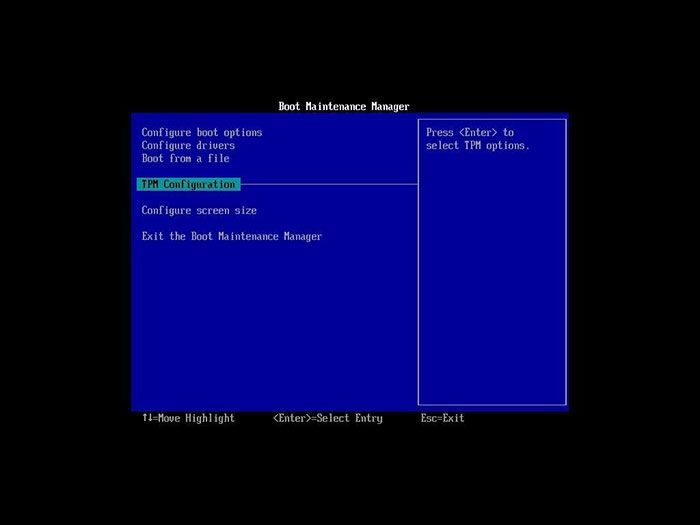
11. Select the Enabled option and press the Enter key.
12. Exit UEFI settings.
13. Confirm the changes and restart the computer.
After completing the above steps, the security module allows you to configure and use features such as BitLocker or compatibility check to install Windows 11.
Solve Secure Boot Prerequisites
Follow the steps below to enable Secure Boot on your computer:
1. Open Settings.
2. Click Update & Security.
3. Click Recovery.
4. Under the Advanced Startup section, click the Restart Now Button.

5. Click on Troubleshoot.

6. Click on Advanced options.

7. Click on the UEFI Firmware settings option.
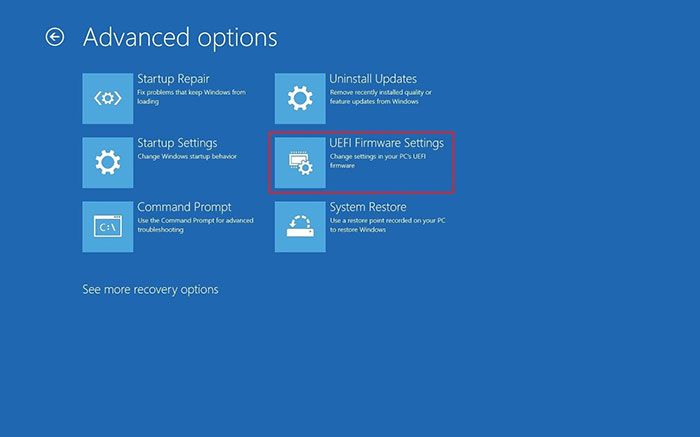
Note: This option will not be available if you have legacy BIOS.
8. Click the Restart button.

9. Open the boot or security settings page.
Note: UEFI settings vary by manufacturer or computer model. For more details on standard settings, visit the manufacturer’s support website.
10. Select the Secure Boot option and press the Enter key.
11. Select the Enabled option and press the Enter key.

12. Exit UEFI settings.
13. Confirm the changes to restart the computer.
After completing the above steps, the security module will be activated, and the computer will comply with Windows 11.
Fix unexpected errors using Windows Update.
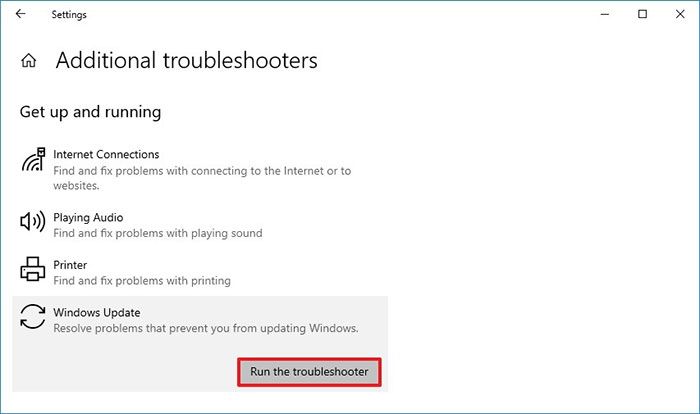
In addition to system prerequisites, you may encounter Windows Update issues, but you can use the built-in debugger to resolve common problems. Follow the steps below to troubleshoot Windows Update issues when downloading Windows 11.
1. Open Settings.
2. Click Update and Security.
3. Click on Troubleshoot.
4. Click on Additional troubleshooters.
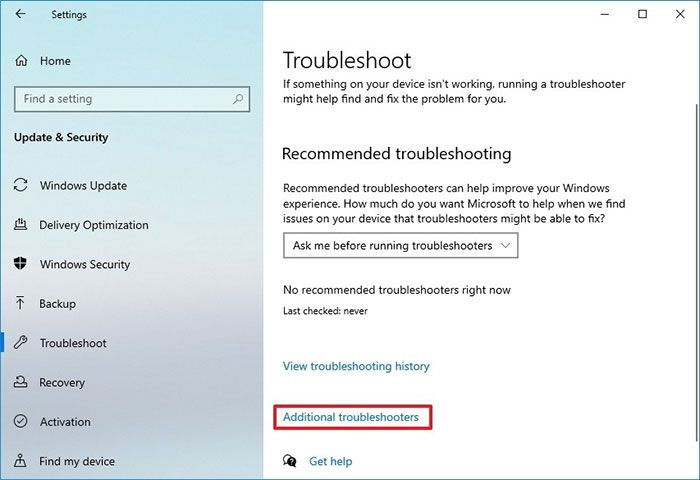
5. Select the Windows Update option under the Getting Up and Running section.
6. Click the Run the troubleshooter button.
7. Click Apply this fix.
Note: Disabling the Apply this fix option does not mean that the problem has not been resolved. This tool fixes some issues; if an error persists, the Apply this fix option will appear.
8. Continue according to the directions on the screen.
9. Click the Close Button.
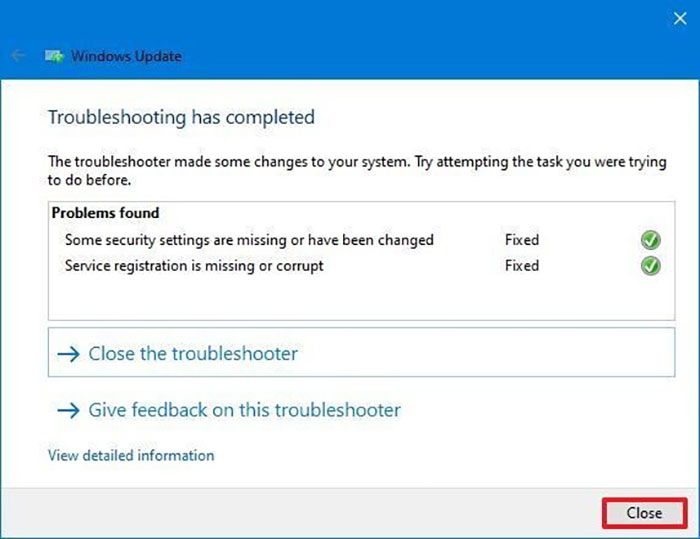
10. Restart the computer.
After completing the above steps, the Windows Update settings will run to install Windows 11. Receiving error 0xc1900223 means a problem downloading the new version, and you do not need to do anything. The System will start downloading again at another time.
Fix 0x80073712 error using Windows Update.
When upgrading to Windows 11, you may encounter the error message 0x80073712. This message means that one or more files are missing or damaged.
Using the Deployment Servicing and Management tool or DISM, you can solve this problem and recover system files in good condition. To use DISM to fix Windows Update, follow these steps:
1. Open Start.
2. Search for Command Prompt (CMD), right-click on the first result, and select Run as administrator.
3. Type the following command and press Enter.
dism / Online / Cleanup-image / Restorehealth
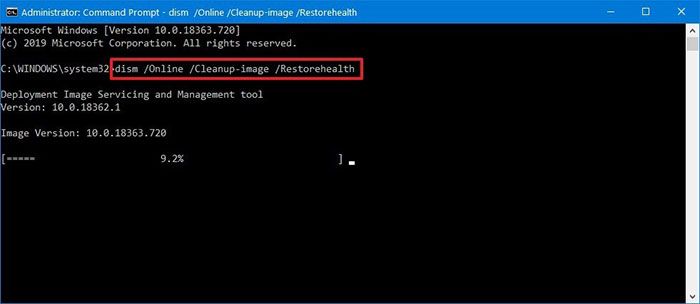
After completing these steps, the necessary files will be repaired, and Windows Update will begin downloading and installing the first Windows 10 semiannual update.
Fix 0x800F0922 error in upgrade with Windows Update
If you use Windows Update to upgrade your device, you may encounter error 0x800F0922. This error means the computer cannot access the update servers or the system partition lacks memory.
Disconnect the VPN session
When upgrading to Windows 11, you usually see error 0800F00922 when the VPN connection is enabled. Follow the steps below to end the VPN session:
1. Click the network icon in the Taskbar.
2. Select the VPN connection.
3. Click the Disconnect button.
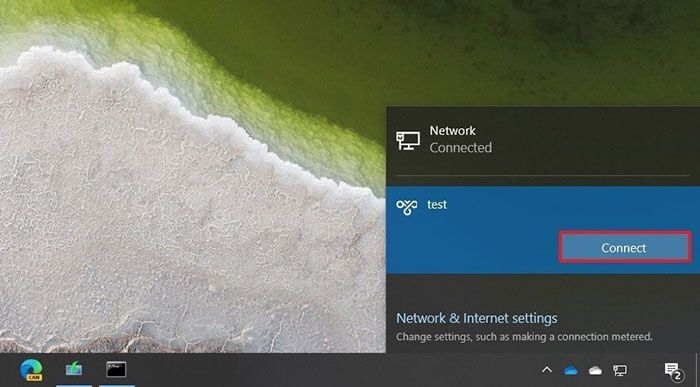
If you use another VPN client software, check the documentation for instructions on disconnection.
Set up a System Reserved Partition
Third-party security software (antivirus) can store data in the System Reserved partition, preventing Windows 11 from being installed.
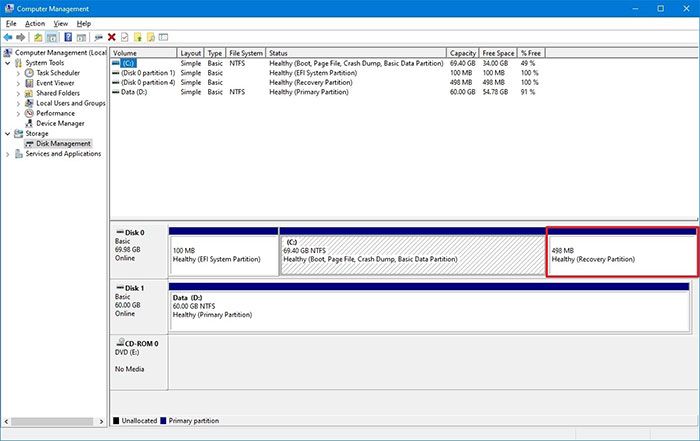
You can solve this problem using third-party tools and set the partition size to equal or greater than 500 MB. This process solves the problem, but you can run a new installation that solves other problems and improves system performance.
How to fix USB flash drive problems in Windows 11 installation
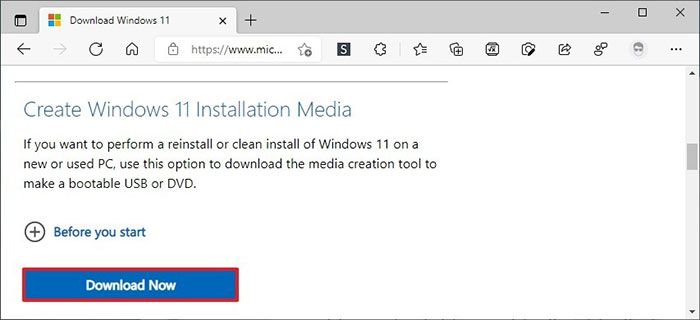
If you started installing Windows 11 with a bootable USB drive and the installation stopped, one or more files may not be available or damaged. A quick fix to this problem is to build a new USB flash drive. Follow these steps to make a new USB flash drive:
1. Open the Windows 11 download page.
2. Under the Create Windows 11 Installation Media section, click the Download Now Button to save the file to the device.
3. Click the MediaCreationToolW11.exe file to launch the tool.
4. Click the Accept button to accept the terms.
5. Disable the Use of the recommended options for this PC option (optional).
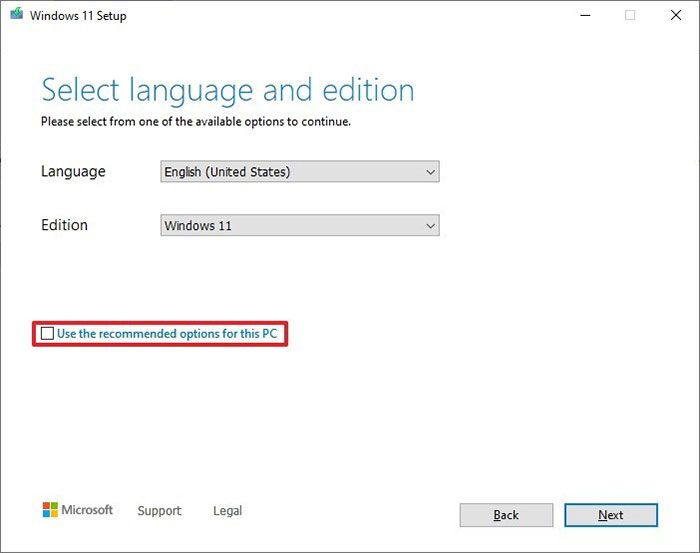
6. Select the correct language and version of Windows 11.
7. Click the Next Button.
8. Select the USB flash drive option.
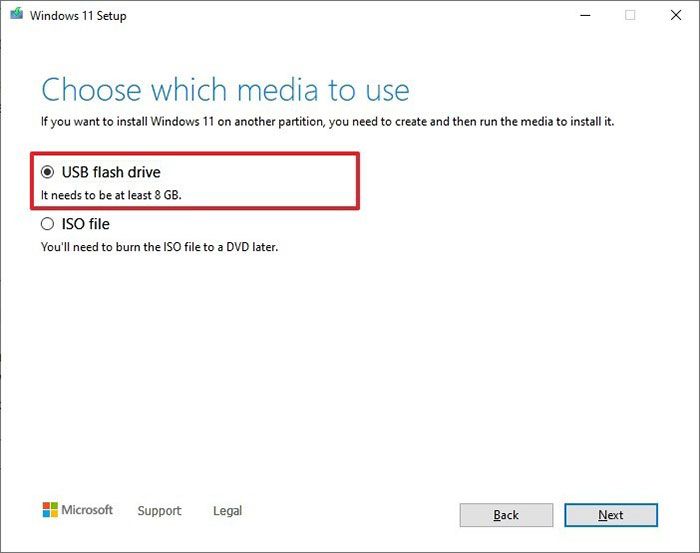
9. Click the Next Button.
10. Select the USB flash drive.
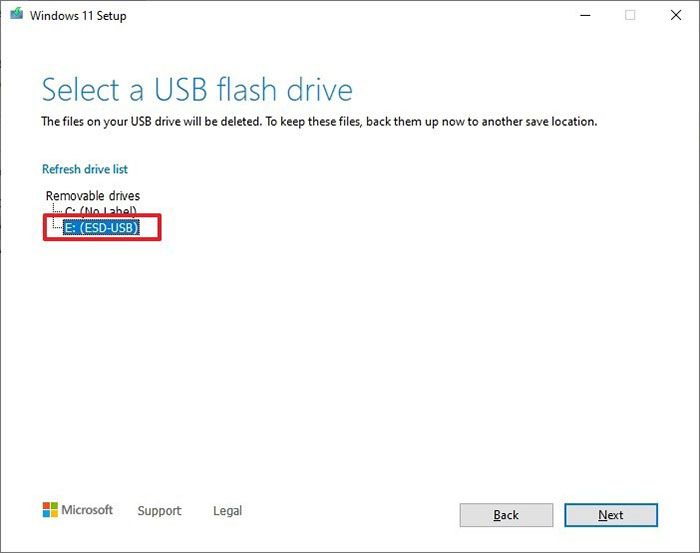
Note: If the device is not on this list, click Refresh drive list.
11. Click the Next Button.
12. Click the Finish button.
After completing the steps, the Media Creation tool creates a new stopwatch to install Windows 11.
How to solve stop problems in Windows 11 installation
Using existing installation tools may cause Windows 11 to stop unexpectedly with error code 0x8007042B 0x4000D or 0x800700B7 0x2000A, indicating an incompatible process. To solve the problem, you can find the incompatible processing and restart the stop. Finally, restart the installation or install the problematic app with a clean boot.
End the process in Task Manager.
Follow these steps to end a process or application in Task Manager:
1. Open Start.
2. Search for Task Manager and click on the first result to open the application.
3. Click the More Details button.
4. Select an application or process.
5. Click the End Task button.
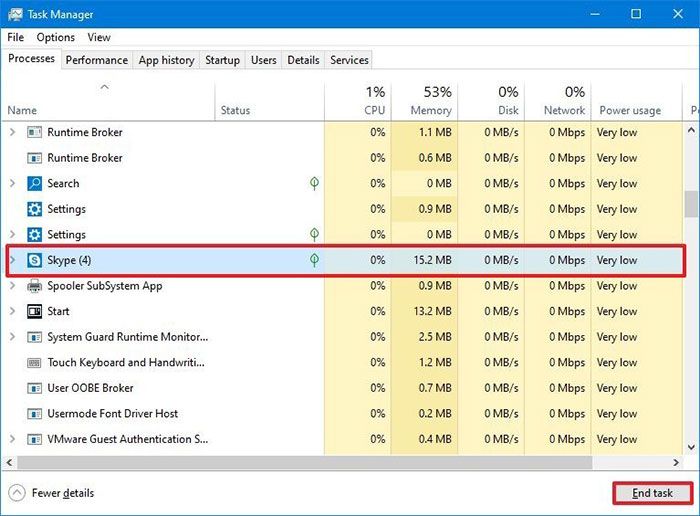
6. Repeat steps 3 and 4 to end the remaining applications.
After completing the steps, restart the stop and continue installing Windows 11.
Remove the Windows application
To uninstall an application in Windows 10, follow these steps:
1. Open Settings.
2. Click Apps.
3. Click on Apps & features.
4. Select the application.
5. Click the Uninstall button.

6. Click the Uninstall button again.
7. Continue working according to the directions on the screen.
After completing the above steps, the upgrade process is completed successfully.
How to solve Installation Assistant problems when installing Windows 11
Installation Assistant is an on-site upgrade tool, but it can sometimes cause problems in the upgrade process.
Installation Assistant problems are often network-related, and you can solve these problems by following these tips:
- Close the tool and disconnect the network cable or device using the network icon on the Taskbar. Wait a full minute, reconnect the computer to the Network, and restart Installation Assistant.
- Restart the device, reopen the Installation Assistant, and continue the stop.
If the problem persists, download the Windows 11 ISO file, double-click it to open it in File Explorer, and manually run the Windows 11 upgrade.
How to resolve error 0xC1900101 and an upgrade to Windows 11
Error codes starting with 0xC1900101 or 0x80090011 indicate several problems during the Windows 11 upgrade process. The following errors are common examples of error 0xc1900101 that may occur when upgrading to Windows 11:
- 0xC1900101 – 0x2000c
- 0xC1900101 – 0x20017
- 0xC1900101 – 0x30017
- 0xC1900101 – 0x30018
- 0xC1900101 – 0x3000D
- 0xC1900101 – 0x4000D
- 0xC1900101 – 0x40017
Clear memory space
Installing Windows 11 requires a few gigabytes of memory space to process the upgrade properly. If the device does not have enough memory, you may encounter error code 0xC1900101. You can solve this problem using the Storage and Apps & features settings.
Disconnect devices
If the computer is connected to peripherals such as external hard drives, printers, Bluetooth devices, USB devices, or cameras, disconnect them from the computer to reduce the risk of errors and other problems during the Windows 11 upgrade. You can reconnect these devices after the upgrade.
Remove security applications
If you encounter problems with third-party security software, you may experience error codes 0xC1900101 0x20017 and 0xC1900101 0x30017. The easiest way to solve these problems is to remove the problematic software. Follow these steps to remove security applications temporarily:
1. Open Settings.
2. Click Apps.
3. Click on Apps & features.
4. Select the security application.
5. Click the Uninstall button.

6. Click the Uninstall button again.
7. Continue with the next steps.
After completing the above steps, continue the upgrade. Once the upgrade is complete, reinstall the software.
Update device drivers
If you encounter a driver problem during installation, you may see errors starting with 0xC1900101 or 0x80090011. You should use the relevant instructions when downloading the driver update from the manufacturer’s support website. Follow the steps below to update your device drivers on your computer:
1. Open Settings.
2. Click Update & Security.
3. Click Windows Update.
4. Click View optional updates.
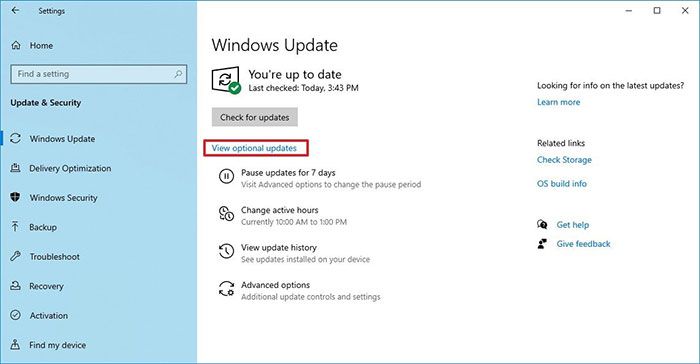
Note: This option is only available if there is a driver update via Windows Update.
5. Click on the Driver updates list to expand.
6. Select the DDriver to update.
7. Click on Download and install.
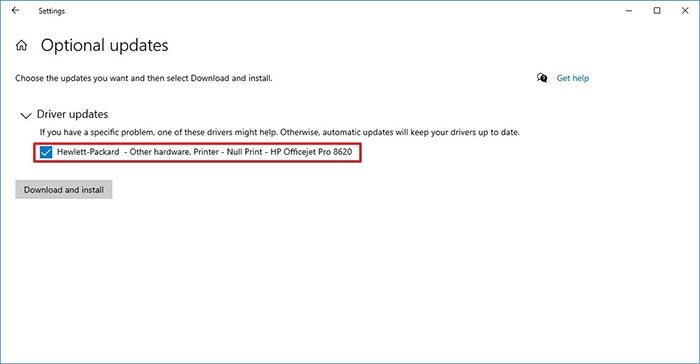
After completing the above steps, the driver update can fix the errors that prevented you from installing Windows 11.
Repair the current installation.
If you receive error 0xC1900101, the problem could be stopped. You can solve this problem using DISM command-line tools and System File Checker (SFC).
Hard Drive Repair
You can also use the CHKDSK tool to fix specific and logical physical errors on the installation drive. To use the CHKDSK tool, close all running applications, then follow these steps:
1. Open Start.
2. Search for Command Prompt. Right-click on the first result and select Run as administrator.
3. Type the following command and press Enter:
: chkdsk / FC
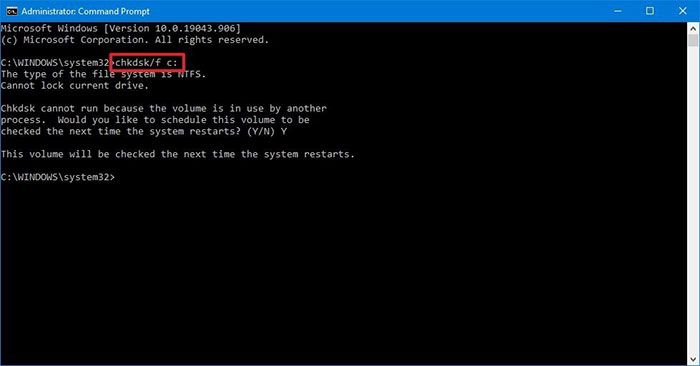
4. Type Y and press Enter to schedule a scan.
5. Restart the computer.
After rebooting the computer, the CHKDSK tool solves all drive problems.
Clean upgrade installation
If your laptop or computer continues to display error code 0xC1900101, you can run the upgrade with a bootable USB for a clean install.
How to fix error code 0x80070070 in an upgrade to Windows 11
If you see the error codes 0x80070070-0x50011, 0x80070070-0x50012, or 0x80070070-0x60000, the computer does not have enough space to process the stop. Clearing temporary files to get more space on the drive can solve this problem. Follow these steps to free up storage space and continue updating:
1. Open Settings.
2. Click System.
3. Click on Storage.
4. In the Storage section, click the Temporary files option for the System drive.
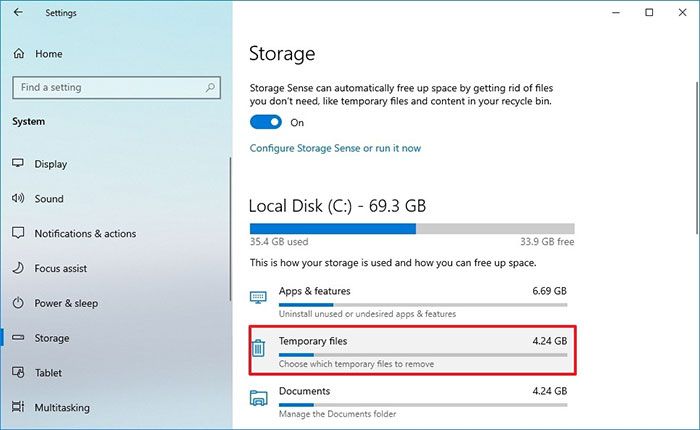
5. Find the items you want to delete.
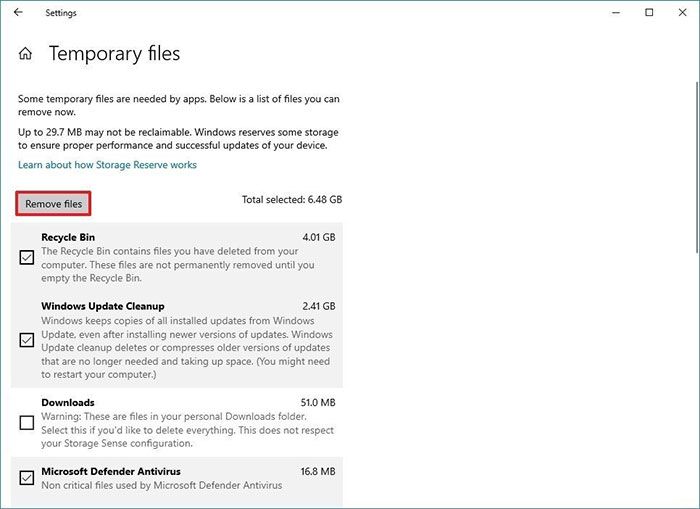
Note: When selecting items, do not select the Windows Setup temporary files or Windows ESD installation files options, as these are two upgrade files.
6. Click the Remove Button.
After completing the above steps, continue upgrading to the first version of Windows 11.
If you cannot create enough space, you can use external storage (such as a USB flash drive or external hard drive) with at least 16 GB of free space as a temporary location to stop upgrades.
How to fix error code 0x80070002 0x20009 and an upgrade to Windows 11
Error code 0x8007002 0x20009 indicates a problem stopping the installation process. You can solve this problem by disconnecting any external drive not part of the installation file, including USB flash drives (except the stop interface) and hard drives, and restarting the installation.
How to fix error code 0xC1900107, which is an upgrade to Windows 11
In rare cases, error code 0xC1900107 appears, indicating that the device is trying to upgrade, but the previous installation is still suspended. You can solve this problem by removing the last stop copy or restarting the device. Follow the steps below to remove the previous installation files:
1. Open Settings.
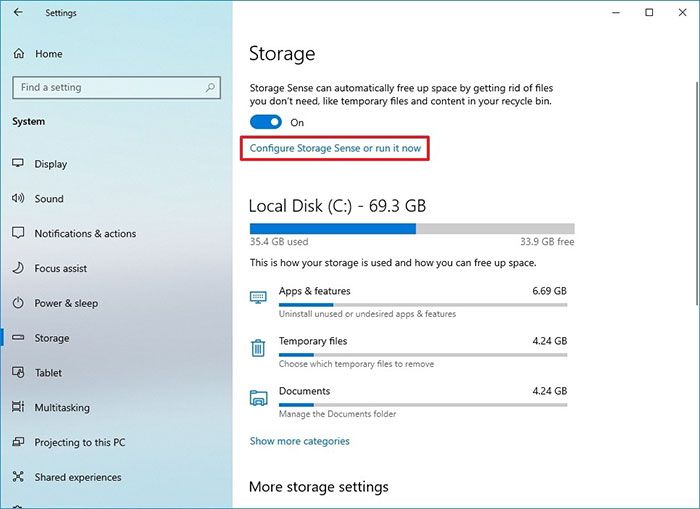
2. Click System.
3. Click on Storage.
4. Under the Storage section, click Configure Storage Sense or run in now.
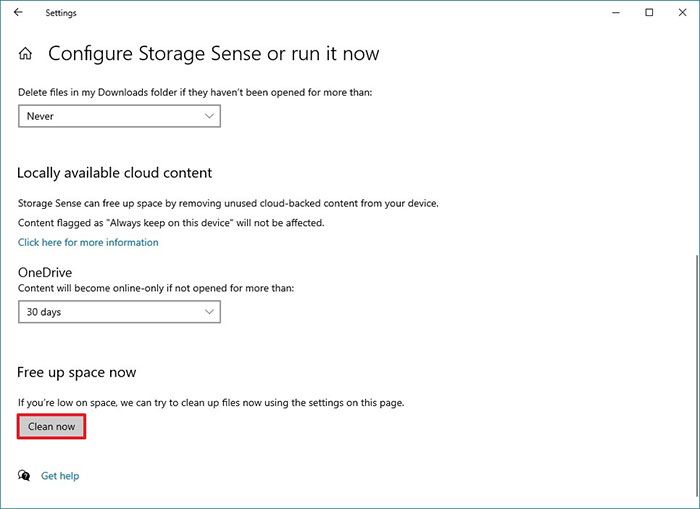
5. Under the Free up Space Now section, enable the Delete previous versions of Windows option.
6. Enable the Delete previous versions of Windows option.
7. Click the Clean Now button.
After completing the above steps, the upgrade process to Windows 11 will continue.
How to fix error code 0x800F0923 in Windows 11 installation
If your device is running Windows 10 and you want to upgrade to Windows 11, you may see error code 0x800F0923, which indicates a problem with the program or Driver. This error is usually related to the graphics driver.
Installing the latest updates from the manufacturer’s support website can help solve the problem. If you can not find a newer driver, you can use the beta version. If the Driver does not have a new update, you can uninstall it to continue installing it and reinstall it after upgrading to Windows 11.
Application versatility solution
If the problem is with the app, you have two choices: install a newer update or uninstall it before continuing. Follow these steps to uninstall apps:
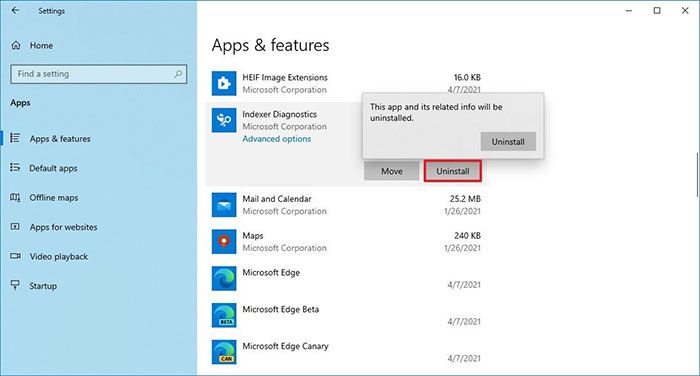
1. Open Settings.
2. Click Apps.
3. Click on Apps & features.
4. Select the incompatible application.
5. Click the Uninstall button.

6. Click the Uninstall button again.
7. Continue the installation based on the directions on the screen.
After completing the steps, continue installing Windows 11. After this process, you can reinstall the applications.
Driver versatility solution
Follow the steps below to remove the device driver:
1. Open Start.
2. Search for Device Manager and open the first result to open the application.
3. Expand the device problems directory.
4. Right-click on the desired section and select Uninstall device.
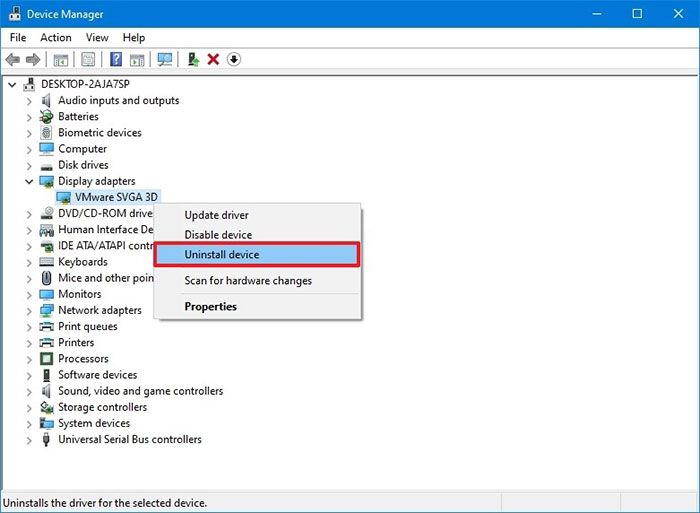
5. Click the Uninstall button again.
After completing the above steps, the DDriver will remove the installation and continue with the installation without any problems.
How to fix error code 0xC1900208 an upgrading to Windows 11
When upgrading to Windows 11, error code 0xC1900208-0x4000c indicates an incompatibility with the application. A quick fix to this problem is to remove the problematic app. Follow these steps to remove the incompatible application:
1. Open Settings.
2. Click Apps.
3. Click on Apps & features.
4. Select the incompatible application
5. Click the Uninstall button.
6. Click the Uninstall button again.
7. Follow the on-screen directions to uninstall the app.
After completing these steps, the installation of Windows 11 will continue.
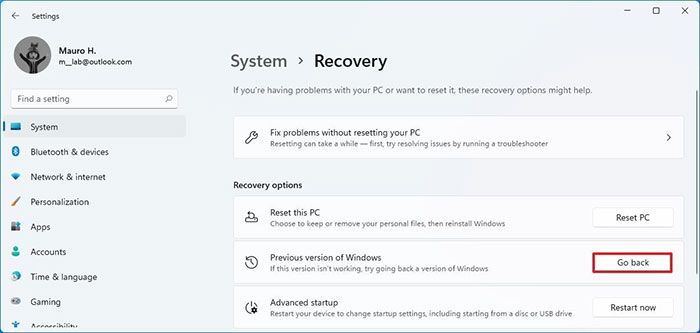
How to solve the black screen problem in Windows 11
The black screen is a common problem during and after a new installation and is often a problem with the graphics driver or the upgrade process. Finding the situation’s root in such cases is difficult, but returning to the previous version is the easiest way. Follow the steps below to remove and revert to the last version of Windows:
1. Click Settings.
2. Click System.
3. Click the Recovery page on the right.
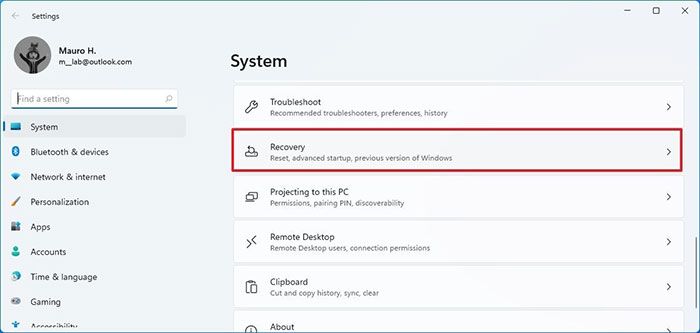
4. Click the Go Back Button Under the Recovery options in the Previous version of Windows settings.

Note: If the option is not available, you will need to perform the reinstallation process.
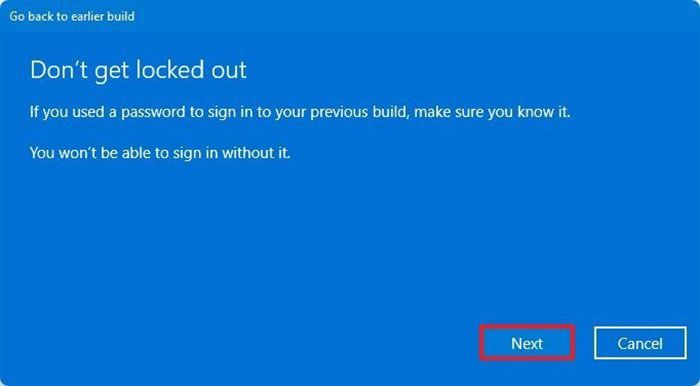
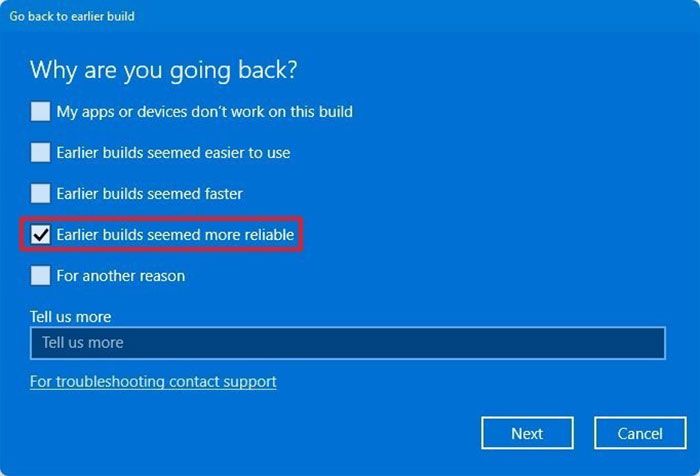
5. Choose any of the following reasons as you wish.

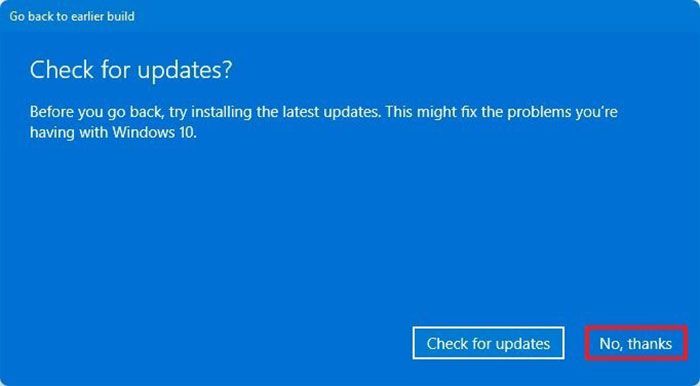
6. Click the Next Button.
7. Click the No, thanks button.

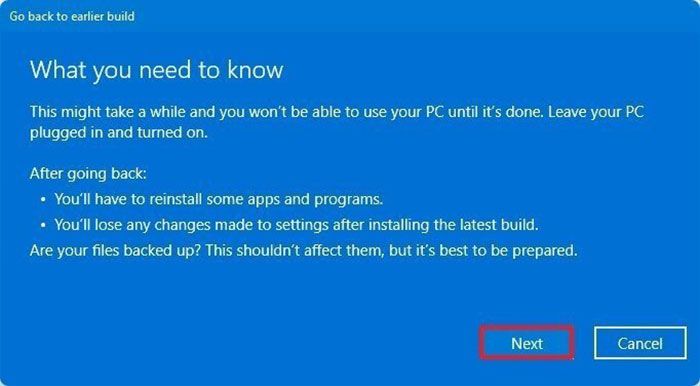
8. Click the Next Button.

9. Click the Next Button again.
10. Click the Go back to earlier build Button.
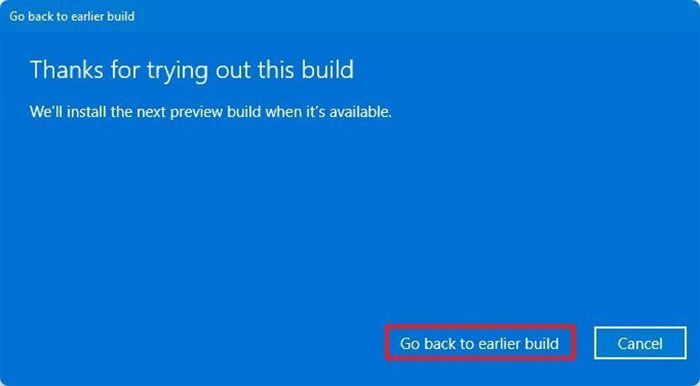
After completing these steps, you must wait for a new update that fixes the related issues.
How to fix the error of completing the installation of Windows 11
During the upgrade from Windows 10 to Windows 11, you may encounter two messages indicating that a job is wrong:
. Error: We could not complete the updates. Undoing changes. Don’t turn off your computer.
Error: Failure configuring Windows Updates. Reverting change
If you receive one of these two messages, you can specify the Windows Update configuration error code, which you can use later to find the appropriate solution.
1. Open Settings.
2. Click Update & Security.
3. Click Windows Update.
4. Click View your update history.
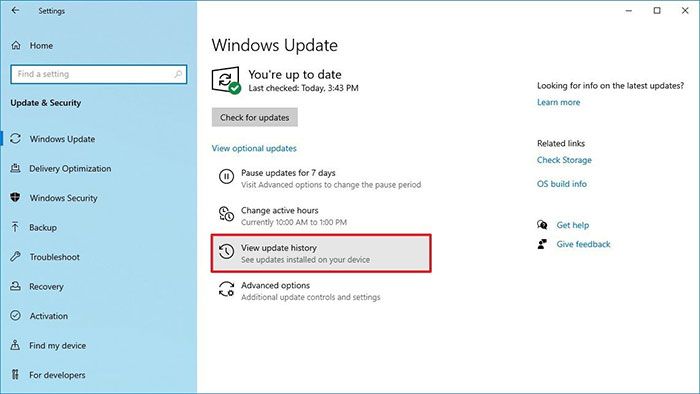
5. Check the error code next to the failed update.
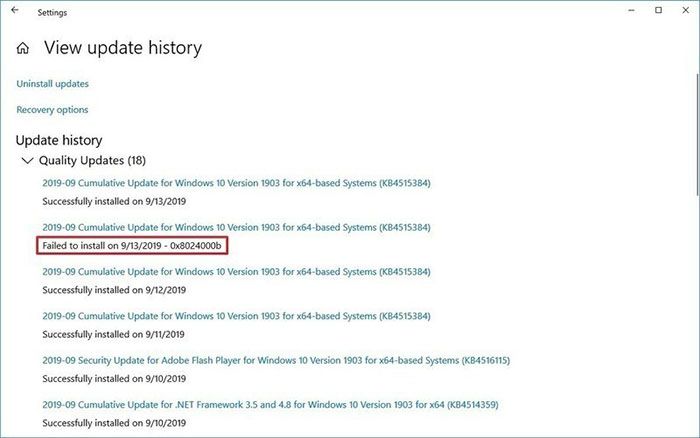
After completing these steps, use the error code to search for instructions online.
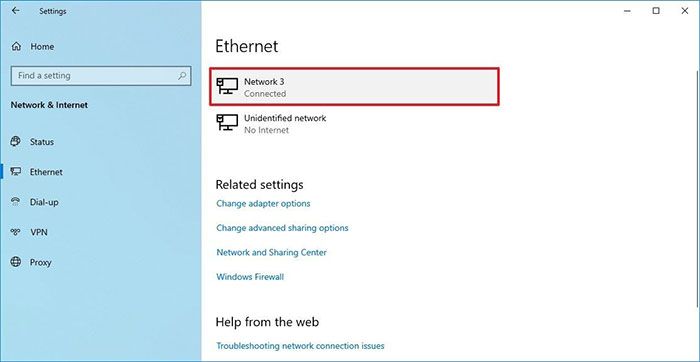
How to solve WiFi and Ethernet adapter problems in Windows 11
After upgrading to a newer version of Windows, you will usually encounter problems with WiFi and Ethernet adapters. Sometimes, the connection may not be reliable, and sometimes, it may be completely broken.
Although various factors, such as drivers, settings, wireless signals, cables, switches, routers, or Internet Service Providers (ISPs), can cause networking issues, bugs in the newer version of Windows 11 can also be problematic.
If you recently upgraded your computer, the problem may be with the DDriver or settings. You can fix it by using a network debugger or the Network reset feature.
Network troubleshooter
Follow these steps to troubleshoot your network adapter after upgrading to Windows 11:
1. Open Settings.
2. Click System.
3. Click the Troubleshoot page on the right.
4. Click Other troubleshooter settings.
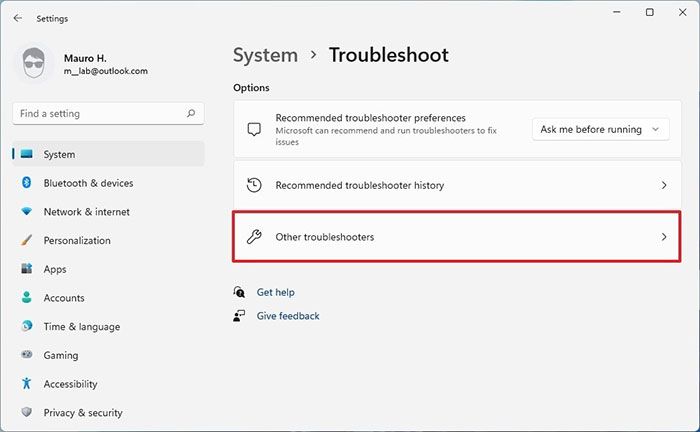
5. Under the Other section, click the Run button for Network Adapter.
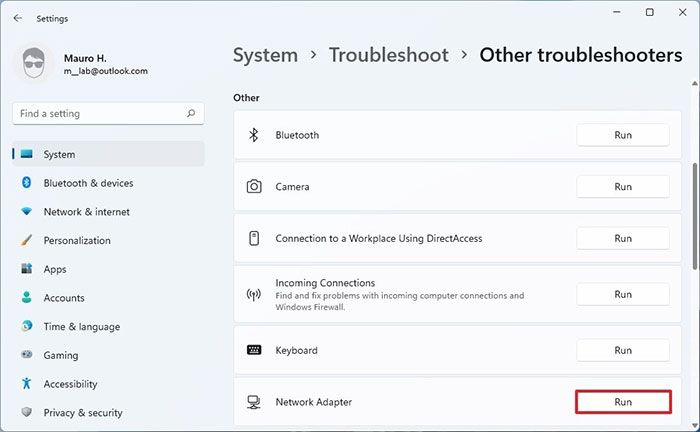
6. Follow the directions on the screen to continue the step. After completing these steps, the device will reconnect to the Network.
Network reset
To reset network adapters in Windows 11 to the default settings, follow these steps:
1. Open Settings.
2. Click Network & internet.
3. Click the Advance network settings page on the right.

4. Under the More settings section, click on Network reset settings.
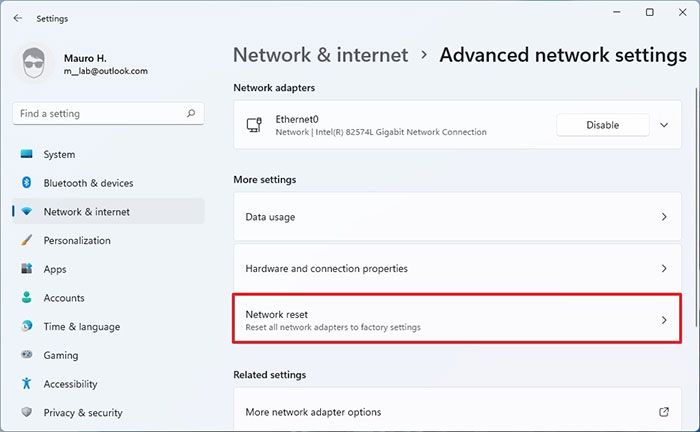
5. Click the Reset Now Button.
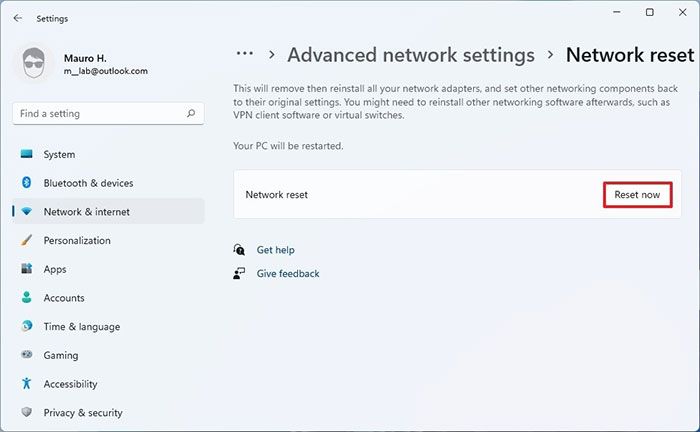
6. Click the Yes Button.
After completing the steps, Windows 11 reinstalls the adapters and restores the default settings. You must enter your password to reconnect if you use a wireless connection.
How to fix VirtualBox not working in Windows 11
If you are using Virtual Box, Virtual Machines will not boot after you upgrade to Windows 11, and you may receive an error. This error occurs due to an incompatibility issue between VirtualBox and Windows 11 and the presence of Hyper-V on the computer. Microsoft is aware of this problem and expects Oracle to update this issue this month (October).
Disable Hyper-V
If you have upgraded to Windows 11, you can resolve the issue by disabling Microsoft Hyper-V:
1. Open Start.
2. Search Turn Windows features on or off and click on the first result to open the Windows Features app.
3. Clear the Hyper-V feature.
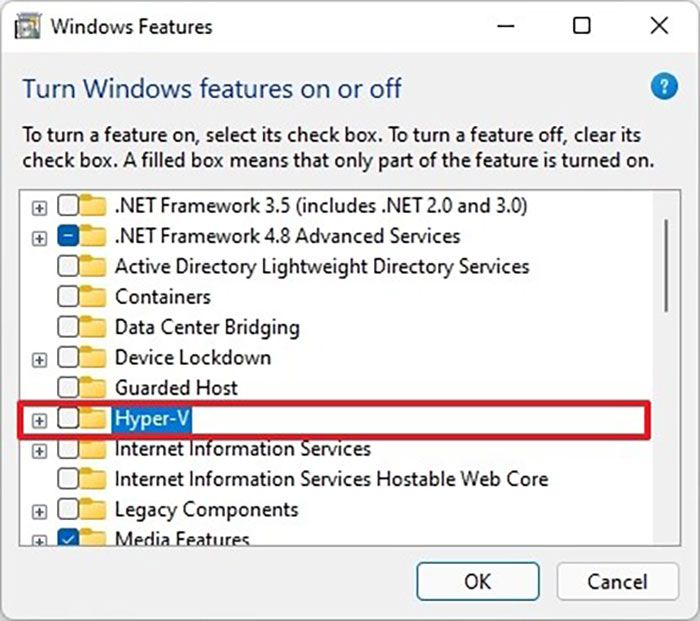
4. Click the OK Button.
5. Click the Restart Now button.
After completing these steps, you can run virtual machines in VirtualBox. If a Windows 11 upgrade is unavailable on your computer because of this issue, you can disable Hyper-V or uninstall VirtualBox and then look for a new version update.
Remove VirtualBox
Follow these steps to remove VirtualBox:
1. Open Settings.
2. Click Apps.
3. Click on Apps & features.
4. Select the Oracle VM VirtualBox item.
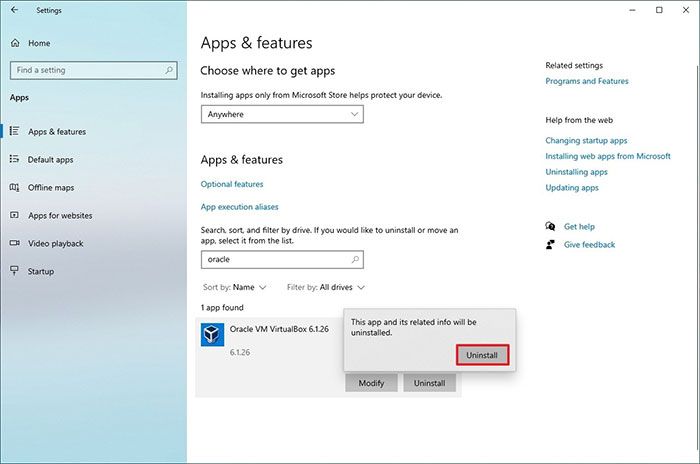
5. Click the Uninstall button.
6. Click the Uninstall button again.
7. Follow the on-screen paths to complete the installation.
After completing the above steps, you can upgrade to Windows 11.
How to solve Intel Killer networking problems on Windows 11
After upgrading to Windows 11, devices running Intel Killer Networking may, under certain conditions, experience a drop in UDP (User Datagram Protocol) packets, slowing down the loading of websites and video streams. If you’re still struggling with these issues, Microsoft will address them during the following October 12 update. If you can not wait for the update, you can return to the previous version.
To uninstall and revert to previous versions of Windows, follow these steps:
1. Open Settings.
2. Click System.
3. Click the Recovery page on the right.

4. Click the Go Back Button Under the Recovery options in the Previous version of Windows settings.
Note: If the option is not available, you will need to perform the reinstallation process.
5. Choose any of the following reasons as you wish.
6. Click the Next Button.
7. Click the No, thanks button.
8. Click the Next Button.
9. Click the Next Button again.

10. Click the Go back to earlier build Button.

After completing these steps, you must wait for a new update that fixes the related issues.
Solve the problem of the browser not working in Windows 11
Microsoft has noticed an incompatibility issue with devices installed in the Coc Coc browser. If a free upgrade to Windows 11 is offered through Windows Update and you need to use a browser, you do not need to upgrade using the Installation Assistant or Media Creation Tool unless the issue is resolved.
However, you can fix this problem by temporarily removing the browser until the end of the upgrade. Follow these steps to remove the browser:
1. Open Settings.
2. Click Apps.
3. Click on Apps & features.
4. Select the Coc Coc item.
5. Click the Uninstall button.
6. Click the Uninstall button again.
7. Continue with the installation paths until the removal is complete.
After completing these steps, you will need to upgrade to Windows 11. After solving the problem, you can reinstall the browser.
Fix 0x8007007F Installation Assistant error in Windows 11
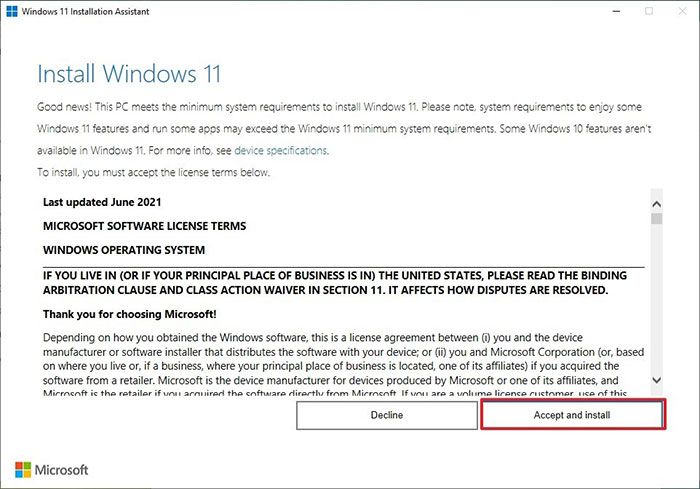
Although the recommended way to upgrade to Windows 11 is to use the Windows Update settings, this new version can be installed with the Installation Assistant, which works like the Update Assistant for Windows 10.
However, this application does not work as expected for everyone, and you may encounter a 0x8007007F error.
Microsoft does not consider error 0x8007007F a Windows 11 problem, but you can fix it by installing the Windows 11 ISO file and launching the stop process from File Explorer. Follow the steps below to download the Windows 11 ISO file directly from the Microsoft Support Website:
1. Open the Windows 11 download page.
2. Under the Download Windows 11 Disk Image (ISO) section, select the Windows 11 option.
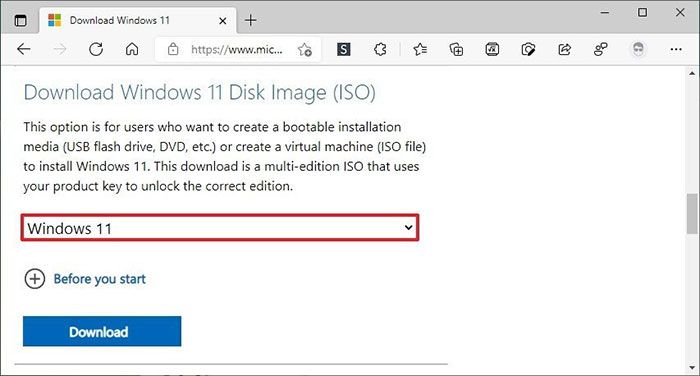
3. Click the Download button.
4. Select the ISO language.
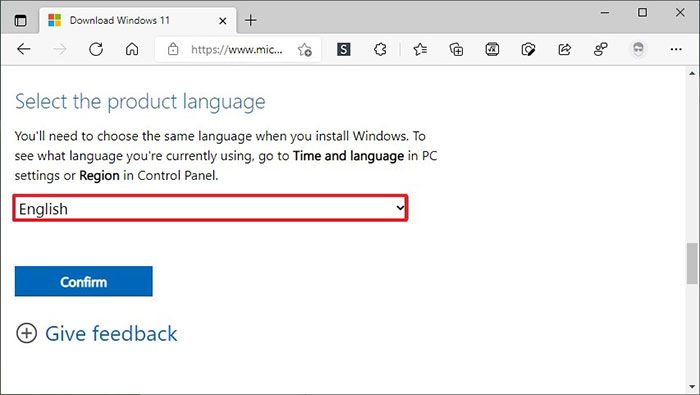
5. Click the Confirm button.
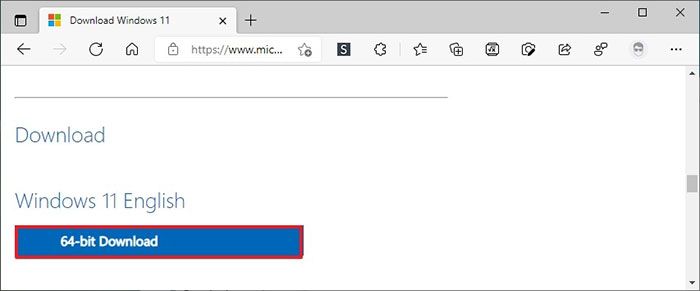
6. Click the 64-bit Download button.
7. Click on the ISO file to open it in File Explorer.
8. Double-click Setup.exe to launch the installer.
After completing the above steps, upgrade the device to Windows 11.
Tips to minimize the problem of installing Windows 11
Microsoft has always tried to provide a reasonable upgrade experience for its users. The upgrade to Windows 11 is expected to go smoothly and without any problems; however, you may encounter problems during and after installation. In this case, you can minimize the possibility of these problems and restore the upgrade process without destroying the files in the event of an error.
Create a temporary backup.
A full backup may be the best recovery strategy in case of an installation problem. It is also a great way to protect files.
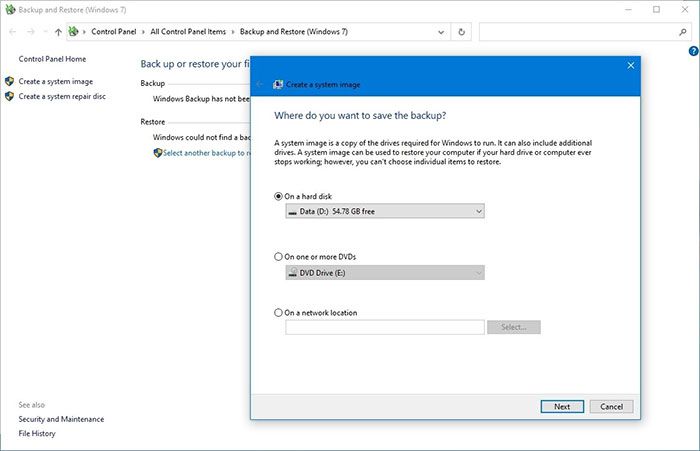
If you use specific backup software, use it to make a backup copy of the upgrade. Otherwise, you can always make a temporary backup using the imaging tool available in Windows 10. In addition, it is recommended that you back up the file to an external or cloud drive using OneDrive.
Disable metered connection
A metered connection prevents Windows Update from downloading Windows 11 files. If you want to upgrade via Windows Update, ensure the connection is not metered. If you have an Internet connection, connect to another network or turn off the metered connection to upgrade to Windows 11. Follow the steps below to turn off the metered connection in Windows 10:
1. Open Settings.
2. Click Network & Security.
3. Click on WiFi or Ethernet.
4. Select the active network connection.
5. Disabling the ” Set as a Metered Connection option under the Metered Connection section.

After completing the above steps, Windows Update can download Windows 11 files to the PC connections.
Remove unnecessary applications
Applications not designed for Windows 10 or Windows 11 can cause compatibility issues. You can always prevent these problems by removing troublesome apps before installation. These applications are usually older. Follow these steps to remove these apps:
1. Open Settings.
2. Click Apps.
3. Click Apps & Features.
4. Select the desired application and click the Uninstall button.

5. Click the Uninstall button again.
6. Follow the on-screen directions.
After completing these steps, follow the instructions to remove the remaining applications. If you use antivirus or third-party firewalls, check the software backup website for details on deactivating or uninstalling the program. After installation, you can reinstall the applications.
Disconnect unnecessary peripherals
Unnecessary devices (USB flash drives, hard drives, peripheral hard drives, printers, scanners, security devices, and Bluetooth) can cause installation errors. If you have peripherals connected to a computer, disconnect them.
You need only a monitor, keyboard, mouse, and internet connection. After installation, you can reconnect the peripherals to the computer.
Start again with a clean install.
If you are tired of the debugging steps, use the same Windows 10 and wait a little longer. If you can not wait, you can resume a clean installation of Windows 11. A clean installation will help solve the problems mentioned above. On the other hand, an upgrade means modifying the previous version, which can be problematic.
A clean facility is a straightforward process, and it only takes more time to create a USB flash drive and reset the System after installation.
FAQ
What kind of update problems occur?
Updates can fail if disk space is low, update files are corrupted, or hardware drivers are incompatible — freeing space or installing correct drivers often fixes this.
Why does File Explorer or Start menu sometimes crash or freeze?
Conflicts with system files, third-party extensions or outdated drivers — restarting File Explorer, updating drivers, or reinstalling conflicting software can help.
What causes slow performance, Wi-Fi issues or printer malfunctions?
Outdated or incompatible drivers (network, graphics, printer), corrupted print-spooler service, or system conflicts — updating drivers, rebooting services, or reinstalling device support can solve the problem.