Activation of iPhone Internet roaming
Activation of iPhone Internet roaming
One of the challenges you may face when traveling to foreign countries is talking to your friends and acquaintances from that country with the SIM card of the country of origin. This is because your SIM card operators operate in the same country as your country of origin, and do not cover geographical areas outside that country. Fortunately, there is a solution to this challenge. You can make phone calls in the country you have traveled to by activating the roaming of your mobile phone with the same SIM card of the country of origin. In the rest of this article, we will talk about activating iPhone internet roaming.
Activating mobile roaming and using roaming data internet
By activating the roaming of your SIM cards, in addition to activating and having conversations and sending SMS, you can also use the Internet roaming feature. In the following, we will talk about the activation of Internet roaming in iPhone phones.
Activating iPhone Internet roaming is different from activating roaming on an Android device, and that’s why we want to talk about where iPhone roaming is and how to activate iPhone roaming? In the following, we will give examples about the activation of iPhone 12 roaming and iPhone 13 roaming.
How to activate iPhone internet roaming: Where is iPhone roaming?
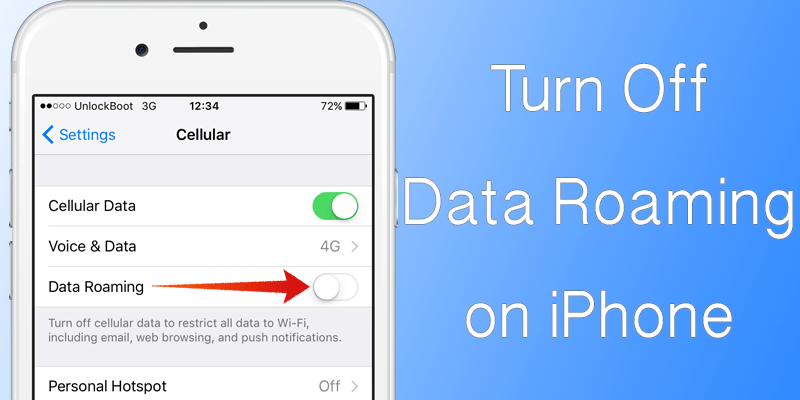
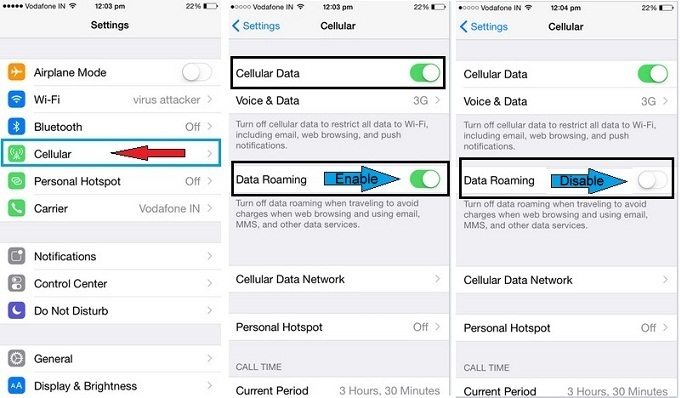
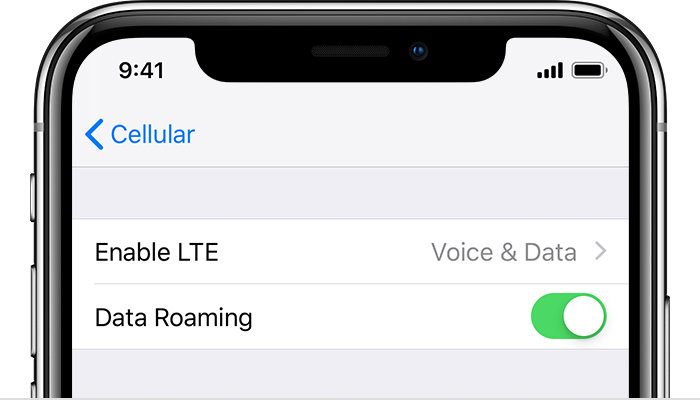
To know where iPhone roaming is, you must first enter the settings section of your iPhone. In the settings section of your phone, you must select the Cellular or Cellular Data option, and after entering this section, you must select the Data roaming option. In this way, the roaming of your iPhone will be activated.
How to activate iPhone roaming: How to activate iPhone Internet roaming?
After you have activated the roaming feature of your iPhone, you must enter the Carrier menu in the same settings section. In this section, you should select Network Selection and enter it. There, you need to disable the Automatic option. When you disable this option, several internet networks will be displayed for you to choose from.
Steps to activate iPhone internet roaming: What is Data roaming on iPhone?
Now that you have specified the Internet network in the roaming section of the iPhone, we want to see what the data roaming location is in the iPhone. For this, you need to go to the settings section of your iPhone again. In the settings section, you must enter the Cellular menu. There, you must first activate the Cellular data option and then the Data roaming option. In this way, you can activate the internet roaming of your iPhone from the roaming section of your iPhone.
How to activate iPhone roaming: How to activate iPhone 12 roaming?
We generally talked about how to activate iPhone roaming. Of course, it should be noted that the activation of iPhone Internet roaming can be slightly different in its different versions. Here we will explain how to activate iPhone roaming for version 12.
How to activate iPhone 12 roaming: enter the roaming section and activate the roaming option
Above all, before using the iPhone 12 data internet, you must activate its roaming feature. Activating Internet roaming on iPhone 12 is generally similar to the process that is done on most iPhone phones. For this, you must enter the settings section of the iPhone and select the Cellular menu there, then click on the Cellular Data Options option and then activate the Data roaming option. In this way, you can activate iPhone 12 roaming.
How to activate internet roaming on iPhone 12: activate internet data roaming on iPhone 12
For this, you must first enter the settings menu on the iPhone 12. There you must select the Mobile Data option. In the Mobile Data menu, you must click on Mobile Data Options. This section, you must activate the Data Roaming option. In this way, you have been able to activate the roaming feature on your iPhone 12.
How to activate iPhone roaming: How to close iPhone 12 roaming?
After you have activated the iPhone 12 data internet feature, you can enter the Mobile Data Options section and disable the Data Roaming option. In this way, you can close iPhone 12 roaming.
How to activate iPhone 13 roaming
First of all, to activate iPhone 13 internet roaming, you must follow the same steps as we explained about activating roaming so that you can use iPhone 13 internet roaming. After you have activated the roaming on the iPhone 13, to activate the roaming feature of the iPhone 13, you must first go to the settings section of your iPhone 13. Then, there you must enter the Mobile Data menu. Then, in this menu, you should select Mobile Data Options. Here, you have to activate the Data Roaming option to be able to use the iPhone 13 internet roaming.
Turn off roaming on iPhone 13
To turn off roaming on the iPhone 13 and not use roaming internet data, you must go to the same Mobile Data section and then go to the Mobile Data Options section. Then, to close iPhone 13 roaming, you must disable the Data Roaming option. In this way, roaming will be turned off on your iPhone 13 and you will no longer be able to use the Internet roaming on your iPhone 13.
Also Read This
How to save iPhone images in JPG format
Freeing up the internal storage space of smartphones is an important concern for many people. Some mobile phones have a lot of storage space and users can use them well. Some smartphones have also provided other methods to optimize the internal storage space. For example, Apple has made it possible to save images in JPG format to save images in HEIC format in its eleventh version of iOS software for iPhone and iPad systems. In the rest of this article, stay with 9ded to learn how to save photos in JPG format on iPhone.
Save photos in JPG format on iPhone: HEIC format photos are not suitable for viewing on a computer
The HEIC format is different from the JPG format, which is the main format of photos, and is useful for optimizing the internal storage space of mobile phones. However, if an iPhone or iPad user wants to transfer the photos he took with his device to another device such as a computer, he cannot see these images on those devices.
Why?
Because the HEIC format is not a format that can be used to view images on a laptop or computer. Therefore, it is necessary to change this format. In a separate article, we have written about different methods of reducing the size of photos, which you can also refer to.
To view iPhone images on other devices, it is necessary to first save the photo in JPG format on iPhone.
How to save iPhone images in JPG format with the phone: How to save iPhone images in JPG format
If you want the photos you took with your iPhone or iPad to have the same JPG format, you can go to your iPhone and iPad settings and change the photo format saving settings there. What should we do to change the image storage format on the iPhone?
For this, it is necessary to follow the following steps:
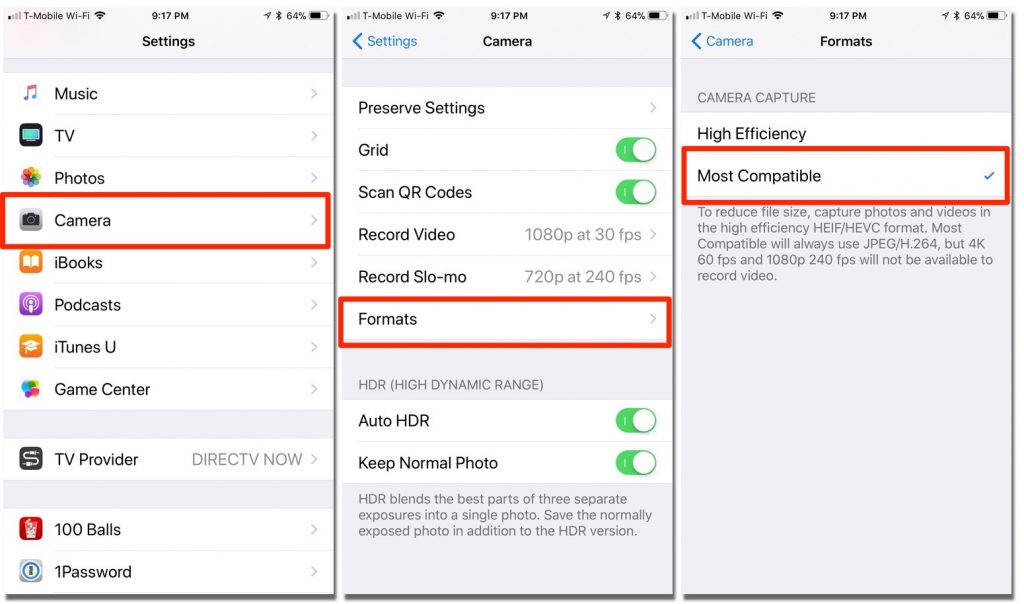
First, enter the settings section of your iPhone or iPad.
Enter the camera menu in the settings section.
After entering this menu, you can see Formats, Grid, Preserve Settings and Camera Mode options.
Among these options, you must choose the Format option.
Then, change the High Efficiency option to the Most Compatible option.
In this way, every photo you take with your iPhone or iPad will be saved in JPG format on your device.