Securing Your MikroTik Router: Practical Steps to Lock Down RouterOS
When it comes to network security, routers are among the most important components that need protection and sensitivity. Mikrotik routers, which have become one of the must-haves of organizational networks due to their power and excellent use, play the role of the gateway for network data entry and exit, and you, as a network manager, should think about implementing Mikrotik’s security enhancement solutions. Be.
Mikrotik router security depends on many factors, and it is you who must identify vulnerabilities and improve your Mikrotik security by implementing solutions such as creating new users with strong passwords, defining appropriate firewall rules, disabling unnecessary services, etc.
Although these routers are well designed in terms of security, the world of hacking and unauthorized access is progressing day by day, and if you do not keep up with these developments and do not update the security settings, the vulnerability of your Mikrotik router against Unauthorized accesses and hacker attacks will increase and this will be the beginning of a decrease in the performance and security of your network.
Although the vulnerability and loss of security of Mikrotik are very sensitive and worrying issues, we recommend that you put aside your concerns for a few moments with the wonderful solutions that we offer to improve the security of Mikrotik. Upgrade your Mikrotik router to the highest possible level to move forward with more confidence in your progress.
Each of these solutions improves different aspects of security, but if you want to have a secure and powerful foundation that will bring your Mikrotik router security close to 100% by implementing these solutions, we recommend that you go to the page Buy a Mikrotik virtual server and after checking the great plans that have been prepared for you, get a Mikrotik virtual server according to your budget and priorities.
1. Use a strong username and password
The default mode of a Mikrotik can be accessed with the username admin and without a password, and if you only use this mode, hackers who are looking for an opening to infiltrate network devices will quickly notice this Mikrotik router vulnerability.
Try to use a strong password (a long combination of characters, upper and lower case letters, and numbers) for admin access. You can use services such as Have I been PWND to check the security and repeatability of your desired username and password.
To change the password of your admin user, you can go to the system> Users section and change the password of the admin user.
Of course, if you’re thinking of creating a stronger layer of security, it’s a better idea to create new users for everyday use and disable or change the name and password of the admin account. The overall goal is to make the Mikrotik account away from the defaults to make it unpredictable for hackers and intruders.
To create a new user, you can open the Winbox terminal and create a new user with a strong username and password by running the following command:
/user add name=myname password=mypassword group=full
You can also use the following command to delete the admin user:
/user remove admin
Of course, before you remove the admin, test the new users to make sure they have the necessary permissions and that Winbox configurations can be configured with these usernames/passwords.
If you are thinking of creating a safe space to create and manage your Mikrotik passwords, in addition to keeping user accounts safe, the process of creating and remembering strong and long passwords will be easier for you. You can use password management tools.
2. Use appropriate firewall rules.
One of the best tools for managing traffic and unauthorized access is the Mikrotik firewall. This firewall works based on firewall rules. In fact, it is the firewall rules that tell the firewall what kind of traffic flow to deal with. This is where you can use them to define Mikrotik’s behavior against all types of access and use this to increase Mikrotik’s security.
Of course, in order to add proper and secure firewall rules to your MikroTik router, you first need to think about why MikroTik’s default firewall is not secure enough and what weaknesses it has.
You are not going to increase the security of Mikrotik by adding a series of new but useless rules. All you have to do is identify the vulnerabilities and add appropriate rules to the firewall. In fact, you want to block unwanted and malicious traffic by creating new firewall rules, and you can use different techniques to do this.
3. Update Mikrotik router
With every Mikrotik update, new patches are released to fix bugs and improve Mikrotik security. For this reason, you should always update the RouterOS version and the Winbox application, your firmware, so that you are not deprived of these new features and do not endanger the status of your router.
To upgrade your Mikrotik router, you can open Winbox and go to the following path:
System → Packages → Check for Updates → Download and Install
Or, open a Winbox terminal and run the following command:
/system package update install
It doesn’t matter which method you use; the important thing is to fix software vulnerabilities by regularly updating your router and, in this way, improve the security of your system against any kind of abuse and unauthorized access.
4. Carefully set the permissions of MikroTik router users and groups.
If the IT department of your organization or company is so large that each user or management group has different responsibilities, you don’t need to give them all the authority. For example, technical support does not need to see the passwords, but an administrator must have access to the passwords section.
RouterOS allows you to assign specific permissions to desired groups and then add users to these groups. This is where you can set the level of user access to different parts of Mikrotik and prevent unauthorized access.
To manage groups and users, you can go to the following path from the Winbox menu:
System → Users
Or open the terminal and run the following command:
/user group
When creating groups, you will encounter the following permissions, which it is better to check:
elnet, ssh, ftp, winbox, web, api, romon, dude, and tikapp – user policies of the respective protocols.
local – permission to access the Winbox internal terminal Reboot – permission to restart the router
read, write – Access permission to read/write router configurations
sniff – permission to run the sniffer tool
test – permission to run troubleshooting commands (ping, bandwidth test, wireless scan, etc.)
password – permission to change the password by the user themselves
Policy – permission to manage accounts and groups
Let’s illustrate how to define a group and add a user to this group:
Enter Winbox and select users from the system menu.

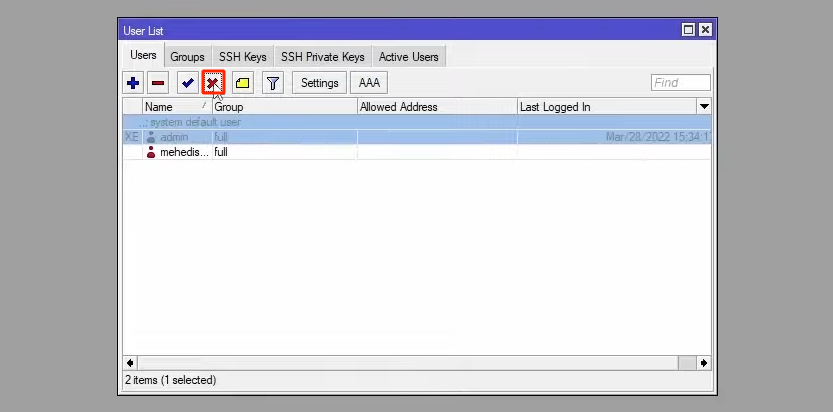
The list of Mikrotik router users can be seen in this list in the Users tab.
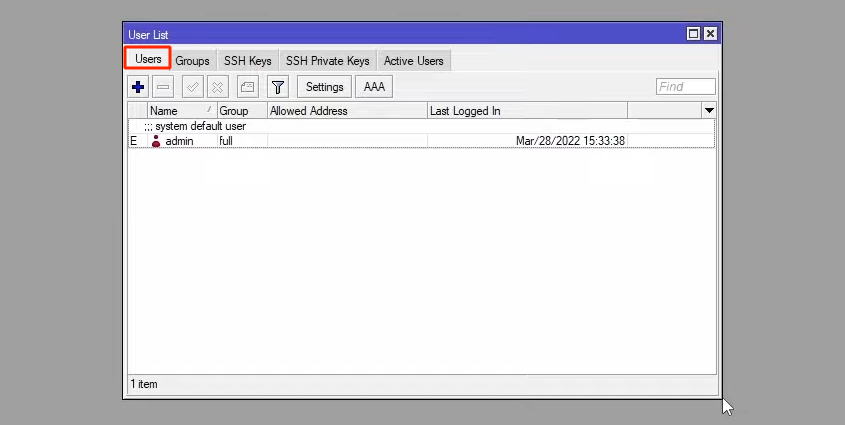
In this router, we have only one user, and that is the admin, who belongs to the full group.
If you want to see the groups and their permissions, you need to click on the Groups tab.
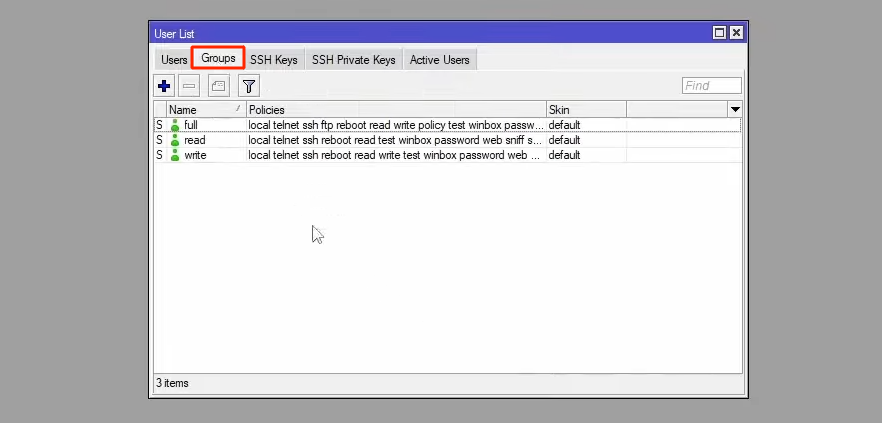
In this section, we are faced with three groups, each of which has its own permissions. To view group permissions, for example, the read group, just double-click on it.
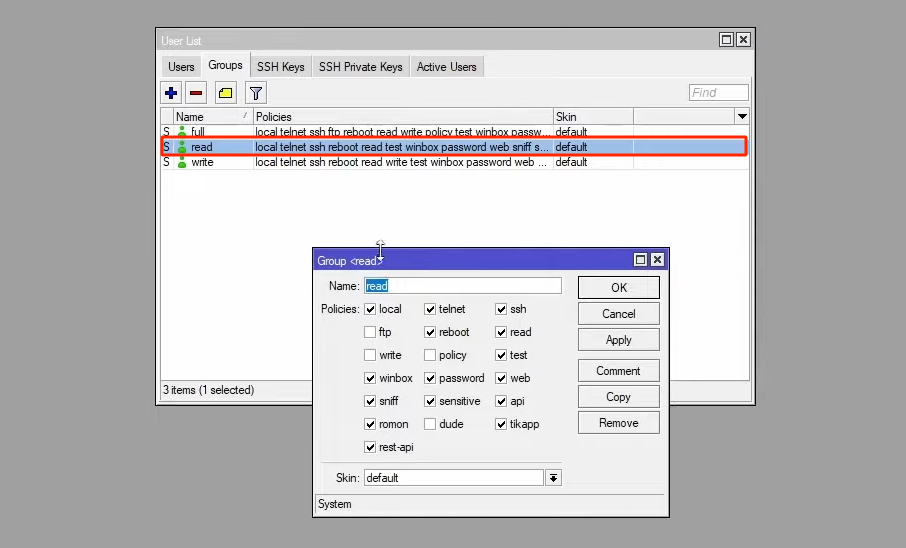
You can see that the permissions are in the form of checkboxes, and if you want, you can add or remove any of them from the group.
Of course, if you want, you can create a new group by clicking +.
Just enter the name of the group and assign the desired permissions to it, and finally, click on apply and ok.

We created a group called Super and assigned all permissions to it. If you look at the list of groups, you will see the supergroup.
Now, if you want to disable the admin user for security reasons and replace it with another user, you can create a new user by clicking on + in the Users tab.
Enter the user’s name in the name field and select the desired group from the Group section so that the user can benefit from its permissions.
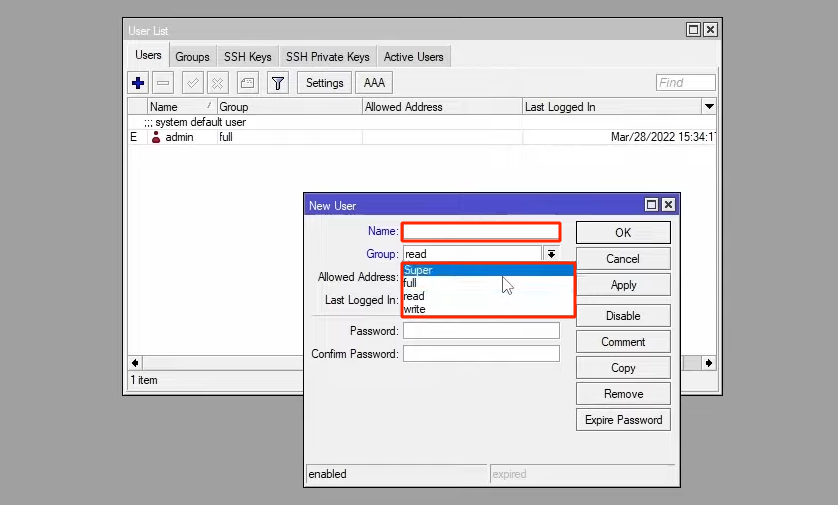
After entering and repeating the password in the confirm password section, click Apply and ok to create this user.
Now that you have created a new user and you are sure of its access, you can disable the admin. Just select the admin user from the users tab and click on the cross.
Yes, now that you’ve learned how to set permissions and assign users to groups, it’s time to manage the users and permissions section to suit your needs.
5. Change the SSH port number
If you use SSH to remotely connect to your Mikrotik router, one simple technique to prevent brute force attacks and router hacking is to change its port number so that it is anonymous to hackers.
By default, this service listens on port 22, and to change this port to another port, for example, 2200, you can open a Winbox terminal and run the following command:
/ip service set ssh port=2200
After you change the port number, test the SSH connections and make sure that SSH can be used on the new port.
6. Disable unnecessary services.
If you have ports and services that are practically unused, it is better to limit the attack surface of your router by disabling them. Services such as SSH, ftp, Telnet, and Web are prone to attack and use your Mikrotik router mercilessly, so try to disable unnecessary services.
You can use the following command to view the list of active services:
/ip service print
Then select the desired service (for example, telnet) and then disable it with the following command:
/ip service disable telnet
There are many services that your Mikrotik activates without needing them, and you, who are thinking of increasing the security of Mikrotik, should be sensitive to these services. For example, the bandwidth server is used to test the power between two Mikrotik routers, which in turn can become a DDoS attack tool, and disabling it is the most logical thing to do (unless, of course, for things like Bandwidth speed test in Mikrotik, it doesn’t need it):
/tool bandwidth-server set enabled=no
7. Disable the neighbor discovery feature.
Mikrotik provides a service called neighbor discovery that includes MNDP, CDP, and LLDP protocols and can be used to draw a network map.
Malware and other malicious agents can map your network using the service and use it to access network information, change settings, and execute various attacks. This is where you should go and disable this service, which is enabled by default.
For this, you can use the following command:
/ip neighbor discovery-settings set discover-interface-list=none
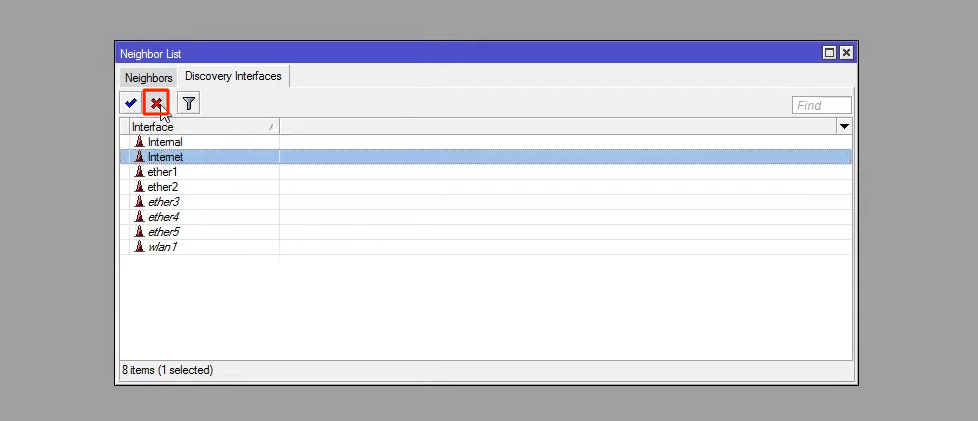
Or click on IP and neighbors from the Winbox menu.

Then click on discovery interfaces, and after selecting the desired network interfaces, click on the cross mark.
8. Do not allow the Mikrotik router to act as a DDoS proxy.
The activation of some Mikrotik services, such as proxy, socks, UPnP, etc., can turn Mikrotik into a powerful weapon for DDOS attacks. In fact, the combination of these services with some of Mikrotik’s capabilities makes Mikrotik a botnet member and can be used to carry out malicious attacks.
Although these servers are disabled by default, it is better to disable these services by running the following commands:
/ip proxy set enabled=no

/ip proxy set enabled=no

ip upnp set enabled=no

ip upnp set enabled=no
9. Backup Mikrotik configurations.
Although the above solutions are for increasing the security of Mikrotik, you should always have a key to restore the ideal status of your Mikrotik, and this key is nothing but backup files.
When your Mikrotik performance and security are compromised, the fastest thing you can do to get back to safe mode is to restore the backup file and apply your router’s safe mode configurations.
10. Keep track of Mikrotik router reports.
If you are careless in this area, you will definitely be late in detecting unauthorized IPs and accesses, which is not what you want. Therefore, it is better to constantly refer to the system> Logging section and check the reports and activities related to the Mikrotik router.
In general, try to avoid doing things related to Mikrotik security while implementing these solutions. Don’ts:
- Only default users, like admin, without a password
- Failure to define appropriate firewall rules
- Providing permission to all incoming and outgoing router traffic
- Not backing up Mikrotik configurations
- Not monitoring router reports
- …
Why should we think about improving the security of Mikrotik?
A Mikrotik router is an important part of network equipment that performs various tasks such as routing traffic between networks and devices, filtering traffic, etc.
A Mikrotik router or virtual server with the RouterOS operating system plays the role of a gateway through which data entry and exit of a network is done. Therefore, sensitive and important network data flows through these routers, and any defect or security violation in the router can lead to theft of sensitive information, interruption of network services, or unauthorized access to different parts of the network.
Among the most important reasons for increasing the security of the Mikrotik router, the following can be mentioned:
- Protection of important and sensitive information, such as traffic data, routing tables, and firewall settings
- Eliminating vulnerabilities and preventing penetration and hacker attacks
- Prevention of unauthorized access to router settings and configurations
- Not being satisfied with the poor default settings of routers and upgrading them to a safer and more reliable version
- Preventing spiritual and financial losses caused by hacker attacks
- …
So it makes perfect sense that you are here now to upgrade your MikroTik security, and not only now, but you should constantly consider upgrading the security of your MikroTik routers and implement the necessary security measures.
Conclusion
The power and high efficiency of the Mikrotik router have made most of the networks equipped with this router. If you are among the users who have preferred the Mikrotik router, you should think about increasing its security. The solutions we reviewed in this article can increase the security of your router and prevent unauthorized access and hacker attacks. It is better to go ahead according to the vulnerabilities of your Mikrotik system, and instead of limiting yourself to one method, implement more solutions because a secure router can meet your expectations in the best possible way.
FAQ
How do I secure my MikroTik router against unauthorized access?
Start by changing the default admin username and setting a strong password. Then disable unused services like Telnet and FTP, and restrict management access using IP-based firewall rules.
Which MikroTik services should I disable for better security?
You should disable Telnet, FTP, MAC Winbox, and the bandwidth server if they are not needed. Also, turn off network discovery protocols to reduce exposure.
How often should I update my MikroTik RouterOS?
Regular updates are crucial. Check for updates at least once a month, as new RouterOS versions often fix security vulnerabilities and improve system stability.
