How to Install WordPress on Docker
Installing WordPress on Docker
Every WordPress site administrator should test their site before publishing it. If you are looking for a way to do this, we suggest that you familiarize yourself with container technology. One of the most famous platforms for implementing container technology is Docker. In this educational article, we will go through the steps of installing WordPress on Docker.
What you will learn after reading this article:
- What exactly is Docker?
- How to install WordPress on Docker
- Step 1: Install Docker
- Step 2: Install WordPress on Docker
What exactly is Docker?
Docker is an open source container software that creates secure environments for running or testing an application.
With this software, you can develop, test and run several programs on one system.
In container software, unlike virtual machines (virtual machines), there is no need for each container to have a separate operating system.
These software share the host core. For this reason, it occupies much less space and a server can run several containers at the same time.
This is one of the reasons why Docker is recommended for developers. A normal WordPress test environment usually takes up a lot of system resources. Docker avoids this issue so that work can be done with minimal consumption of server resources.

How to install WordPress on Docker
This is done in two steps. First, we install Docker, then we start WordPress on it.
Step 1: Install Docker
Windows, Linux and Mac Docker operating systems are supported. In this step, we will learn how to install Docker on these three operating systems.
Installing Docker on Windows
Here we teach how to install Docker on Windows 10 64-bit version.
1. The first step is to activate Hyper-V technology in Windows.
How to activate Hyper-V
- First, by pressing the combination keys Win
- Then type appwiz.cpl in it and click OK to open the Program and Features window.
- Then click on Turn Windows Features on or off in this window.
- On the page that opens, search for Hyper-V and tick it.
- Click on Ok and the system will search the system for the component and its installation files.
- After finding the required files, Windows will install and at the end it will ask you to restart the system to complete the installation.
- After Windows boots, search for Hyper-V Manager from the start menu or Cortana and click on it to open the Hyper-V management page.
- At this stage, you have succeeded in activating HyperV in Windows 10 and you can use it.
2. Download the Windows Docker version from this link and open its installer file.
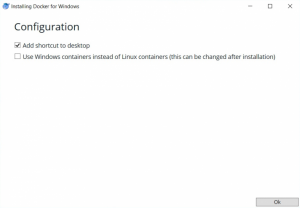
3. In the following window, check the boxes according to your preferences and click Ok.

4. After the installation is finished, click Close. You will see the Docker icon in the Taskbar.
Installing Docker on Linux
We teach the steps according to Ubuntu 18.04 version.
1. First, we update the package list:
sudo apt-get update
2. Here we need to allow apt to access a repository via https:
sudo apt-get install
apt-transport-https
ca-certificates
curl
gnupg-agent
software-properties-common
3. Add the Docker GPG key using the following command:
curl -fsSL https://download.docker.com/linux/ubuntu/gpg | sudo apt-key add –
4. Add Docker repository:
sudo add-apt-repository “deb [arch=amd64] https://download.docker.com/linux/ubuntu $ (lsb_release -cs) stable “
5. We update the Docker repository:
sudo apt-get update
6. And finally install Docker:
sudo apt install docker-ce
Note that installing Docker on other Linux distributions is different. If from version
If you are using other than Ubuntu, refer to the official Docker documentation.
Install Docker on Mac
Steps to install Docker on Mac operating system:
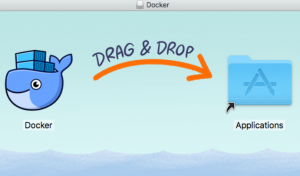
1. Download Docker software for Mac from this link. Then run the .dmg file. Drag and drop the Docker icon into the Applications folder.

2. Open your Applications folder and double click on docker.app. During the installation process, you will be prompted to enter your password.
3. After the installation process is complete, you can see the Docker icon in your Status bar.
Step 2: Install WordPress on Docker
Now that we have made sure that Docker is installed on our system, it was time to install and run WordPress on it.
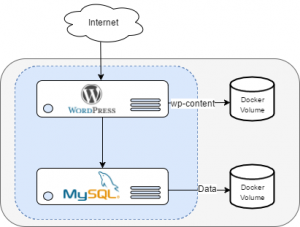
Generally, there are 2 ways to install WordPress on Docker. Docker compose method and CLI. In this part of the article, we are going to install WordPress using Docker compose method.
1. Enter the following command to check whether Docker compose is installed.
docker-compose –version
2. Then we create a new directory for WordPress.
mkdir ~/wordpress
cd ~/wordpress/
3. In the new directory we created, create a new file called docker-compose.yml and put the following codes in it.
version: ‘3.3’
services:
db:
image: mysql:5.7
volumes:
– db_data:/var/lib/mysql
restart: always
environment:
MYSQL_ROOT_PASSWORD: somewordpress
MYSQL_DATABASE: wordpress
MYSQL_USER: wordpress
MYSQL_PASSWORD: wordpress
WordPress:
depends_on:
– db
image: wordpress: latest
ports:
– “8000:80”
restart: always
environment:
WORDPRESS_DB_HOST: db:3306
WORDPRESS_DB_USER: wordpress
WORDPRESS_DB_PASSWORD: wordpress
WORDPRESS_DB_NAME: wordpress
volumes:
db_data: {}
4. Now to create the containers, run this command in the desired directory:
docker-compose up -d
5. Your browser will automatically enter the address localhost:8000 and on the page that opens, you will see the beginning of the WordPress installation process.

Conclusion
Docker is a great containerization tool for testing applications like WordPress. Its environment helps you to improve the efficiency of system resources
Control yourself.
In this tutorial, you learned how to install Docker on Linux, macOS, and Windows.
You also learned how to deploy WordPress on Docker using the Docker Compose tool.

