How to Fix the Windows 10 or 11 Settings Not Opening Issue
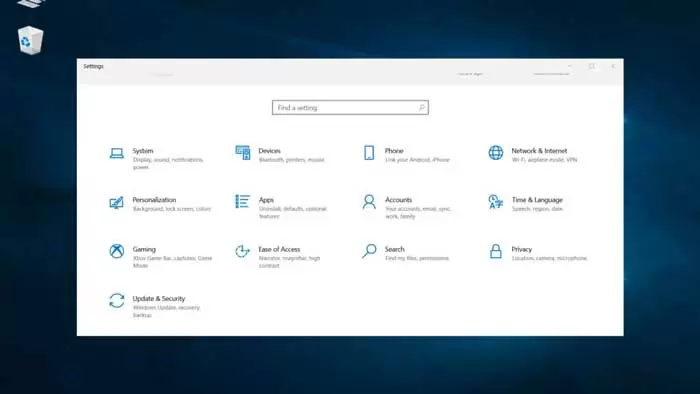
Windows 10 or 11 is known as a unique and helpful application for many reasons, one of which is the Settings application. This tool allows you to customize your display, change your network and internet settings, and, most excitingly, improve your game experience.
As you can see, there’s a lot you can do with the Settings app. It’s no wonder why many consider it an essential component of Windows 10/11.
So, with that being said, can you imagine using a computer without a settings program? In this case, your work will be limited, and your entire Windows system will probably suffer.
Pro tip: Run a dedicated PC optimization tool to eliminate misconfigurations, junk files, harmful programs, and security threats that can cause system problems or slow down performance.
Unfortunately, not a few users experience the absence of the Settings program in Windows 10/11. All of them have the same problem: For some reason, they cannot use the settings program to its fullest. This problem manifests itself in different ways for each user.
Some examples of these modes are as follows:
- Some users cannot click the Start button, so they cannot access the main menu or the Settings app. In some cases, the Settings option is grayed out.
- The search function does not work. When users try to access the Settings app through search, they cannot click on the search box. Sometimes, pressing the Enter button does not show a result.
- The Settings app crashes immediately after launch. Some users can access it.
The settings app icon is not found. Although this rarely happens, the Settings app icon disappears from the main menu for some reason. - The Settings app does not launch. Some users can find the Settings app through the Start menu, But the app doesn’t launch or display when they click on it. What makes the situation more confusing is that the System process is related to the active and running configuration program.
The absence of the Settings app can cause serious problems. This tool gives you more control over Windows processes and features. Even if there are other indirect ways to access Windows settings, they won’t be as unique as the experience provided by the Settings app.
Why can’t you access the Settings app?
Is it due to a malware attack? Is there a troubleshooting program on your PC? Have you installed a defective Windows update? All of these are possible. We will discuss these reasons in detail below.
- Problem update. Some users reported that the problem occurred after updating Windows. The Settings app was working fine before the update, but it was no longer accessible after that. Experts say that the installation file may be corrupted, or Microsoft may have released a faulty update. Returning to the previous Windows version or canceling the update may solve the problem.
- Corrupt system files. There are cases where the Settings app disappears for no reason. Although it has worked well before,, you can’t find its icon after a few hours. Worse, it cannot be clicked even if the icon is found. In this case, the system files related to the program are probably corrupted. The crash problem may be caused by various factors, such as malware attacks or sudden power outages. Fixing these corrupted system files will generally improve the problem.
- Junk files. If junk files are on your system, you have found the next possible culprit. These filesthose may interfere with critical Windows processes, including those associated with the Settings program. That’s why we suggest cleaning your system regularly. If possible, use third-party tools to eeffectively reducese hiding on your system. A problemse PC Repair can effectively remove unwanted files that cause roblems, such as settings not opening in Windows 10/11.
- Operating system malfunction. In addition, there may be a malfunctioning operating system problem that you have to deal with. In most cases, restarting the computer will solve the problem. However,Third-party’t help, try restarting your computer in Safe Mo in this modede. Third-party services and unnecessary processes will not run in this mode, so Windows 10/11 should run smoothly.
If you can’t access settings and other important features, there are other options you can try:
If you can’t click Settings, or if Windows 10/11 can’t access Settings, don’t worry. Be aware that there are other alternatives. The most popular way to access settings is probably to press the Windows button and click the gear icon. But if it doesn’t apply to your system, we suggest you look for other ways to launch the settings:
- I am using the search function. Click on the Start menu and type Settings in the search box. From the list of results that appear on your screen, click on Settings. This method is best if the shortcut or settings icon in the Start menu is broken or not working.
- Use the right-click menu. Another way to open settings is to use the right-click menu. Start by right-clicking on the Start menu. And then select Settings from the menu. Many Windows 10/11 users don’t know about this trick, but now you do!
- Use the shortcut key. Press Windows+I to run the settings automatically. This is the fastest and most convenient way to access the settings. If your system does not respond to mouse clicks, try this method.
- Using Command Prompt. If you still can’t access the settings, you may need to use the Command Prompt. To do this, right-click on the Start menu and select Command Prompt (Admin) from the list of options. Now, in the window that appears, type start ms-settings and press Enter. This should open Settings.
- Using Action Center. If all else fails, the last resort is the Action Center icon. You can access it through the taskbar and select All Settings.
At this point, if the Settings app won’t open or launch, you have no choice but to fix the problem. The next section will share other solutions.
How do we fix the problem of the Settings app that is inaccessible?
Again, various factors, such as corrupted system files, malware, and problematic installation files, cause the problem. However, before you proceed with technical fixes, consider some simple troubleshooting methods. For example, restarting once may solve the problem.
Some troubleshooting steps include:
1- Scan your system to detect any malware. Make sure you get rid of infected files and remove any suspicious programs from your system. If you don’t feel confident doing this manually, you can use malware removal tools and let them do it for you.
2- Delete unnecessary programs that you no longer use.
3—Delete useless files that may occupy a large part of your system space. A tool like PC Repair can help you do this.
4- Restart Windows 10/11. If the problem is caused by a bug or temporary glitch, it should be fixed.
If none of the above steps work, try these changes:
First solution: Use Command Prompt to install Windows 10/11 updates
If you need to update Windows 10/11, you can try another method. Since you can’t click on the Settings app, you can only use the Command Prompt to update the system.
How to use the the Command Prompt tool to install Windows 10/11 updates is as follows:
1- Start the Command Prompt by typing cmd in the search box.
2- Then press Ctrl + Shift + Enter.
3- Now the Command Prompt window should open. At the command line, type this command: exe /updatenow
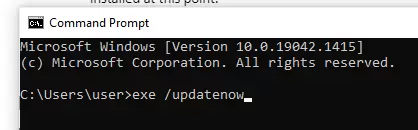
4- Press Enter. The update process should start now. All available updates must be installed at this stage.
5- If it doesn’t work, enter the command several times.
6- After installing all available updates, go to the start menu and see if you can now click on the Settings program or not.
Second solution: Scan SFC and DISM
Many system files are hidden, which of course, is not a problem. There is a reason why Microsoft designed them this way. Since these files play a vital role in ensuring the smooth operation of the operating system, Microsoft has to make sure that they cannot be easily accessed, which is why they are hidden.
If any system files, especially related to the Settings program, are defective, the program may not work properly.
Microsoft has taken this into account and created the System File Checker tool to scan your system for any problematic, missing or corrupted system files. To run this tool, just run Command Prompt and enter the command sfc /scannow. After pressing the Enter key, your system will check your system files and fix any damaged ones. Corrupted or damaged system files are replaced with a saved copy.
If the SFC command does not produce any positive results, you can perform a more complete scan using the DISM tool. This tool, also known as Deployment Image Servicing and Management, checks your Windows image files and hard drives for problems and fixes them if necessary.
To scan DISM, simply run these commands through Command Prompt:
Dism /Online /Cleanup-Image /ScanHealth
Dism /Online /Cleanup-Image /CheckHealth
Dism /Online /Cleanup-Image /RestoreHealth
After running each of them, any problems with your system files should be fixed.
Third solution: Use the PowerShell tool to re-register the Settings app
The Settings app is a built-in tool; That is, it is already installed in Windows. And the problem with pre-installed tools is that they cannot be uninstalled like the programs we download online. So, if you’re having trouble with the Settings app, the only way to reset it is to use PowerShell commands.
To re-register the Settings app via PowerShell, follow the step-by-step instructions below:
1—Start the PowerShell tool in administrator mode. Right-click the Start button and select Windows PowerShell (Admin). You can also press the shortcut Windows + X to launch the WinX menu and find PowerShell.
2- Then, in the PowerShell window, enter this command
Get-AppXPackage -AllUsers -Name windows.immersivecontrolpanel | Foreach {Add-AppxPackage -DisableDevelopmentMode -Register “$($_.InstallLocation)\AppXManifest.xml” -Verbose}

3- Press Enter to run.
4- After finishing, close PowerShell and restart your computer.
5- See if you can open Settings or not.
Fourth solution: Do Boot Clean
If you still can’t access the Settings app, perform a Clean Boot. This will run only essential processes and launch minimal startup programs and drivers. In this case, you can easily identify if a certain background process is causing problems with the Settings app.
To clean boot Windows 10/11, follow the steps below:
1- Be sure to log in using a user account.
2- Enter msconfig in the search box.
3- From the search results, find System Configuration and click on it.
4- Go to the Services tab and uncheck Hide all Microsoft services.
5- Then click on Disable All button and OK.
6- This time, go to the Startup tab and click on Open Task Manager.
7- After loading Task Manager, go to Startup.
8- Make sure that all the items below this section are set to Disabled.
9- Exit Task Manager and restart Windows.
10- When Windows restarts, it should be in clean boot mode. If you find that the Settings app works fine in this mode, an unnecessary service or process or a third-party app may be causing the problem.
To identify the real culprit, you may have to manually enable and restart each service and program several times. This solution might take a lot of time and patience, but it’s worth trying.
Fifth solution: Create a new user account in Windows
If you still can’t click on the Settings app or can’t launch it, create a new admin account and transfer your files there. This trick may seem very specialized and technical, but if none of the above solutions work, you have no other choice.
However, since we usually create new user accounts through the Settings app, you have to do it using a more technical method; It means that:
1- Enter msc in the search box. This will open the Common Console Document.
2- Go to the Users section and select Add New User.
3- Add all the necessary details to create an account.
4- After creating a new account, log out of your active account and log in to your account.
5—The next step is to transfer your files to the new admin account. Go to File Explorer and navigate to the hard drive where you installed Windows 10/11.
6- Click on the View tab and uncheck Hidden Items.
7- Go to the previous admin user account. You can find it by entering the following location:
C:/Users/old
8- Double click on your old username folder.
9- A notification will appear saying that you do not have permission to access this folder.
10- Click Continue to continue. Enter login information if needed.
11- After opening the folder, copy and paste all your files from there into the new folder you see in C:/Users/newusername.
12- If the integration of the folders is completed, you will be notified.
13- Click on Yes to continue.
14- All your files should be successfully transferred to the new user account.
Sixth solution: Restart Windows 10/11
If creating a new admin account doesn’t solve the problem, try resetting Windows 10/11 from the lock screen. Don’t worry because you don’t need to log in any account to redo the settings.
Here’s how to do it:
1- Turn on your computer and wait until the lock screen appears.
2- Enter your account username and password.
3- Press and hold Shift.
4- From the Power section, select the Restart option.
5- A new set of options will appear.
6- Go to the Troubleshoot section and select Reset This PC.
7- Decide if you want to delete all your files and programs or if you want them all to remain intact.
8- Click on Reset.
But a simple but very effective method (probably definitive)
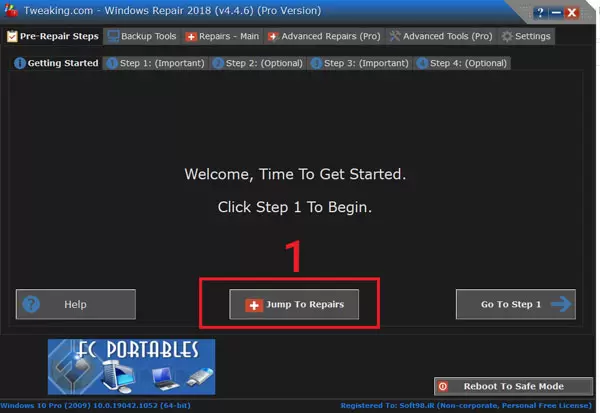
There is a very powerful and small software called Windows Repair Pro that scans your entire system and detects and fixes all errors, problems and defects in about half an hour!
First boot Windows in Safe Mode (if Windows doesn’t boot). If you don’t know how to enter safe mode, read this guide
You can download and install this software from here. (Preferably, download the portable version, which does not need to be installed.) Then, open the program as shown in the image and click on the All Repairs option.
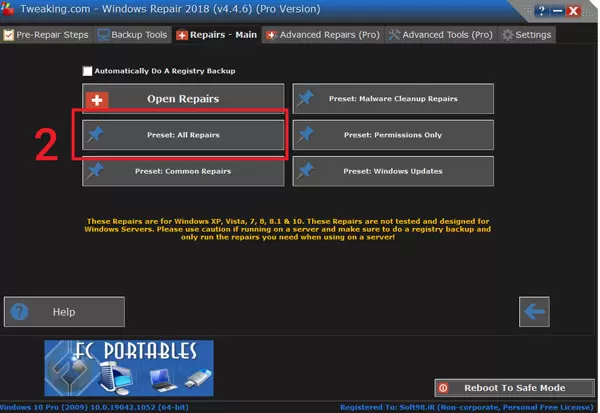
It takes about half an hour to an hour to scan your system and finally a Windows restart message comes up and you have to click Yes. After Windows is reset, your computer will work without any problems!
Conclusion
We know how annoying it can be to not have access to Settings. This is one of the most useful tools that Windows 10/11 has. If this program is lost, everything will become very challenging. Although there are other ways to make the necessary changes in the system without the Settings program, the existence of this program will give you a different experience. So, if you can’t click on the Settings option, it is the best and most practical option to fix the problem.
FAQ
Why won’t Settings open on Windows 10 or 11?
Corrupted system files, incomplete updates, or app conflicts can stop the Settings app from launching.
How can I repair the Settings app?
Running System File Checker (SFC) and DISM tools can fix corrupted Windows components that prevent the Settings app from opening.
Will Windows updates help fix the issue?
Yes — installing pending updates often resolves bugs and system errors that cause Settings not to open.