


Learn How To Set Up Windows Computers To Turn On The Specified Clock
If you use your computer for study or work, then you will most likely always turn it on at a specific time.
If you do this manually, then you have to wait a few minutes for the computer to boot and then be able to get started.
This is where scheduling a computer start can come in handy. In the following , we will teach you how to do this in Windows 10 operating system .
If you do not have the patience to turn on your Windows PC manually, then you can put it to Sleep or Hibernate mode and then use the tools that turn it on at the specified time. This way you can do certain things on your computer before you start using it.
What is the use of scheduling a computer start?
Scanning a Windows computer can help you save time. To do this, you must set your computer to Sleep or Hibernate mode. If you want to use your computer after a short break, then Sleep mode can be useful for you. If you do not want to use your computer for a long time and also do not want to turn it off, then the Hibernate feature can work for you.
If you want it to turn itself off, do certain things, and also turn off again when you are away from your computer, then scheduling it to turn it on can help.
If you want to complete your downloads at a certain time or scan your computer (to find the virus), then this feature can still be useful for you. This feature can also help you with Hard Disk Defragmentation. Doing such processes may take hours, so it is best to do them when you are not using your computer.
If you want to use your computer as an alarm clock, then your computer must be turned on automatically again, otherwise your alarm clock will not work. In addition, the ability to schedule the computer to start can save you from enduring the boot process. Here’s how to do it.
1. Automatically turn on the computer using the Task Scheduler
Using one of your Windows 10 applications called Task Scheduler, you can turn on your computer automatically.
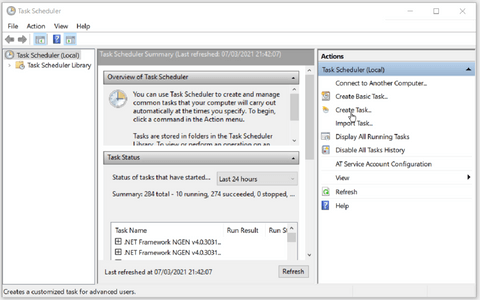
In the search bar of the Start menu, type “Task Scheduler” and then select the best result. In the right panel of the Task Scheduler window, you must click on “Create Task”.
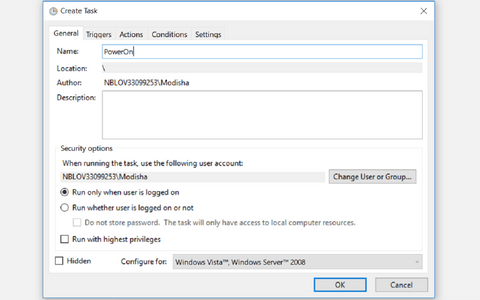
In the window that appears, you must select a name for your function. Try to choose a recognizable name; Like PowerOn. This way you can easily find this function in the future and distinguish it from others.
In the same window you should check the box next to “Run whether user is logged on or not” and “Run with highest privileges”. In the “Configure for” drop-down menu, you must select “Windows 10”.
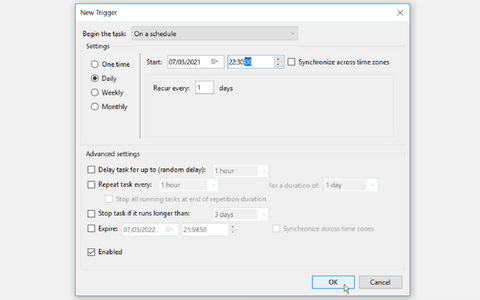
Next you need to go to the “Triggers” tab and then click on “… New”. In this way, you can determine the conditions that lead to the performance of your desired action.
In the “Begin the task” drop-down menu, you must select “On a schedule”. This will give you the function you want, according to the specified schedule. Then by checking the “Daily” option you can set the function to be activated on a daily basis. In the “Start” section, you must enter the desired time and date to perform the operation. You must click “OK” to continue.
Task Scheduler prompts you to create at least one action to run when the computer turns on. You can select a normal action, such as running the Snipping Tool or any other application to do so.
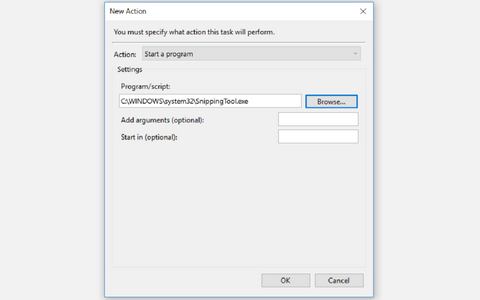
To do this, go to the “Actions” tab and then click on “… New” to specify what happens when you start the action.
In the window that appears, you must select “Start a program” in the “Action” drop-down menu. Click the “Browse” button to find the application that you want to run after the computer is turned on. Then you have to click “OK” to continue. In this article, we have chosen the Snipping Tool.
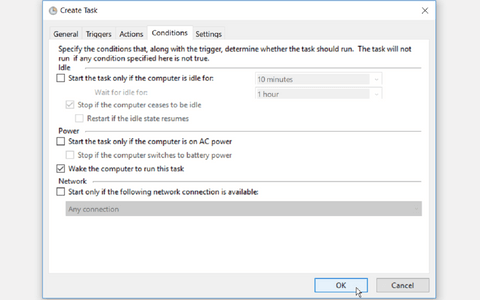
The next step is to go to the “Conditions” tab. Here you have to check the “Wake the computer to run this task” option and also uncheck the other options. Click “OK” to continue.
The last step is to make sure that your computer’s power plan allows you to do this (wake timers). If this feature is disabled, then your scheduled function will not work either.
To set this feature, you must type “Control Panel” in the Start menu to access the control panel.
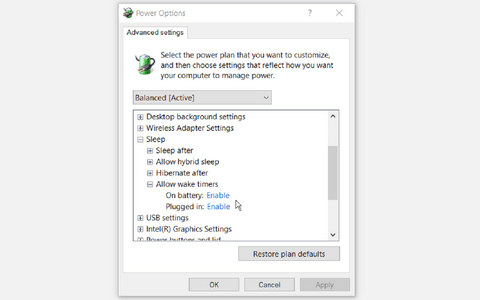
Next you need to go to “Hardware and Sound> Power Options> Change Plan Settings> Change advanced power settings”.

In the “Advanced settings” tab you should go to “Sleep> Allow wake timers”. Set “On battery” and “Plugged in” to “Enable”. Click “Apply” and then “OK”. This way you can put your computer on Sleep mode and you will see that it will turn on at the specified time.
2. Use of third party software
If you do not want to use Task Scheduler, then you can use third-party software to schedule your computer to turn on. The “WakeupOnStandBy” tool can put your computer out of Sleep mode (based on the various conditions you have set in that program).
- Download WakeUpOnStandBy, extract the zip file and then run the application.
- In the “Specify time to wake up computer” section, you must specify the time and date of turning on your computer. If you want the screen to turn on or something to do when the computer turns on, then you should also check the box.
- In the “Run the following file / program / web page when computer wakes up” section, you can specify the programs that you want to run.
- By checking the appropriate option in the “Specify what to do next” section, you can determine what your computer will do after the tasks.
- By checking the option in the “Repeat these tasks” section, you can specify when your scheduled tasks will be repeated.
- To activate the desired function, you must click on “Start”.

What sets WakeOnStandBy apart is that it’s easy to work with. To make things easier, the tool also provides an online guide for users that you can access by pressing the “F1” key.
Concluding remarks
Above we tried to introduce you to the solutions for turning on Windows computers automatically. This will allow you to do things automatically and avoid delays in the boot process.