How to Secure Your WordPress Login Page
All site administrators should be concerned about the security of the WordPress login page.
WordPress is the world’s most popular content management system because it is very easy to create a website. Although it is a free CMS, there are steps you can take to improve its security. WordPress is very predictable, which sometimes makes it a target for hackers.
Take, for example, the WordPress login page.
WordPress websites have a login page (/wp-admin or /wp-login.php). Since the login URL is the same across all WordPress sites, attackers often make the site’s login page their first target.
Security experts say the login page is the most vulnerable page on a website. Every day, hackers deploy bots to perform brute-force attacks on that page. By specifying login credentials, they can easily access your CMS. Therefore, you should take every possible measure to enhance the security of your WordPress login page.
This article will teach you five advanced ways to improve WordPress login security and prevent hacking.
How can the security of the WordPress login page be increased?
In this article, we will show you methods that are very effective in increasing the security of the WordPress login page:
- Changing the URL of the login page (login page)
- Enable two-step verification
- Set the login attempt limit
- Prevent username discovery
- Using auto-logout
You must have noticed that we have not included implementing strong passwords and installing SSL certificates in the above. This is because doing these actions is a must for everyone, and we assume that you have already done them.
Note: You need to install one or two plugins to perform the steps we mentioned below. Even the best plugins can cause problems on the site, so make a backup of your website before proceeding.
1. Changing the URL of the login page (login page)
As we said at the beginning of the article, the default WordPress login page is as follows:
www.website.com/wp-admin/
or
www.website.com/wp-login.php/
Everyone knows it, including hackers who design bots that target WordPress login pages. And since most people use weak passwords, it is very easy to hack a website on the login page.
Consequently, changing the login URL is one way to increase the security of the WordPress login page.
Creating a new custom login page URL is easy. Several plugins allow you to do this with a few clicks.
To do this process, we will use the WPS Hide Login plugin. Install and activate the plugin. Then, go to Settings >> WPS Hide Login.
Scroll down to the bottom of the page, enter the new URL in the Login URL field, and click Save Changes.
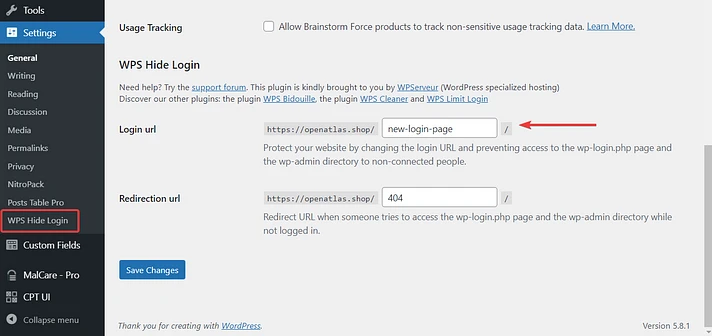
From now on, you can only enter your site’s admin dashboard with the new URL.
2. Activating two-step verification to increase WordPress login security
You must have encountered two-step authentication when using Facebook and Gmail. The Services typically send a unique code to your registered mobile phone number whenever you want to log into your account. This security measure is implemented to ensure that only the account owner can access it. Even if hackers can get your password, there is no way they can steal the unique code sent to your registered mobile number.
Two-factor authentication can also be applied to your WordPress website. It adds a layer of security to the login page. All you have to do is install one of the following plugins:
- miniOrange’s Google Authenticator
- Google Authenticator – Two Factor Authentication (2FA)
- WP 2FA by WP White Security
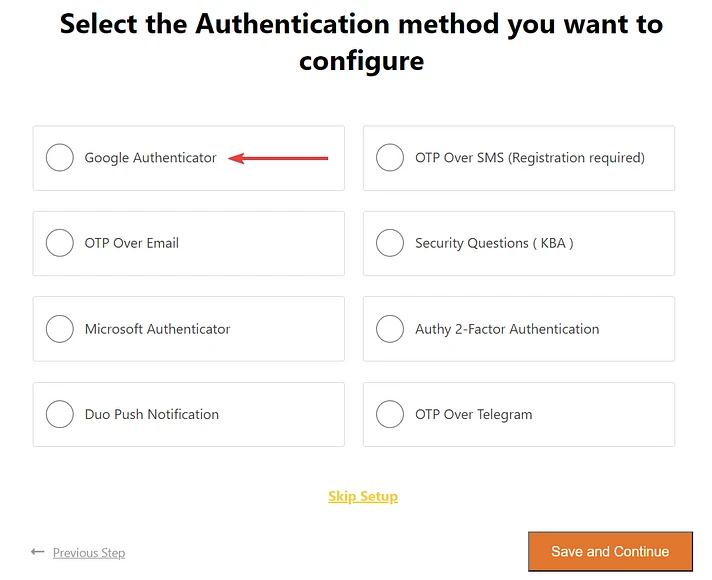
Setting up a two-factor authentication plugin is very easy. We use Google Authenticator miniOrange in this tutorial.
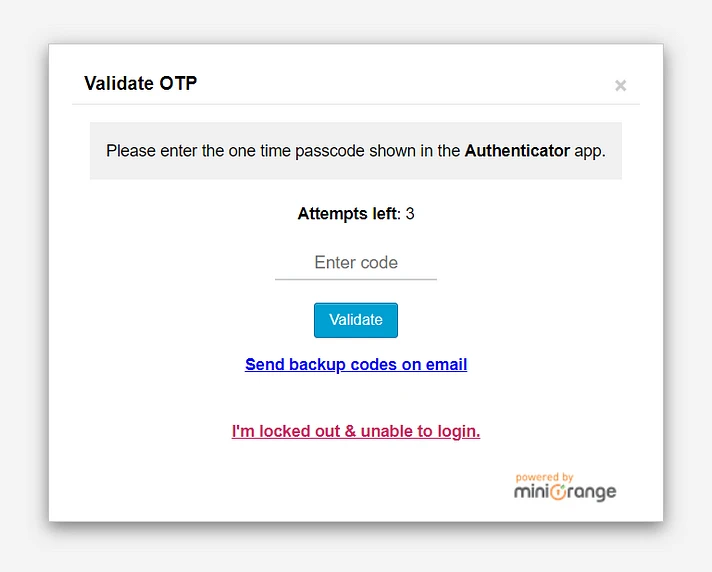
Install Google Authenticator miniOrange. As soon as you activate the plugin, the launch widget will appear. Choose the first option, i.e., Google Authenticator.
Next, download the Google Authenticator app on your smartphone. Open the app and scan the QR code.
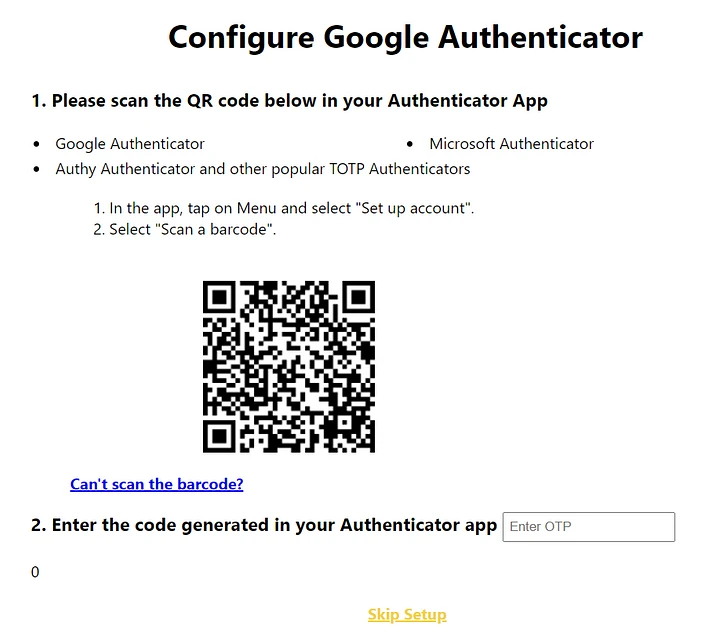
The program generates a code. Please enter it in the installation widget and click Save.
2FA for WordPress is now enabled on your login page.
3. Setting the login attempt limit
WordPress allows its users unlimited login attempts. This may sound innocuous, but it’s a glaring security hole.
Unlimited login attempts enable hackers to perform brute-force attacks. In this type of attack, hackers use bots to brute-force the correct username and password. Bots will fail several times before they achieve proper credibility. Limiting login attempts is one of the most effective ways to combat bot attacks.
The following plugins will help you do this:
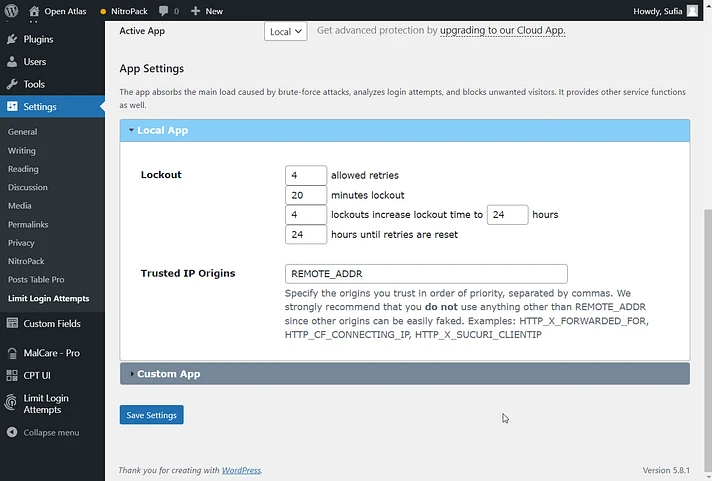
We use the Limit Login Attempts Reloaded plugin to limit login attempts. Install the plugin and then go to Settings >> Limit Login Attempts >> Local App. Here, you can determine how many login attempts are allowed for your website and how long a person will be locked out after the specified number of login attempts.
4. Prevent the discovery of the username
Typically, a username is less critical than a password. But this is not true because the username is half your credit. So it should be protected like a password.
On a WordPress website, usernames are displayed in posts and author archives. Fortunately, there is a way to deactivate both of them.
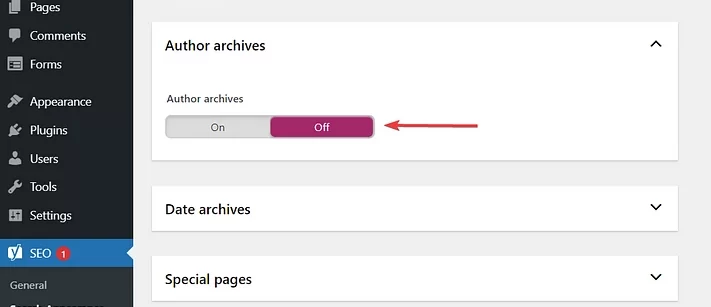
This can be done using any SEO plugin. In this section, we use Yoast SEO to demonstrate it.
Go to SEO → Search Appearance → Archives and then disable Author Archives. Click Save changes.
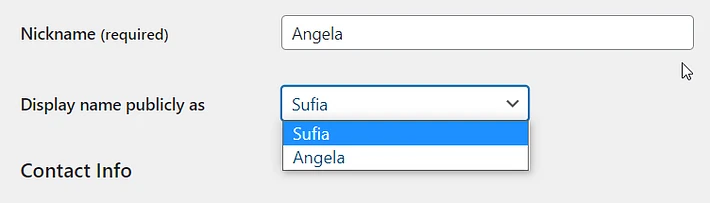
By default, the display name and username (the username you use to log in) are the same. You can change the display name to something else to prevent username discovery.
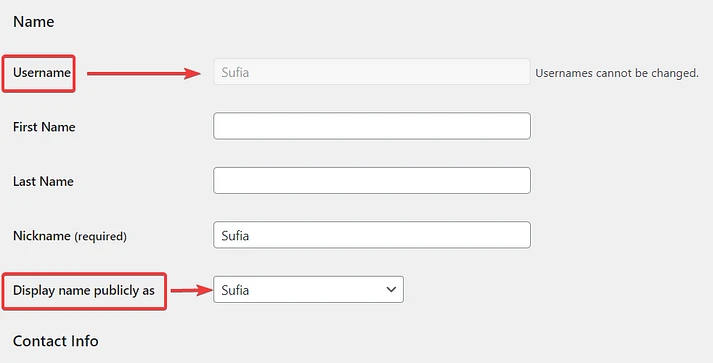
Go to Users >> ID >> Nickname. You cannot change the display name directly. You need to change the nickname first. Then choose a new nickname from the drop-down menu below.
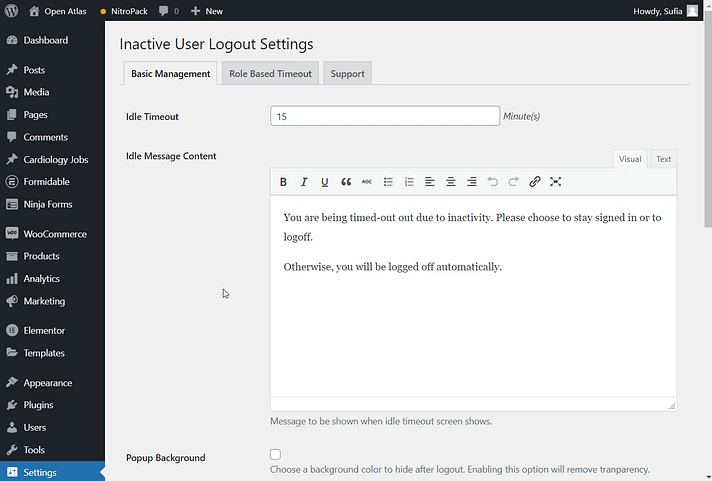
5. Using auto-logout
Automatic exit from websites protects against spies. When users leave the session unattended, automatic logout ends and protects the website.
WordPress’ default behavior is to log the user out 48 hours after the session cookie expires. And if the user has checked the “Remember Me” box, you are logged in for 14 days. You need to install a separate plugin to end the session due to some idle time.
The following plugins help you log out to end an inactive user session:
Activate the plugin and then go to Settings >> Inactive Logout. Set the clock for idle time. There are also options for role-based timeouts.
Conclusion about the security of the WordPress login page
As discussed above, hackers’ first attempt is to compromise your site’s login page, so it is essential to keep it secure. In this tutorial, we have taught you five efficient ways to do this.
FAQ
What is one way to protect the login page?
Enable two-factor authentication to add an extra layer of security.
Can changing the login URL help?
Yes, customizing the login URL reduces exposure to automated attacks.
Should strong passwords be used?
Always use strong, unique passwords to prevent unauthorized access.