How to Limit Bandwidth on MikroTik Router with Queue – Step-by-Step Bandwidth Control
There is an unwritten rule about people who buy Mikrotik virtual servers: Most of them buy them for bandwidth management. People with this goal want to control and monitor network traffic well.
One of Mikrotik’s features is the ability to manage bandwidth consumption, which is possible with the help of the Queue feature.
One of the standard methods that most Mikrotik hosting service providers offer to their customers is bandwidth management. But it is not difficult; you can quickly learn and do it yourself.
Bandwidth control includes limiting network users’ size and download speed, setting users’ access to the Internet and network resources, and applying various restrictions that you can easily manage.
If you also like to be able to manage all these things, visit Mikrotik’s virtual server purchase page and free yourself from excessive bandwidth consumption by users.
In the future, stay with us to provide zero to one hundred bandwidth management training in Mikrotik with the Queue feature.
How to Manage Bandwidth in Mikrotik?
There are two ways to control bandwidth in Mikrotik:
Simple Queue: The most straightforward way to perform bandwidth management, which is applied to small to medium networks, to adjust upload and download bandwidth usage for each user.
Queue Tree: Similar to a Simple Queue, but more complex, which can limit bandwidth-based groups even hierarchically. If you want to use Queue Tree, we need to enable this feature on Firewall Mangle.
Be careful that in Simple Queue, Queue processing is sequential, and there is even a possibility that if they are used as a group on the same IP range, the settings you have applied will not work correctly. For that reason, Internet traffic control, to be precise, you need to define Simple Queues individually on IP addresses.
In the following, we will teach each one in detail and tell you what to do.
How to manage bandwidth in Mikrotik with the Queue feature?
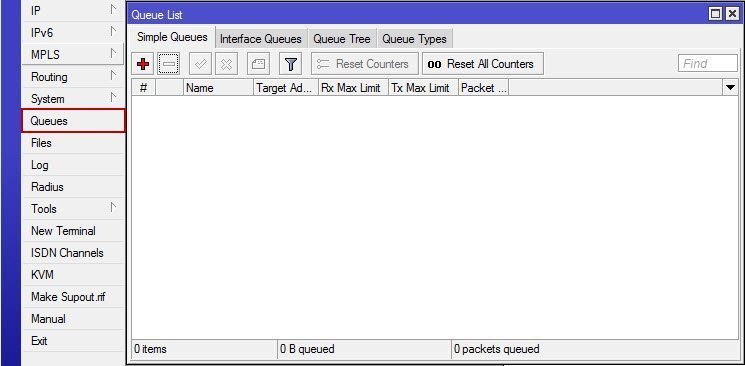
To start this time, we will try to limit the bandwidth for all users with a proxy. Please open it and select the Winbox Queues menu; you will see the following, as shown in the picture.
If your ISP’s bandwidth is 1 Mbps, its bandwidth limit will be at most 1 Mbps.
Click the + button to add a new simple Queue like this:
There are several tabs in the Simple Queue window, but we will only use the General tab and the Advanced section.
General tab
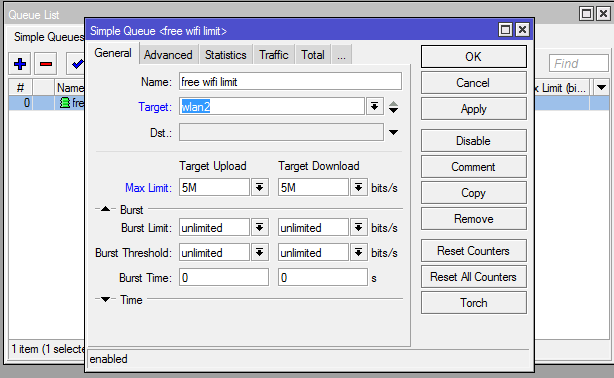
In the General tab, several options can be enabled. We must carefully consider using the target address and the Maximum Limit.
Target Address
You can set the target address to a specific IP address to which you want to limit bandwidth, for example, 192.168.100.0/24. From the image above, it can be seen that the destination address is empty, which means that the configured bandwidth limit is applied to all IP addresses.
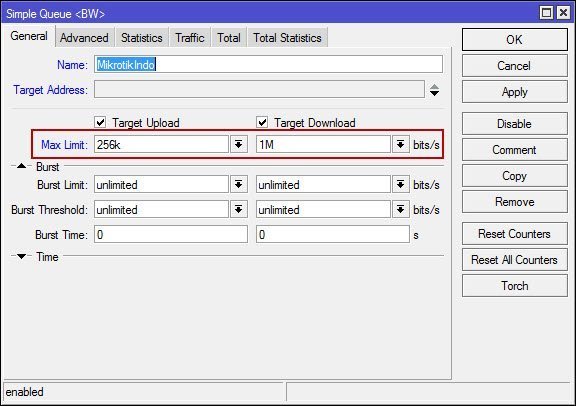
Max Limit
Max Limit is the maximum bandwidth allocation that a user can acquire and is usually reacquired by the user if another user does not reuse the bandwidth allocation. Don’t forget to check Target Upload and Target Download to enable this feature; choose a big bandwidth limit in Max Limit.
For example, upload 256 kbps, and download 1 Mbps.
The bandwidth limit for uploads is lower than for downloads, because it’s usually mostly user downloads (browsing, downloading music, files, etc.) rather than uploading. You can choose as you like.
You can also select the Time option to determine when and for how long Simple Queue will start running.
Advanced tab
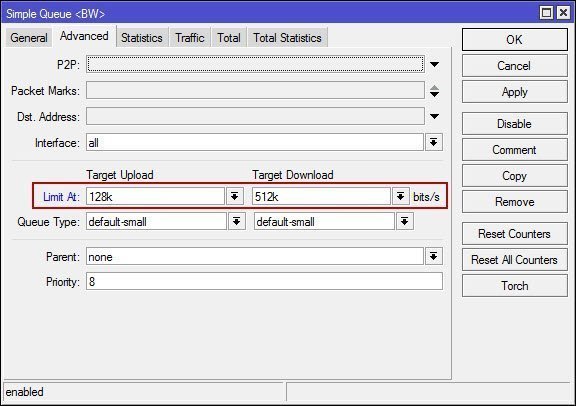
On the Advanced tab, about things that need attention and the Limit At Interface option.
Interface
Select the interface whose bandwidth you want to limit, for example, the wlan1 interface to limit wireless Internet connections. Select all if you want to limit bandwidth for everyone.
Limit
In Limit, bandwidth allocation is a process that the user can receive if the network traffic is hectic.
In any bad network situation, the user will not have the bandwidth allocation under the Limit in this value.
Therefore, this limitation is in the lowest bandwidth the user can obtain. For example, upload 128 kbps and download 512 kbps.
If each user uses the Internet connection and the network conditions are busy, each user will receive 128 kbps bandwidth, and 512 kbps. If one or more users are not using the link, the bandwidth link is given to the connected users. And if only one user uses the link, the user gets a maximum bandwidth of 256 kbps, 1 Mbps. Click OK to add the Simple Queue that appears in the Queue list.
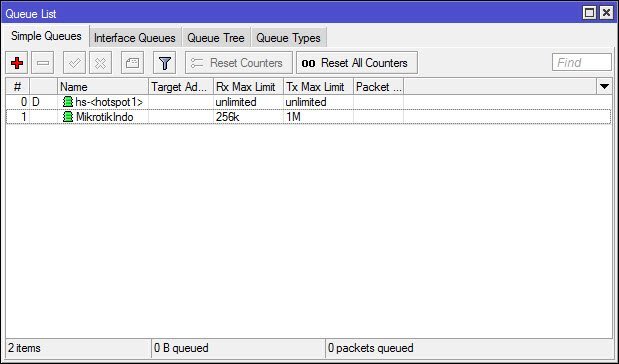
Bandwidth management in Mikrotik
You can adjust the configuration according to your taste. Set up Simple Queue yourself.
Conclusion
In this article, we taught you how to manage bandwidth in Mikrotik using the Queue feature. Here, you are free to configure everything as you like. The choice is yours; Cut and sew! If you have any questions about this article, please leave a comment so we can respond as soon as possible.
FAQ
What MikroTik feature is used to limit bandwidth?
You use the Queue system in MikroTik RouterOS to control data rates for specific IPs, interfaces, or subnets.
What is a Simple Queue on MikroTik?
A Simple Queue sets upload and download speed limits for a target IP range or interface using max-limit and optional limit-at settings.
When should you use Queue Tree instead of Simple Queue?
Use Queue Tree for advanced, hierarchical traffic shaping across groups and more granular control, often combined with firewall packet marks.