Duties of Server Administrators in Professional Server Management
Windows Server 2019, Thanks To Its Comprehensive Capabilities, Helps Network Administrators Manage Servers In The Best Possible Way.
Windows Server 2019, some home users have personally installed the operating system to implement and manage their home network and the systems under the network as accurately as possible. However, Microsoft has considered this operating system for entirely professional business applications.
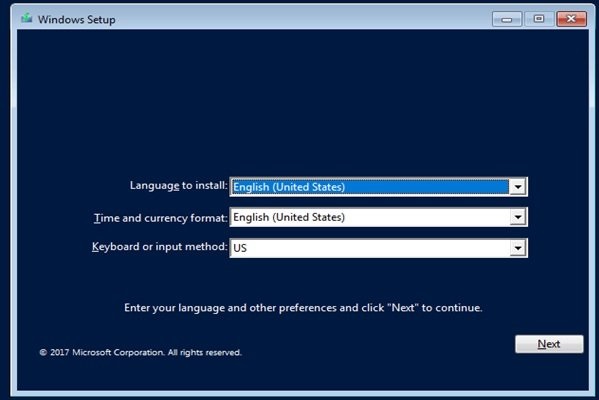
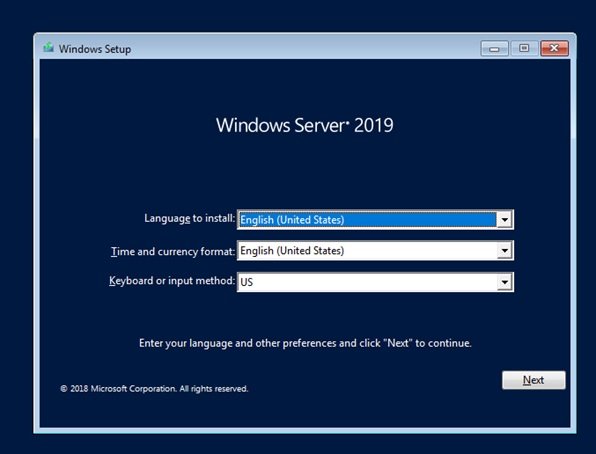
You will install the above operating system in this part of the free Windows Server 2019 tutorial.
People often ask which version of Windows Server 2019 to start with. Each version has its technical capabilities and licenses. To give readers a clearer view of the differences, let’s write a few lines about the differences between these versions.
Suppose you have only one operating system on your system. In that case, I suggest that, according to the goals of this training series, you install Windows Server 2019 on a virtual machine in VMware or Windows 10 Hyper-V so that your system does not experience problems. You can Uninstall Windows Server Troubleshoot and reinstall.
If installed on the central operating system, access to the previous Windows will no longer be possible if you do not want to install VMware. Windows 10 offers an easy-to-use tool for building a virtual machine. I suggest you install your Windows 10 virtual machine on your Hyper-V.
This article will install Windows Server 2019 on a Windows 10 Hyper-V Virtual Machine. For more information, see the article “How to create a virtual machine in Windows 10 without using any peripherals?”
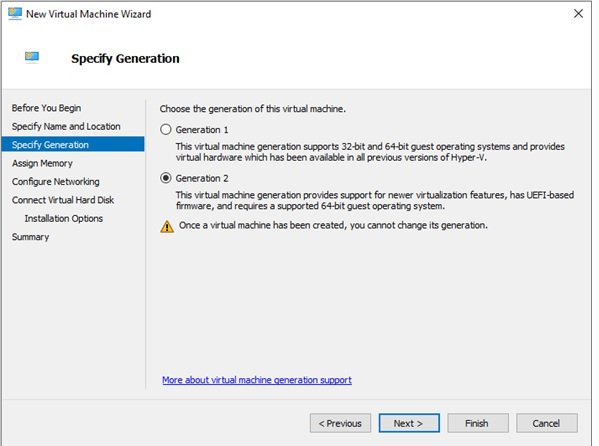
If you are using Hyper-V to install the virtual machine, be careful when building it. In the settings window, select Generation2 in the Specify Generation section.
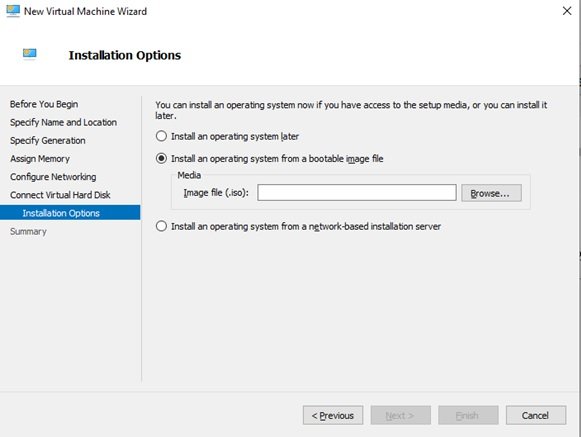
In the Installation Options section, select the “Installing an operating system from a bootable image file” option and specify the path to the ISO file so the virtual machine boots directly from it when launched.
Standard vs. Data Center
When you decide to install Windows Server 2019 on a system, you are given two different options. The first option is the 2019 standard version, which is the default option and includes the traditional rules of Windows Server.
The definitive version is a cheaper option, and the above version is mainly used to install Windows Server 2019. We can not comment on pricing, as each company offers a different price, and this pricing depends on the business agreement between Windows and Microsoft providers.
Several roles and features in Windows Server 2019 only work with the Datacenter version and are not available in the Standard version. On the other side is the data center version, the luxury model of Windows Server 2019.
If you are looking to install one of Microsoft’s technologies on your hardware equipment, you must first examine the requirements of the organization’s environment and your goals, and then choose the technology you want.
Keep in mind that the Data Center version can cost much more than the standard version, so companies only go to the Data Center version when they have significant needs. For example, if you are interested in hosting protected virtual machines or working with Direct Space Storage, you need to select the 2019 Data Center version with related technologies.
One of the most significant functional differences between the standard version and the data center is the number of virtual machines each can host. The 2019 standard version can only host two virtual machines at a time, which is a relatively large limitation, especially when you plan to create a Hyper-V server.
The data center allows you to run an unlimited number of virtual machines, which will not be a problem when building virtual host servers.
Desktop Experience
The above option is the most common choice related to Windows Server that you see anywhere. Whether installing the standard version of Windows Server 2019 or Datacenter, you can use or skip a graphical user interface in both cases. The traditional view of network experts is more towards the Desktop Experience. The above interface allows some components similar to RDPing in Windows Server to have a desktop version.
A traditional desktop allows you to use a graphical server administrator, enabling you to manage the server better. If you are familiar with Windows 10 navigation, you should be able to use the Desktop Experience in Windows Server 2019 with the least possible effort. We have Windows Server 2019 in most Windows Server 2019 tutorials.
Server Core
When you install Windows Server 2019, you will notice that the default option is not set to Desktop Experience. Server Core tries to provide a faster and more efficient server than the desktop version because it has minimal coding and fewer system resources than displaying a sizable graphical interface.
Almost anything you want to do in Windows Server can be done in both Server Core and Desktop Experience, with the only significant differences being the hidden UI and security. To use Server Core, you need to have the skill to use the PowerShell command-line interface without problems and consider remote server management a reliable way to communicate with your servers. Besides performance, the most significant advantage of using Server Core is its security.
Most malware that tries to attack Windows servers focuses on the graphical interface of the Desktop Experience. Because the Server Core version is highly protected, some attacks on Server Core-based machines fail.
Nano Server
There is another third-party platform for Windows Server 2019 called Nano Server. It is a scaled-down version of Windows Server, similar to Server Core, but it can be used on most machines. When I started a Nano Server, I used less than 500 MB of data to install the operating system, which is incredible.
With the release of Windows Server 2016, there were rumors about Nano Server. Due to the various capabilities and plans of the Windows Server that are put inside the Nano Server, Microsoft is looking to replace the Nano Server and increase the size of this operating system. And the hadiths are over.
One of Nano Server’s most considerable capabilities is its excellent interaction with containers. Some experts believe that the only way to run a nano-server properly is as an image inside a container.
Note: We are not talking about licenses, the Long Term Service Channel (LTSC), and related issues here, as for various reasons, technical support is subject to the purchase of a legal version and a range of legal matters.
Technical requirements for installing Windows Server 2019
There are several things to consider when planning to build a new server. What are you going to install on the server? Can the 2019 standard version meet your needs, or do you need the 2019 data center version? Is Server Core reliable from a security standpoint, or must you use the Desktop Experience version?
Since virtual servers have become popular and can run virtual machines, do you need such a feature? First, specify the minimum hardware requirements for Windows Server. This information is available on the Microsoft website at the following address. here
In short, to continue reading these tutorials and installing Windows Server 2019, you need the following minimum requirements.
Processor: A 1.4 GHz 64-bit processor supports NX, DEP, CMPXCHG16b, LAHF / SAHF, PrefetchW, and SLAT.
Main memory: At least 4 GB of memory is needed to run Windows Server with the Desktop Experience. Of course, you can install a desktop-experience-based server on a system with less main memory, but system performance will be significantly reduced.
External memory: Windows Server 2019 requires a PCI Express (PCIe) storage adapter. ATA / PATA / IDE is not allowed for boot drives. The minimum necessary storage space is 32 GB, but Desktop Experience consumes about 4 GB more than Server Core.
If you are looking to familiarize yourself with and master Windows Server 2019, the above are the minimum installation requirements. But to do your professional work, you need powerful hardware and additional components to properly install and use specific maps and features.
Components such as UEFI and the TPM chip are rapidly becoming mainstream in the tech world and are increasingly used across most operating systems. In particular, people want to use BitLocker to secure their systems, or to use strong certificates or protected virtual machines. In such cases, you should ensure your systems are equipped with TPM 2.0 chips.
Note: If you use a virtual machine to install Windows Server 2019, you do not need to follow the steps below; you can go directly to the installation file.
Burn the ISO Server 2019 ISO file on the target media
Installing Microsoft operating systems has improved dramatically over the past 15 years. In the past, installing a modern operating system such as Windows Server 2019 was high-speed and straightforward. You first need to burn the program’s installation files to a bootable medium.
First, download the Windows Server 2019 ISO file and burn it to a disc or flash drive so the disk or drive can boot the system. Usually, you should buy the original version of the product, but due to limited access, you have no choice but to use the Windows Server 2019 + v1903 x64 download link and download Windows!
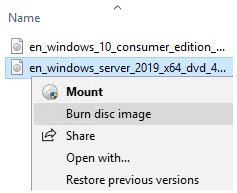
You need to download Windows, which is 5140 GB in size. Once you have downloaded and decompressed the files, you must burn them to a disk or flash them to flash memory. Right-click the ISO file and select Burn disk image to burn the Windows files to a disk. A simple wizard will appear and write the files to disk.
Since Windows Server 2019 is larger than 4.7 GB, you will need a dual-layer DVD to burn it to a DVD, allowing you to burn more data to the disk. As a result, it is better to burn Windows Server 2019 to a blank flash drive for faster access during installation and ease of operation.
Build a bootable flash drive.
It would help if you did this. To build a flash drive, you need Rufus software or ISO Burner. If you have downloaded the Windows installer from the source mentioned, the option above is included in the archive. Click the Rufus file, enter the ISO file path below, then click the Start button.
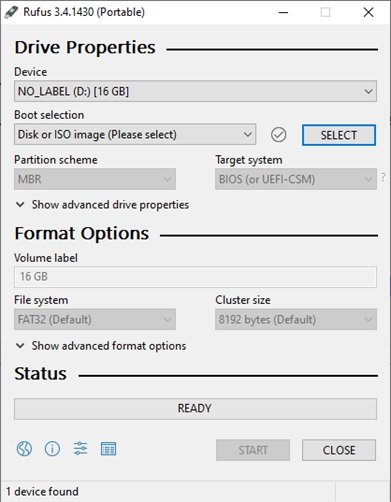
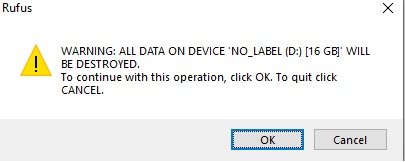
Clicking the Start button displays a warning to erase all data on the flash drive.
By pressing the Ok button, the Windows Server 2019 installation files will be burned to flash memory. After installing, click the CLOSE button to close the Rufus application.
Run the Windows Server 2019 installation file.
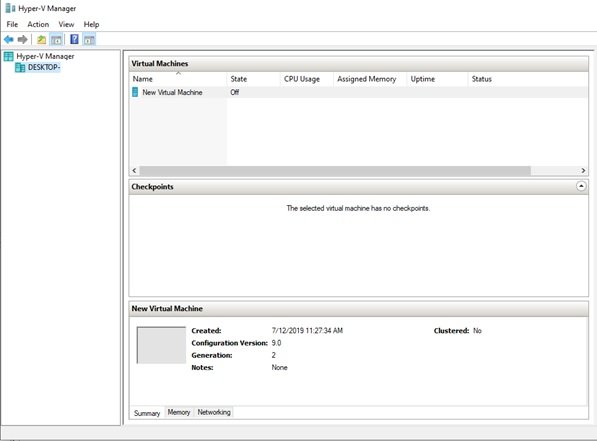
First, connect the flash drive to your system. If you used Windows 10 Hyper-V to build a virtual machine, run the Hyper-V Manager program as shown below and double-click on the virtual machine you created.
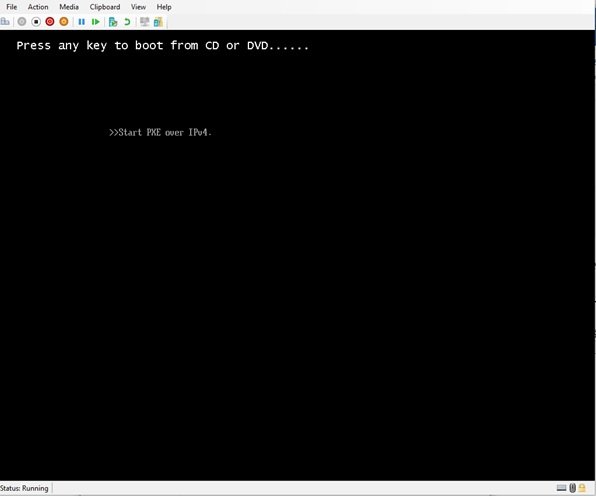
Press a key to start the installation process.
Select the default settings, then click Next on the previous page.
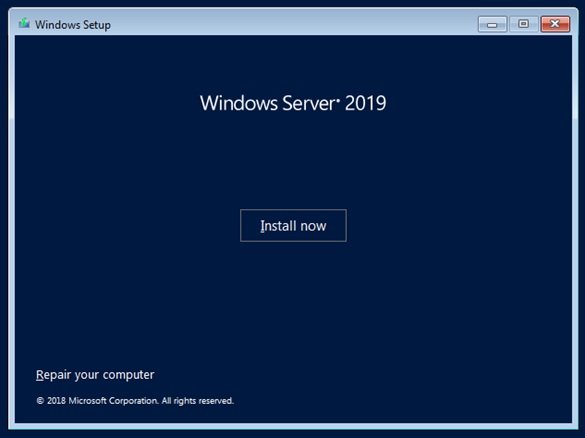
Now, click the Install button.
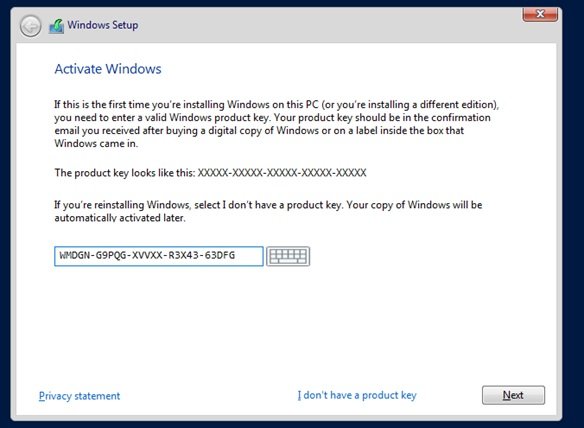
You must enter the serial number of the version you intend to use on the page above.
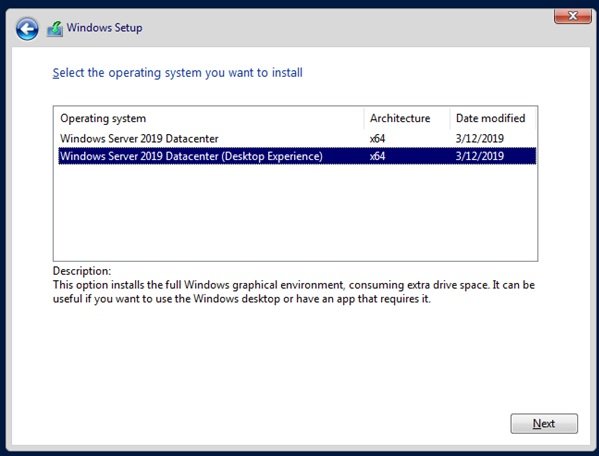
This article selects the Windows Server 2019 Datacenter (Desktop Experience) version. Please note the serial number for this version of Windows, according to the image or from the PC World site, and type it in the field below. (It is best to disconnect from the Internet before doing this.)
After entering the serial number, Windows Server automatically detects the corresponding version and displays the options below. Select the desktop option shown in the image, then click Next.
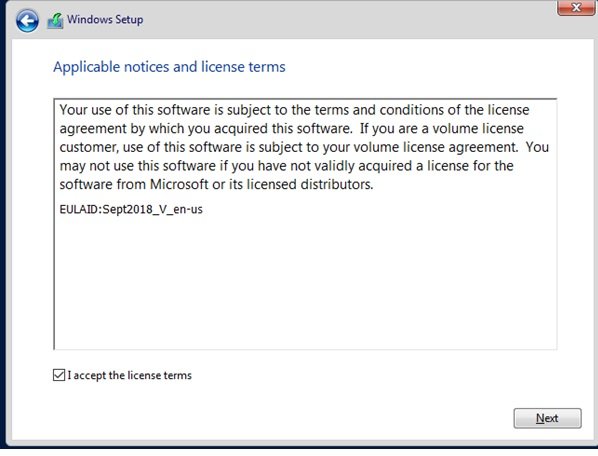
Select the agreement checkbox, then click Next.
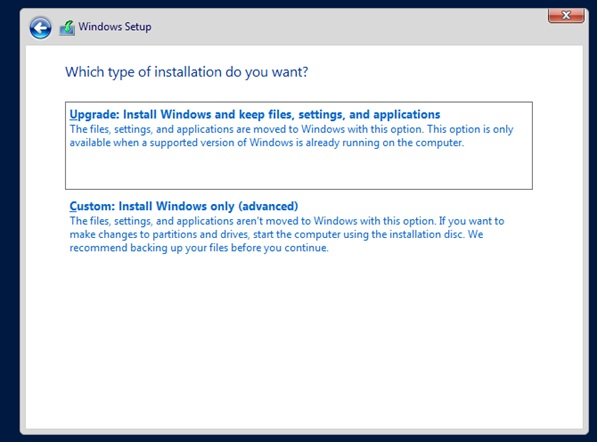
Then select Custom: Install Windows only (advanced) on the following page.
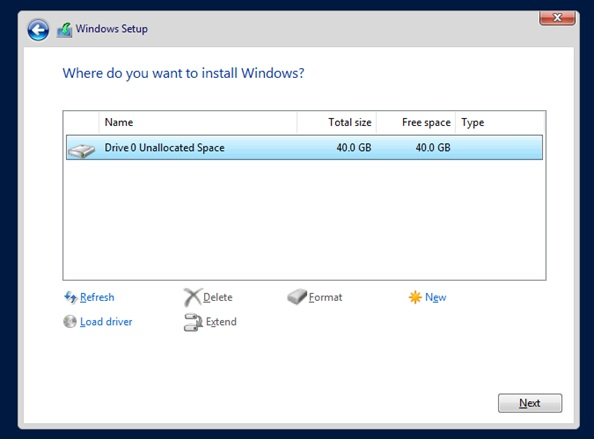
Then select the desired partition and click Next.
It begins by installing Windows Server 2019 in a Hyper-V virtual machine.
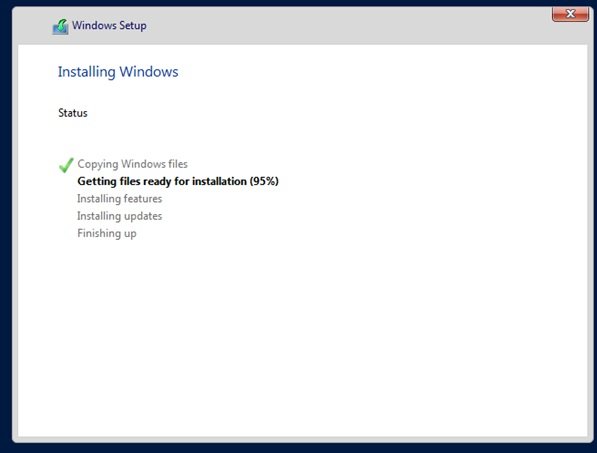
Let Windows Server 2019 services and settings go through their normal installation process.
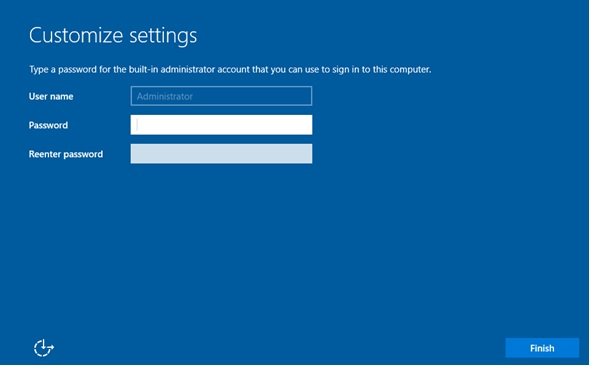
After completing this process, you will see the image below. Note that you must enter your password in the relevant fields. The password must be a combination of uppercase, lowercase, and numbers. Otherwise, Windows will not accept it.
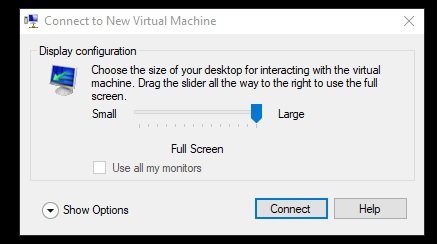
If you are using a Hyper-V virtual machine, specify the screen dimensions, drag the bar to the right, and select the full-screen option.
Without doing anything extra, click the Pause button at the top of the Hyper-V window to stop the virtual machine from running, and select Exit from the File menu.
FAQ
What does a server administrator do?
A server administrator manages, maintains, and monitors servers to ensure stability, security, and performance.
Why is server administration important?
It prevents downtime, protects data, and ensures systems operate efficiently and securely.
What skills are required for server administrators?
Technical expertise, problem-solving skills, security knowledge, and system monitoring experience are essential.