How to Create and Run a Microservice With Kubernetes
Developers And Development Teams Can Build Microservices With Kubernetes, Docker, And Jenkins. This development model has a simple process, and you can build and run containers with microservices using the Docker pipeline plugin.
However, the above method has a big flaw; We have to connect all the containers to communicate between the microservices deployed in the containers. Another intelligent solution based on Kubernetes is needed to solve this problem.
Getting to know Kubernetes and its essential terms
Kubernetes is an open-source platform for automating container deployment, scaling, and operations in host-based clusters. It is a technology that provides an efficient container-oriented infrastructure.
This powerful technology was first developed by Google and gained attention by providing a wide range of application-related features such as load balancing, dependency bundling, high interaction with services, application health monitoring, automatic horizontal scaling, and continuous updates. When you plan to use Kubernetes for microservices, there are a few essential terms you should know about.
These terms are as follows:
Pod: A key component of Kubernetes that can consist of one or more containers and ensures that the containers are located on the host machine and share the same resources. Containers in a pod can see other containers through localhost, each with a unique IP address within the cluster.
Service: It is a set of pods that work together. A service is a default placed in a cluster, but can be outside it. In this case, it has an external IP address. Developers can display it using one of the four properties: ClusterIP, NodePort, LoadBalancer, and ExternalName.
Replication Controller: It is a particular type of Kubernetes controller. The above component prepares a certain number of copies of a pod in a cluster so that the replication and scaling process can be done accurately. In addition, the above component is responsible for pod replacement in case of lower-layer node failure.
Minikube: Configuring a Kubernetes cluster that is supposed to be used based on the principle of high availability is not a simple task. Fortunately, there is a tool that makes it simple to run Kubernetes locally.
The device is called Minikube, which can run a single-node cluster in a virtual machine for developers to access whenever needed. If you intend to use the above tool in the Windows operating system, download minikube.exe and kubectl.exe and add them to the PATH environment variable.
Next, you can run it from the command line using the mini kube start command and use all Kubernetes features by calling the Kubernetes order. An alternative to the command line tool, Kubernetes Dashboard, can be launched by calling the Minikube Dashboard command. In this mode, there is the ability to create, deploy, update, or delete clusters through a dashboard that provides a user interface. Also, configuring all pods, services, inputs, replication controllers, etc., is readily available via the above dashboard. Figure 1 shows the user interface of this tool.
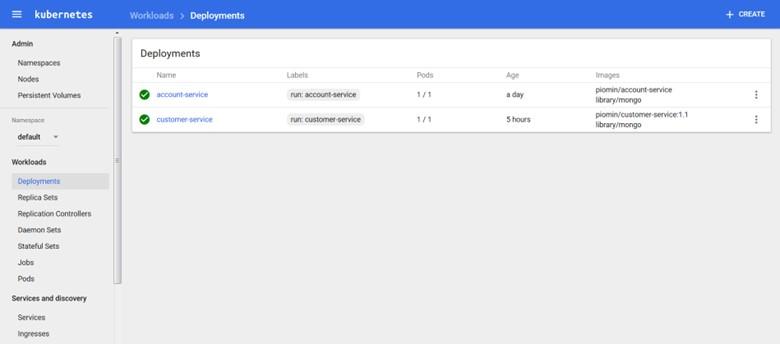
figure 1
Kubernetes is an excellent tool for clustering and orchestrating microservices. Of course, it is still a relatively new solution under development, but it can be used with the Spring Boot stack or as a replacement for the Spring Cloud Netflix OSS. Providing a dashboard based on the user interface allows you to monitor the resources and how they are accessed accurately.
Are you planning to use microservices? Microservices break an application into small independent parts, yet IT administrators still need a way to manage them. With Kubernetes, IT administrators can automatically collect and scale containerized microservices. Specific steps are followed carefully to simplify building and deploying a microservice container in Kubernetes.
Advantages of Kubernetes for microservices
Containerization, along with its orchestration and management with Kubernetes, aimed at supporting microservices, is an essential capability that application developers need. This vital feature offers significant benefits, the most important of which are the following:
- Self-healing: When a container fails or encounters a problem, Kubernetes automatically replaces it to maintain application performance and stable conditions.
- Declarative configuration management and version control: Kubernetes configurations are stored in YAML format files that allow software version control through Git. Additionally, settings can be updated seamlessly so all containers have the exact locations.
- Multi-cloud and hybrid cloud: Kubernetes allows IT teams to choose their preferred cloud platform for deploying workloads. Cloud platforms such as Google Cloud Platform, Microsoft Azure, or AWS are available to developers for this purpose.
- Service exposure and load balancing: Using domain name systems or IP addresses, Kubernetes exposes containers in pods or groups of pods so that other microservices can consume those resources. Also, IT administrators can load-balance logical pod groups with less hassle.
- Secrets Management: Kubernetes plays a vital role in preventing the disclosure of sensitive information, such as passwords and images inside containers, and protects objects that should not be exposed through the etch component.
- Scalability: When the demand to access services increases or the load increases, Kubernetes horizontally scales the number of containers running a microservice to prevent performance problems.
- Zero Downtime: Kubernetes can install additional pods based on a fresh image to ensure no downtime. When new containers are ready, teams can release updates and remove old containers. Additionally, IT teams can roll back changes with minimal downtime if new containers fail.
Communication between microservices in Kubernetes
There are several ways to display a running application in Kubernetes. Typically, developers use Kubernetes services to represent an abstract or logical entity of pods on the network. Available services include the following.
Cited:
- ClusterIP: Places the service in a cluster with a local IP address. The above service is the default Kubernetes option.
- NodePort: Represents the application on a fixed IP and port at the node level so it can be accessed outside the cluster via the IP address and port. This is the method we use in our paper.
- LoadBalancer: Defines the application as a service available to a load balancer component hosted on the cloud.
- ExternalName: Maps <IPAddress: Port> services to external addresses and names using a CNAME record. In internal communications, you can use the ClusterIP service and the domain name system to configure fully qualified domain names similar to the following addresses:
http://get-employee-microsvc.default.svc.cluster.local
http://new-employee-microsvc.default.svc.cluster.local
In this case, identification and access from within the cluster are possible. Regardless of the mentioned services, it is possible to use Kubernetes Ingress to expose HTTP/HTTPS services to users, which we will use in this article.
Our application
The architecture we intend to implement is shown in Figure 2. In Kubernetes, we have microservices related to User Accounts and Customers. Application services are associated with user account services when searching for customer accounts. Each microservice pod consists of two containers. The first container is connected to the microservice application, and the second is connected to the Mongo database.
Account and customer microservices have their own database where all data is stored. Each pod is available as a service and can be accessed by name in Kubernetes Searched Here; we’ll configure Kubernetes Ingress to act as a gateway for microservices.
It is necessary to explain that this program’s source code is available on the GitHub site, whose address is included at the end of the article.
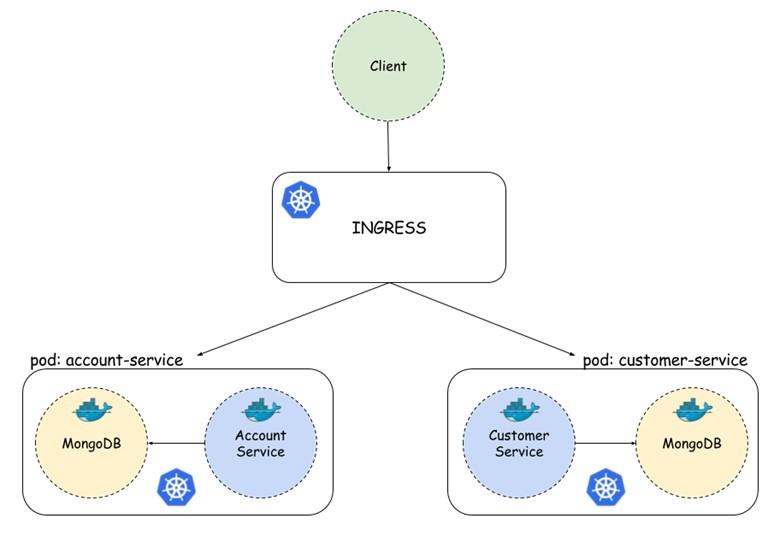
figure 2
The above architecture is based on two modules of account service (account service) and customer service (customer service), which operate based on the Spring Boot framework and only use the Feign client component, the Docker account service file. Additionally, we use a small OpenJDK-alpine image. The above image allows our base image to take up only 120MB of space instead of 650MB.
FROM OpenJDK: alpine

MAINTAINER Piotr Minkowski <piotr.minkowski@gmail.com>

ADD target/account-service.jar account-service.jar

ENTRYPOINT ["java," "-jar," "/account-service.jar"]

EXPOSE 2222
To enable MongoDB database support, we must add the Spring-boot-Starter-data-MongoDB dependency to pom.xml. Also, we need to define the data access mechanism for application.yml and the @Document class.
Next, we need to extend the repository interface called MongoRepository to be able to perform CRUD operations. For this purpose, we define the required key modules as follows:
public interface AccountRepository extends MongoRepository<Account, String> {

public Account findByNumber(String number);

public List<Account> findByCustomerId(String customerId);

}
In the client service section, we will call the API method from the account service. For this purpose, we need to define @FeignClient so that all pods with the account service can access @FeignClient under the account service and the default service port 2222. The process of determining the above component is as follows:
@FeignClient(name = “account-service”, url = “http://account-service:2222”)

public interface AccountClient {

@RequestMapping(method = RequestMethod.GET, value = “/accounts/customer/{customerId}”)

List<Account> getAccounts(@PathVariable(“customerId”) String customerId);

}
In the next step, we use the Docker build command to build the microservice image. Next, we must connect the image to the central Docker hub or our private repository.
To do this, we use the following commands. To view the public Docker Hub repository used in this project, refer to promin/account-service and promin/customer-service, whose addresses are at the end of the article.
Docker builds -t promin/account-service.
docker push promin/account-service
Deployment
You can deploy to Kubernetes using the kubectl run command, the Minikube dashboard, or YAML configuration files with the kubectl create order. One thing to note is that we will make all resources from YAML configuration files since we will deploy multiple containers in a single deployment step.
The deployment configuration file for the user account service is as follows. Note that you must specify the deployment name, the image name, and the port that is supposed to provide access to the service. Also, we need to select the number of requests to build pods in the replicas attribute.
apiVersion: extensions/v1beta1

kind: Deployment

metadata:

name: account-service

Labels:

run: account-service

Spec:

replicas: 1

Template:

Metadata:

Labels:

run: account-service

Spec:

Containers:

- name: account-service

image: promin/account-service

ports:

- containerPort: 2222

protocol: TCP

- name: mongo

image: library/mongo

ports:

- containerPort: 27017

protocol: TCP
Next, we will perform the installation process using the following command. It is possible to use the same power to create services and inputs. The only thing to note is that the YAML file format is different.
kubectl create -f deployment-account. YAML
Now, let’s take a look at the service configuration file. As you can see, the dashboard image is taken from Docker Hub, and the pods and replication set are built based on it. Now, we are going to move our microservice to the production environment.
Next, we need to set the MongoDB database to the default port to connect to the database services and define the collections of MongoDB clients. How to do this is as follows:
kind: Service

apiVersion: v1

metadata:

name: account-service

spec:

Selector:

run: account-service

ports:

- name: port1

protocol: TCP

port: 2222

targetPort: 2222

- name: port2

protocol: TCP

port: 27017

targetPort: 27017

type: NodePort
Now, we have a service similar to what you see in Figure 3.
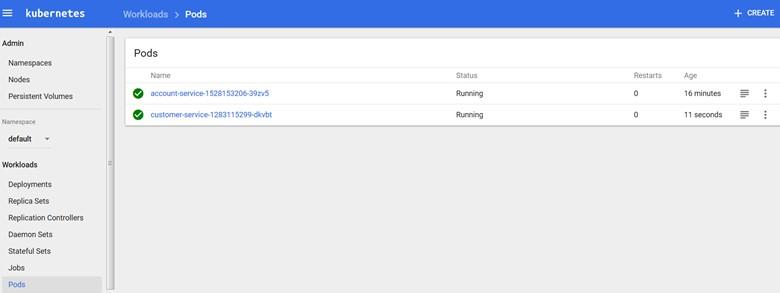
Figure 3
After creating a similar configuration for the client service, we must expose our microservices. In Kubernetes, they are visible through default ports (2222 and 3333) and service names. For this reason, we defined the URL http://account-service:2222 in the @FeignClient module.
Here, it doesn’t matter how many pods are created; the service is always available at the defined URL, and requests are balanced between all pods.
If we want to access any service outside of Kubernetes and use software such as web browsers, we must use the container’s default port number. For example, access to the account service is through port 31638, and customer service is through port 31171.
If you’re running Minikube on Windows, Kubernetes is available at 192.168.99.100, so you can interact with the accounts service using the URL http://192.168.99.100:31638/accounts. Of course, before accessing the services, we must define users in the Mongo database and set the application.yml file (Figure 4).
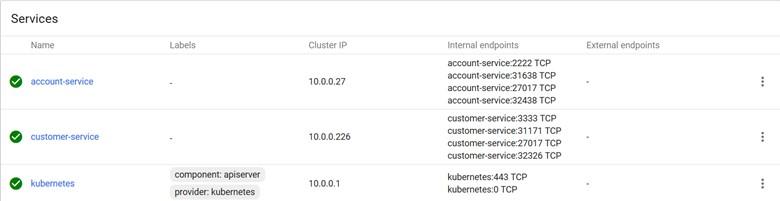
Figure 4
Now, we have two microservices, each with two ports, which is not what we expect. We need a gateway that directs our requests precisely to the desired service by matching the request path. Kubernetes provides us with a robust capability in this field.
This is the Ingress solution and is available through the Ingress YAML configuration file. Here, we need to define two accounts and customer service policies. Our gateway is available under the hostname micro. All defaults to HTTP port. The following commands show how to configure the settings.
apiVersion: extensions/v1beta1

kind: Ingress

metadata:

name: gateway-ingress

Spec:

Backend:

serviceName: default-HTTP-backend

service port: 80

Rules:

- host: micro. all

HTTP:

Paths:

- path: /account

backend:

serviceName: account-service

service port: 2222

- path: /customer

backend:

serviceName: customer-service

service port: 3333
The last thing to make the gateway usable is adding the following entry to the system’s host file. Go to /etc/hosts in Linux and C:\Windows\System32\drivers\etc\hosts in Windows and edit the corresponding file. Now, you can access http://micro.all/accounts or http://micro.all/customers/ {id} from your web browser, which calls the account service in the background.
[MINIKUBE_IP] micro. all
FAQ
What’s the first step to run a microservice on Kubernetes?
First, write your microservice (for example with Go, Node.js, or Python), then create a Docker image using a Dockerfile.
How do I deploy the microservice to Kubernetes?
Define a Deployment manifest (deployment.yaml) specifying the Docker image and replica count, then apply it with kubectl apply -f deployment.yaml.
How can I access my microservice once it's running?
Create a Service in Kubernetes (e.g., ClusterIP, NodePort, or LoadBalancer) to expose your pods; or use kubectl port-forward for local access.