How to Create an Author Page for Your WordPress
How to Create an Author Page for Your WordPress
The WordPress author page increases the credibility of the website’s visitors, and all kinds of websites use it to produce text and video content.
In this article, we’ll explain the true definition of an author page, clear up some confusion about what some people think author pages are, and walk you through the steps to add WordPress author pages.
What is an author page?
Unlike an author website, author pages are not full-fledged websites for novelists and authors but simple informational sections of any website with a blog.
The author pages are:
- Individual pages that display information about the author of a post.
- Often, blog posts link to the author’s biography or website:

This author bio box opens the author page by clicking on the author’s name.
This box is filled with background on the author, maybe a photo, and a list of articles they’ve contributed to:

An example of an author page with a photo, name, description, total posts, and a list of author contributions
The following section lists some of the benefits of WordPress author pages:
- Articles seem more authentic and from a real person because author pages usually feature a photo and description of the author.
- Contributors can quickly find their past work and put it into a portfolio.
- Brands looking for writers can find posts they like, then click on the author page to find that contributor’s contact information and background.
- Site visitors can feel more confident about what they are reading because they know it is from an experienced author.
Author Page vs. Author Gallery
Many people confuse author pages with author galleries.
An author page, at least as WordPress defines it, is a single page dedicated to an author’s information and blog archives. You can set up global styling so that every author on your website has a place to list recent blog posts, author information, and even social media links:

An author gallery (or list) page has multiple contributors from the same website. This gallery is a kind of showcase of all authors and content producers where the audience can get more information about them:
In theory, an author gallery leads to author pages after visitors click on author links.
WordPress author pages help all parties, making them ideal for improving credibility and humanizing blog posts. And they are easy to implement! So, keep reading to learn how to create WordPress author pages.
How to make WordPress author pages
By default, WordPress offers author pages, but they are limited to any designs added to your current theme.
For example, you might have something simple like this, where you see the author’s name, bio, and a list of articles:

Or you might not see anything at all, as many theme developers remove author pages altogether.
Therefore, there is a high possibility that you want to add your creativity to this page and customize it.
You can use one of the following two methods to add/customize your WordPress author page:
The first method: using the plugin (easy)
Second method: manually create an author page in your theme files (difficult)
prerequisite
Before proceeding with any of these methods, ensure user information is populated for at least one author. This way, you can test whether elements like photos and descriptions appear correctly when you customize your author page.
To complete the user information, go to the Users tab in WordPress. Select a user, then the important fields like:
- name
- last name
- Display the name publicly in the title
- Website (some themes show this on the author page):

Also, add the following:
- Biographical information
- Profile picture :

Finally, click on the Update Profile button.
⚠ Note: If you have multiple blog contributors, each must complete their user profile information. Only then will the content be shown on their author page.
Method 1: Using the plugin
One way to customize WordPress author page elements is to use a plugin. There is no specific author page plugin, but several membership plugins allow you to create rich profiles for each of your contributors.
Install the plugin
For this method, we use the Ultimate Member plugin. To get started, download and install the plugin on your WordPress site:
Creating home pages
After activation, Ultimate Member provides a button to create pages at the top of the dashboard. Click it to generate user profile pages (so you don’t have to do it manually):

This will take you to the automatically generated pages, which you can leave as is.
The user page (by user selection) is designated as the author page, so all your WordPress author pages now look a little different:

Access to the author’s page
Check out one of your current author pages (by clicking on the author name in a blog post) to see the changes. You will now see a module of the Ultimate Members plugin with author information:

Depending on your theme, this section may appear slightly differently:
Author page customization
Some typed information may appear on the WordPress user page, but it’s best to customize the author page by clicking the gear icon. After that, select Edit Profile:

Here, we recommend you:
- Upload a profile picture
- Add a cover photo
- Personalize the author’s bio
After finishing the work, click on Update Profile:

The results are instant, but you may notice a blank space under the bio and author menu where it says, “Your profile appears empty.” To add content to that section, go to the next step:

Add content to the author page
Go to Ultimate Member > Forms in WordPress, then select the Profile Form button.
Now add other fields for authors to fill in to complete their pages.
Click the + box under the first tab:

Decide on any fields you want to add. Some ideas are:
- website address
- Country
- Social media links like Facebook, Twitter, and LinkedIn:

Once you’ve entered the new fields, you’ll see them in the form builder.
Click on Update to continue:

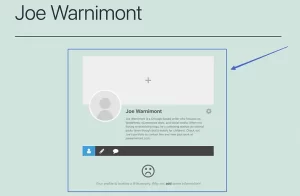
Now, when an author goes to their author page, they can click the gear icon and select Edit Profile to populate the new fields:

As you can see, each author page is now customizable with Website, Facebook, Twitter, and LinkedIn URL fields:

After clicking Update Profile, the author page will show links to the fields:

Finally, to view posts by that author, the user needs to click on the Posts tab (pencil icon) to list the posts archive:

Method 2: Manually create an author page in your theme files
This method provides full control over the styling of the WordPress author page but is limited to those who can edit theme or child theme files.
To use this method, follow the steps below:
- First, you must connect your website server with an FTP client such as FileZilla.
- Once connected, use FTP Client to navigate to /wp-content/themes/(thenameofyourcurrenttheme)/.
- Create a file called author.php in the current theme folder. (If there is already an author.php file, use the current one):

Here’s the code you can put in the new author.php file, which will add a nice author box and the author’s posts to the page:
<?php
// Set the Current Author Variable $curauth
$curauth = (isset($_GET['author_name'])) ? get_user_by('slug', $author_name) : get_userdata(intval($author));
?>

<div class="author-profile-card">
<h2>About: <?php echo $curauth->nickname; ?></h2>
<div class="author-photo">
<?php echo get_avatar( $curauth->user_email , '90 '); ?>
</div>
<p><strong>Website:</strong> <a href="<?php echo $curauth->user_url; ?>"><?php echo $curauth->user_url; ?></a><br />
<strong>Bio:</strong> <?php echo $curauth->user_description; ?></p>
</div>

<h2>Posts by <?php echo $curauth->nickname; ?>:</h2>


<?php if ( have_posts() ) : while ( have_posts() ) : the_post(); ?>
<h3>
<a href="<?php the_permalink() ?>" rel="bookmark" title="Permanent Link: <?php the_title(); ?>">
<?php the_title(); ?></a>
</h3>
<p class="posted-on">Posted on: <?php the_time('d M Y'); ?></p>

<?php the_excerpt(); ?>

<?php endwhile;

// Previous/next page navigation.
the_posts_pagination();


else: ?>
<p><?php _e('No posts by this author.'); ?></p>

<?php endif; ?>
The main reason for using this method is full control over the style. So, you can go to Appearance > Customize > Additional CSS to add CSS code to the author page.
Here are some examples of CSS you can try (feel free to customize it):
.author-profile-card {
background: #EBE9E8;
border: 2px solid #ccc;
padding: 25px;
margin-bottom: 25px;
}
.author-photo {
float: left;
text-align: left;
padding: 6px;
}
And we are done!
In this article, we taught how to create an author page in WordPress in two ways, using a plugin (easy method) and code (hard method). Good luck!