How to Choose Your Microphone in Windows 11
When Using Windows 11, You May Need To Switch Audio Inputs Between Multiple Microphones Connected To Your Computer. Microphone in Windows 11. Fortunately, Windows has made this process relatively easy.
Change the microphones in Windows 11 using the taskbar shortcut.
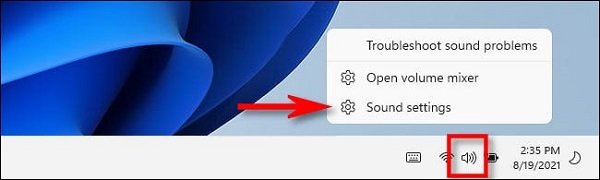
One of the fastest ways to choose a different microphone in Windows 11 is to use the hidden taskbar shortcut. First, right-click on the volume icon in the taskbar. In the small menu that appears, select “Open Volume Mixer”.

Windows Settings opens to System > Sound > Volume Mixer. Under “Input Device,” click the drop-down menu and select the desired microphone from the list.

Then, close the settings. Note that if you need to change the audio output in Windows 11, the Quick Settings menu has a different way to change audio devices.
Change microphones from Windows settings.
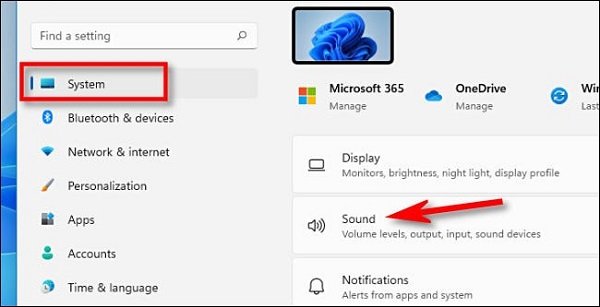
Although we used Windows Settings in the last section, you can also select your audio input device in the Settings app. First, open Settings by pressing Windows + I on your keyboard. When the locations appear, select “System” in the sidebar, then “Sound.”
Alternatively, right-click the volume icon on the taskbar and select “Sound Settings.”
In the Sound settings, go to the “Input” section. In the Choose a device for speaking or recording section, click the circular radio button next to the microphone or input device you want to use.

If the microphone you want to select is not on the list, try (if possible) unplugging and reconnecting it, restarting your computer, or installing it on a drive from the same microphone manufacturer.
Also, if you need to adjust the input level of your microphone or input device, use the “Volume” slider just below the microphone selection list. When you’re done, close the settings—your changes will be saved.
FAQ
How do I select a different microphone in Windows 11?
Open Sound settings (right-click the speaker icon → “Sound settings” or press Win+I → System → Sound), then under “Input” choose your desired microphone from the list.
Can I switch mics quickly without opening full settings?
Yes — right-click the volume icon on the taskbar, choose “Open Volume Mixer,” then select the mic under “Input Device.”
What if my microphone doesn’t show up?
Try unplugging and reconnecting it, restarting your PC, or updating the mic’s driver; also check that Windows has permission to access the microphone in Privacy settings.