
How to Change Your Router’s Wi-Fi Channel for a Faster, More Reliable Connection
We Are Faced With An Unstable Wi-Fi Router Signal for Many Of Us, And We Can Not Solve The Problem With Various Measures.
Wi-Fi Channel: You can change the Wi-Fi router channel to choose the best, most private one. This article will teach you how to do this.
Fortunately, changing the Wi-Fi channel is not complicated, and you can fix the Wi-Fi network performance problems in several steps. This article provides information on how to change the Wi-Fi router channel and strengthen network performance through the end of this article.
What is the fastest Wi-Fi band?
Before we get into how to change the channel on the router, it’s a good idea to see which Wi-Fi band is the fastest. So, first, we compare the 2.4 GHz and 5 GHz channels.
1. 2.4 GHz band
This band consists of 14 channels, 22 MHz wide, with a 5 MHz distance between each adjacent channel. Not all channels on this band work in all countries, so users will have access to some of these 14 channels depending on the country in which they live.
For example, only 11 of the 14 channels can be used in North America. In this case, users should use the first, sixth, or eleventh channels to overlap less with other channels. The 2.4 GHz channels are perfect for general tasks such as surfing the web, watching videos, and using social media.
2. 5 GHz band
It is best to use this band to minimize users’ use of the same frequency. The 5 GHz band offers 24 channels with a width of 20 MHz that do not overlap with each other. You can also select 40, 80, and 160 MHz channels.
If you want to stream high-quality videos, using channels in the 5 GHz range makes more sense.
Now that we know the differences between the 2.4 and 5 GHz bands, we need to change the Wi-Fi router channel change tutorial.
How to change the Wi-Fi router channel
Of course, changing the router channel is not as simple as changing the TV channels, but we do not have a difficult task. There are two ways to make such a change, so once you know which channel works best for your network, you can easily change the channel.
It should be noted that each Wi-Fi router has its own variables and different firmware. So, for better guidance, you can refer to your router’s instructions. However, there are general solutions that work on most routers. In this regard, we will teach you two ways to change the Wi-Fi router channel.
Change the Wi-Fi channel with the router management interface.
The Wi-Fi network settings are located within the interface of your web router, which is called the admin or admin interface. With this interface, you can easily change your router channel. To do this, follow these steps:
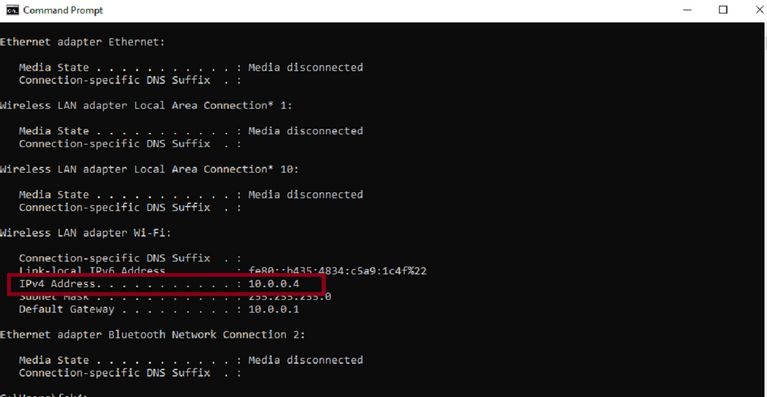
1. Find the IP address of the router
If you are running Windows, type Command Prompt in the search bar of this operating system and press the Enter key on your keyboard. After that, type the word ipconfig and press Enter again. The IP address is displayed next to the phrase “Default Gateway,” and the IP address will be the router.
Mac Apple users can access the IP address by running the terminal app and typing netstat -nr | grep default. After typing, press the Enter key, and your IP address will be displayed in the line containing the word Default.
2. Enter the IP address in the browser
Now that we have the IP address, we need to go to the Internet browser, enter our IP address in the address bar, and press Enter. A window will open, and you will have to enter the router’s administrative information to access the modem settings.
3. Open Wi-Fi settings
We can change the channels manually here. The exact location of this option and its name can be different for each router; however, in most of them, you have to go to the Advanced Settings section.
4. Change the Wi-Fi channel
Click the Channel drop-down menu and select the Wi-Fi channel you want to change. When done, click Save or Apply to apply the changes you want.
Change channels using Wi-Fi scanning software.

Wi-Fi scanning apps help analyze your channels and ensure the router only transmits information to the non-interfering channel.
To change your Wi-Fi channel using such programs, follow these steps:
1. To change the Wi-Fi channel through a Wi-Fi scanning program, first run the program and select your Wi-Fi network name from the list of available networks.
2. Once you find your channel name under the SSID panel, look at the channels column to see which channel the Wi-Fi network uses.
3. Click Details to display the different frequency bands and channels available. The best channels are the least busy ones; of course, a diagram shows how busy the channel is.
4. Finally, select the least crowded channel and save the settings at the end.
Strengthen Wi-Fi by changing channels.
When multiple routers use the same channel, interference eventually occurs. When this happens, the best thing to do is remove the Wi-Fi channel from automatic configuration and change it to a less crowded one.
With the steps and solutions we have taught you, you can improve your Wi-Fi router’s performance and experience greater stability and speed.
FAQ
What is a Wi-Fi channel?
A Wi-Fi channel is a specific frequency slice within a band (like 2.4 GHz or 5 GHz) used by your router to communicate wirelessly.
Why should I change my Wi-Fi channel?
Changing to a less crowded channel reduces interference from nearby routers and devices, improving connection stability and speed.
How do I change my router’s Wi-Fi channel?
Log into your router’s admin interface (via its IP address), open the wireless settings, select the channel drop-down menu, choose the least busy channel, and save the changes.