
How to Install WordPress on a Subdomain in cPanel — Step-by-Step Guide
To build a website, we need to install it on the host. The best option for WordPress is Linux hosting, which is available today with a slightly better, easier configuration. We already mentioned installing WordPress on cPanel and DirectAdmin. For this purpose, the installation steps are done on the root host and appear in the primary address. But today, we will teach you how to install WordPress on a subdomain in cPanel. This post is valuable and practical for people who need to install multiple sites on a single host.
Installing WordPress on a Subdomain in cPanel
Discussing why WordPress is installed on a subdomain in cPanel is not harmful.
There are many reasons to install WordPress on a subdomain. Typically, you use this method to distinguish between installing on a subdomain and installing on the main WordPress branch. You may make this distinction for branding, technical, or both.
For example, you may want to use a different theme or install additional plugins. Here are some examples:
Knowledge Base / Support – e.g., docs.yoursite.com
Blog – e.g., blog.yoursite.com
Bilingual site – e.g., uk.yoursite.com
Online store – e.g., shop.yoursite.com
Courses – eg, courses.yoursite.com
Events – e.g., events.yoursite.com
The situation may also be different. For example, you may have created your online store with Shopify but want to use WordPress for your store blog because it offers more powerful blogging functionality. In this case, you must install WordPress on the subdomain in cPanel.
Now that we have examined why this is important, it is time to learn how to install it.
Step 1: Create a subdomain in WordPress
Before installing WordPress, you need to create a subdomain in cPanel. To do this, follow these steps:
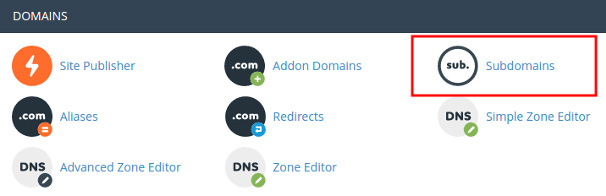
Log in to your cPanel. On the Tools page, in the Domains section, click Subdomains:
On the page that opens, click on Create a Subdomain. A new domain is created here:
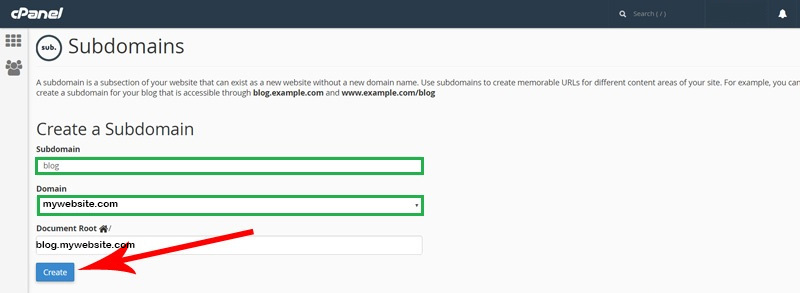
Subdomain: Here, enter the exact name you want for the subdomain. For example, we tend to create a blog as a subdomain.
Domain: Enter the address of the central part of the leading site here.
Document Root: Enter the address that will be created as a subdomain here.
After that, click the Create button to apply. No. Our subdomain has been created and is ready to install WordPress.
Step 2: Download and install WordPress on the created subdomain
Now, click on the File Manager option on the main page of cPanel and go to public_html from there.

In Public_html, a folder with the selected tisubdomain title will be seen. This is where WordPress should be installed.
Suppose the name of this folder is blog.mywebsite.com, according to our creation:
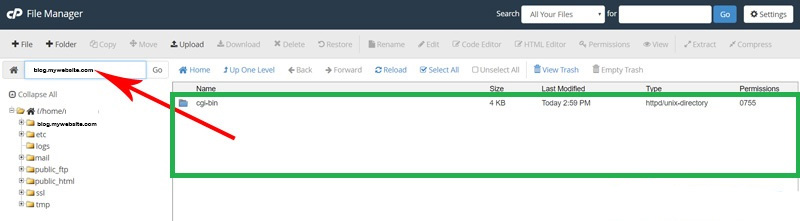
Now, it is enough to download the latest version of WordPress from the WordPress repository and upload the received file to the root of the subdomain. Then, extract it and move the WordPress folder’s contents to the subdomain’s primary source (blog.mywebsite.com).
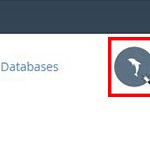
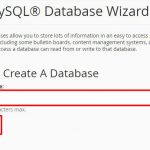
Step 3: Create a database for WordPress
We need to build a database to connect the content to the site. That is precisely what we did for the leading site; we must do the same for the subdomain. For this purpose, visit the main page of Cpanel and click on the MySQL database wizard option to go to the database creation page:
Here, you have to choose a name for the database, username, and password:
Now, click on the Next Step option to proceed with the rest of the database creation steps:
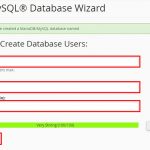
After entering a solid username and password, click on the Create User option to see a page similar to the image below:
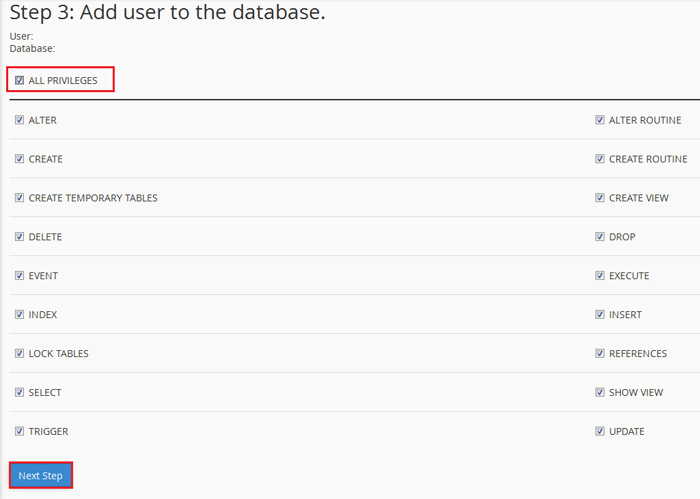
By selecting these items, we connect the user with the database. Now, click Next Step. A message indicating that the operation was successful will appear. Here, the construction and database connections are also completed.
Step 4: Install WordPress on the Subdomain
Now that we have made all the preparations, it’s time for the main operation: installing WordPress on the subdomain in CPanel! For this purpose, enter the subdomain address, i.e., blog.mywebsite.com, in your address bar. In the first step, select the WordPress language, usually Farsi. After that, you will see the following image:
Now it’s time to enter the database information. Everything we made for the database must be entered in this section: after entering the above information, click the send button. You will see the following image: Now, click on the install button.
Here, we have to enter the information about the WordPress site.
Site Title: You must consider a title for your site—for example, the jacket training base.
Username: Specify a username for your site.
Password: To enter the admin, you must also specify a password in addition to the username. The more complex the password, the better.
Your email: Choose an email. This email is known as the admin.
Showing to search engines: You can prevent search engines from checking your site until it is ready.
Now, click on the Launch WordPress button.
Installing WordPress on a subdomain in cPanel was as simple as this.
Advantages and disadvantages of installing WordPress on a subdomain
Advantages:
A subdomain is separate from the leading site, which is good if it has a different purpose -for example, it is an excellent option for installing a blog and an online store.
You can use different themes/plugins to install WordPress. For example, you can use a completely different theme and design for the subdomain.
While you can create separation between the original domain names, you maintain the same overall branding. That would be a different situation if you changed to a separate domain name.
You can use a different host to separate the subdomain from your main site and prevent them from influencing each other. This can be useful, provided that the content in the subdomain is generally available. For example, some VIP sites host member information on a subdomain because unique content requires more space.
You can back up sites on separate schedules optimized for each. This can save capital and resources while keeping information secure.
There is no interference between the subdomain and the primary domain.
Disadvantages:
Google will likely treat subdomains as separate sites, negatively affecting your subdomain’s SEO because it doesn’t take full credit from your primary domain. However, SEO experts disagree about the importance of this issue.
If you install two WordPress instances separately, site management becomes complicated. (e.g., 2x the number of updates to be applied).
You often must purchase two licenses to use the same plugin on both sites. For example, the popular Elementor Pro plugin counts a subdomain as a separate site.
Installing WordPress on a Subdomain in cPanel
Sometimes we need to install two WordPress installations on our site. Two WordPress sites, each with its own address. For this purpose, the best option is to create a subdomain. This way, you will have two or more sites with one domain address. In this article, we discussed how to install WordPress on a subdomain in cPanel so that you can efficiently perform this operation.
FAQ
How do I create a subdomain before installing WordPress?
Log in to cPanel → go to the Subdomains (or “Domains”) section → enter the subdomain name (e.g. “blog”) → cPanel automatically creates a document-root folder (e.g. /public_html/blog) for it.
How do I install WordPress on that subdomain?
In cPanel, open the “Softaculous Apps Installer” (or “WP Toolkit”), select WordPress → choose the subdomain from the drop-down list → leave the directory field blank → fill in site settings (admin user, password, etc.) → click “Install.”
Is a separate database required for WordPress on a subdomain?
Yes — typically you create a new MySQL database and user via cPanel’s “MySQL Databases” panel, assign the user to the database with full privileges, and then provide those credentials during WordPress setup.