
How to Change DNS in Windows 10
Change DNS: This article mentions Several Ways To Use More Secure And Private DNS Servers And Change DNS Settings.
Access and download various files. After the user registers and purchases the Internet, the ISP (Internet Service Provider) makes the necessary network settings as part of the Service (including Domain Name System or DNS addresses); with these settings, the user can load the websites of their choice to online services.
However, DNS servers are sometimes slow, insecure, and not very private. However, many solutions or third-party companies can be used to improve the Internet in Windows 10.
What is DNS?
Ir into computer-readable IP addresses. Every computer connected to a network (and the Internet) needs an IP address to communicate with other devices. But it is not easy to remember these addresses (for example, the IP address is 104.18.189.55). This is where DNS becomes a mechanism for translating user-friendly domain names. The Domain Name System, or DNS, is a (usually free) service that allows users to type a name into a web browser to load a web page.
You can access the desired site by typing https. But to run this command in the background, the web browser sends a request to the DNS servers to analyze the website name and convert it to an IP address. The browser downloads the content and displays the page when the URL is found.
Users usually don’t see this process because it happens so fast (within milliseconds); the internet speed will decrease if the resolvers are unreliable. If the user wants to use more private and faster servers, Windows 10 can change DNS settings. The following are the steps to change the device’s DNS settings using the Control Panel, Command Prompt, and Settings application.
How to Change DNS Settings Using Control Panel
To change the current DNS settings through the network settings on the Control Panel, follow the steps below:
1. Open Control Panel.
2. Click on Network and Internet.
3. Click on Network and Sharing Center.
4. Click on the Change adapter settings option in the left panel.
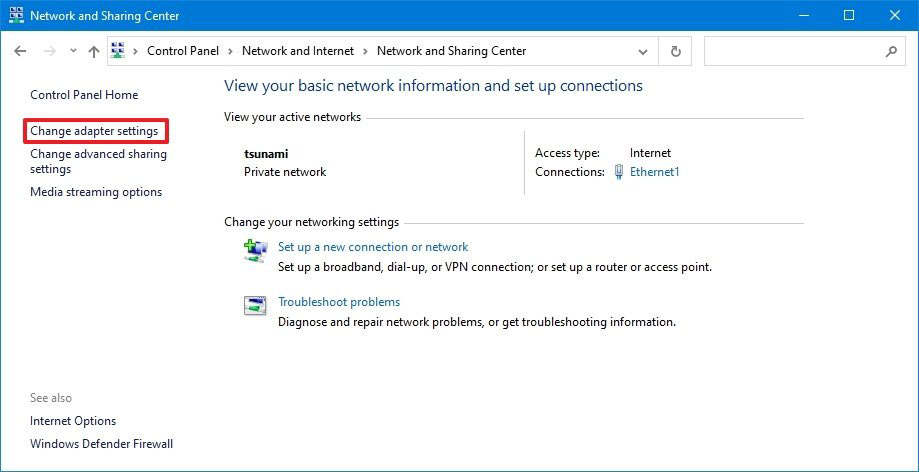
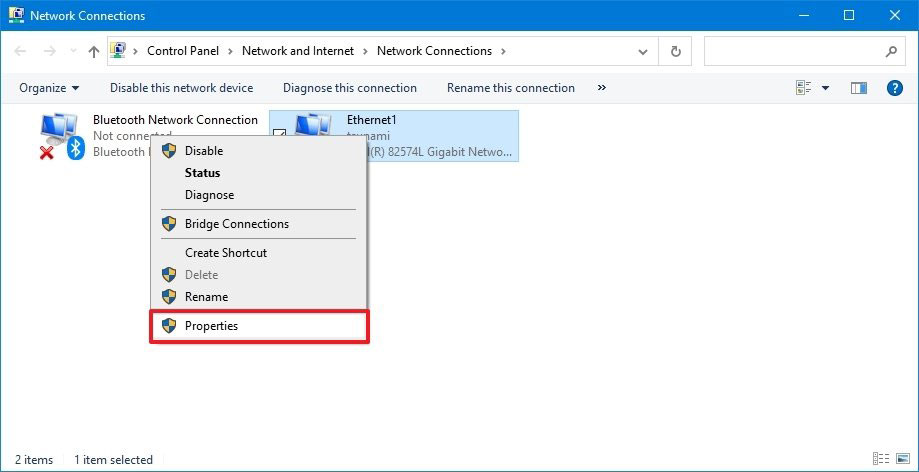
5. Click on the active network interface and then select Properties.
Note: You must know which adapter is connected to the network and should not have the “Disabled” or “Network cable unplugged” label.
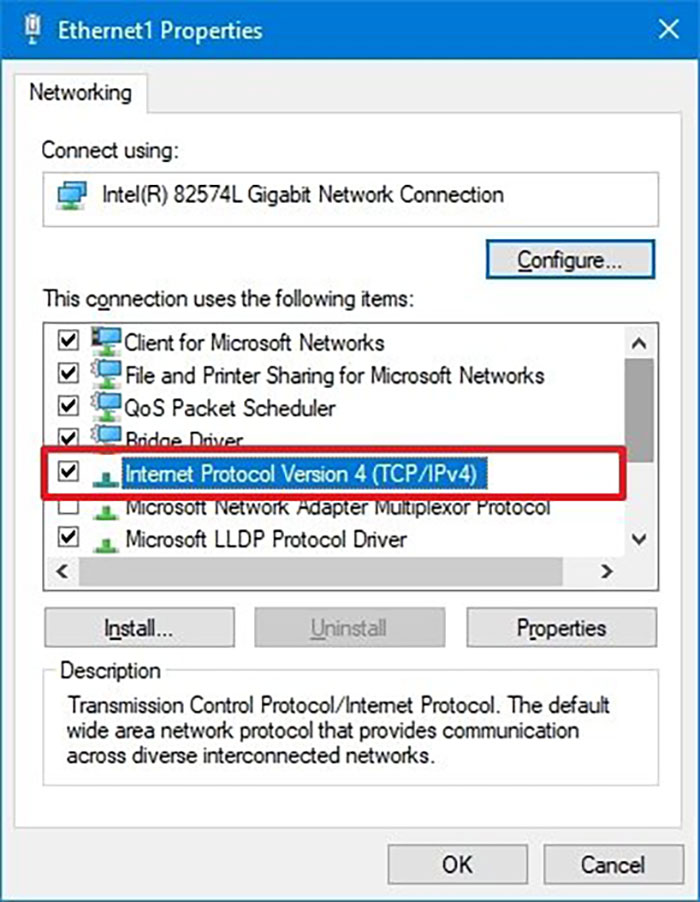
6. Select the Internet Protocol Version 4 (TCP/IPv4) option.
7. Click the Properties button.
8. Click on Use the following DNS server addresses option.
Note: When you select this option to enter DNS settings manually, the computer will continue to obtain a TCP/IP address from the DHCP server (router).
9. Enter the primary DNS address in the Preferred DNS Server section. If you want to use Cloudflare, Google Public DNS, or Cisco OpenDNS, you can use the following settings:
Cloudflare: 1.1.1.1
Google Public DNS: 8.8.8.8
OpenDNS: 208.67.222.222
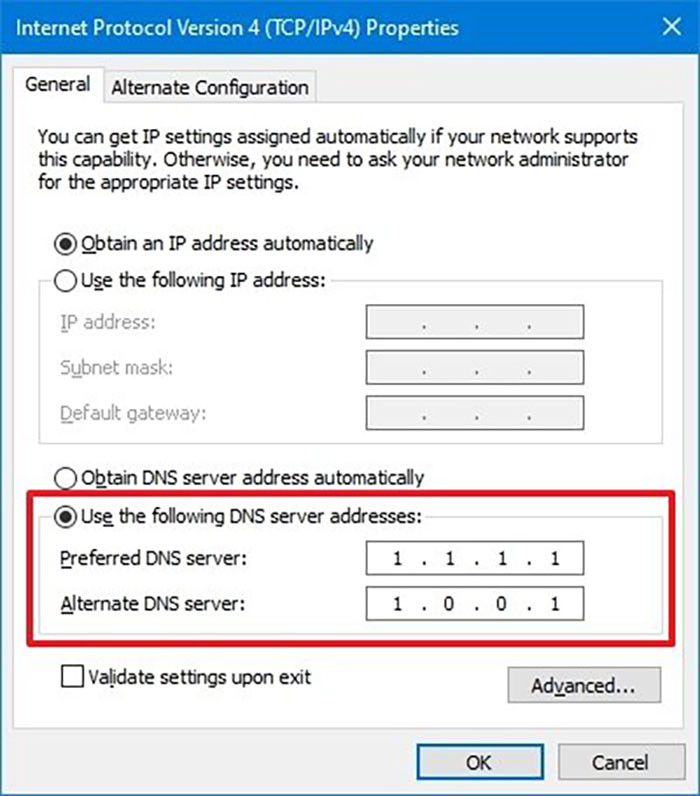
10. Enter the secondary DNS address under the Alternate DNS server section. This address is used if the primary lesson is not accessible. You can use the secondary address of one of the following companies.
- Google Public DNS: 8.8.4.4
- OpenDNS: 208.67.220.220
- Cloudflare: 1.0.0.1
11. Click on the Advanced button. (optional)
12. Click on the DNS tab.
13. Click the Add button.
14. Enter additional addresses for the alternate DNS server.
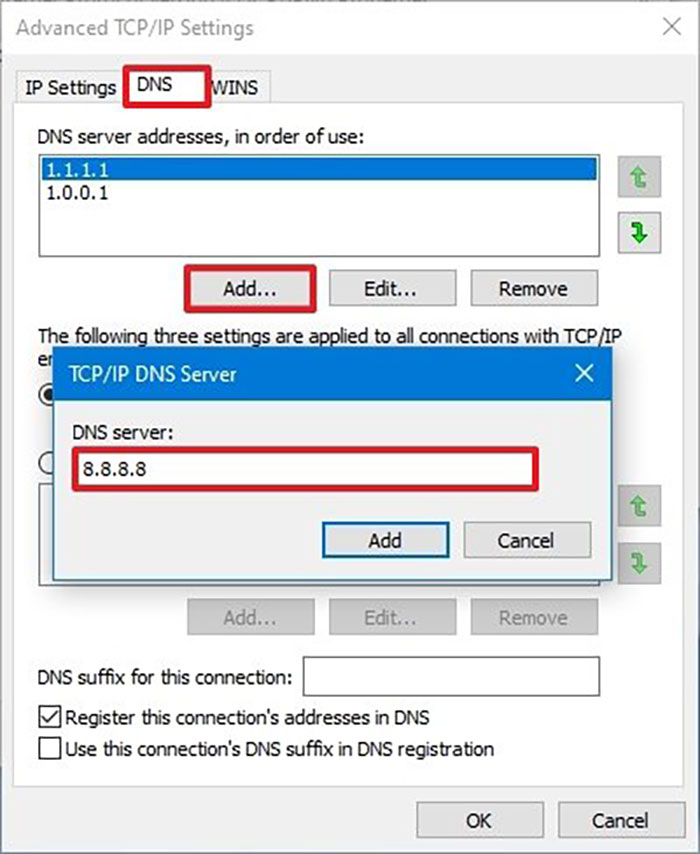
15. Click the Add button.
Tip: Besides adding new addresses, you can edit or delete them and change their priority.
16. Click the OK button.
17. Click the Close button.
18. Click the OK button.
After completing these steps, the computer will use the defined DNS settings.
How to change DNS settings using Command Prompt
If you don’t have access to the Control Panel and it’s easier for you to work with commands, you can use Command Prompt to change Windows 10 DNS settings:
1. Open Start.
2. Search for Command Prompt, right-click on the search result, and select Run as administrator.
3. Type the following command to change network settings and press Enter.
Netsh
4. Type the following command to identify the names of the network adapters and then press Enter:
Interface shows interface
5. Type the following command to set the primary DNS IP address and press Enter:
“interface IP set DNS name=”ADAPTER-NAME” source=”static” address=”X.X.X.X
In the command line, replace “ADAPTER-NAME” with the name of your network adapter, then enter the IP address of the desired DNS server instead of XXXX. To use Google Public DNS, OpenDNS, or Cloudflare, you can apply the following settings:
- Google Public DNS: 8.8.8.8, 8.8.4.4
- OpenDNS: 208.67.222.222, 208.67.220.220
- Cloudflare: 1.1.1.1, 1.0.0.1
This example sets the primary DNS address to 1.1.1.1:
interface IP set DNS name=”Ethernet1″ source=”static” address=”1.1.1.1″
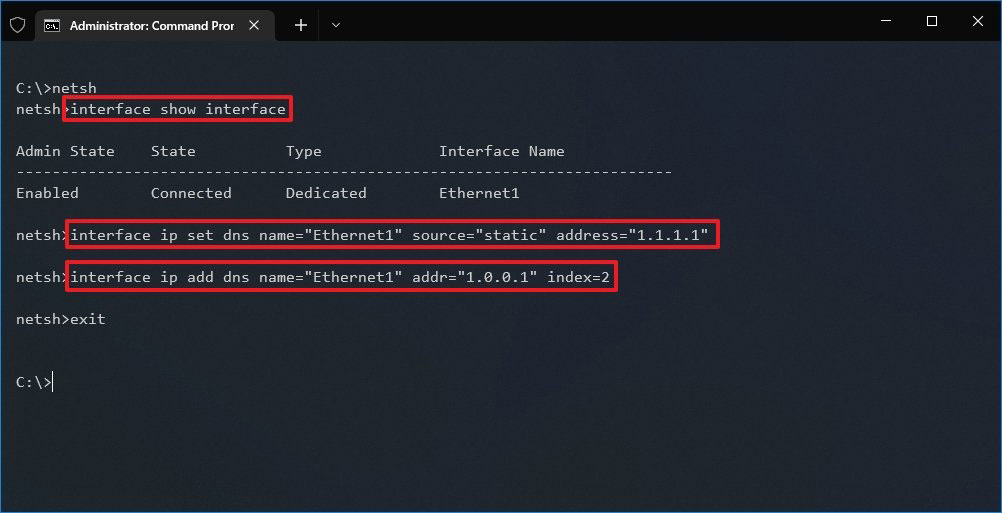
6. Enter the following command to add the IP address for the alternate DNS and press Enter:
interface IP add DNS name=”ADAPTER-NAME” addr”=XXXX” index=2
In this command, replace “ADAPTER-NAME” with the name of your network adapter and enter the secondary address instead of “XXXX.” This example changes the secondary DNS address to 1.0.0.1:
interface IP add DNS name=”Ethernet1″ addr=”1.0.0.1″ index=2
Note: You can repeat the above steps to add more addresses. However, in the command line, you must increase the number of index settings by 1. For example:
interface IP add DNS name=”Ethernet1″ addr=”8.8.8.8″ index=3
After completing the above steps, Windows 10 will use the new DNS address.
How to change DNS using Settings
To change DNS settings using the Settings application in Windows 10, follow the steps below:
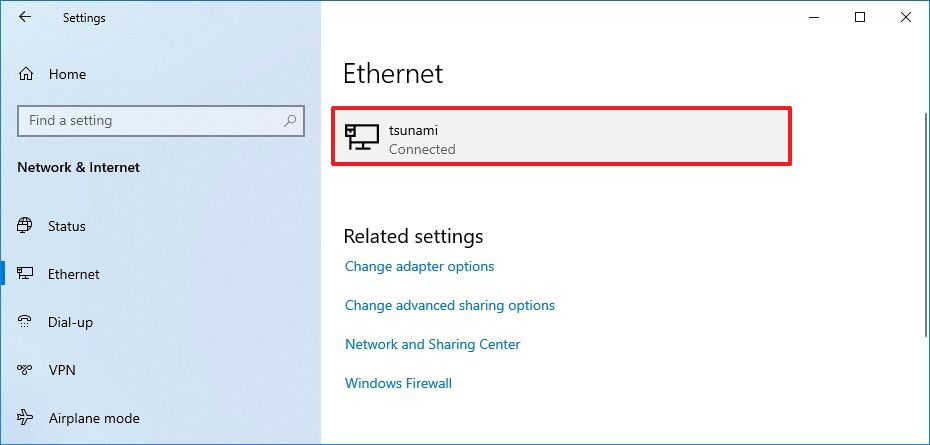
1. Open Settings.
2. Click on Network & Internet.
3. Click on Ethernet or Wi-Fi.
4. Select your desired network connection.
5. Under the IP Settings section, click the Edit button.
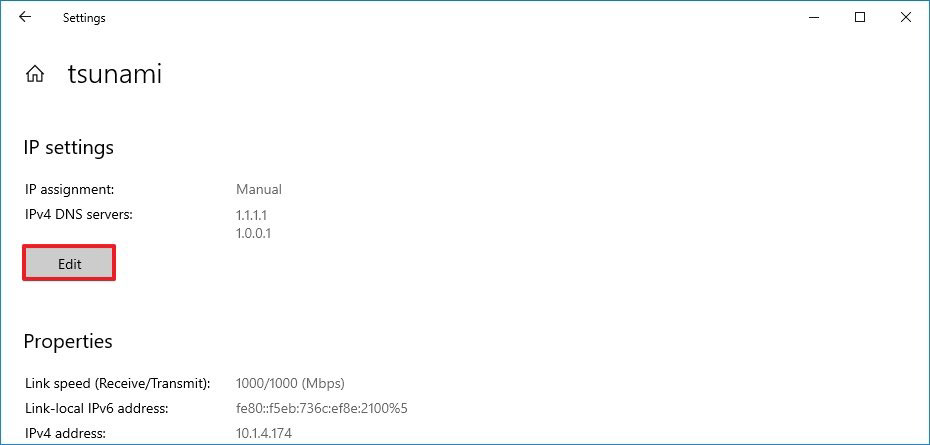
6. From the Edit IP settings menu, select the Manual option.
7. Enable the IPv4 toggle.
8. Under Preferred DNS Server, enter the primary DNS address. If you use Google Public DNS, OpenDNS, or Cloudflare, you can apply the following settings:
- Google Public DNS: 8.8.8.8
- OpenDNS: 208.67.222.222
- Cloudflare: 1.1.1.1
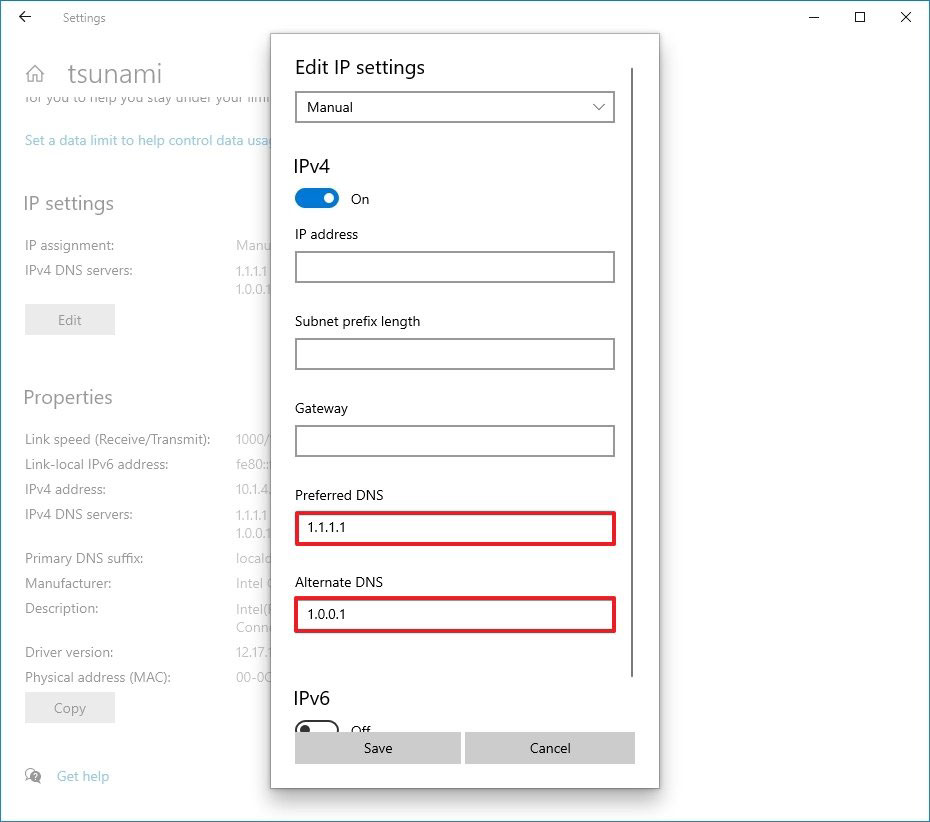
9. Under Alternate DNS server, enter the secondary DNS address. You can use one of the following secondary addresses:
Cloudflare: 1.0.0.1
Google Public DNS: 8.8.4.4
OpenDNS: 208.67.220.220
10. Click the Save button.
11. Restart your device.
After completing these steps, the new DNS settings will be applied, and you can connect to the Internet with the new analyzers. Although using the Settings app to change your computer’s DNS settings is recommended, this option has been prioritized last due to design flaws that may confuse some people.
For example, if changes are made, the setting will not be applied until the computer is restarted or the current TCP/IP settings are refreshed. Additionally, adding more than two DNS addresses with this program is impossible.
Conclusion
In addition to using different Windows 10 analyzers, there are many other ways to change DNS settings; for example, you can mention manipulating router settings or using third-party applications.
Usually, the user uses the above instructions to customize one or two devices, or if they are in a public location, they want to use different DNS servers. Of course, applying DNS changes to work computers is not recommended because new settings can cause connection problems. Therefore, you should consult the network administrator if you need to change the DNS settings.
FAQ
How do I change DNS using the Windows 10 Settings app?
Go to Settings → Network & Internet → your connection (Wi‑Fi/Ethernet), click Edit under IP settings, set it to Manual, turn on IPv4, and enter your DNS server addresses.
Can I set DNS through Control Panel instead?
Yes — open Network Connections, right-click your adapter, go to Properties → Internet Protocol Version 4 (TCP/IPv4), choose “Use the following DNS server addresses,” and type in your preferred DNS.
Is there a command-line way to change DNS on Windows 10?
Yes — using PowerShell or Command Prompt (as admin), you can use commands like Set-DnsClientServerAddress or netsh interface ip set dns.