


An Introduction To Perspective In Photography And Its Types
Understanding perspective in photography dramatically changes the feel and message of the photo. Perspective can be the subject of photography or help frame subjects.
To better understand the perspective, we need to become familiar with its types.
Perspective in photography refers to the spatial relationship between the dimensions of objects and their position from the observer’s point of view. The farther away an object is from the observer’s eye, the smaller it looks. Perspective in photography can be defined as the perception of the depth or spatial relationship of the objects in the photograph to the horizon. Here, the horizon is the same as the camera lens.
In this guide, we refer to the definition of perspective types and some of its terms, including virtual horizons. Then we will provide tips and techniques appropriate for different types of situations and subjects.
Perspective in photography
The human eye and the camera do not function in the same way. Man sees with both eyes and interprets visual information to see and understand the three-dimensional world. You may have learned about perspective in school art classes in the past, But the perspective of photography is a little different and can make one photo stand out from the other.
Painters use a variety of drawing techniques to represent distance, space, and three-dimensional shapes. For photographers, there is perspective in the outside world, and it is enough to learn how to capture it; So when we talk about perspective in photography, we are actually talking about influencing the audience’s perception of the objects in the image. The photographer can use angles, focal length selection, and camera settings to increase or decrease perspective perception in the photo.
Why perspective is important in photography
Perspective in photography is an integral part of landscape perception and helps to create depth and distance perception. The photographer can create an attractive visual framework for the main elements of his image by emphasizing the perspective aspects. This image can be a landscape, portrait, or inanimate nature. Perspective also has a psychological effect on the audience and helps to create a sense of the image.
Things like the angle of the camera, the distance to the subject, or the type of lens have a significant impact on the creation of perspective in the final image.
Understanding the use of the right position and type of lens can only be achieved through practice. For example, if you are photographing a large subject, you can photograph it from the street, window, or even the roof of a taller building. Each perspective will lead to unique results.
The aerial perspective creates a dreamy world. The linear perspective enhances the visual or narrative sense of the image and draws the viewer’s eye to the vanishing point. In the following, we will introduce the types of perspectives and how to use them. Perspectives are divided into the following types:
- Linear perspective
- Overlapping perspective
- Decreasing scale perspective
- Perspective imposed
- Aerial or atmospheric perspective
Linear perspective
One of the best ways to create depth in an image and thus convey a three-dimensional sense is to use a linear perspective. There are often two types of linear perspectives:
- A single point perspective
- A two-point perspective
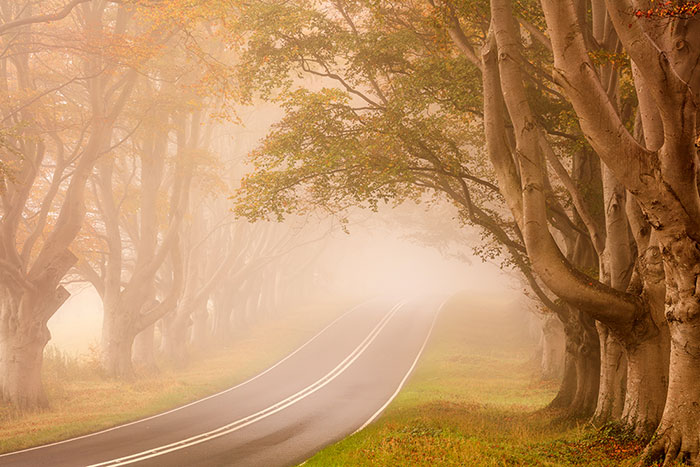
One-point perspective
Consider long, smooth roads that intersect at distant distances. This perspective is called a single-point line. In other words, there is only one intersection in this perspective. A single-point perspective helps to create depth, and the closer the parallel lines are to each other, the farther away they are.
Photographing the subject in a single-point perspective space intersects wall lines and columns at an intersection
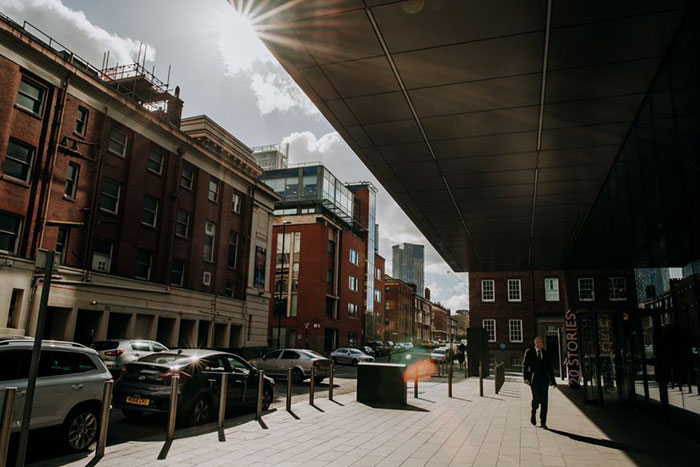
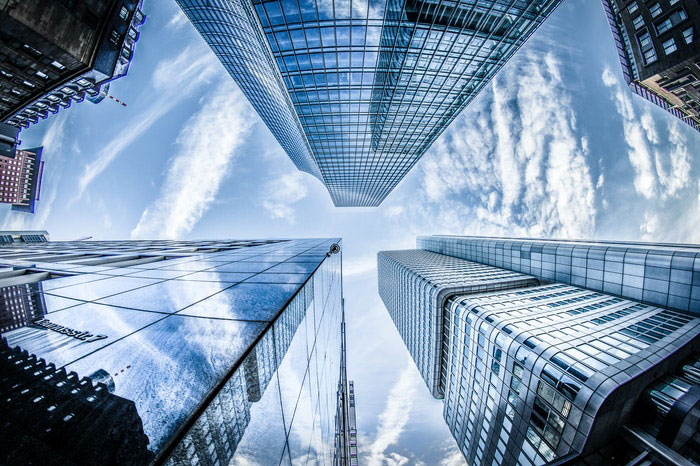
A two-point perspective
In a two-point perspective, there are two intersection points where lines end at long distances. An ideal example of this type of perspective is the corner of a building. By placing the subject at the intersection of two walls, you can create an attractive composition; Because in the first degree, the two sides of the wall disappear at long distances and increase the depth by creating two intersection points, and in the second degree, more emphasis is placed on the subject with guidelines.
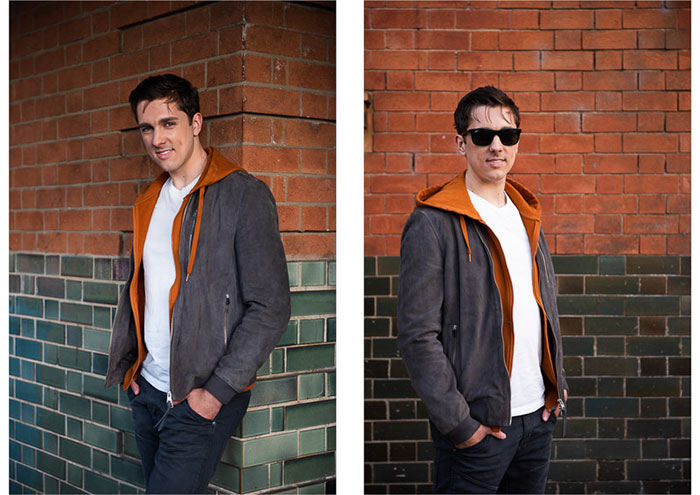
The image of the left stamp is recorded in the corner of a building and shows a two-point perspective that is more dynamic than the image on the right.
Decreasing scale perspective
As the distance between the photographer and a set of subjects increases, the perspective of the scale decreases. Consider, for example, a forest on the edge of a mountain that extends to great distances. The first row of forest trees looks bigger, But the trees in the back row are gradually getting smaller.
In an image, larger objects are closer to the camera. Even some nearby objects can be as large as larger objects at a great distance. By recording this type of perspective, you can convey depth to the audience very well.
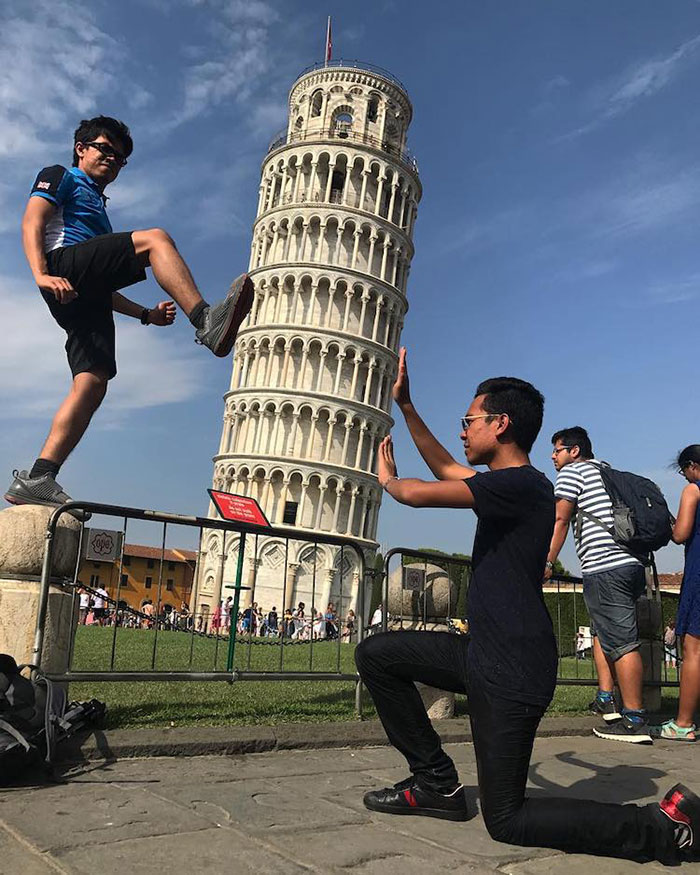
Perspective imposed
Imposed perspective has a lot to do with entertainment. Travelers visiting the Leaning Tower of Pisa usually play with this kind of perspective; For example, someone pretends to hold the Leaning Tower of Pisa and prevents it from falling. Or someone holding the moon in his hands.
You get an attractive composition by fine-tuning the subject relative to the camera and focusing on the subject. You can do the same with smaller objects. For example, you can place a toy car close to the camera and a person behind it. In this way, the car looks like a car in real dimensions. Try to use a low aperture for this type of perspective. This way you can increase the sharpness of the subject. Use the focus accumulation technique if needed.
Overlapping perspective
Front-facing objects can block or overlap part of distant objects; Therefore, when using an overlapping perspective, the two-dimensional object assumes a three-dimensional state and gives the viewer a greater sense of depth.
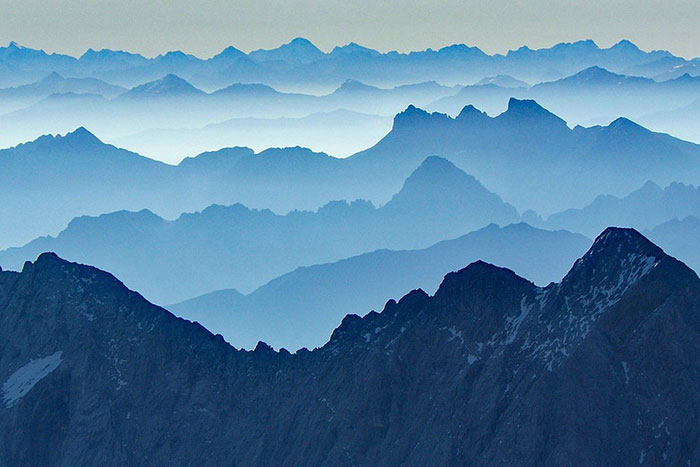
Atmospheric or aerial perspective
The greater the distance between the subject and the camera, the more difficult it is to identify the subject; Because weather conditions add dust and moisture to the photo. This type of perspective can be used to achieve a vague view from a distance. For example, when you see a mountain range in a picture from a distance; It conveys a three-dimensional sensation.
How to show perspective in our pictures
Here are some suggestions on how to look or get an appointment for antique items, to help you improve your composition, photography, focus, and add depth to 2D images.
Understand the horizon line
Knowing the position of the horizon line is one of the key points to achieve good images and one of the inseparable parts of perspective control in photography. Place your camera perfectly flat on the floor. In the viewfinder, find a hypothetical horizontal line in front of you. This line is the horizon line.
Next to the sea, the horizon line is the intersection of sky and sea and can be seen clearly; But in many situations, other subjects, such as buildings, mountains, or trees, must be considered.
As a result, the horizon line can be the intersection of the sky with the mountain or the roof. Try shooting a landscape with perfect vertical and horizontal lines and then skew it a bit to see the differences between the two types of images.
Of course, you can ignore the horizon line for some images; In this way, a dynamic movement and a sense of insecurity are induced in the image.
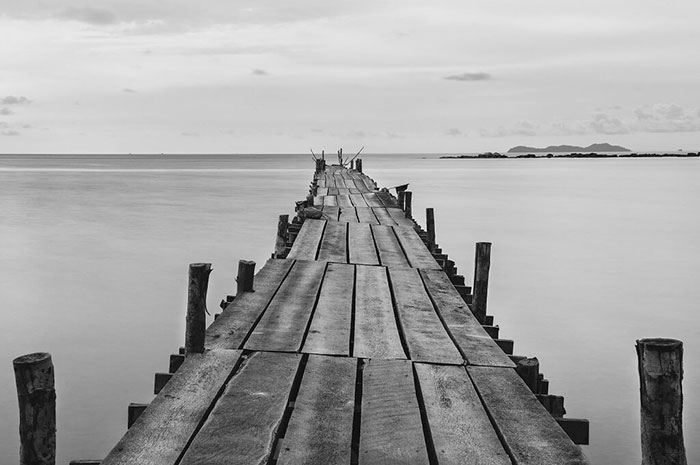
The horizon line in this image is the intersection of sea and sky. In some images, this line is not well seen; But you can use the virtual horizon line as the intersection of the slopes of the earth with each other
Using a single point perspective
A single-point perspective adds a sense of depth to photography and gives it a sense of narrative. You can use the guidelines to display a one-point perspective. Roads, railways, walls, fences, buildings, and tree lines are all used to emphasize distance. You can also increase the aperture points to increase the perspective effect.
Adjust the focal length to bring the subject closer to the lens and consider the horizontal line at a farther distance. The aperture of f / 1.8 can also dramatically improve the use of a single-point perspective.
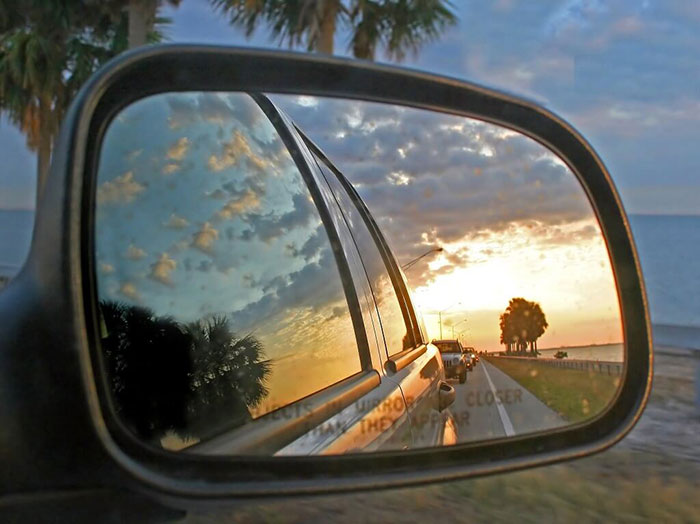
Use mirrors and reflections
You can use mirrors and reflections to play with perspective. Mirror photography or reflective surfaces (such as polished cars or shop windows) can distort the subject’s perspective. Move the camera to different angles to achieve a new perspective by changing the distance from the reflective surface or changing the lens. It depends entirely on trial and error.
Change the position of the photographer
Changing the photographer’s position can dramatically change perspective perspectives. Do not forget that the photographer is not a tripod and it is better to move.

Use frame-by-frame mode
The default format is a three-by-four camera frame. Of course, you can crop the image; But by creating frame by frame, you can make a dramatic change in the display of the image. For example, capturing a landscape from a window frame is a good idea for this method of photography.
News photographers usually capture images from holes in the walls of dilapidated buildings; So that the main view can be seen from inside the hole.
In this way, the focus of the audience is drawn to the subject and by placing the subject in the frame, the image looks flatter.

Foreground, middle ground, and distance
One simple way to create perspective is to consider three layers for indoor or outdoor imagery: foreground, midrange, and distance. Perspective in street photography is naturally created by placing a subject close to the camera, a subject in the middle (for example, a street musician), and a building in the distance.
Subjects in the background are usually semi-focus, creating abstract shapes while helping to create a sense of distance and visual space for the main subject.
Depth of field is achieved with the help of this technique and is easily created in landscape photography. For example, a large rock with a view or a vase full of flowers. Sometimes you can reduce the aperture; In this case, the perspective is flattened and the elements get closer to each other.
Change the point of view
You can change your point of view when shooting by lowering or raising the camera. The point of view from the bottom to the horizontal line shows larger human subjects, buildings, trees, sculptures, and more parts of the sky are in your image. The higher point of view increases the visible area of the earth and the figures are displayed from above.
Changing the point of view is a prominent way to induce a metaphorical concept in the image and to show the subject, large or small.
Use of borderline points of view
With one step you can add sharp points of view such as the angle of view of the bird or the angle of view of the worm to your images and change the perspective of the subject. As you climb a building or raise a camera by drone, the world looks like a map in which people and vehicles are small and miniature.
Lying on the ground or under a bridge or beside the pillars of a bank, the figures appear with large legs and heads raised to the sky. Try to photograph buildings, especially tall buildings.
Wide perspective and focal length
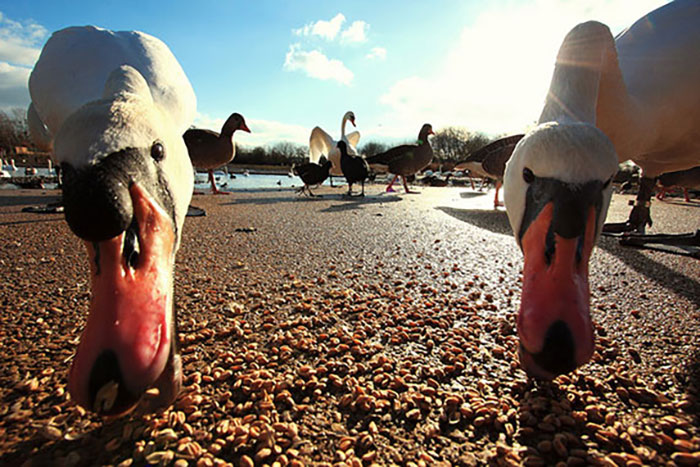
Wide-angle lenses capture only the widest view and provide a wider angle to the human eye (the 35mm lens provides the closest view to the human eye). Of course, this great achievement is not without problems. Wide-angle lenses can severely distort the image. This problem usually does not occur at a distance from the subject; But the closer you get to the subject, the more distortion there is.
For example, by going to a flower garden and photographing the first row of flowers, the closer flowers appear larger and the wider sky is behind them. This exaggerated perspective can be very dramatic. Try 14-24mm lenses and 24mm prime lenses for wide perspective photography.
The telephoto lens and short view
The telephoto lens shows the subject very closely and compresses the perspective; For this reason, the background elements are pulled forward. These elements accumulate on top of each other and the perspective disappears. Short-sightedness refers to the appearance of objects in the middle and background space that is pulled towards the foreground, thus exaggerating the size of the foreground objects and changing the perspective.
The best telephoto lenses are the 70-200mm lens and the 105mm prime lens.
Use image editing tools to change perspective
When editing images, change the contrast or brightness and darkness in certain areas. This way you can show the perspective more deeply.
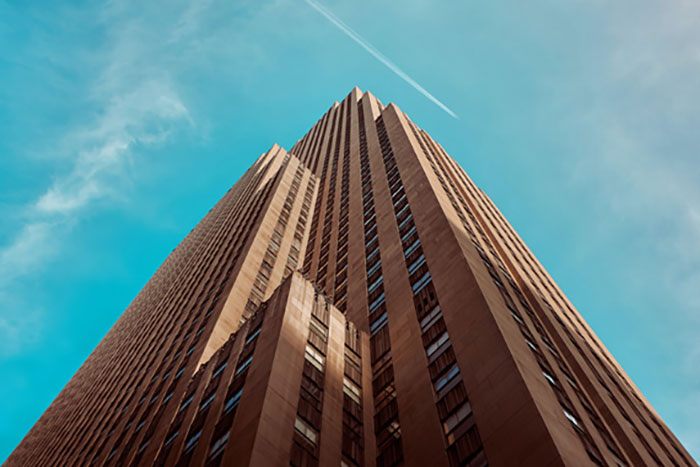
A three-point perspective
The perspective is seen as a three-point point when the subject is very tall. For example, we can mention a very tall building or tree. When photographing a building, not only do the two sides of the wall lead in different directions, but the height of the building leads to a point where the sky intersects, which is the third point of perspective.
Take a skyscraper, for example; If the third perspective is distorted, you can use Photoshop or Lightroom editing tools to correct it.
Perspective correction
Perspectives can be corrected by correcting unwanted distortions with digital tools such as Photoshop. In Lightroom, you can use the Transform tool to flatten the perspective of the building. If you want to do this in the camera, you must use tilt-shift lenses.
In such images, the building must be aligned with the horizon. If the point of view has slightly deviated, you can correct it in the final edit
Achieving the optimal result in aerial perspective
To make the most of the aerial perspective, you must first be in the right position. For example, one of the best options is the top angle of brand-building to the city. Another option is a mountain view; An attractive aerial perspective can be created by looking down on valleys, lakes, or other mountains.
An aerial perspective can change the bright color and shade of the image. Compare your color image with the black and white version in Photoshop. To understand this kind of perspective, you can see the works of famous artists and photographers such as Ansel Adams.
How to show the scale
Camera lens selection can reflect the frame of view; But focusing on the subject can also change perspectives and relative size. What is the size of a tree in the sky? What is the size of an insect magnified with a macro lens? Photographers can skip the actual dimensions and let the audience guess the dimensions. The subject can be displayed larger than it looks or a subject can be placed in the image to understand scale and size; For example, a person standing in front of a tree.
Concluding remarks
Perspective can be the main subject of a photograph, But it is usually part of a structure that is used to emphasize events and people’s reactions. The photographer must increase the awareness of the perspective and show the extent of its impact on the image.
According to photographer De Moore: “Photographic mechanics are not difficult; “What matters is eye training.”
So in the next images that you capture, observe the perspective and use the techniques of this article to show new dimensions and add depth to the images.