


10 simple tips that double the efficiency of Access software
I have been working with Access 2010 for almost 6 months now and I learned more about increasing its performance.
In this article, I have provided 10 tips to increase the efficiency of this software, which I hope will be useful.
1- Hide / show Ribbon tape
Unless you’ve worked with Access 2007 a lot, finding a ribbon in this version can be a bit daunting. Menu options are not like Access 2003. In addition, they take up a lot of space, which makes the area where you work smaller. You can easily minimize the Ribbon by double-clicking on one of the tabs, and Access keeps your selection in its memory.
2. Get used to right-clicking
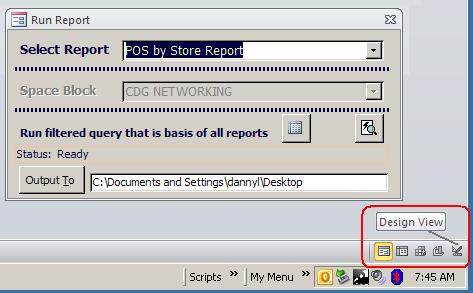
I think the simplest things are harder to do in higher versions of Access. Accessing the old options menu is still possible by going to Into design mode, but if you have minimized the Ribbon, you will get what you want with one or two extra clicks. In Access 2003, your distance from Form View and Design View is one click. Now after displaying the Ribbon (first click), you need to change the default View which is Layout View. Then you have to click on the cascading arrow (second click) and then click on the Design View option (third click).
I think only I am lazy because I use the right click menu. You can right-click on a form, report or query to display the View menu. This allows the steps to be performed with two continuous clicks. However, there is a small separate toolbar in the lower right corner that shows the options in the View menu. This is a one-click solution.
There are only two ways to open items in the Access Navigation bar on the left, one is double-clicking on the object (which opens it) or right-clicking and selecting the type of view you want. Like I said, I prefer right-clicking.
3- Finding a Code Window
Maybe this is just my weakness in displaying the menu, but previously I used to open the Code Window for a form or report with the toolbar menu option. But this is much more difficult and complicated now because if you end up with Ribbon on the Create tab while working on a form in Design View, an option called Module will not open the module behind your form, but as its name implies. Obviously, it creates a new module.
It may seem logical, but it requires effort that I am not accustomed to. Not only do I have to look for menu options, but now I have to note which menu tab is active.
To bypass this hurdle, I now simply press Ctrl + G to open the Immediate Window, making the VBA editing environment available. I still have to put the form in the object browser to load that particular code module, but at least I prevented the creation of empty modules that I had to delete later.
4- Home, Create, Design
There are three tabs that you must know about, namely Home, Create, Design, which the Home tab has the least use. The Create tab contains all the possibilities for creating tables, forms and queries, etc. The Design tab allows you to work with these newly created objects, converting a SELECT query to an UPDATE query. The Home tab is where you can apply text formatting. There are also common runtime options, such as sorting a data sheet or filtering a form.
5. Use the Quick Access toolbar
I think things like printing have also become difficult. What used to be done with one click is now done with three clicks. Unless you add Print or Print Preview options to the Quick Access Toolbar. It’s a good idea to overfill the toolbar with things you can’t easily find in menus unless you are accustomed to menu options.
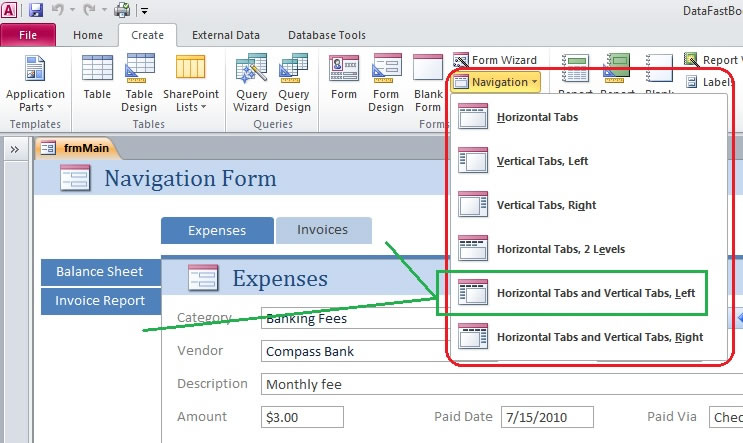
6- Try Navigation Forms
These forms are an alternative to the Switchboard of previous versions of Access. The menu options in the Create tab (shown below) guide you through the steps that are most obvious. In the beta, the way the button was displayed and placed was a technical glitch, but I did not see anything like that in the Production code.
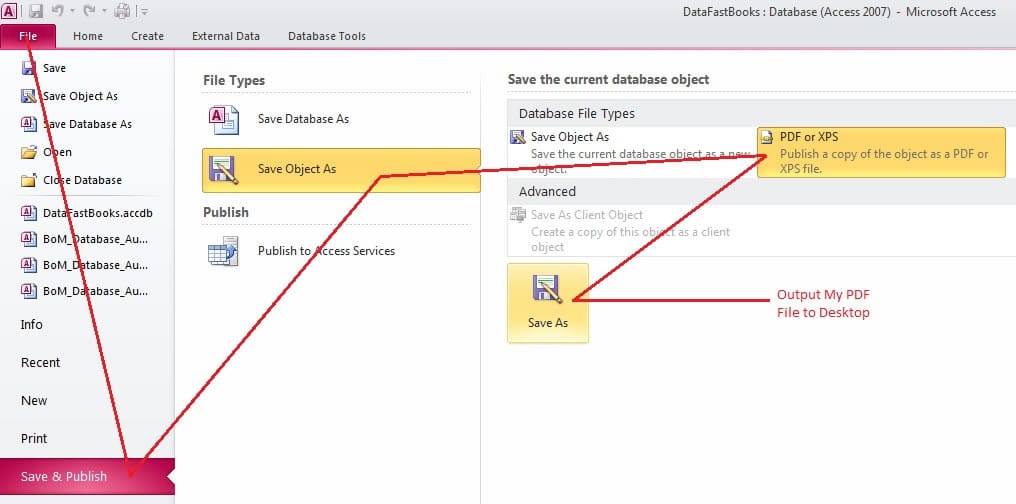
7- Exiting reports in PDF format
For some time I have been using Cute_PDF to output invoices and other reports in PDF format. PDF output support is now included in Access 2010, although I believe this is much easier to do with VBA code. As you can see in the screenshot below, from the menu system, you can do this with 5 clicks. This is one of the best candidates for the Quick Access toolbar, which makes it one click.
=> File Menu => Save and Publish => Save Object As => PDF or XPS => Save As
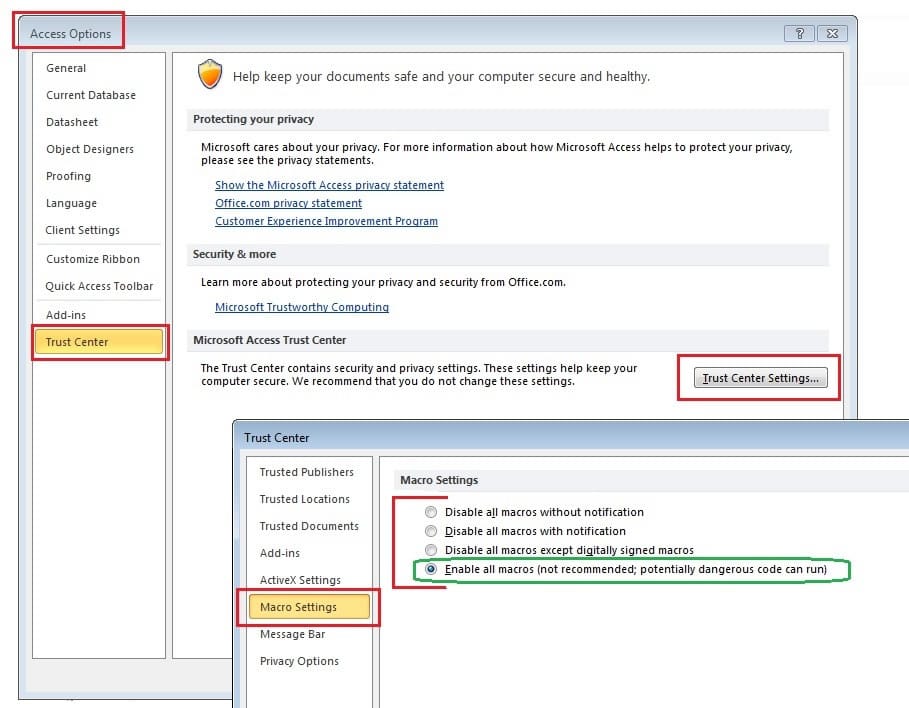
8. Only enable the Enable All Macros option
If, like me, you hate security alert messages, then just enable All Macros. This is not highly recommended, but why? Because if you are not careful, the code may be executed in this file. To disable the alert, you must enable macros. From the File menu, find Access Options and navigate to the Trust Center options. Select Enable All Macros and click Save.
9. Use Query Intellisense
Intellisense is now available with the ability to create queries. This item is displayed in the Criteria row and the Update To row for a UPDATE query. Auto-complete will help you get the correct table and column name. For example, if you start typing the table column name, a list of names will appear that you can choose from. Functions are also displayed in the Intellisense autocomplete list.
For years I have been in favor of using the SET and GET commands to store and retrieve values, to filter data. For example, a report may be launched from a form that collects an ID or text code. You save this value using a SET command. The query behind the report then uses a GET call command to call the value. As you can see in the screenshot below, in Access 2010, your commands are displayed with Intellisense from the Criteria row.

The same goes for built-in functions, so this feature can work, regardless of whether you use my SET-GET template or not. On the other hand, you should be careful when typing that Intellisense does not misinterpret and does not automatically complete what you did not want.
10. Refer to experts for more tips
Since I work with Access 2010, I am constantly looking for things that save time. I recently found out that some old friends from new Access groups have written a book called Access Solutions, which contains tips, tricks, and secrets from Microsoft’s most respected Access experts. This book is published by Wiley and these authors are two of the most respected Microsoft experts in the Microsoft community. From the book’s table of contents, it is clear that they cover topics used in previous versions of Access, as well as specific features of Access 2010.
Common Mistakes in Access
Access forms are extremely powerful. However, the developer can easily make a mistake that causes a form to perform incorrectly or poorly. This article gives you a brief overview on common design problems. Developers need to make sure that these problems do not exist before finalizing their forms.
Check these in your forms before you publish them:
1. Confirm data sources
Verify that the tables and queries used by the form are valid. This includes checking the form record source and resource row of all combo boxes and the list of boxes.
2. Use captions
Without properly setting the form caption, the form name will appear, which may not be what you want your users to see.
3- Spelling check
Make sure what users see is correct and spelled correctly. In addition to tags, the user also sees Validation text and Control tip text. A common mistake occurs when copying a control with these properties, and only the label and source of the control change. In this case, other properties such as Validation rule, Input mask, Default value, Format and other things may be wrong.
4. Avoid repeating shortcuts
Make sure the shortcut keys are not duplicated. These keys allow users to use a combination of the Alt key and the letter key to jump to a control. They are set using “&” characters in captions that follow a letter. For example, the letter H may be the Help button shortcut key and appear as “Help” with the “& Help” button. A common mistake is to assign two shortcuts to multiple controls on the form. Test your format by pressing each shortcut twice and make sure it does not refer to more than one control.
5. The command buttons must have an OnCLick event
If the button does not have an OnClick event, it must be deleted, invisible, or corrected. Sometimes the OnClick event is accidentally identified by a wrong event like OnDblClick. On the other hand, if the event has a hyperlink, the OnClick event is not required.
6. Confirm the Tab Oder
Make sure the controls are correct. By default, the tab order must be done from left to right and from top to bottom. This is what users expect. If your form does not work this way, it exhibits unexpected (non-intuitive) behavior that can be annoying to users. The default tab order can be easily placed under View.
You can change this when you want the tab order to work differently (for example, you may want to scroll to the bottom of the columns), but at least make a deliberate decision to deviate from the original order.
7. Explicitly set the allowed views
Authorized views should be explicitly specified to display only the way you want users to view the form. Options include form view in Form view, Datasheet view, and in Access 2002, PivotChart and PivotTable views. Without disabling unwanted options, a user can view the form view by right-clicking on the form and changing to the shortcut menu.
8. Confirm the shortcut menu settings
By default, the Property Shortcut menu is set to Yes and no shortcut menu is specified. This means that the default access menu appears. If this is not to your liking, set this feature to No.
9- Confirm the context IDs of the help file
If you are using a help file, make sure the help file name and context help ID are correct.
10. Do not lose the code
Make sure that each event that has virtually a dedicated event procedure has a defined Event Procedure. One common mistake is to specify an event without actually clicking to write code for it. This also happens when you rename a control and forget to change the procedure for the old name event.
11. Set AutoCenter to Yes
Make sure the AutoCenter attribute is set to Yes. AutoCenter ensures that when your format is opened, it opens in the center of the screen, no matter when you save it to your computer or what the user’s screen resolution is.
12. Set the Resize attribute to Yes
Make sure the AutoResize attribute is set to Yes. AutoResize automatically adjusts the display of your format to the size you designed. If this attribute is set to No, the form will be displayed as last saved, which can be very large or small.
13. Set the LimitedToList combo box to Yes
The LimitedToList property of the combo boxes must be set to Yes, so users can only enter values in the list. If this property is set to No., users can enter any value. To support users to add new values to the list, set the LimitedToList attribute to Yes and use the NotInList event to manage new values.
14. Increase the number of rows displayed for combo boxes
The number of items in a combo box from a combo box should be greater than the default number of 8 (and 16 in Access 2007), so that if your list gets longer, more items will be displayed without forcing the user to scroll through the list. We recommend 25 or more.
15. Set the AutoExpand Combo box attribute to Yes
AutoExpand simplifies data entry by automatically filling in the rest of the options based on the first few letters the user types.
16. Set the AllowDesignChanges attribute to Design View Only
The AllowDesignChanges attribute should not be on All Views, but Design View Only should be selected for it. When you set this feature to All Views, users can change the Design even if they are not in the Design view. This is something that everyone rarely wants users to do. In fact, if the form attribute tab opens the last time the designed form opens, when a form with this attribute appears on All Views, the attribute tab will also appear, which will be very confusing for end users.
Video tutorial for creating and modifying various forms in Access software
17. Use system colors
For the BackColor attribute of the form sections and controls, instead of using the default gray (12632256), use the system gray (2147483633- (in recent versions of Windows (my Windows is XP 2000)), there is a slight change in the way gray is displayed. The old gray is darker than it should be, the combination of the two values is not a problem for older versions of Windows, but you can see the difference in the newer versions.