


10 Practical Tricks That Mac Users Should Know
macOS offers various levels of interaction and customization, but many users only use limited features. If you do most of your work with this device after buying a Mac, you should know that there are tricks that can improve your user experience.
For this reason, today, we have decided to introduce some of the tricks available in macOS in the article before you so that you have a better experience when working with Mac. The following is for macOS Ventura, but most of these tips will also work on older versions of the Mac operating system.
Stay with us until the end of this article to learn some of the most useful MacOS tricks.
Open a copy of the file by default.
Maybe it happened to you that you opened a file and made changes to it, but after some time, you need its original version. This trick can keep the original file on the device and allow you to apply all changes to the copy.
A stationery Pad should be used to make a copy of the file. With this option, almost any file can be defined as a template. In the following, we teach how to activate this feature.
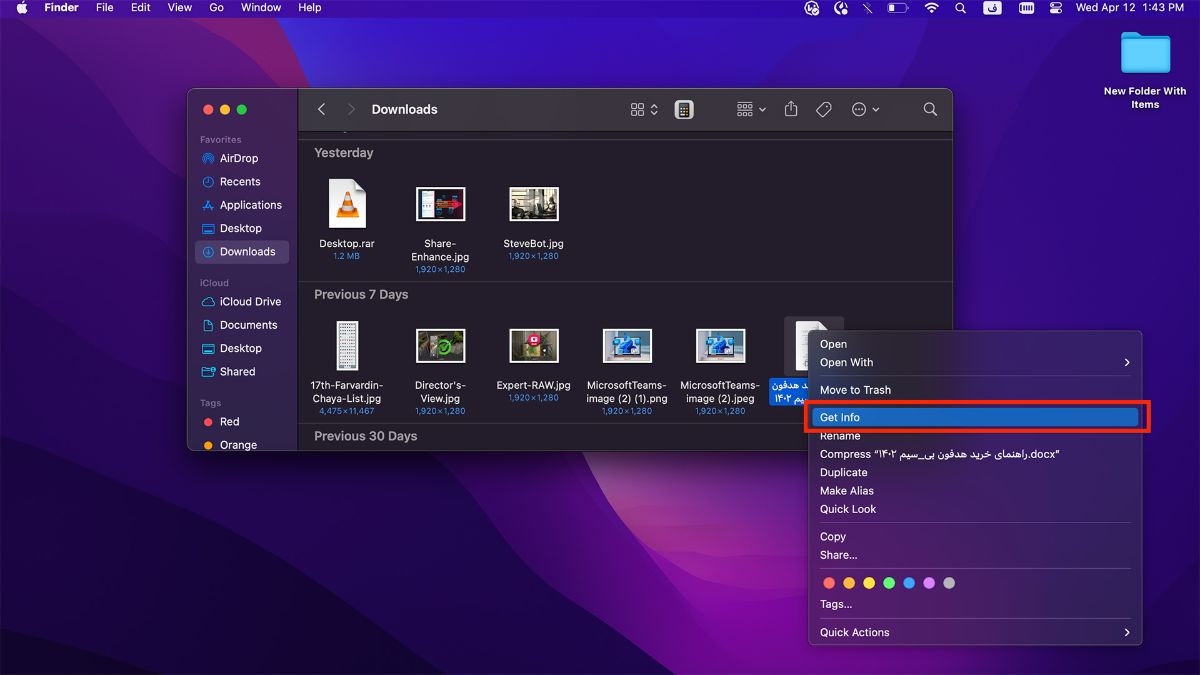
- Right-click on the file you want to use as a template to open a copy of the file by default.
- Then select Get Info.
- Now check the Stationery Pad box in the General section.
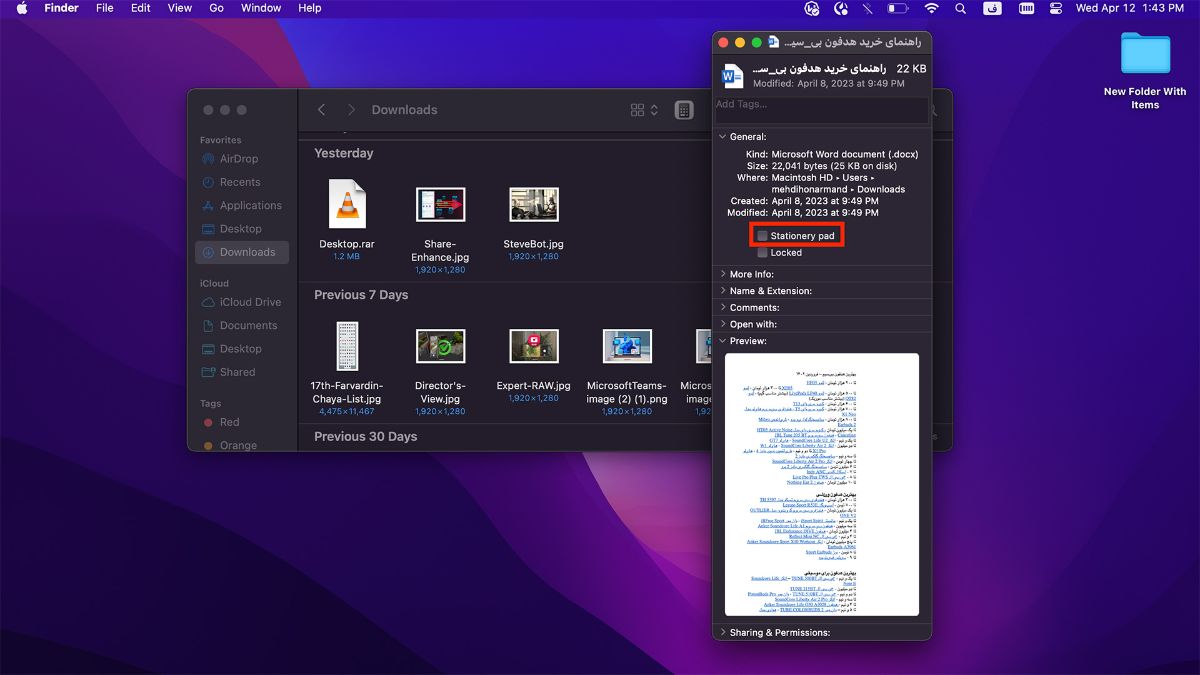
- Now close the Get Info window.
The next time you double-click the template file, Finder will automatically create and open a copy, leaving the original intact.
These days, Stationery Pad is not very popular. Still, it is an excellent alternative to repeatedly editing templates and using the “Save As” command, which can lead to overwriting the original file if you are not careful.
Access to more preview file format options
By default, the number of preview file formats on Mac OS is limited, but there is a way to access more options.
- To access more file format options, press the options button and click on the Format option simultaneously so that more formats will be shown to you.
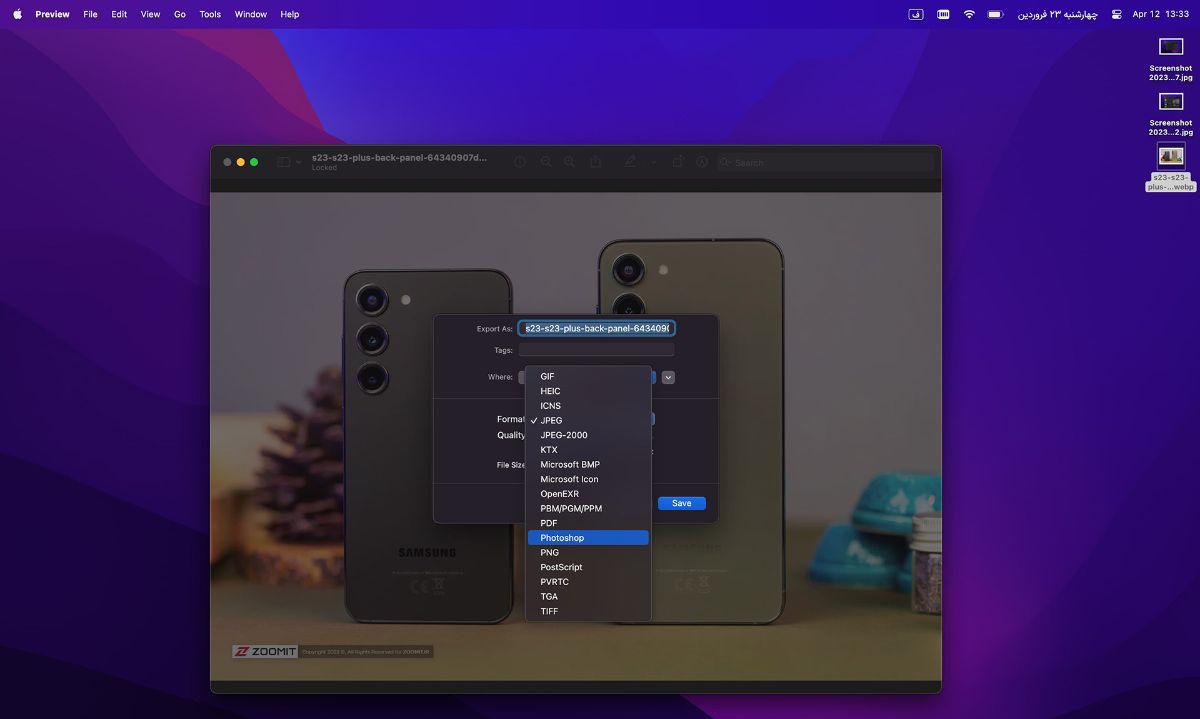
This way, more preview file format options will be available to you.
Return to Safari search results.
Suppose you want to get information about a specific topic and you need to search for it on the Internet. First, you type a word or phrase in the Safari bar. One of the results seems to have helpful information. You go into it and see another link in it that is related to the main topic, so you click on that too. Then another link catches your eye, and you decide to check it out too. And this story will continue until you forget what you were looking for.
If this story sounds familiar, Safari’s SnapBack will rescue you. The mentioned trick will save you from hitting the back button to reach the main page of the search. Follow the steps below to access it.
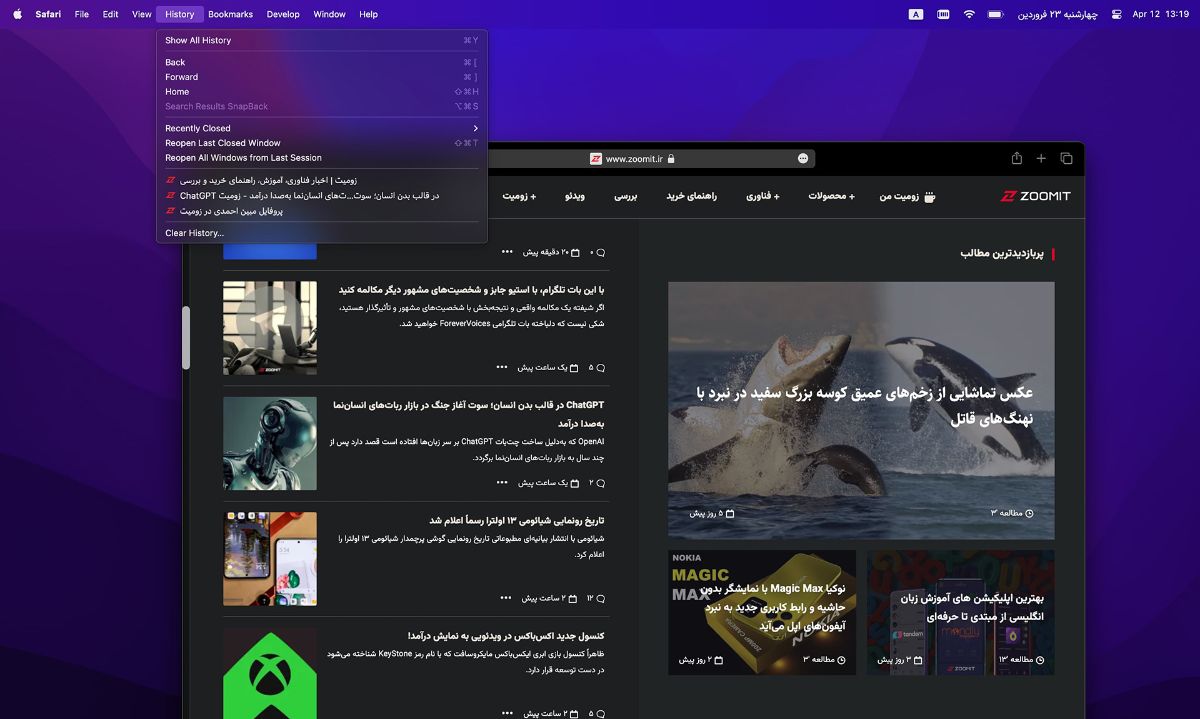
- First, open the Safari menu.
- Then enter History and select Search Results SnapBack from there. (You can also use Command-Option-S)
SnapBack can only be used if all clicked links are on the same primary tab. If clicking the link takes you to another account, you cannot use this method to return to the first page.
Better control of hot corners
With the Hot Corners feature, each of the screen’s four corners can be set to perform specific actions in macOS. This feature allows you to quickly access certain functions built into the system, such as Mission Control, Notification Center, Screen Saver, etc.
This is a valuable feature, but randomly going to a section like Notification Center can be annoying. Fortunately, there is a way to control Hot Corners.
- Go to Desktop & Dock from System Settings.

- Go to the bottom of the menu and click on Hot Corners.

- In the opened box, click on the drop-down menu corresponding to the corner of the page that you want to be used as a hot corner.
- In the next step, press one of the extra keys (modifier key) and select one of the applications in the opened menu for the hot corner. For example, we choose Shift-Command.
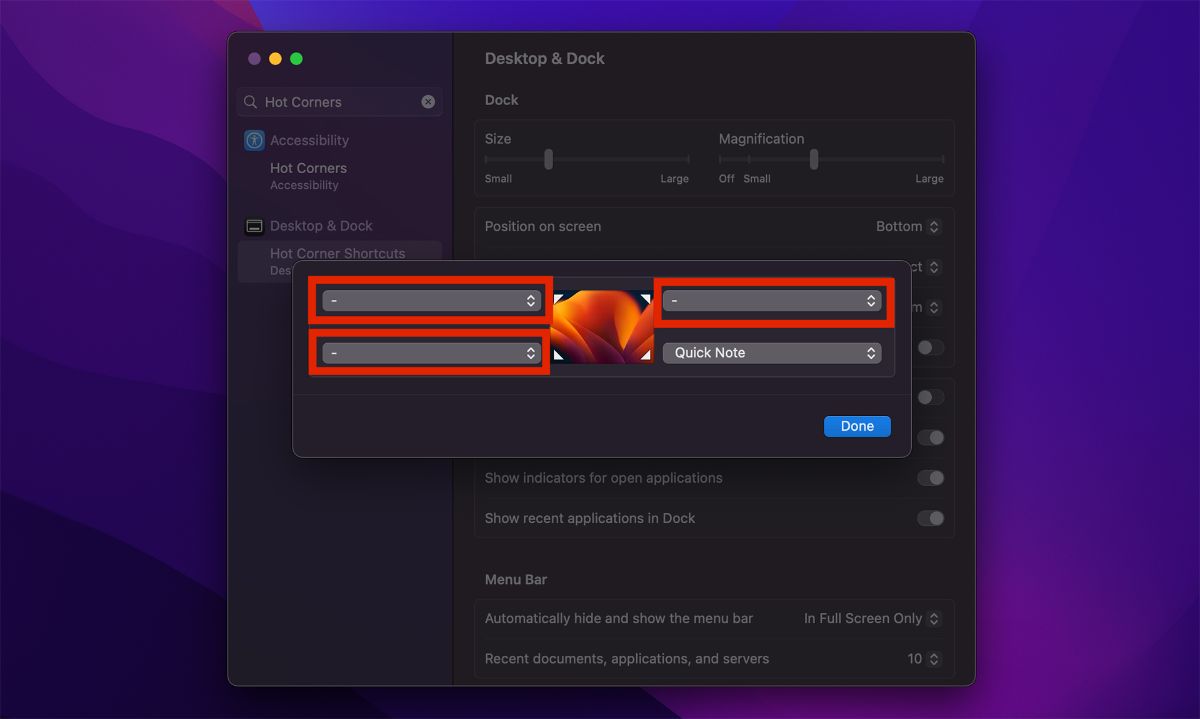
With this, if you keep the mentioned extra keys, the hot corner will be activated when the mouse pointer goes to that part of the screen.
Show more recent apps in the Dock.
On macOS, a handy option called Show recent applications in Dock (found in System Settings -> Desktop & Dock) adds a section to the right side of your Mac’s Dock that shows the applications you’ve used recently.
By default, this option shows only three recently used apps. But if you use a lot of software and want more recent apps displayed in the Dock, there is a way to do that.
- First, enter System Settings from the top bar.
- Then find the Recent Documents, applications, and Servers option in the Desktop & Dock section.
- With the help of the down and up arrows, you can decrease or increase the number of programs displayed in the deck.
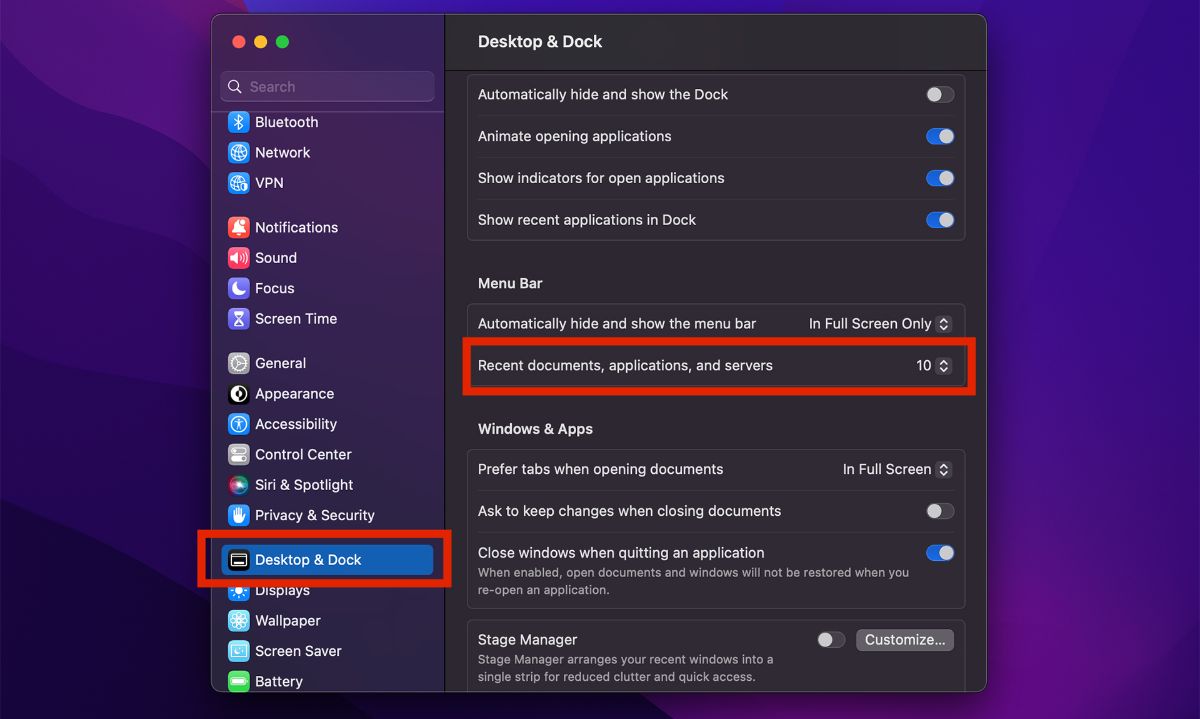
The number of recently used programs displayed in the Dock can be easily changed.
Resize windows from center
One easy but useful MacOS trick is to resize the Window from the center. You can easily do this.
- Option-click to resize windows from the center point, not from the corners.

Exclusive alerts for new VIP emails
You can apply Apple Mail settings so that your notification will stand out when you receive a message from VIPs. In this way, you don’t have to worry about not seeing new emails from people whose statements are essential to you.
You can change the program so that if you receive a message from VIPs, a unique notification sound will be played, or the email icon will move up and down. The second Option will be especially suitable for when the sound of your system is interrupted or low.
- In Mail settings, click the Rules tab and then Add Rule.
- Write a name in the Description field, then select any option for If.
- For the first condition, the select Sender is VIP.
- In the next step, in the Perform the following actions section, select the Play Sound option from the first drop-down menu. (Another option here is Bounce Icon in Dock)
- Then select a sound to play from the second drop-down menu in Perform the following actions.
- Finally, click OK and then Apply.
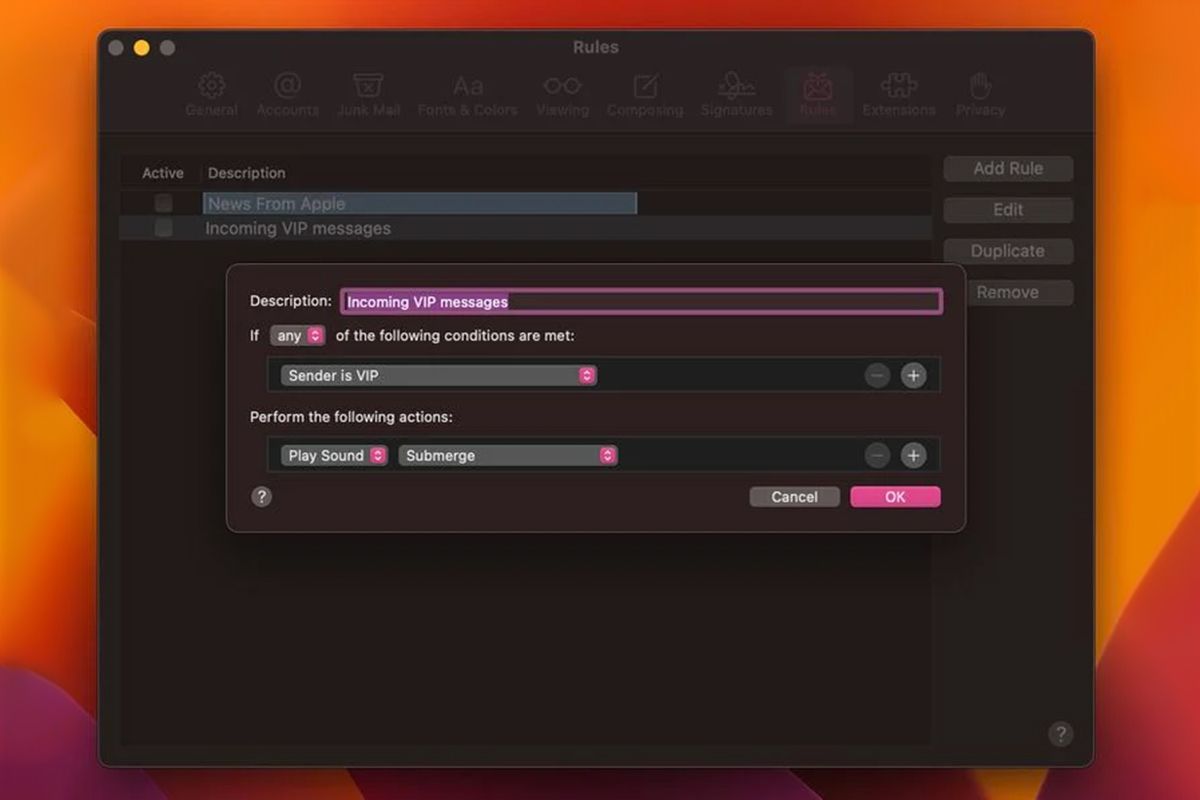
By applying these changes, you’ll have a unique notification for each VIP email you receive that can differentiate it from regular new messages.
Floating notes
In macOS, you can set notes to float over all other windows when they are open. With this method, your important note will never remain under other windows.
With the following method, you can make the note you want to float so that when other windows are opened, it will not be placed under them.
- First, double-click on the desired note.
- Now select Window and then Keep on Top from the top bar.
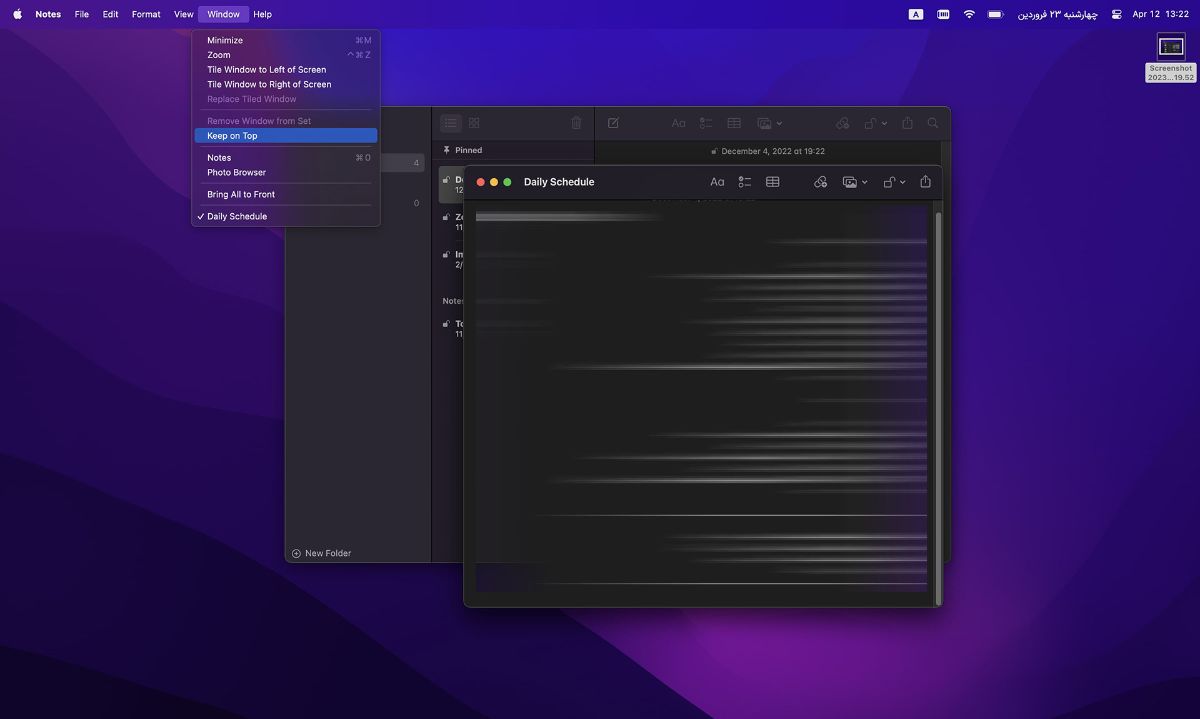
So quickly, your note stays on top of other open windows, even if you switch between apps using Stage Manager.
Add a shortcut to the Finder toolbar.
If you want to add appropriate program, file, and folder shortcuts to the toolbar of the Finder window, you can do the following.
- Just drag and drop the desired items into the Finder window.
- Then hold down the Command (⌘) key and release it in the space on the toolbar.
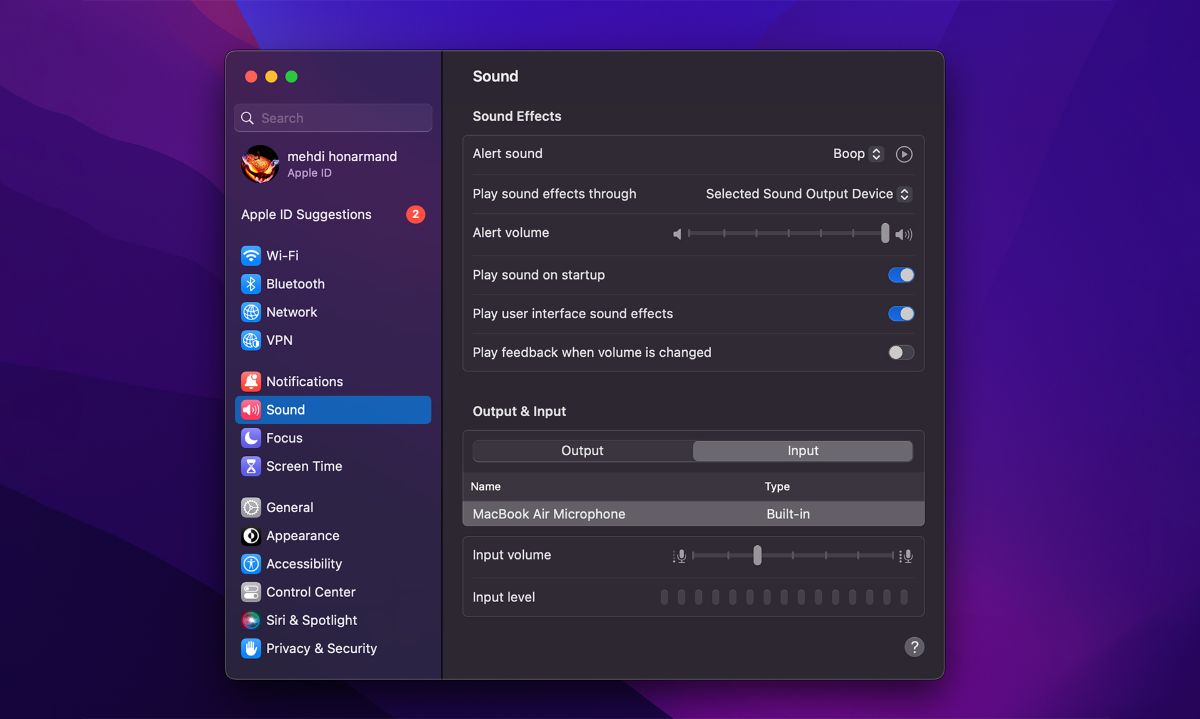
Quick access to system-specific settings
On the Mac keyboard are buttons on which icons are printed, and pressing them causes a specific operation. For example, pressing the F11/12 keys with the speaker icon adjusts the volume.
- If you hold Option while pressing one of these keys, the system settings associated with this feature will immediately open. For example, Option-F11/12 opens the sound panel.
last word
In the end, we have to say that there are more MacOS tricks, but we tried to collect some of the most useful ones in this article. We hope this article is helpful for you. If you want to add to your Mac knowledge, we suggest you read ” Introducing the best Mac applications of 2023 “.
If there is another trick that you use as a Mac user, please share it with other users in the comments section.