What Is WebP and Using WebP Images in WordPress – Complete Guide
WebP is a format developed by Google after buying On2 Technologies. Based on the VP8 video codec, WebP provides rich, high-quality images at a smaller size than PNG or JPEG. It combines and enhances the best qualities of JPEG and PNG formats by providing advanced lossless compression. Optimizing the size of image files is essential to increase site performance. The WebP format can do this without reducing image quality, making it suitable for many website owners.
In this article, you will learn what WebP is and also its advantages and disadvantages. We’ll also cover ways to use WebP in WordPress and how to save a WebP file to your computer.
What is WebP?
WebP is a new generation image format introduced and recommended by Google as one of the image compression methods without reducing the image size, maintaining its quality, and improving the loading speed.
Page load speed has always been something that Google and other search engines care a lot about, but now, more than ever, you can’t afford to have a slow-loading website. In fact, slow loading speeds have been proven to drive users away from your website (especially for mobile users). More importantly, since Google’s Page Experience algorithm was updated in June 2021, much less traffic is sent to websites with fast loading times.
Images are usually only a small part of the content of most web pages. However, they make a big contribution to the file size. So, if you want to increase the loading speed of your website, pay attention to your images. So, how exactly do WebP files help? WebP files are a very lightweight image format and can reduce file size by 25-34% compared to other file formats such as PNG and JPG.
What are the benefits of WebP?
Here are five main benefits of using WebP images:
- Increases website performance: WebP format is lighter compared to JPEG and PNG. Smaller image file sizes increase site loading speed.
- Saves more bandwidth: Bandwidth is the speed at which your server can transfer data to end users at a given time. WebP can free up bandwidth and allow websites to serve more content. This is especially important for websites with many images, such as food, travel, or photography blogs.
- Increases search engine optimization (SEO): Increasing page speed due to smaller images will positively affect site ranking in search engines like Google.
- Display high-quality images: You don’t need to sacrifice image quality for faster loading speed. With WebP, you can have the best of both worlds and improve your site’s user experience.
- Displaying different types of images: WebP supports transparent and animated images.
To further illustrate WebP’s advantages over other formats like JPG and PNG, let’s look at what the two offer in comparison.
Comparing WebP to PNG and JPG for the web
To help you understand what makes WebP images so special, we’ll take a closer look at WebP images in comparison to PNG and JPG images. First, let’s review some jargon. When image files are compressed, they are either lossless or lossy.
Lossless compression produces images that lose little or no quality compared to lossy images. They can also be unzipped and unzipped. This is possible because the compression process for lossless images only removes irrelevant bits from the data encoded in the images. PNG files are generally lossless files.
Lossy images are fundamentally altered, and parts of the original information are permanently removed. This makes them smaller in size than lossless images, but their quality is also lower; Especially when you zoom in on the images, this reduction in quality becomes more visible. JPG or JPEG files are good examples of lossy images.
In addition to these, there are WebP images:
WebP images are an excellent choice for this format as they can be subjected to both lossy and lossless compression. They offer excellent compression in both cases, while their quality drops commensurately compared to PNG and JPG files.
Take a look at the sample images in the Google WebP gallery. This website compares JPEG and WebP images of similar quality. Click on any image on the site and compare what you see. There is not much difference in quality between the JPEG images on the left and the WebP images on the right. However, WebP files are much smaller in size compared to JPEG files.
On the other hand, the PNG file type is great for maintaining high image quality due to its lossless compression. This format is suitable for images that have many pixels, such as text infographics. It also supports transparency, which makes it ideal for web design elements and logos. Unfortunately, PNG is usually larger in image size and doesn’t support animation.
WebP has the best quality of both formats. Most importantly, WebP offers approximately 25-34% smaller file size with an SSIM quality index equivalent to PNG or JPEG.
Before we show you how to use WebP images, we’ll also provide some information about the disadvantages of WebP.
What are the disadvantages of WebP?
While there are many advantages to using WebP, there are also disadvantages that you should be aware of. Let’s look at software issues – specifically, web browsers – and WordPress compatibility. Although WebP support in major web browsers has improved incrementally over the years, some browsers still do not support the file type. Popular web browsers such as Google Chrome, Mozilla Firefox, Opera, and Microsoft Edge have supported WebP for years. Recently, Safari also finally added WebP support. Given the current trend, we can expect other browsers that don’t support WebP to follow suit eventually, so feel free to stay tuned.
When it comes to other software, not all of them support the WebP format. Some image viewers and image editing tools cannot open WebP files. For example, Adobe Photoshop does not support it by default. To edit a WebP file in Adobe Photoshop, you must first install the WebPShop plugin. Another issue is that WordPress does not currently support WebP images. WordPress only supports JPEG, PNG, GIF, and ICO image formats. Fortunately, some solutions allow you to use WebP images on your WordPress site, which we will explain in the next section.
How to add WebP images in WordPress
Although you can use the WordPress image compression plugin to optimize your images and photos to speed up your site, WebP can give you more benefits. There are a few different ways to use WebP images in WordPress. Now that WordPress allows native WebP uploads, this is the best way to get started. But, as we mentioned, you still need to consider browsers that don’t yet support WebP images. The methods we will cover below will help you do this. It’s worth noting that neither method is necessarily better than the other, so you can choose what works best for you.
1. The first method: use a CDN
Content Delivery Networks are an effective way to use WebP images in WordPress. CDNs are a network of servers that help redistribute the load of content served by your website’s servers. In general, if you use a CDN, it caches your website content and serves it to users faster and more efficiently. A CDN can easily convert your PNG/JPG files to WebP files and serve them to selected audiences based on browser type. Some popular CDNs to use include Max CDN, Sucuri, Stackpath, Cloudflare, and KeyCDN.
2. The second method is to use an image optimization plugin
Even though WordPress now allows you to upload WebP images, you don’t necessarily have to upload your images in WebP format. Actually, we think it’s better to upload images in PNG/JPG format first and then convert them to WebP. This is because, as we said, not all browsers currently support WebP images. To do this, you must have the same images available in PNG/JPG format to be displayed in browsers that do not support WebP files. Some plugins allow you to achieve this goal easily.
Here are some popular plugins you can use:
Imagify
Imagify is a free image optimization plugin, and we recommend it for converting your images to WebP. While Imagify is free to get started, there are limits to how much you can optimize. Currently, users can enjoy up to 20MB of free optimization on a monthly basis. To get started, first, install the plugin from the WordPress repository and activate it. You will then be asked to create an account (all you have to do is enter your email), after which you will be sent an API key. Log in to the API and continue configuring the plugin.
 By default, most of the options you need are already set for you. However, you must remember to enable the option to display WebP images. You will see that the plugin has two ways to do this. The first is by allowing you to create rewrite rules, and the second is by using instead of tags. The second method is preferred; however, it does not work with all themes. Imagify is free, simple to use, and effective, making it a great plugin we recommend.
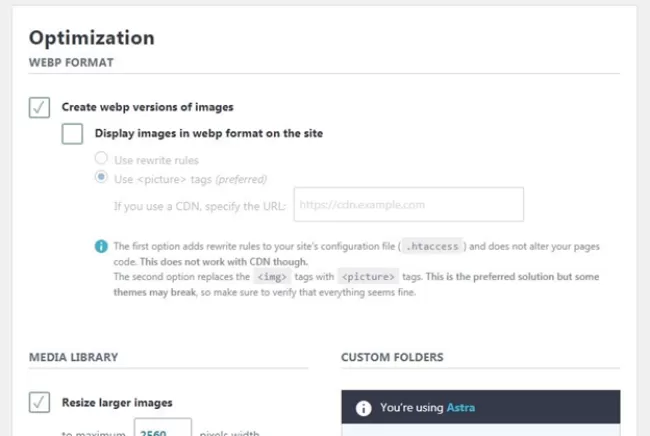
However, there are some alternative image optimization plugins as well as other ways of doing things, which are listed below.
Smush
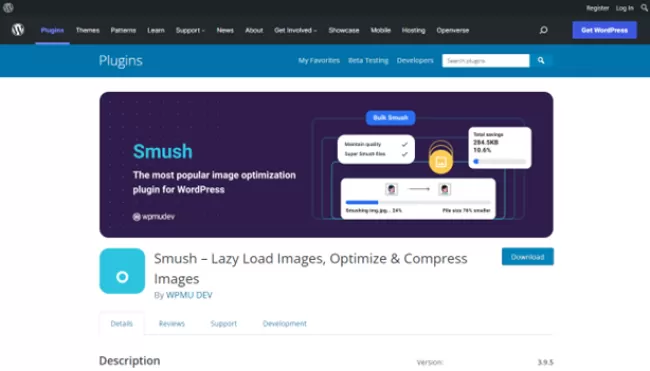
Smush is a multipurpose image optimization plugin for WordPress. Smush can compress PNG and JPG files or convert them to WebP files. Smush has many other useful features like lazy loading and a 45-point image CDN, all of which help speed up your website. Although many of these amazing features are available for free, WebP conversion is only available in the Pro version. Smush Pro packages cost $6, $14, and $29 per month, depending on how many websites you work with.
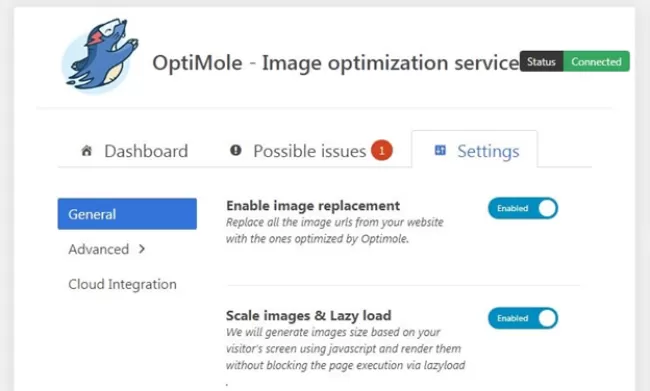
Optimole
Optimole is an image compression plugin that provides WebP conversions and the ability to serve them dynamically using Amazon CloudFront. In addition, this plugin provides an optimal viewing experience for every visitor to your website by automatically resizing images to fit the screen. User experience is a big part of Google’s Core Web Vitals, so this is a great feature to use. You can start with Optimole’s free plan, which allows you to serve up to 5,000 visitors per month, or choose a paid plan that allows you to increase to 25,000 visitors per month.
To use the free plan:
Simply install and activate the plugin. You will be prompted to open an account to receive an API key. Once you enter your API key, the rest of the steps are done for you by default. Optimole automatically optimizes your images and provides default WebP support along with other image optimization best practices.
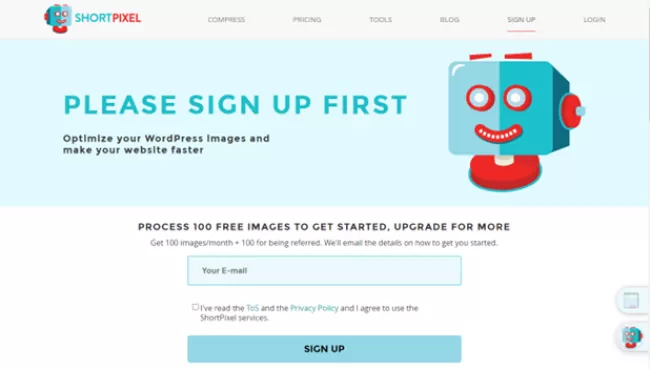
ShortPixel
ShortPixel is a popular image conversion and optimization plugin. Just like the other plugins on this list, you can run ShortPixel to optimize or convert your WebP images. You can also serve PNG / JPG versions of your WebP files to Safari users and other unsupported browsers. ShortPixel supports conversion to WebP images in both lossy and lossless formats and offers other benefits, such as its mass optimizer. One of the outstanding features that ShortPixel offers is its unique glossy file format. Glossy images are designed to compromise between the reduced quality of lossy image files and the smaller file size of lossless images.
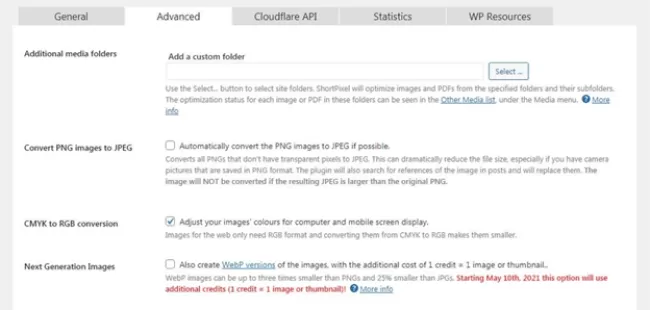
To get started with ShortPixel Image Optimizer, download and activate the plugin, and get an API key by creating an account. You won’t need to do much beyond this step, as most of the options are set for you. However, to enable WebP conversion, you need to go to the advanced tab and click the allow WebP conversion option.
In WebP conversion, one credit will be charged for each conversion. ShortPixel offers 100 free credits when you open an account, with 100 more monthly credits. If you use these, you can buy more.
3. Third method: Add WebP images to WordPress manually
To do this, you can use a plugin, a CDN, or a combination of both. A third option is to avoid both methods and manually upload your WebP images to WordPress.
Here are the steps you need to follow:
Convert your images to WebP
Before you upload your images to WordPress, you need to convert them to WebP format. In general, this is easy to do and can be done in different ways.
Use an online image converter.
The first method is to use an online image converter. There are several of these, and there is not much difference in quality between them. One of the most popular is Online-Convert.com. If you are just creating your website, you can easily convert your images first and then upload them. But what if you already have a fully built website or have already filled your website with images? You can use a plugin that offers bulk image conversion to get around this. If you want to do it manually, you can do it by coding. We’ll walk you through that process soon, but first, here’s another way to convert your images to WebP format that we’ll explore.
Use the Adobe Photoshop plugin.
If you use Adobe Photoshop to create or edit images, you may want to save them in WebP format from within the program itself. Although this is not possible by default, it is easily done by installing the Photoshop Image Conversion plugin.
FAQ
What is WebP?
WebP is a modern image format that uses advanced compression to make files significantly smaller than JPEG or PNG while maintaining visual quality.
Why should you use WebP in WordPress?
Smaller WebP file sizes speed up page loading, reduce bandwidth use, and can improve SEO performance when used on WordPress sites.
How do you use WebP images in WordPress?
Since WordPress 5.8, you can upload WebP files directly to the media library, and you can also use plugins to convert and serve WebP images automatically.