


What is Server Name Indication (SNI)?
Suppose you are going to send a package to a person, but you enter the recipient’s address up to the name of the building, and there is no information about the license plate of the desired unit. In this case, how sure are you that your package will reach the intended person? The same thing applies to SSL or TLS certificates for sites implemented on a server with a shared IP address. When a user clicks on a link on a website page, the server’s IP address alone cannot indicate which domain the user is trying to access. This is how the SNI plugin came into play.
SNI (Server name indication) is one of the widely used plugins for SSL or TLS certificates, which is responsible for solving the problem of connecting the user to the desired website from among the websites available on a shared server.
If you want to fully familiarize yourself with this plugin and learn how to activate it, don’t miss the following article:
What is SNI?
Regarding website security, an SSL certificate is one of the first factors that come to mind. This certificate is one of the primary needs of every website because establishing a secure connection between the user and the website increases the website’s security level and is considered a positive signal in terms of user satisfaction and SEO.
But the matter becomes a little complicated when we want to use a shared host or run several websites with SSL certificates on one server. The user who wants to connect to the desired website needs the server’s IP address, and when the SSL certificate of the websites on the shared host is active, the IP of all websites becomes the same. It becomes difficult for the user’s browser to recognize the destination.
This is where SNI comes into play.
The SNI plugin makes recognizing the user’s destination possible by combining the initial connection message and the hostname as a TLC handshake between the user and the website.
SNI is a bit like sending a package to an apartment building. Numbers are enough when sending a parcel to someone’s house, street address, and license plate. But when sending the packet to an apartment building, you need the apartment unit number and the street address. Otherwise, the package may not reach the intended person.
When each website has its own SSL and uses a shared IP, the server may not know which domain to show when the user requests because the certificate-checking process is done before connecting to the website.
Of course, before the development of IPv6, the lack of IPv4 IP addresses was another reason to use SNI. Overall, this plugin allows website owners to create as many domains and subdomains as they want and secure them with an SSL certificate.
If you want to avoid the hassles of shared hosting and use SNI to manage your websites more efficiently, we recommend that you prioritize the purchase of a virtual server because, in this case, you are in charge of everything. You are in control and use the hardware and software power of the server exclusively at a lower cost.
How the SNI plugin works
SNI is a plugin that deals with the TLS handshake process. In general, this handshake process is included to secure and encrypt HTTPS connections, and a handshake is performed before requests are exchanged. This is where SNI comes into action, and before displaying the page, along with the handshake connection, it also specifies the requested hostname.
So when you use SNI, along with the client’s initial message (Hello), the hostname is also sent.
This will make HTTPS websites on a server have their unique certificates, and the limitation caused by shared IP will be removed.
It is worth mentioning that since this information is sent via TLS and all browsers and devices automatically support it, there is no need to update or change the system.
Of course, ESNI can help if you’re looking for even more security. This plugin is an extended version of SNI that also encrypts the handshake message. This makes the requested certificate information undetectable to hackers and increases the security level of connections. But until now (02/05/1402), only Firefox supports this extension.
You might ask what happens to HTTP connections.
Websites that do not have an SSL certificate do not need this plugin because when the user requests, the browser also sends the domain name to the web server. The client specifies the requested website in its HTTP connection as soon as a TCP connection is opened.
Reasons for using SNI
Overall, there are many reasons why using SNI can be beneficial for your business:
With SNI, you no longer need to include an SSL certificate for each domain and subdomain on your server because you can work with one SSL certificate. By doing this, you will also save money and no longer need to go through installing and activating SSL for all domains, thus saving time.
If we look at it from a security point of view, you can use SNI from an SSL certificate issuing authority such as Let’s Encrypt. In this way, if you try to obtain the certificate of all websites from several different sources, the probability of security leakage increases.
Of course, it is better to point out that using the SNI plugin will not decrease the performance and speed of the most visited websites because the TLS handshake process only happens at the beginning of the SSL session, and SNI is a lightweight technology.
As a result, since each IP can typically only host one HTTPS domain, SNI makes things easier for many businesses, especially web hosts.
Benefits of using the SNI plugin
- Securing multiple domains on a server with a shared IP
- Use one SSL certificate for multiple domains or subdomains
- Save time and money
- Lightweight and no impact on website performance and speed
- No need for more IP addresses
- Simplify the process of configuring and managing multiple websites
- Increasing the security level of websites with shared IP
- Dealing with the risk of running out of IPv4 addresses (of course, the invention of IPv6 also eliminated this risk)
Which browsers or platforms support SNI?
- Internet Explorer, version 7 or later
- Firefox, version 2 or later
- Google Chrome, version 6 or later
- Chromium version 11 and later
- Microsoft Edge
- Safari version 2.1 or later
- Opera mobile, version 10.1 and later
- Konqueror/KDE version 4.7 or later
- MobileSafari version 4 or later
- Android default browsers version 3 and later
- Windows Phone 7
tip! None of the versions of Internet Explorer on Windows XP support SNI.
Are there any disadvantages to using SNI?
Although this plugin is an excellent solution for limiting websites related to a shared IP, it still has a minor bug that affects a small part of users with old browsers or operating systems.
As you know, the SNI plugin does not support old browsers and web servers. For example, Windows XP users who use Internet Explorer or mobile users with Android versions lower than 3 are not compatible with SNI. As such, the Handshake may choose a default certificate, leading to problems such as name conflicts.
In general, if your website is one of the HTTPS websites available on a server, the user using old browsers to open your website will likely encounter the error “Your connection is not private.”
So, if users move to newer browsers and platforms, this SNI problem will also be removed.
How to activate SNI in cPanel
Before starting the activation, if you need more information about cpanel, don’t miss the article What is cpanel.
This plugin is enabled by default in cPanel. Still, if, for any reason, you encounter problems in this field, mainly if you use a dedicated server or a virtual server to host several websites, it is better to activate this manually.
Just go to the WHM section and open Tweak Settings:
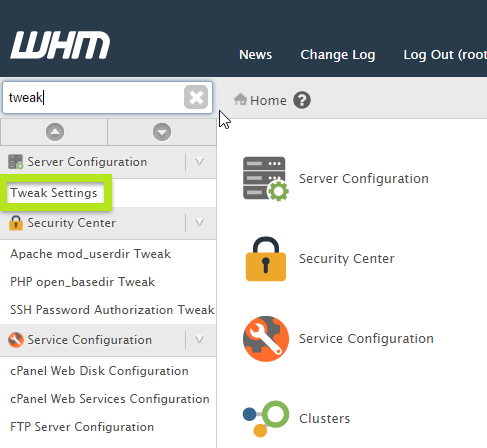
In the search section, enter Allow cPanel and then enable Allow cPanel users to install SSL Hosts:
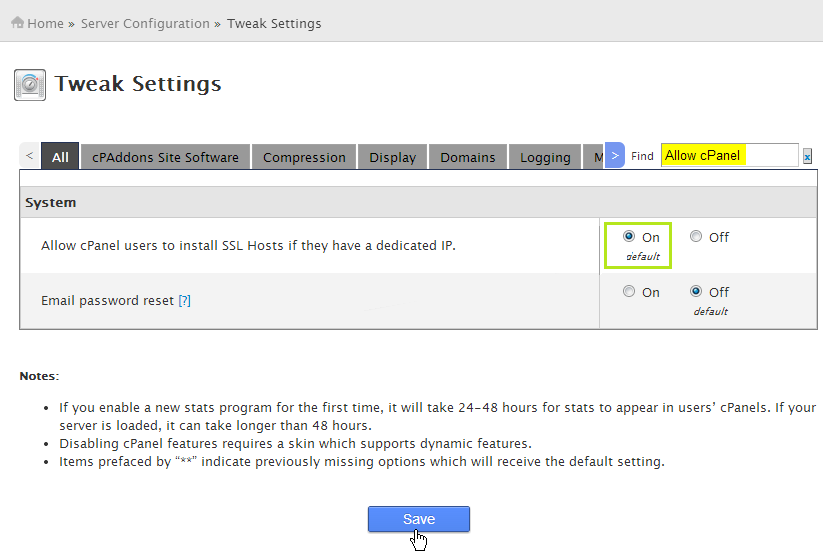
Finally, click Save to save the changes.
How to activate SNI in Direct Admin
Direct Admin is one of the most popular control panels most users prefer. Before activating SNI, if you need help with SSL activation, you can get help from the SSL installation and activation article in Direct Admin.
To activate SNI in it, follow the steps below:
Open the DirectAdmin configuration file with your favorite editor:
vi /usr/local/directadmin/conf/directadmin.conf
- Change the enable_ssl_sni value from 0 to 1.
- After you save this change, restart DirectAdmin:
service directadmin restart
How to activate SNI in Plesk
Like CPanel, Plesk has this feature by default, but to ensure this, it is better to follow the following steps:
From the Tools & Settings section, click on Server Settings.
Search for SNI Support and enable the following option:
Turn on SNI support, which allow using individual SSL/TLS certificates on websites with the same IP address
Next, save this change.
Of course, if your operating system is Linux, you can use the following method to activate SNI:
- Connect to the server via SSH.
- Open the configuration file with the following command:
vi /etc/psa/psa.conf
Change the value of SNI_SUPPORT to true:
SNI_SUPPORT true
Finally, after saving these changes, restart the PSA service:
service psa restart
Now that you know how to activate the SNI plugin, it’s time to get started and use the power of this tool to remove access restrictions to your website.
Conclusion
Users who use shared hosting or plan to launch several websites on a shared server face problems after activating the SSL certificate because their IP address is shared. So, if you use SNI to send the domain or hostname to the server during Handshake, in addition to the initial request message, it will be easy to recognize the user’s destination.
Thank you for staying with us until the end of the article. We hope that reading this article was helpful for you. If you have any questions or requests and need guidance, you can contact us by registering your opinion so we can answer you as soon as possible.