What Is A Virtual Switch And How To Create It For Virtual Machines?
A Virtual Switch Is A Software Program That Allows One Virtual Machine To Communicate With Another Machine.
Virtual Machine: A virtual switch is more useful for data transmission than a physical Ethernet switch. It can manage intelligent communications over a network by inspecting packets before sending them to their destination.
Some virtual switch manufacturers include their software in the virtualization package, but a virtual switch can also be embedded in the server hardware as software.
One of the biggest challenges with virtual servers is when network administrators try to restore virtual machines to physical hosts without reconfiguring them again.
Because transferring virtual machines to physical hosts in a way that maintains scalability takes time and, if not done correctly, can lead to security vulnerabilities, most organizations prefer not to discuss virtualization too much
This is precisely where the virtual switch comes in to solve the problem and help organizations.
Because it is an intelligent virtual switch, it allows organizations to make the best arrangements to ensure the integrity of virtual machines, security settings, network configuration, and virtual machines when transmitting over a network to different physical hosts.
Today, leading companies such as VMware market various robust virtual switches.
Meanwhile, Microsoft’s virtual switch, which offers powerful capabilities, ease of use, and the ability to download and purchase special software, seems to have been abandoned. The Microsoft Virtual Switch is located inside the Hyper-V Hypervisor, a tool used to build virtual machines.
This article will learn how to build a Hyper-V virtual switch to connect virtual machines to a virtual network and other machines.
People new to networking, especially virtualization, face various difficulties, such as being unable to configure the network and understand the concepts adequately.
Networking in Hyper-V is different from other hypervisors, and even people with years of experience in virtualization may have some trouble getting their first contact with Hyper-V.
In this article, you will get acquainted with the conceptual design of virtual networking in Hyper-V, its settings, and solutions for better implementation.
Hyper-V Virtual Switch
The Hyper-V Virtual Switch is a Layer 2 Ethernet network switch inside the Hyper-V Manager tool installed on a physical machine and the Hyper-V server role.
The virtual switch directs packets to the meta-address, manages virtual local area network tags, and even provides some features such as service (quality of service).
This tool allows virtual machines to be connected to private and physical networks. Of course, programmers are provided with a software development kit for managing this tool.
In addition, the Hyper-V Virtual Switch provides robust governance policies for isolation, security, traffic guidance, protection against malicious virtual machines, simple debugging, and service delivery at various levels.
However, the Hyper-V Virtual Switch only supports Ethernet and does not support other technologies available on local area networks such as Infiniband and Fiber Channel.
Microsoft Virtual Switch, because it can support Windows Filtering Platform and Network Device Interface Specification drivers by default, allows any standalone software developer to develop extended extensions called Virtual Switch Extensions for Hyper-Switch. These extensions were Created to improve network performance and security.
A virtual machine with a virtual network card can be connected to the Hyper-V Switch via the switch port. Microsoft Virtual Switch, because it can support Windows Filtering Platform and Network Device Interface Specification drivers by default, allows any standalone software developer to develop extensions called Virtual Switch Extensions for Hyper-Switch, which were Created to improve network performance and security.
A virtual machine with a virtual network card can be connected to the Hyper-V Switch via the switch port. Microsoft Virtual Switch, because it can support Windows Filtering Platform and Network Device Interface Specification drivers by default, allows any standalone software developer to develop extensions called Virtual Switch Extensions for Hyper-Switch, which were Created to improve network performance and security.
The switch port allows a virtual machine with a virtual network card to be connected to the Hyper-V Switch.
What are the main features of Hyper-V Virtual Switch?
The most essential features of the Hyper-V Virtual Switch that make you want to use it are:
- ARP / ND Poisoning (spoofing) protection: Provides a robust layer of protection against a malicious virtual machine. A malicious virtual machine can use the ARP (Address Resolution Protocol) protocol to eavesdrop on the IP addresses of other virtual machines. Using the Neighbor Discovery spoofing technique, the ARP / ND Poisoning protection mechanism protects machines from attacks that may jeopardize a virtual machine via the IPv6 protocol.
- DHCP Guard protection: This creates a layer of protection around virtual machines. In this case, it fails if a malicious virtual machine tries to present itself as a Dynamic Host Configuration Protocol (DHCP) server and seeks to assign a malicious IP address to other machines or implements an intermediary attack. Will be.
- Port ACLs: Provide a consistent solution for filtering traffic based on MAC (Media Access Control) MAC addresses or IP addresses/address range that allows an isolated virtual network.
- Virtual Machine Terminal Mode: Allows network administrators to configure a specific virtual machine as a virtual machine and direct traffic directly from the virtual local area network (VLAN) to the virtual machine.
- Network Traffic Monitoring: Allows administrators to monitor the traffic transmitted from the network switch.
- Bandwidth limitation: Bandwidth limitation ensures that the reserved bandwidth is under the network administrator’s control and that the allocation process is performed accurately.
How to create a virtual switch for Hyper-V virtual machines?
Note that the technique below can run on Windows 10, Windows Server 2016, Windows Server 2019, Microsoft Hyper-V Server 201,6, and Microsoft Hyper-V Server 2019 operating systems. A virtual switch allows machines built on Hyper-V to communicate with each other.
When installing a Hyper-V role on a Windows server, you can create a virtual switch. If you are implementing an extensive virtual network that requires more virtual switches, you should use Hyper-V Manager or Windows PowerShell to build more switches.
Networks of virtual machines can quickly become complex, especially when you plan to use advanced features such as SET (Switch Embedded Teaming).
Implementing and managing a virtual network based on a proper, step-by-step scheme will not be complicated. Figure 1 shows a relatively accurate picture of how the Hyper V virtual switch is built and interacts with the physical network adapter.
Follow these steps to build a simple virtual network with Hyper-V:

Figure 1. How the virtual switch interacts with the machine’s virtual network cards, virtual switch, and physical network
1. Open Hyper-V Manager and select the host computer name in the left panel.
2. Right-click on the computer name and select Virtual Switch Manager. (figure 2)
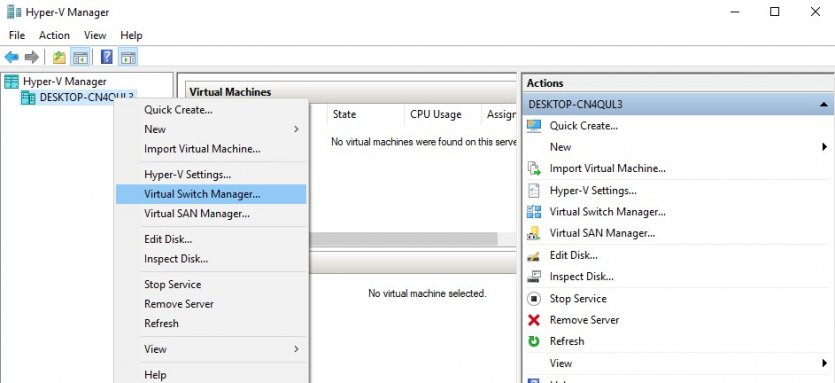
Figure 2. Hyper-V software main window
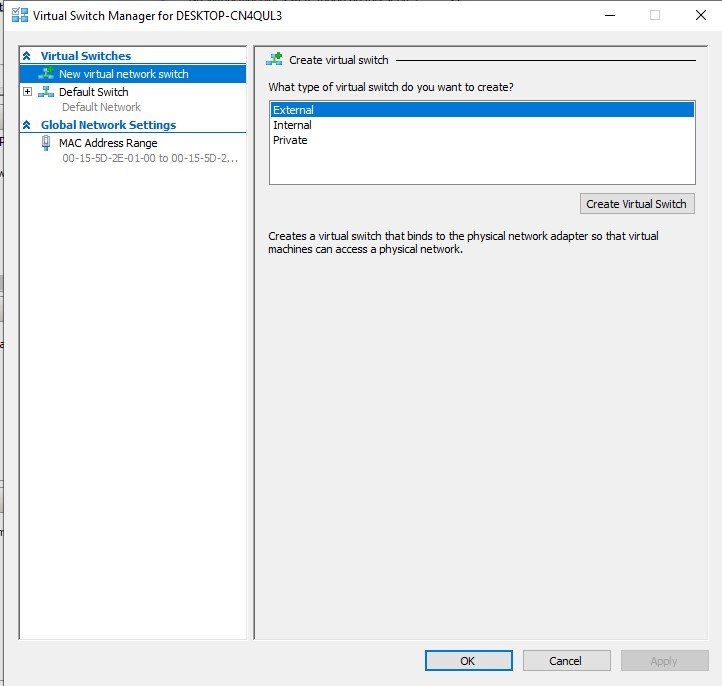
Figure 3. Virtual internal, external, and private switches are used for specific purposes.
3. In this step, you must specify the type of virtual switch. Hyper-V lets you choose one of the following three options to build a virtual switch.
- External: An external virtual switch allows virtual machines to communicate with servers and clients on an external network through access to a physical network while communicating with virtual machines on the same Hyper-V server. An external switch must be connected to a physical adapter. This switch allows communication between the physical network, the operating system, and the virtual adapters used by the virtual machines. Be careful not to confuse the external switch with the public IP addressing scheme or Internet-based systems that must be connected to the Internet for proper operation. You can use the same range of private IP addresses for adapters located on an external virtual switch that you attach to a physical network to which they are connected.
- Private: A private switch that allows virtual machines to communicate with each other only on the host machine or, more precisely, the server on which Hyper-V is installed. This option is ideal for organizations looking for an isolated private network. A network that has no interaction with external network traffic. For example, implementing a bed and environment for conducting experiments is one of these. This switch makes perfect sense and does not use any physical adapters. Note that the word Private in this network model has nothing to do with private IP addresses. Upgrading to other switches is another advantage of a private switch.
- Interna: The function of the internal switch is very similar to that of a private switch, except that it allows the operating system to have a virtual adapter on the switch. The built-in switch allows virtual machines on the same Hyper-V server to communicate. It also allows the host operating system to manage them. The operating system can use the internal switch to operate any virtual machine directly with a virtual adapter. Like the private switch, the internal switch has nothing to do with the physical adapter.
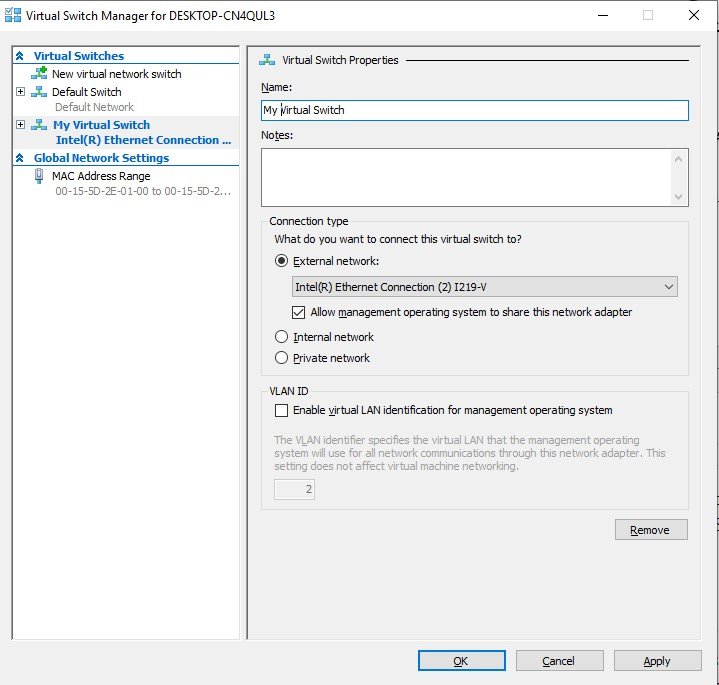
Figure 4. Assign a name to the virtual switch for ease of operation.
4. Select the default External option and select the Create Virtual Switch button.
5. Assign a name to the virtual switch.
6. If you have selected the External option, you must now specify the network adapter (NIC) you intend to use, along with other related parameters.
When choosing External mode, pay attention to two critical options related to this switch:
Allow the management operating system to share this network adapter:
Enable this option if you want to allow the Hyper-V host to share the virtual switch and network card it uses with virtual machines. Once enabled, the host can use any configuration applied to the virtual switch, such as Quality of Service (quality of service settings, security settings, or other Hyper-V virtual switch features.
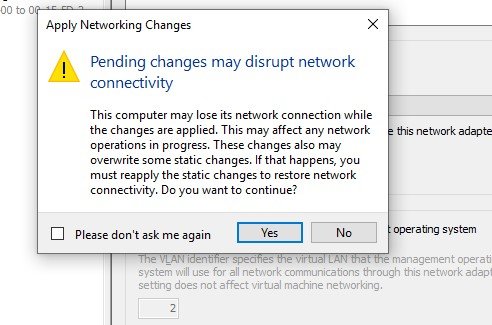
Figure 5. You may lose access to the Internet for a few moments while building a virtual switch.
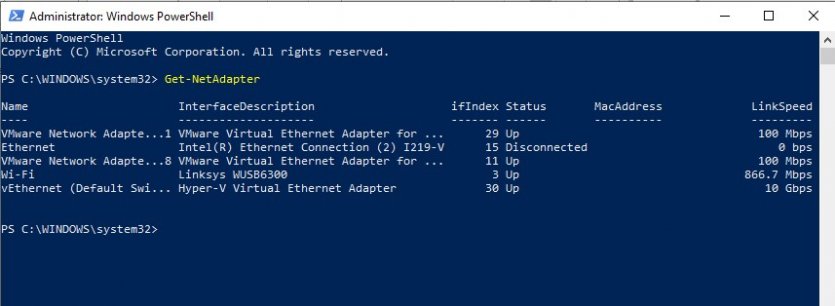
Figure 6. The various adapters are shown in terms of their speed and MAC address.
Enable single-root I / O virtualization (SR-IOV): This option allows virtual machine traffic to communicate directly with the physical network card, regardless of the virtual switch.
7. If you want network traffic to be isolated from other virtual machines with which the virtual switch is shared or from the Hyper-V management tool on the host operating system, the option:
Enable Virtual LAN Identification For Management Operating System
Enable. You can change the VLAN ID value or accept the default value. This value is the local virtual network identification number the operating system manages and communicates via the virtual switch.
8. Click Ok.
9. Pressing the Ok button displays a warning message announcing that your computer may disconnect until changes are made. Changes that may overwrite static settings. Click the Yes button. By pressing the Yes button, the virtual switch is ready to use.
Build a virtual switch through Windows PowerShell.
Windows suggests a second solution: Use the Power Shell window to build a virtual switch.
Follow the steps below to build a virtual Hyper-V switch via the command line.
- Click the Start button on the desktop and type Windows PowerShell in the Windows 10 search box.
- Right-click on the found option and select Run as Administrator.
- Run the Get-NetAdapter command to find your current network adapter. The above command displays all the installed adapters on your system, along with their specifications and addresses.
- The New-VMSwitch command builds a virtual switch in the PowerShell environment. For example, to create an external virtual switch called ExternalSwitch, use the network Ethernet adapter and enable the adapter sharing management feature by running the following command.
New-VMSwitch -name ExternalSwitch -NetAdapterName Ethernet -AllowManagementOS $ true
The following command is used to build an internal switch:
New-VMSwitch -name InternalSwitch -SwitchType Internal
A private switch is created by running the following command:
New-VMSwitch -name PrivateSwitch -SwitchType Private
It does not matter if you use a graphical or command-line environment to build a virtual switch. Both options allow you to create virtual switches, connect virtual machines according to the network schema you have created, and take advantage of the benefits of network and switch virtualization.