How to Build a Virtual Machine Using Client Hyper-V — Step‑by‑Step Guide
In This Article, We Will Use Hyper-V, One Of The Internal Components Of Professional and Enterprise Windows 10 (64-bit), to build and manage virtual machines and virtual networks in a single workstation.
Client Hyper-V and VirtualBox are client hyperlinks and software used to manage virtual machines installed on a workstation. If you do not want to use Client Hyper-V or VirtualBox as your hypervisor, you will need to use an alternative hypervisor, such as VMware Player. In this series of tutorials, we will use the three hypervisors listed above.
In this project, we want to use Hyper-V, another internal component of Windows 10 (64-bit) Professional and Enterprise, to build and manage virtual machines.
The first step is to enable the virtualization feature on your motherboard BIOS or UEFI because Hyper-V uses this technology. After that, you will be able to build virtual machines, install operating systems in them, and use virtual networks as a single workstation. Follow the steps below to complete the project.
Your CPU must support the hardware-assisted virtualization header HAV feature and be enabled from within the motherboard BIOS or UEFI settings for Hyper-V to work. If you are unsure if this option is enabled, restart your computer—Troubleshoot option when booting the system.
Select Advanced options and then select UEFI Firmware Settings. The computer is restarted twice, and you can enter the UEFI settings. this time
The above part is enabled in the CPU configuration section in the figure below. Make sure the hardware-assisted virtualization feature is enabled in this section.
Also, ensure that each HAV subset setting is enabled. Save the settings and exit the UEFI environment. Now restart the system and log in to Windows.
 By default, Hyper-V is disabled in Windows 10. To activate it, right-click on the Start button and select Apps and Features. Scroll down the page and select Programs and Features. Click Turn Windows features on or off. Activate the Hyper-V checkbox, then click OK. When Windows is done, restart the system for the changes to take effect.
From the Windows Administrative Tools folder in the Start menu, run Hyper-V Manager. In the Hyper-V Manager side panel, select the host computer’s name at the bottom of the Hyper-V Manager.
To ensure the virtual machine on your network can access the Internet, you must first create a virtual switch in Hyper-V. Click the Virtual Switch Manager option in the Actions panel to make a virtual machine switch.
Pairing a virtual switch with a physical network adapter in a virtual machine enables the virtual machine to access the physical network. In the Virtual Switch Manager dialog, ensure the New virtual network switch is selected in the left pane. Select the External option in the right panel. Now, click on Create Virtual Switch. In the following dialog, ensure the Allow management operating system to share this network adapter option is enabled. Then select the Apply button. Click Yes in the message that appears. Your virtual local network now has a virtual switch.
Close the Virtual Switch Manager dialog.
Build a virtual machine.
Follow these steps to build a virtual machine:
- In the Actions panel, click on the Quick Create option. Use the following values for the new virtual machine :
- Name the virtual machine VM1 or VM_Lab_A.
- Click the Change installation source option, then select two .iso or .vhdx files. (.Iso file is a disk image, virtual DVD, or CD. A .vhdx file is a virtual hard disk.)
- Make sure the Windows Secure Boot option is enabled.
- Specify that the virtual machine can use the new virtual switch you created in the previous section.
- Select the Create Virtual Machine option.
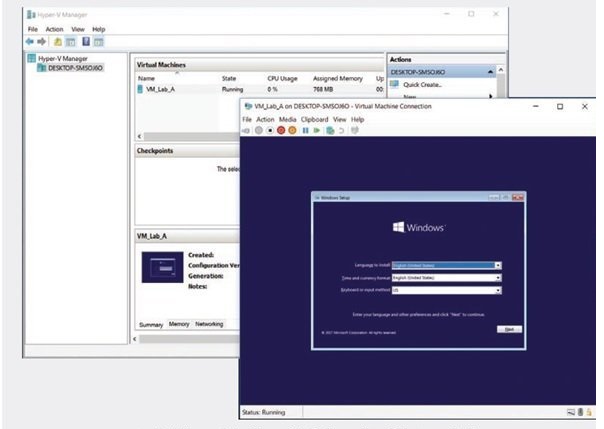
Once the virtual machine is built, you can change its settings to suit your business needs. If you click Connect, then Start, the virtual machine will start. If you use an ISO file as input for the operating system installation, the message “Press any key to boot from CD or DVD” appears.
Pressing a key starts the boot process from the ISO file. The following figure shows a virtual machine running and booting from an ISO file.
After installing Windows on the virtual machine, run the Edge browser to verify that the virtual machine can connect to the Internet.
Note: If you have problems with the boot process from the ISO file, it is better to increase the primary memory size in the Settings menu.
The more you increase the virtual machine‘s main memory, the less the host machine’s main memory decreases. On 64-bit Windows, you need at least 4 GB of main memory.
FAQ
What is Client Hyper‑V in Windows?
Client Hyper‑V is Microsoft’s built‑in virtualization platform for Windows editions like Pro or Enterprise that lets you create and run virtual machines locally.
How do I start creating a virtual machine with Hyper‑V Manager?
Open Hyper‑V Manager, select New > Virtual Machine, and follow the New Virtual Machine Wizard to name the VM, choose generation, assign memory, configure networking, and set up a virtual hard disk.
What do I need before building a VM with Hyper‑V?
Ensure Hyper‑V is enabled in Windows Features, your CPU supports virtualization, sufficient RAM and disk space are available, and you have installation media (ISO) for the guest operating system.