
18 Ways to Copy Files Faster in Windows – Efficient File Transfer Techniques
Slow file transfers or copying in Windows is not a new issue. Many users complain about slow file transfers to other folders, Flash drives, or external hard drives, especially when moving large files that should take minutes.
Slow file-copy speeds in Windows can be caused by hard disk failure, file system errors, outdated drivers, and disk fragmentation, among other factors. By disabling Auto-Tuning, updating Windows, and using file-copy tools, you can increase file transfer speed.
So, if you are tired of the slow speed of file copying in Windows and you would like to do simple tasks such as file copying and not spend time looking at the ‘Copying Items’ window in Windows, we know great ways to use them. You can go through this tedious process faster.
If you plan to buy a Windows virtual server and want to improve the speed of copying files on your Windows server, there is nothing to worry about. These methods can also be applied to your Windows Server.
How to quickly copy files in Windows
1. Check for file system errors
Before doing anything, check the hard disk or external drive status to identify and resolve errors that are slowing file copy speeds. You can use the built-in Windows tool for this.
- Right-click the desired internal or external drive and select Properties.
- Select the Tool tab and click Check from the “Error-checking” section.
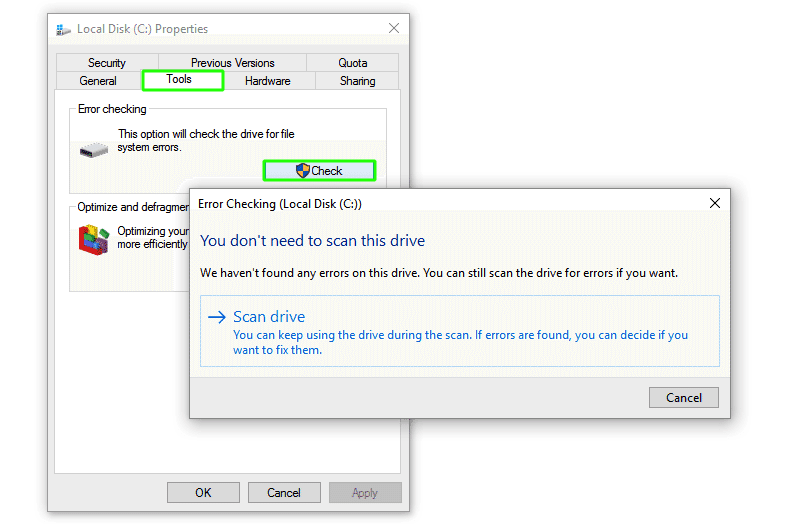
- Follow the wizard’s instructions to check and fix the errors.
2. Disable the Auto-Tuning feature
If you are transferring files between networked computers and experiencing slow copy speeds, disabling the Auto-Tuning feature may help. Although this feature is designed to transfer files more efficiently, if your network uses an older router or your firewall does not support it, enabling this feature can slow file transfer speeds in Windows.
To turn off the Auto-Tuning feature, follow the steps below:
- Click on Start and open CMD as Run as administrator.
- Run the following command:
netsh int tcp set global autotuninglevel=disabled
Next, transfer the files again and check if the transfer speed has increased.
Don’t forget to re-enable the Auto-Tuning feature after completing the file transfer process, for which you can use the following command:
netsh int tcp set global autotuninglevel=normal
3. Enable the Optimize Drives feature
This method works for many Windows users. Especially users who have upgraded from Windows 7 to Windows 10 and experienced slow file copying can use this method. This method optimizes and cleans disk space and moves files to parts of the disk with higher access speeds.
To activate this feature, follow the steps below:
- Press Win + R and type services. msc and press Enter.
- Find Optimize drives, then right-click on it and select Properties.
- Change the Start type to Automatic and click on Start in the lower part of the Service status.
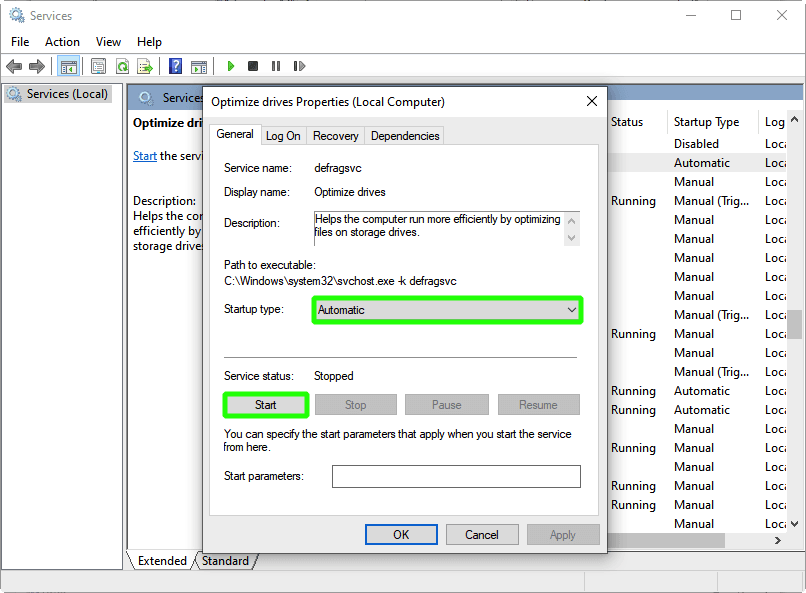
Click Apply and then OK.
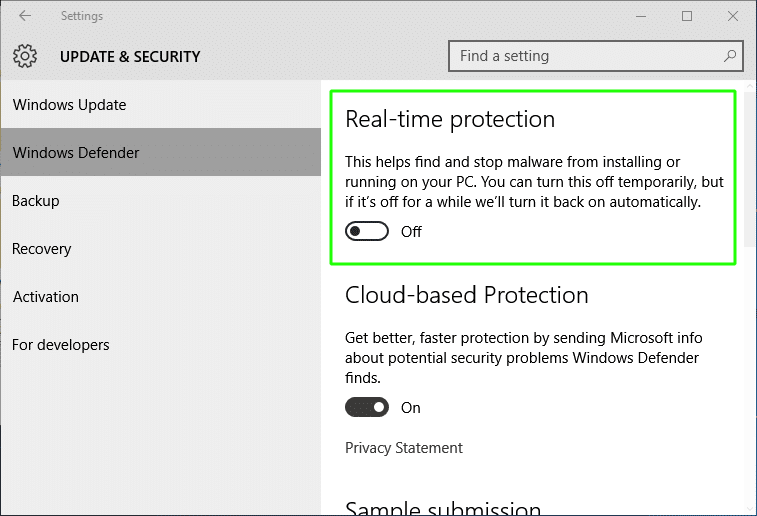
4. Disable the Real-Time Protection feature
Some antivirus software, including Windows Defender, scans files in real time during operations such as downloads or file copying, which can reduce file-copying speed in Windows. But this scan makes your system resistant to malware and other security threats and not affected. Therefore, the best approach is to temporarily disable the Real-Time Protection feature while transferring files, then re-enable it when you are done.
To turn off this feature, follow the steps below:
- Click Start and search for Windows Security.
- Select the Virus & threat protection tab, then click Manage Settings.
- Disable Real-time protection and test file-copy speed in Windows again.
5. Disable the Drive Indexing feature
Although this feature increases access speed and accuracy by indexing system files, enabling it reduces file-copying throughput in Windows because the system checks the index database before copying files. The files are accessed and fit, which also slows down the copy process.
To turn off this feature, follow the steps below:
- Right-click on the desired drive and select properties.
- Click the General tab, then clear the “Allow files on this drive to have contents indexed in addition to the file properties” option.

Click Apply, then click OK to save these changes.
Of course, if you spend a lot of time searching for files and speed when accessing them is essential to you, enable this feature.
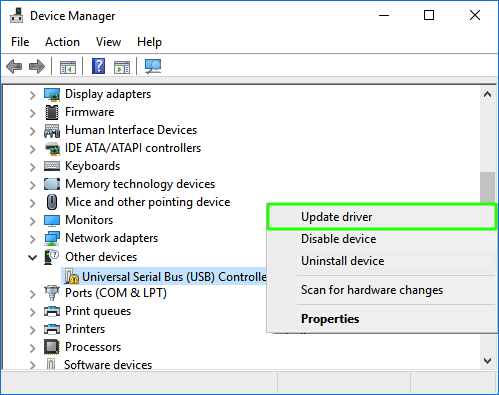
6. Update the USB drivers
The USB driver is the interface between your system and USB devices; updating it can improve file-copy performance in Windows. A new version of the USB driver could include improvements to file transfer speed and support that could resolve your issue.
Follow the steps below to update the USB driver:
- Press Win + R and type devmgmt. msc and press Enter.
- Find Universal Serial Bus Controller drivers and right-click on them.
- Then click on Update driver.
7. Disable Large Send Offload
The Large Send Offload feature is designed to improve network performance and reduce system overhead, but it can also allow background programs to consume significant network bandwidth. If your network has low throughput and you are considering increasing file transfer rates, this method can help.
To turn off the LSO feature, follow these steps:
- Click Start and search for and open Device Manager.
- Click on the arrow next to Network adapters to open the list of adapters.
- Right-click on your network card and select Properties.
- Select Largely Send Offload V2 (IPV4) from the Advanced tab and set it to Disabled.
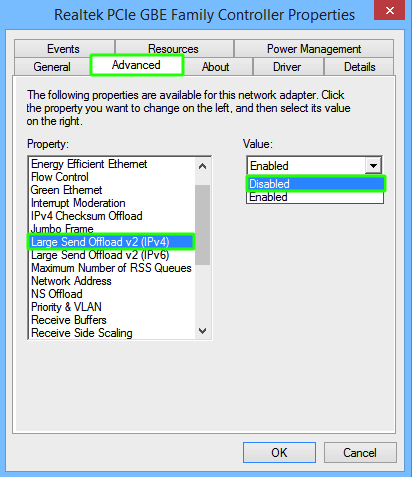
- Do this for Large Send Offload V2 (IPv6) as well.
- Click OK to save these changes.
- Finally, restart your system and recheck the network file transfer speed.
8. Disable RDC
Remote Differential Compression is an essential Windows feature that allows users to reduce the size of files they share on the network, thereby increasing copying speed. However, in some cases, disabling this feature can improve file-copy speed. Significantly, when the network has limited bandwidth, reducing data volume can increase file-copy speed in Windows.
To turn off this feature, follow these steps:
- Click Start, search for, and open Turn Windows features on or off.
- Scroll down and uncheck Remote Differential Compression API support.

Click OK to save these changes.
9. Use another USB port
Sometimes, one USB port has higher bandwidth than another; using the higher-bandwidth port can improve file-copy speed in Windows.
For example, the USB 3.0 port is an improved version of the USB port, which can affect file-copying speed in Windows. Thanks to support for higher transfer speeds and larger file sizes, this port can transfer files faster. The rate of file copying via the USB 3.0 port can reach up to 5 Gbps, which is much higher than the speeds of USB 2.0 and USB 1.1 ports.
10. Format the USB flash drive
According to reports, some users have improved file-copy speeds on Windows by changing their flash drive’s file system to NTFS. In this way, if your USB drive is formatted as FAT32 and you switch to NTFS, you will benefit from faster copy speeds and additional security features, such as encryption and restricted file access.
Note that if you change the Format of your USB flash drive from FAT32 to NTFS, all files on the drive will be deleted, so make a backup of your important data before changing the Format.
To change the Format of your USB flash drive, follow the steps below:
- Open This PC or File Explorer.
- Right-click on the USB flash drive and select Format.
- Select NTFS as the Format and click Start.
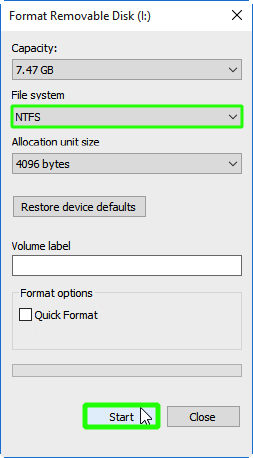
Wait for this process to finish.
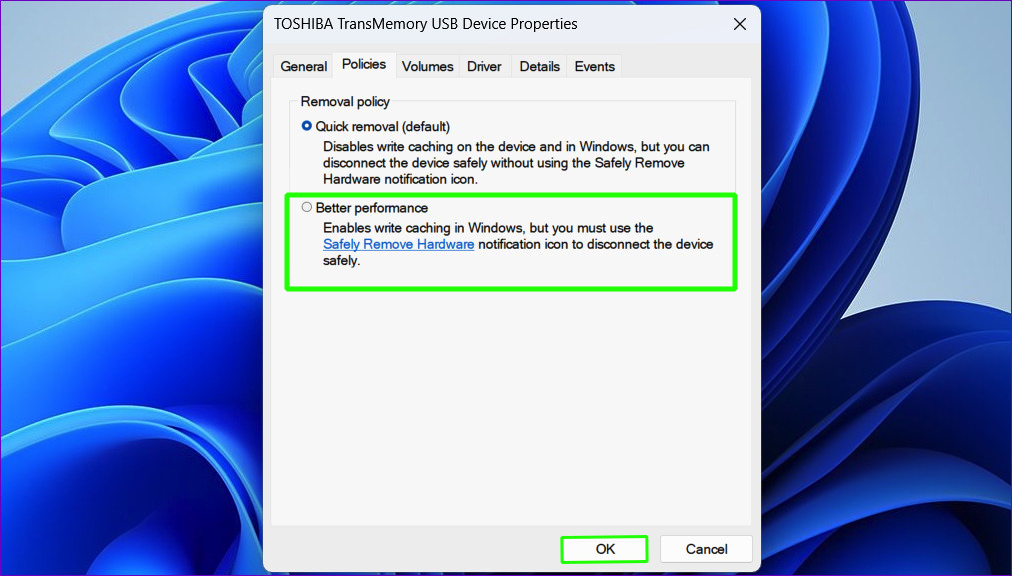
11. Change the drive removal policy
Each external USB device offers two options: Quick removal and Better performance, which you can choose based on your needs. Quick removal prevents caching and is suitable for small-sized USB flash drives. Better performance also allocates time for caching and is ideal for high-volume flash drivers. In general, use Better Performance if you intend to transfer large files and like to do it at a higher speed.
To activate Better performance, follow the steps below:
- Connect the USB flash drive to the system.
- Right-click on Start and open Device Manager.
- Right-click the arrow next to Disk drives to open the list of industries.
- Right-click on the flash drive and select Properties.
- From the Policies tab, enable Better Performance instead of Quick Removal.
12. Disable the Windows search feature to increase the speed of copying files
Windows Search is a valuable feature, but it also consumes significant resources, which can reduce file transfer speeds. Disabling this feature can free up system resources and improve file-copy speed in Windows.
To turn off this feature, follow the steps below:
- Click Start and search for and open Services.
- Double-click on Windows search.
- Click Stop to stop this service.
Of course, if you want to prevent this service from running when you power on the system, you can select the Disabled option in the Startup Type section.
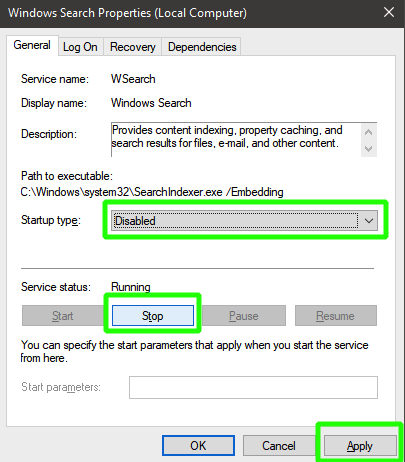
After applying these changes, check whether the file transfer speed has improved.
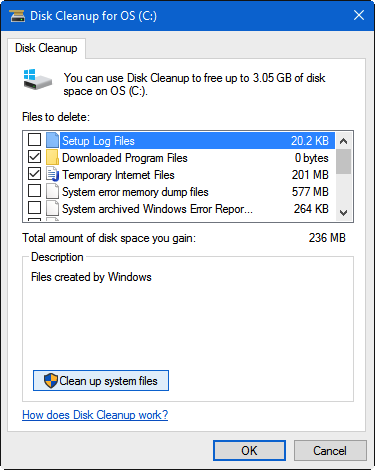
13. Use the Disk Cleanup tool
The tool improves copying speed by removing temporary, old, or unnecessarily complex disk files. In this way, the more space available for copying files on the hard disk, the faster the interaction with the hard disk will be.
To use this tool, follow the steps below:
- Click the Win + S combination button and type disk to open the Disk Cleanup tool in the search results.
- Select the system partition and click OK.
- Click Clean system files, then select the system partition again.
- After the calculations are complete, review all options and click OK.
14. Improve the performance of your system’s hard disk to increase the speed of copying files
Checking the hard disk and optimizing its performance is an effective way to increase file-copy speed in Windows. To do this, you can use tools such as Defraggler and HD Tune.
15. Compress your files
Compressing files significantly reduces their size, thereby reducing the time required to copy them.
Of course, the compression process also requires time and processing, which adds to the time needed to copy files from Windows, but the time required to compress large files, relative to the time needed to copy files at their actual size, is much shorter.
16. Change your hard drive to an SSD
An SSD has higher read and write speeds, so if quick file transfers are very important to you, you can upgrade to an SSD.
Of course, to achieve optimal performance with this hard disk, you must also optimize your device and file systems so that errors do not degrade its performance.
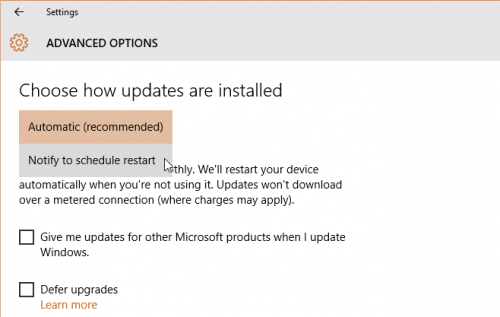
17. Update your Windows
New Microsoft updates can affect system speed and efficiency, as well as the performance of external storage devices such as USB flash drives. For example, one problem that reduces the rate of copying files in Windows is the existence of incomplete updates in Windows, which you can fix by installing new and complete updates.
You can use the following methods to update Windows:
1. Automatic update: In this method, Windows automatically checks for new updates, and if an update is not installed in your system, it automatically downloads and installs it.
To activate this feature, follow the steps below:
Open System Settings and go to the Update & Security section. In the Windows Update section, under advanced options, enable Automatic Updates.
2. Manual update: In this method, you must manually download and install the new updates yourself.
So follow the steps below:
Open System Settings and go to the Update & Security section. Click Check for updates, then download and install any new updates.
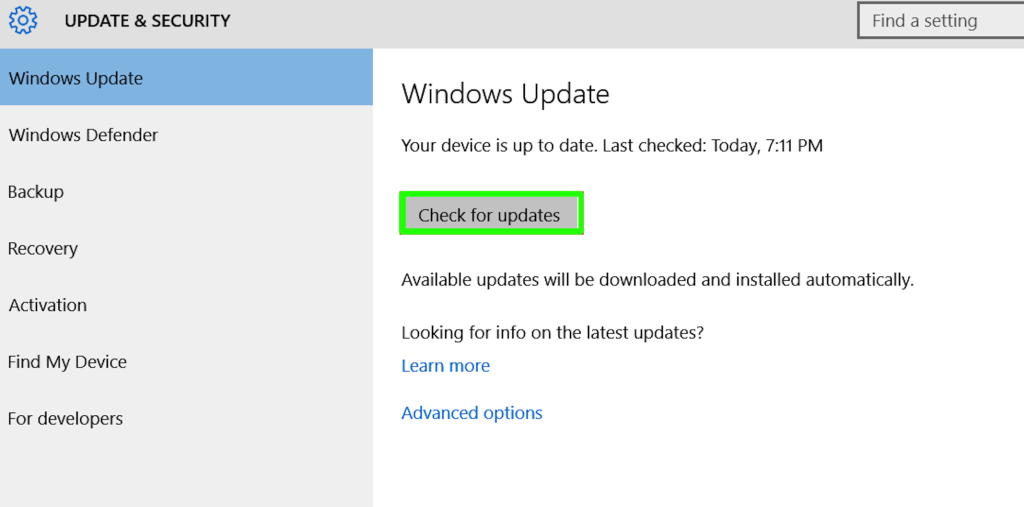
Note that to install updates, you must use a stable, high-speed internet connection so that downloads and installations proceed smoothly.
18. Use special applications for copying files in Windows
After you have tried all the above system settings but still don’t get the desired result, you can use other tools designed for this task. In addition to improving the speed of copying files in Windows, these tools also provide you with a series of useful features that you can use to improve the quality of your work.
Among the best tools for copying files in Windows, the following can be mentioned:
TeraCopy: A file-copying tool for Windows that offers features such as advanced error recovery, file priority, and more.
FastCopy: This application can also improve file-copy speed, support large files, and let users choose a language, among other features.
File Fisher: This tool is one of the fastest portable file-copying tools for Windows, and one of its best features is that you don’t need to download it; you can simply drag and run it on your desktop. This application has powerful filters that help you transfer only specific files.
Any of these methods can solve your problem. It would help if you used techniques tailored to your needs and available resources to achieve your target speed.
Conclusion
Many factors can cause file-copy slowdowns in Windows. Each method presented in this article has proven efficacy, but its effectiveness depends on your system’s hardware specifications. Try any of the methods based on your needs to finally reach your desired speed.
Thank you for staying with us until the end of the article. We hope this article was helpful. If you have any questions or requests and need guidance, please submit your feedback so we can respond promptly.
FAQ
What is a simple way to speed up file copying?
Use robocopy or Teracopy instead of the default copy dialog to improve transfer efficiency.
How do shortcuts improve file copy speed?
Keyboard shortcuts like Ctrl+C / Ctrl+V or drag-and-drop with right click can streamline the process but don’t change transfer speed by themselves.
Do third-party tools help with faster copying?
Yes — dedicated tools can queue, verify, and optimize transfers to reduce errors and delays.