


Video tutorial of Photoshop software and its practical tools (important and necessary)
In this complete post, we want to introduce to you, in general, the general environment of Photoshop software and its basic, essential and practical tools.
Photoshop software, If you are a beginner in software or a little higher than a beginner, we definitely recommend that you do not miss this important article!
Interface
Photoshop has many similarities to software that uses a typing system or graphic paper. Photoshop creates a virtual studio or a dark room. When you open Photoshop, you see the toolbox on the left and the white square on your canvas on the right. The gray area around the canvas marks the edges of the work. To change the dimensions of the canvas, go to the resize section and select any dimensions you like. But the image surface is directly proportional to the file size.
You can use typing their first letter to select tools.
 Marquee Tool
Images are stored pixel by pixel in Photoshop. An image is just a collection of pixels, so before you can do anything in Photoshop you must first specify which pixels you want to change. Do this. Click on this tool to select it. Then click on your image and drag to select a box. If you want to draw a square or a complete circle, hold down the Shift key. Each pixel in the box when When you make your next move, it will be affected. If you click the mouse button and click on this tool, you will see an oval selection tool and a cut tool.
![]() Crop Tool
Crop Tool
Cutting tool: To cut the image, adjust the part you want to cut with the selection points and then delete the selected part.
![]() Lasso Tool:
Lasso Tool:
Lasso tool: You can choose any shape you want, not just rectangles and ovals.
![]() Magic Wand:
Magic Wand:
Magic Stick: Another way to select a pixel is a magic wand. When you click on an area of an image with this tool, all the pixels that are the same color as the pixel you clicked are selected. Double-click on the tool to specify the range. Reach a wide range of colors (for example, the color of the pixels should be the same as the original color of your pixel).
 The Move Tool:
Move tools: They are very important tools because you can select all the pixels but you can not move them. With the movement tool you can move the places you have selected as well as select all the layers. Hold down the PEN key to select the copy option.
Airbrush ![]() Paintbrush
Paintbrush ![]() and Pencil tools
and Pencil tools ![]()
This tool is selected to paint any color in each layer. To change the background color, double-click on it in the toolbox, then select a color and click ok. To change the brush size, go to the brush display window .
Eraser Tool: ![]()
Eraser Tool: Removes anything in the selected layer. You can change the size of the eraser by going to the display window.
Line Tool: ![]()
Line tool : You can use the Line tool to draw straight lines. Select the tool, then click on the canvas area and draw a line. When you release the mouse button, the line ends. You can change the thickness of the line or add it by clicking on the tool to see this box.
Text tool: 
Text tool: Click on this tool to select it. Then click on the Convoy section. You will be given a box in which to type your text and select its properties. Each new block of text goes to its own layer. So you can move it with the gesture tool. Once you have placed the text, it can no longer be edited. To correct mistakes, you must delete the old version by deleting its layer and replace it.
Eyedropper:![]()
Using this tool, click on any color in the canvas to make your foreground color (then you can color or type with it)
Magnifier:![]()
Using this tool, click on a part of the photo that you want to get closer or drag (drag) to refresh. Also, by holding this option and the alt button, you can zoom out the shape and return it to its original state.
Grabber:![]()
Click on this part to move the page for a better view.
Options Bar
![]()
Settings bar: Appears at the top of the page and is text sensitive. When you change the tool, the option bar also changes. The tool you are using is displayed in the left-hand corner, and the options for each tool are specified on the right. For example, in the image above, the motion tool is selected. The automatic selection of layers when checking means that the tool will move the layers depending on which canvas you click on. You choose to look almost like a vector program. The layer palette shows you what is on each layer and you can use it to select objects. It is easy to click on. When the cursor is held on the corners of the box, it turns into a curved arrow that you click to rotate.
Layers:
Photoshop works on a system of layers that are like transparent sheets. When you place objects on a layer, they become part of it. Just as if they were drawn on a transparent sheet with magic. If two objects in a layer They are the same and you want to bring them closer together. You have to cut them with a lasso tool and move them physically.

In a file with overlapping elements, I allow them to be placed in different layers. To move them without the need for the first choice.
To see all the layers in your document, go to the Layers View window. Here are the layers of the image on the left. The eye icon on the left shows that the layer is visible. Click on the eye to make the layer invisible. Select a layer and then Click the trash can icon at the bottom to delete a layer. Click and drag the layers to change their order.
Resolution, image size, file size
 Pixel files per inch of Photoshop are made up of small colored squares called pixels. Using large pixels, a point-by-point and grain image, and using small pixels, a very smooth image can be created.
There are more small pixels in the file and the file size will be larger. If the file size is large, it opens slower and takes longer to store.
It takes up more space on a disk. For example, if I want to tile the bathroom floor again to have a smiling face, I can use large tiles or small tiles. On the left I use 10 tiles on each side for a total of 100 tiles and on the right 25 I use tiles on each side for a total of 625 tiles.
If each of these images measures one inch on each side and each tile is one pixel, the image on the left has a resolution of 10 pixels per inch and the image on the right has a resolution of 25 pixels per inch.
Notice how a small increase in resolution increases It is more in file size because the increase is significant. You can see why images with different accuracy and resolution are sometimes resized in one file or when brought to other programs.
I wanted to draw the image on the right. What was the size of the image on the left? I had a much larger image at the end. This happens when we bring a high resolution image to a lower resolution file. There is only one resolution per file. Accordingly, the pixels in the emerging image change as much as the pixels in the file.
Image size box box:
 JPEG images on the Internet have a low resolution of 72 dots per inch. However, there is no reason why your JPEG images should have such a low resolution. Image files produced by digital cameras often start with low resolution and very large dimensions. You can use it for your business with a commercial port. To change the resolution or size of your image, go to the file and image size section.
 At the bottom of the window there is a box that displays the image specifications. This box determines whether the area can be changed for resolution. When the resolution is independent of the dimensions of the image. If you change the dimensions or resolution according to the file size. Will change. Click the image to change the area for the resolution of the resume box mark.
 You will see that the link icon currently contains the width, height and resolution. You may not need a 10 inch wide image. If you make the width smaller, see what happens to the resolution.
What you see is that the total number of pixels you have decreased in size and as a result the file size does not change. If you use the resample option , the pixels will be added or removed to the image and the file size will increase or decrease.
What is the best resolution in Photoshop?
300 is optimal, between 200 and 300 is good, but below 200 images start to show pixels, ie the image becomes checkered and low quality.
When should we do the Resample?
When you have two images with different resolutions that you want to combine in Photoshop, you do not want the dimensions of either to change, so before combining them, resample one of them to bring them to the same resolution. This is because A file can only have one resolution. When you bring an image from a file of a different size, Photoshop makes the pixels larger or smaller to match the ones in the image. Bringing a 300-pixel image into a 72-pixel file makes it much larger when the image is imported into the new file. Why? It’s like I decided to put a smiling face in the larger tiles instead of the smaller ones, so I I need a much bigger bathroom.
This is why you really need to resize the tiles. Also, if you have a very high resolution that you do not need, you can choose a resolution of 300 to save disk space.
Tonal Adjustment
Sometimes a scan or a digital photo looks like you see it under a microscope. There are easy ways to adjust the color of an image. use.
Levels
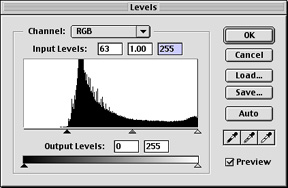
Surfaces: Sometimes an image appears to be blurred or wet. Using the level adjustments, you can increase the contrast in the image. Go to the Adjustments section. The image shows. Here the curve moves to the right which is related to what we see. The image is very clear.
By moving the rotating slider towards the angle part of the curve, we can adjust the amount of the darkest and brightest pixels in the image. Moving the black arrow to the right makes the image darker and moving the white arrow to the left makes the image lighter.
Seeing how the changes are affecting the image, we gradually move the slide towards the edges of the curve. When we click ok, Photoshop rewrites the curve with arrows as endpoints (back to the levels, we can curve See new tunnels)
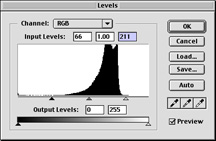
As you can see, the surface settings use the range of the spectrum and assign values from black to white. In the adjusted level calculation box, you can see spaces that represent values that no longer exist.
This is a problem in creating image settings. When you over-adjust the image, you can leave the gap in the adjustment range, which eventually creates a posterisid (not gray enough and looks too black and white).
The only way to prevent this is to Capture a wide range of values when scanning or taking photos, and use only fine settings for images.
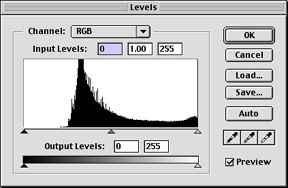
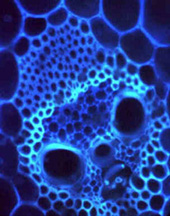
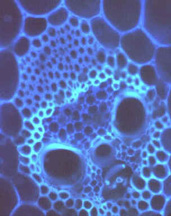
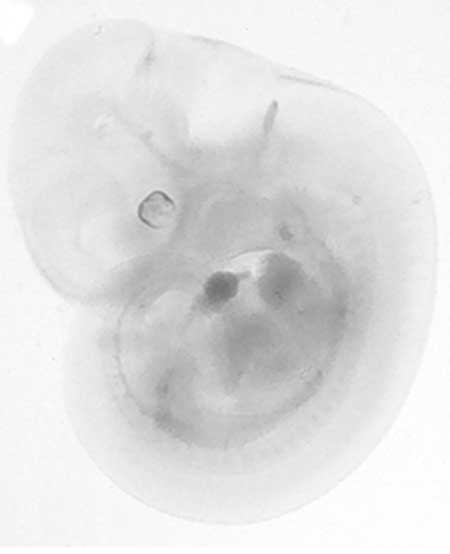
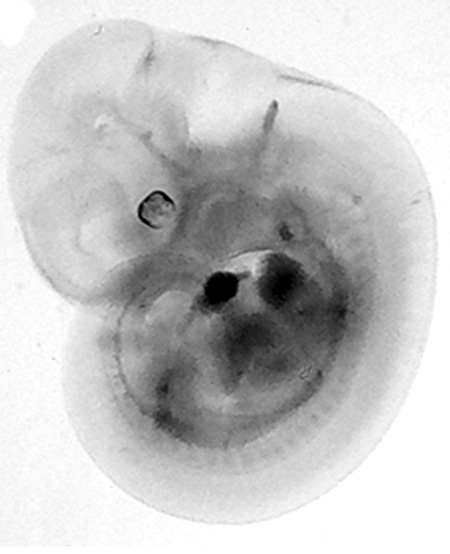
Moving the dark slider to the right deepens the darkness. This background image is not completely black  .
.