


Learn services in Android in simple language
The service is part of the program that runs in the background for long-term operations without the need to interact with the user, and even works when the main program is closed.
A service can have basically two modes –
| Number | Mode and description |
| 1 | StartedThe service starts when an application component, such as an activity, starts it by calling startService (). Once started, a service can run indefinitely in the background, even if the component that started it is closed. |
| ۲ | BoundWhen a program component is connected to it by calling bindService (), the service is restricted. A bound service provides a client-server interface that allows components to interact with the service, send requests, receive results, and even do so through interprocess communication processes (IPC). |
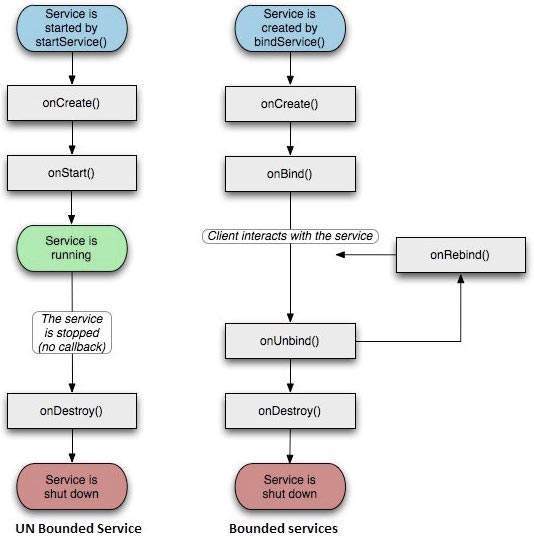
A service has lifecycle callback methods that you can implement to monitor changes in service status and get the job done right. The following diagram on the left shows the service lifecycle created with startService () and the diagram on the right shows the life cycle when creating a service with bindService ():

To create a service, create a Java class that is derived from the base Service class. The Service class defines the various callback methods, the most important of which are listed below. You do not need to run all callback methods. However, it is important that you understand each and implement things to make sure the program works as expected.
| Number | Callback and description |
| 1 | () onStartCommandThis system calls this method when another component, such as activity, requests service start with startService (). If you implement this method, it is your job to stop the services by calling the stopSelf () or stopService () methods. |
| ۲ | () onBindThis system calls this method when another component wants to use a service by calling bindService (). If you implement this method, you must use an IBinder object to provide an interface that clients can use to communicate with the service. You should always implement this method, but if you do not want to allow the connection, you must return null. |
| 3 | () onUnbindThe system calls this method when all clients disconnect from the service. |
| 4 | () onRebindThe system calls this method when new clients connect to the service. |
| 5 | () onCreateThe system invokes this method when the service is first created using onStartCommand () or onBind (). |
| 6 | () onDestroyThe system calls this method when the service is no longer in use and is being lost. The method must be implemented to free up the resources used by the service. |
The following service shows each of the life cycle methods –
package com.tutorialspoint;
import android.app.Service;
import android.os.IBinder;
import android.content.Intent;
import android.os.Bundle;
public class HelloService extends Service {
/ ** indicates how to behave if the service is killed * /
int mStartMode;
/ ** interface for clients that bind * /
IBinder mBinder;
/ ** indicates whether onRebind should be used * /
boolean mAllowRebind;
/ ** Called when the service is being created. * /
@Override
public void onCreate () {
}
/ ** The service is starting, due to a call to startService () * /
@Override
public int onStartCommand (Intent intent, int flags, int startId) {
return mStartMode;
}
/ ** A client is binding to the service with bindService () * /
@Override
public IBinder onBind (Intent intent) {
return mBinder;
}
/ ** Called when all clients have unbound with unbindService () * /
@Override
public boolean onUnbind (Intent intent) {
return mAllowRebind;
}
/ ** Called when a client is binding to the service with bindService () * /
@Override
public void onRebind (Intent intent) {
}
/ ** Called when The service is no longer used and is being destroyed * /
@Override
public void onDestroy () {
}
}
Example
This example will acquaint you with the steps of creating an Android service. To modify the Android application that we created in the Hello World example section, follow the steps below –
| Number | Description |
| 1 | You can use Android StudioIDE to create an Android application and name it My Application under the com.example.tutorialspoint7.myapplication package, as described in the Hello World example. |
| ۲ | Modify the MainActivity.java file and add the startService () and stopService () methods. |
| 3 | Create a new MyService.java file under the com.example.My Application package. This file implements methods related to the Android service. |
| 4 | Define your service in the AndroidManifest.xml file using the <service… /> tag. An application can have one or more services without restrictions. |
| 5 | Edit the res / layout / activity_main.xml file to add two buttons to the program. |
| 6 | There is no need to change any constants in the res / values / strings.xml file. Android studio takes care of string values. |
| 7 | Run the program to launch the Android emulator and see the result of the changes made in the program. |
Below you can see the contents of the MainActivity.java file. This file contains each of the basic life cycle methods. To start and stop the service, we have added the methods startService () and stopService ().
package com.example.tutorialspoint7.myapplication;
import android.content.Intent;
import android.support.v7.app.AppCompatActivity;
import android.os.Bundle;
import android.os.Bundle;
import android.app.Activity;
import android.util.Log;
import android.view.View;
public class MainActivity extends Activity {
String msg = “Android:”;
/ ** Called when the activity is first created. * /
@Override
public void onCreate (Bundle savedInstanceState) {
super.onCreate (savedInstanceState);
setContentView (R.layout.activity_main);
Log.d (msg, “The onCreate () event”);
}
public void startService (View view) {
startService (new Intent (getBaseContext (), MyService.class));
}
// Method to stop the service
public void stopService (View view) {
stopService (new Intent (getBaseContext (), MyService.class));
}
}
Below is the content of the MyService.java file. This file can implement one or more service-related methods based on the required conditions. Currently we have implemented only two methods onStartCommand () and onDestroy () –
package com.example.tutorialspoint7.myapplication;
import android.app.Service;
import android.content.Intent;
import android.os.IBinder;
import android.support.annotation.Nullable;
import android.widget.Toast;
/ **
* Created by TutorialsPoint7 on 8/23/2016.
* /
public class MyService extends Service {
@Nullable
@Override
public IBinder onBind (Intent intent) {
return null;
}
@Override
public int onStartCommand (Intent intent, int flags, int startId) {
// Let it continue running until it is stopped.
Toast.makeText (this, “Service Started”, Toast.LENGTH_LONG) .show ();
return START_STICKY;
}
@Override
public void onDestroy () {
super.onDestroy ();
Toast.makeText (this, “Service Destroyed”, Toast.LENGTH_LONG) .show ();
}
}
Below we edit the AndroidManifest.xml file to define the service. Add the <service… /> tag here to introduce the service –
<? xml version = ”1.0 ″ encoding =” utf-8 ″?>
<manifest xmlns: android = ”http://schemas.android.com/apk/res/android”
package = ”com.example.tutorialspoint7.myapplication”>
<application
android: allowBackup = ”true”
android: icon = ”@ mipmap / ic_launcher”
android: label = ”@ string / app_name”
android: supportsRtl = ”true”
android: theme = ”@ style / AppTheme”>
<activity android: name = ”. MainActivity”>
<intent-filter>
<action android: name = ”android.intent.action.MAIN” />
<category android: name = ”android.intent.category.LAUNCHER” />
</intent-filter>
</activity>
<service android: name = ”. MyService” />
</application>
</manifest>
Below you will find the contents of the res / layout / activity_main.xml file, to which we have added two buttons.
<RelativeLayout xmlns: android = ”http://schemas.android.com/apk/res/android”
xmlns: tools = ”http://schemas.android.com/tools” android: layout_width = ”match_parent”
android: layout_height = ”match_parent” android: paddingLeft = ”@ dimen / activity_horizontal_margin”
android: paddingRight = ”@ dimen / activity_horizontal_margin”
android: paddingTop = ”@ dimen / activity_vertical_margin”
android: paddingBottom = ”@ dimen / activity_vertical_margin” tools: context = ”. MainActivity”>
<TextView
android: id = ”@ + id / textView1 ″
android: layout_width = ”wrap_content”
android: layout_height = ”wrap_content”
android: text = ”Example of services”
android: layout_alignParentTop = ”true”
android: layout_centerHorizontal = ”true”
android: textSize = ”30dp” />
<TextView
android: id = ”@ + id / textView2 ″
android: layout_width = ”wrap_content”
android: layout_height = ”wrap_content”
android: text = ”Tutorials point“
android: textColor = ”# ff87ff09 ″
android: textSize = ”30dp”
android: layout_above = ”@ + id / imageButton”
android: layout_centerHorizontal = ”true”
android: layout_marginBottom = ”40dp” />
<ImageButton
android: layout_width = ”wrap_content”
android: layout_height = ”wrap_content”
android: id = ”@ + id / imageButton”
android: src = ”@ drawable / abc”
android: layout_centerVertical = ”true”
android: layout_centerHorizontal = ”true” />
<Button
android: layout_width = ”wrap_content”
android: layout_height = ”wrap_content”
android: id = ”@ + id / button2 ″
android: text = ”Start Services”
android: onClick = ”startService”
android: layout_below = ”@ + id / imageButton”
android: layout_centerHorizontal = ”true” />
<Button
android: layout_width = ”wrap_content”
android: layout_height = ”wrap_content”
android: text = ”Stop Services”
android: id = ”@ + id / button”
android: onClick = ”stopService”
android: layout_below = ”@ + id / button2 ″
android: layout_alignLeft = ”@ + id / button2 ″
android: layout_alignStart = ”@ + id / button2 ″
android: layout_alignRight = ”@ + id / button2 ″
android: layout_alignEnd = ”@ + id / button2 ″ />
</RelativeLayout>
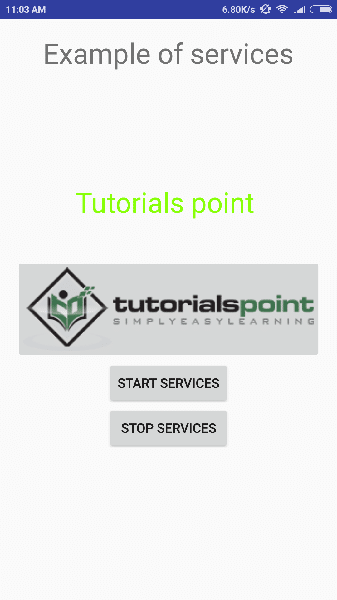
We are now running the program. Suppose you created the AVD (Android Virtual Device) while setting up the Android programming environment. To run the program, open one of the activity files and then click on the run icon. Install the Android studio application in AVD and install it. If everything is set up correctly, a simulator window will appear as shown below:
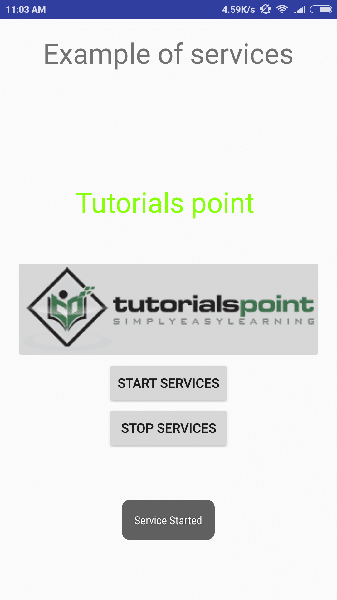
Now to start your service, click on the Start Service button, this button will start the service and according to our programming in the onStartCommand () method, a Service Started message will appear at the bottom of the emulator as follows –
You can click the Stop Service button to stop the service.