


Learn how to design a multiple query form in Access software
As mentioned in the previous post on how to design a query form in Access software (a simple table) , queries or queries in Access are used to ask questions amidst a wealth of information.
In this tutorial, we will learn how to design a multiple query form (the most complex case) called multi-tabular query.
Introduction
In the previous lesson, you learned how to design a simple single-tabular query form. Most of the query forms you design in Access probably use multiple tables, which allows you to answer more complex questions. In this lesson you will learn to design multiple query forms.
If you want to accompany us, you need to download the simple Access 2013 database. You need to install Access 2007 to 2016 on your system to open this example.
Design a multi-tabular query form
Inquiry forms can be more difficult to understand and create if you do not have a good way of finding them. A single-tab query form can be somewhat simple, but to create a stronger query form, you need to pre-design the query form.
Schedule a query form
Here are four steps you can take when planning a query form that uses more than one table:
1- Ask carefully! Creating a query form is more complicated than asking a question, but if you know exactly what question you want to answer, it is essential for a useful query form.
2- Identify! Identify any information you want to include in the results of your query form. What information does this section contain?
3- Find it! Put the fields you want in your query form. Which tables contain these items?
4- Set the standard! Determine the criteria by which the information in each section is met. Think about the question you are asking in the first step. Which part do you need to search for specific information? What information are you looking for? How do you search for it?
This process may seem concise at first, but once we get into the process of planning for a multi-table query form, you need to understand how querying the query form can make it so much easier.
Schedule a query form
Let’s start with the query form planning process that we run in the bakery database. As the steps of the planning process are called step by step, think about each part of the planning process that can be used to execute another query form.
Step 1 – Specify the exact point of the question you want to ask
The bakery database contains many customers, many of whom were not customized but are on our database list. They registered for our email list. Many live outside the city limits, but others live outside the city or even the state. We want to text customers who have once made a purchase and give them another chance to order, so we send them coupons. We really do not want our list to contain customers who live far away from the city, to send coupons to those who probably do not live in the area we want. So we not only find people who live in our city, but also people who live in our area.
In short, the question we want to answer in our inquiry form is: Which customers live in this area, are they outside the city limits, and have they ordered our bakery?
Step 2 – Identify the information that is needed
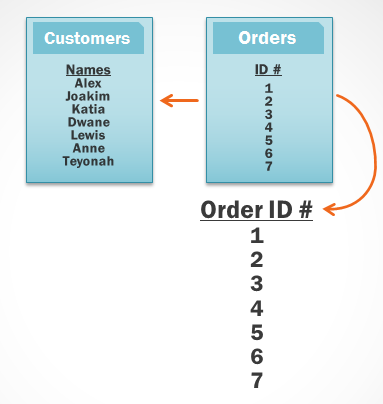
What information do I need to see about these customers in the list? Specifically, we need the customer name and contact information, address, phone number, and email address. But how do we know if they have given their order or not? Each record of the customer order shows that it has placed the order. If we consider the order ID numbers, we can summarize the list of customers who only ordered before.
Step 3 – Embedding the tables that contain the information we need
In order to write a query form, you need to be familiar with the different tables in the database. Based on our database, we know that the customer information we need is in the right place in the customer table. The order ID number is a part of the order table. We need to consider only these two tables to find all the information we need.
Step 4 – Determine the criteria for the search form to search
When you set a criterion for a string in the query form, you are basically using a filter that tells the query form to retrieve exactly the information that matches that criterion. Check the list of strings in this query form. How and where can we set a benchmark that will help us better answer our questions?
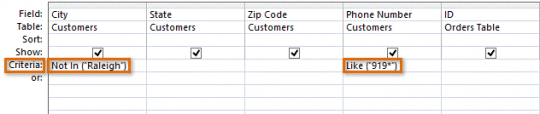
We do not want customers who live in our city, Raleigh, so we want a benchmark that returns all records except those in that city. We do not want customers who live far away, all phone numbers in this area start with the code 919, so we consider a criterion that only goes back to the records. This ensures that the coupons are sent to customers who live close enough to them.
Therefore, we do not set a standard for the order idea field or any other field because we want to see that all orders are for people who have only two set criteria.
In order to write a query form, you need to be able to set the criteria in a language that Access understands. As you can see in the image above, our standard is a phone number that starts with 919. To learn how to write more criteria, refer to the Quick Reference Criteria Form Reference Guide, which contains the most common information used in the Access Query Form.
Connecting tables in query form (common tables)
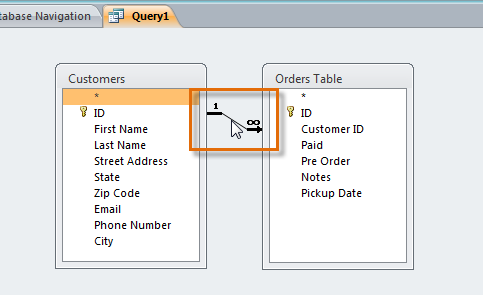
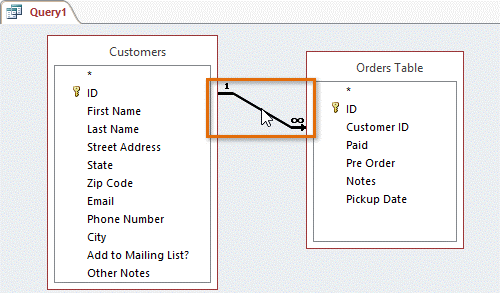
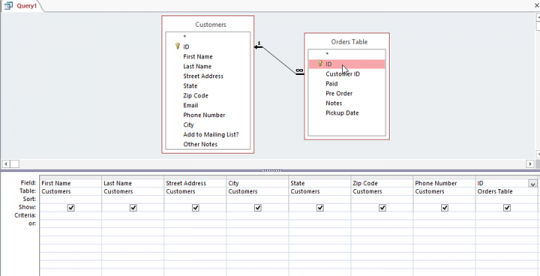
The final point to consider when designing a query form is how to link the tables together. This is what you will see in the Object Relationship pane when you connect two tables in the Access query form :
The line that connects the two tables is called the join line. Look at how the join line is an arrow. This is because this shape represents the order in which the query from the two tables looks at the Data in the image.
Above is a left-to-right arrow that indicates that the query starts at the left, and then just look at the Data record table on the right, which is related to the background already seen on the left. Sometimes Access connects them from right to left.
Either way, you may want to make sure your question contains the correct information. You need to change the connection direction. The connection direction can affect what information your query retrieves. The line that connects the two tables is called the join line. Look at how the join line is an arrow.
Because of this, this is a form that shows the order in which the query looks at the data from the two tables. Look at the table on the right, which is related to the background already seen on the left. Your tables are not always connected this way. Sometimes Access connects them from right to left.
Either way, you may want to make sure your question contains the correct information. You need to change the direction of the connection. The connection direction can affect what information your query retrieves.
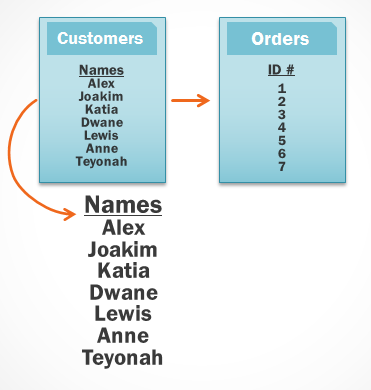
To understand what this means, consider the query you are asking. For our query We need to see the customers who have ordered so we have the customer table and the order table. Let’s take a look at some of the data in these tables.
What do you notice when you look at these lists?
First of all, any order in the order table is related to the person in the customer table, meaning the customer who placed the order.
However, when we look at the customer table we see that customers who have had multiple orders are related to more than one order and those who have never had an order are not related to any order. As can be seen even when two The table is related.
It makes it possible to have backgrounds in a table that have nothing to do with another table. So what happens when Access tries to stream our query with the current connection, from left to right? Drags each record to the left of the table, the customer table.
Therefore, any background in the table on the right that is related to the Access background from the table on the left is retrieved.
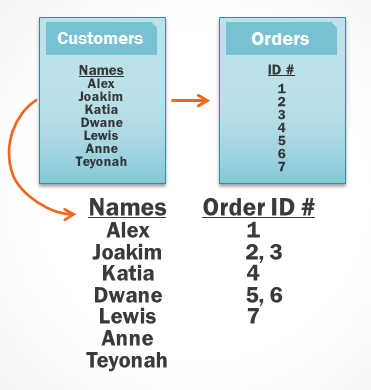
Since our subscription to the customer table started with our query, it includes the records of all customers, including those who did not have any orders.
This is more information than we need.
We just want to see the records of customers who have ordered. We can solve this problem by redirecting the subscription line. Instead, if we go from right to left, Access first retrieves the orders from the right, which is the order table.
Access then looks at the table on the left and retrieves only the history of the clients associated with the custom on the right.
We now have exactly the information we want. All customers who have ordered and only as you can see we need to connect our tables correctly to create the information we wanted.
In the query we needed to use the right-to-left connection, but the correct way to connect depends on what information you want and where that information is categorized.
When we add tables to the query, Access automatically returns those tables to you. It connects but often does not connect them properly, which is why it is important to always take care of the connections between the tables before we start a query.
Create a multi-table query
Now that we have our question, we are ready to design and launch it. If you have written plans for your question, be sure to document them when creating the question.
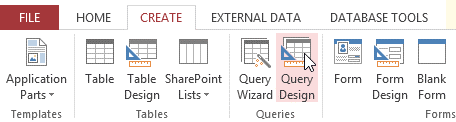
1. From the create tab on the ribbon, select Query Design.
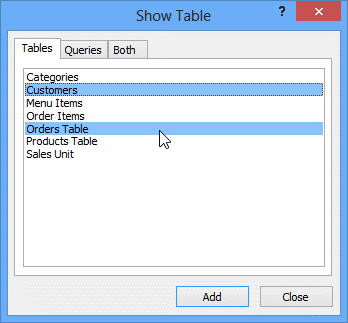
2. In the Dialog box that appears, select any table that you want your question to contain and click Add. You can hold down the ctrl key and select more than one table: Once we formed our query, we decided to get the information we needed from our customers and the order table so we add these.
3. After we have added all the tables we wanted, click close.
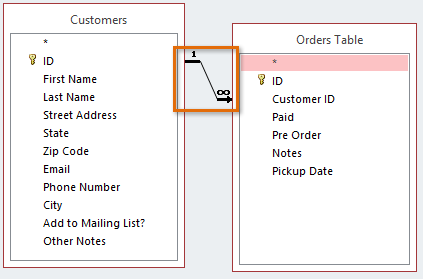
4. A table appears in the Object Relationship pane that are connected by a join line. Double-click the narrow section of the common line between the two tables to edit the shared path.
5. In the dialog box, the title Join properties will appear. Select an option to select your common path. Select option 2 (to move left to right) the connection point. In the question, the table to the left is the table of customers.
This option, which is the choice of all customers who comply with our local regulations (whether they have ordered or not) will be included in our results.
We do not want to select this option for our question. Select option 3 To connect right to left because our table is our order table. Selecting this option allows us to work with the background of all orders and only customers who have placed an order. Select this option for your question We do because this is exactly the data we want to see.
6. In the Windows table, double-click the names of the ranges you want to include in your question. They will be add to the Design grid at the bottom of the page. In our example, we refer to more than one area of the customer table: We refer to the order table.
7- Set the criteria of the range by entering your favorite criteria in the criteria row of each range. We want to have two criteria. First, to find customers who do not live in Raleigh, type it in Not in (Raleigh) within the city limits. Second, to find customers whose area phone number starts with the code 919, just type like 919 in the number range. Phone.
8- After setting our rules, we set the question by clicking the Run command from the Design tab. 9. The results of the query in the Datasheet view The query is displaying which looks like a table. If you want to save your questions by clicking the save command on the Quick Access toolbar and when the naming is over, type your favorite name and click the ok button.
