
How To Use The Nmap Command In Linux To View Networked Devices?
Are you wondering What Devices Are Connected To Your Home Network? You May Be Surprised At The Devices Connected To Your Home Network Without Your Knowledge, But How Do We Identify These Devices?
This article will learn how to use the Nmap command in Linux to identify all devices connected to the network.
Some people think the home network is a straightforward entity with no hidden secrets, and they do not need to increase their knowledge about these networks.
This view may have been accurate in the past. Still, with the proliferation of IoT devices, mobile devices such as smartphones and tablets, and the smart home revolution alongside conventional devices such as broadband routers, laptops, and desktops, your eyes should be wide open.
Users with Windows 10 installed on their systems can easily detect this, but how do we see the above devices in Linux? The answer lies in a word called Nmap.
The first step is to install Nmap.
This article will use the Nmap name to identify devices connected to the network. Depending on the software package you have installed on your system, you may have to install Nmap.
If Nmap is not installed on the system, the following command allows you to install Nmap on an Ubuntu distribution.
sudo apt-get install Nmap
To install Nmap on a Fedora distribution, use the following command:
Sudo dnf install Nmap
The above command installs the Nmap on Manjaro.
Sudo Pacman -Syu map
You can install Nmap on other Linux distributions using the package management tool.
Find your IP address.
The first step is to find your Linux computer’s IP address. Here, you will see a range of IP addresses that the network uses to manage devices, including the minimum and maximum IP addresses that your computer uses.
We need to specify IP addresses or a range of IP addresses for Nmap here, so we must first find this value. Linux has a handy command called IP, which has an address. To use the above control, type IP, create a space with the spacebar key, type address, and press Enter.
IP address
Your IP address is marked with an inlet tag at the bottom of the above command.
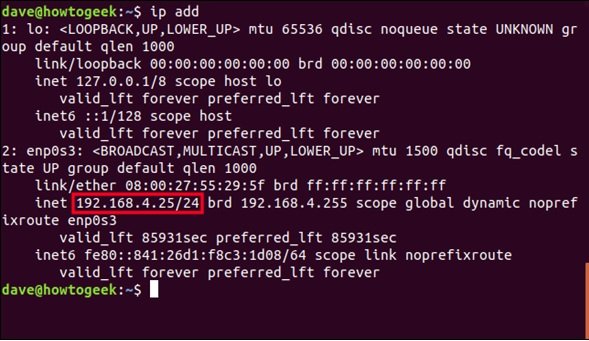
The IP address in the image above is 192.168.4.25. / 24 means three consecutive sets of eight 1s in the subnet mask. 3×8 = 24
In the binary system, the subnet mask is equal to the following value:
11111111.11111111.11111111. 00000000
In the decimal system, this value is equal to 255.255.255.0.
The subnet mask and IP address indicate which part of the IP address is used to identify the network and which part is used to identify devices. This subnet mask informs the hardware that the first three numbers identify the IP address of the web, and the fourth part is the IP address used to identify unique devices.
Since the most significant value you can store is an 8-bit binary value of 255, this network’s IP addresses are 192.168.4.0 to 192.168.4.255. All of these are listed in / 24. Fortunately, Nmap works with this token, so we need to use Nmap.
Start using nmap
Nmap is a network mapping tool that works by sending different network messages to IP addresses within the specified range. Let’s do a simple Nmap scan. We intend to use the—sn option (scan without port), which tells Nmap that it does not currently need to check the status of ports on devices.
As a result, it will perform light and fast scans. Note that the larger the number of devices within a network, the more time-consuming it will be. The IP address that we intend to use is the address that we obtained from the execution of the previous command.
Here, the parameter 192.168.4.0/24 for NNmap is translated to the starting IP address, is equal to equal168.4.0, and includes all IP addresses up to 192.168.4.255. Note that we use sudo as follows.
sudo nmap -sn 192.168.4.0/24
After a short wait, the output of the above command is written in the terminal window. You can run this scan without sudo, but sudo ensures that as much data as possible is extracted. For example, without sudo, this scan does not return manufacturer information.
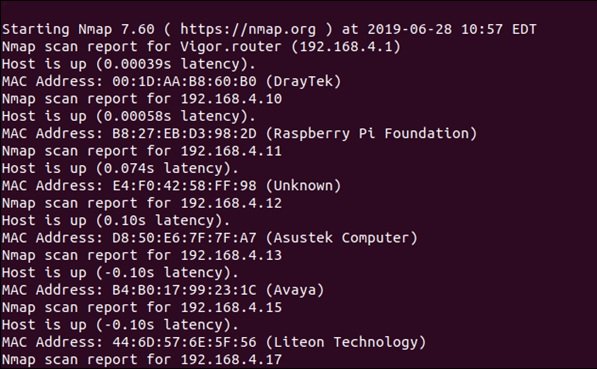
The advantage of using the—sn option is the quick and easy scanning, which provides a clear list of current addresses. In other words, we have a list of devices connected to the network with their IP address, and, if possible, Nmap also provides information about the device manufacturer. You can see the list of manufacturers’ specifications in the image below.
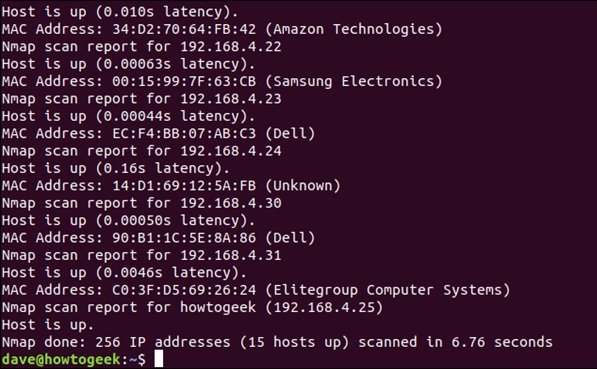
We now have a list of connected devices, so we know how many are connected. In the picture above, there are 15 devices turned on and connected to the grid.
We also know the names of some device manufacturers. The specifications of some devices, such as Raspberry Pi, are likely to be recognizable, but you need to do more for some devices.
Perform a deeper scan.
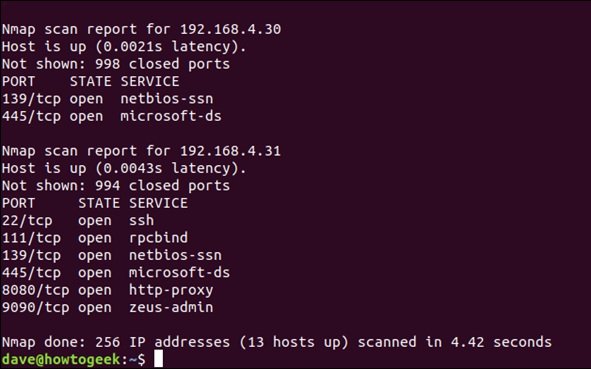
If we remove the -sn option from the nmap command, nmap also checks device ports. Every application or service within a device has a port number. Network traffic is delivered to an IP address and a port, not just an IP address. Some port numbers are preset or reserved.
Ports are always used to transfer network traffic to do a specific job. For example, port 22 is reserved for SSH connections, and port 80 is reserved for HTTP web traffic. We will use Nmapp to scan each device’s port to see which ones are open. For this purpose, we execute the following command: Nmap.
nmap 192.168.4.0/24
This time, we will get more details about each device. The output of the following command is as shown below.
Since the output of this command contains a lot of information, you can move the result into a text file. The following command does this.
nNmap192.168.4.0/24 > nmap-list.txt
The Nmap command has other features; I suggest you discover them all.