How to Type Using Your Voice in Windows 10
How to Type Using Your Voice in Windows 10: This Article Teaches You How To Enable Speech-To-Text Conversion In Windows 10 And How To Work With It.
If You Are Tired Of Typing, We Have Good News For You: In Windows 10, You Can Easily Use Voice To Write Words, And You No Longer Need To Type Manually.
This operating system has a feature that can convert audio to text. However, Speech recognition is only available in a few living languages, including English, French, German, Spanish, Mandarin, and Japanese. In This Article, We Will Teach You How To Enable This Feature.
How To Enable Speech-to-Text Recognition Feature In Windows 10
According to How-To Geek, Using The Software Available In Windows 10, You Can Convert Audio To Text In The Shortest Time. To Access It, Use The Key Combination Win + H.
However, This Feature May Not Be Enabled By Default On Your System; therefore, You May Need To Go To The Settings Section To Enable It.
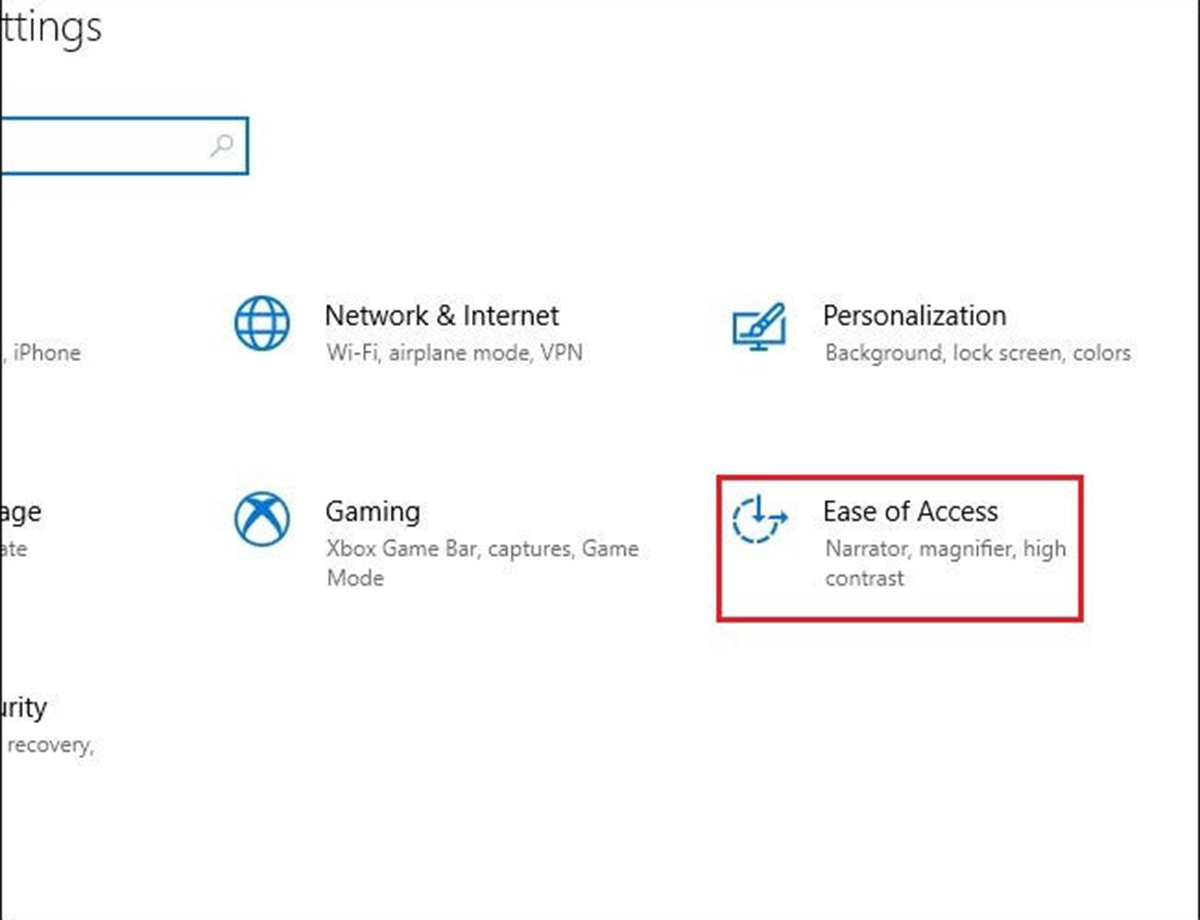
Take The First Step By Opening Windows Settings. To Do This, Open The System Start Menu And Click On The Gear Icon. You Can Also Do This By Pressing The Win + I Key Combination.

In Settings, Click Ease of Access, Then Enter It.
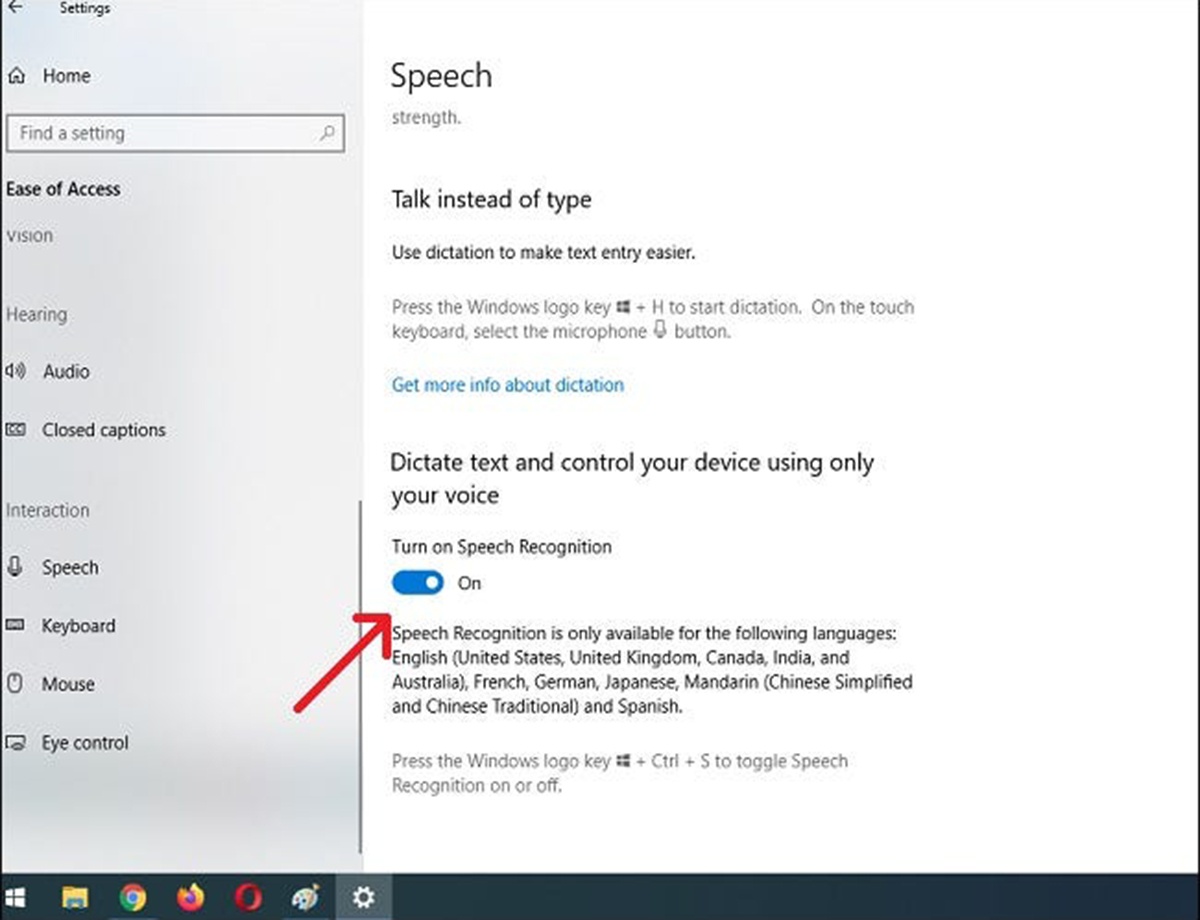
At The Bottom Left Of The Window, Click On Speech In The Sidebar. In the Speech Settings Section, Select Turn On Speech Recognition. After That, Its Status Should Change To On and Turn On.
To Do this Quickly, Press Win + Ctrl + S To Turn Speech Recognition On Or Off Immediately.

When You First Turn On The Speech Recognition Feature, You Have To Adjust It So That The Device Can Detect Your Voice.

Connect a Headset Microphone, a Desktop Microphone, or Another Peripheral Microphone to Your Device for Initial Settings. Then, Follow The On-Screen Instructions To Select And Calibrate the Microphone. We Recommend Using A Headset Microphone For Dictation Software.
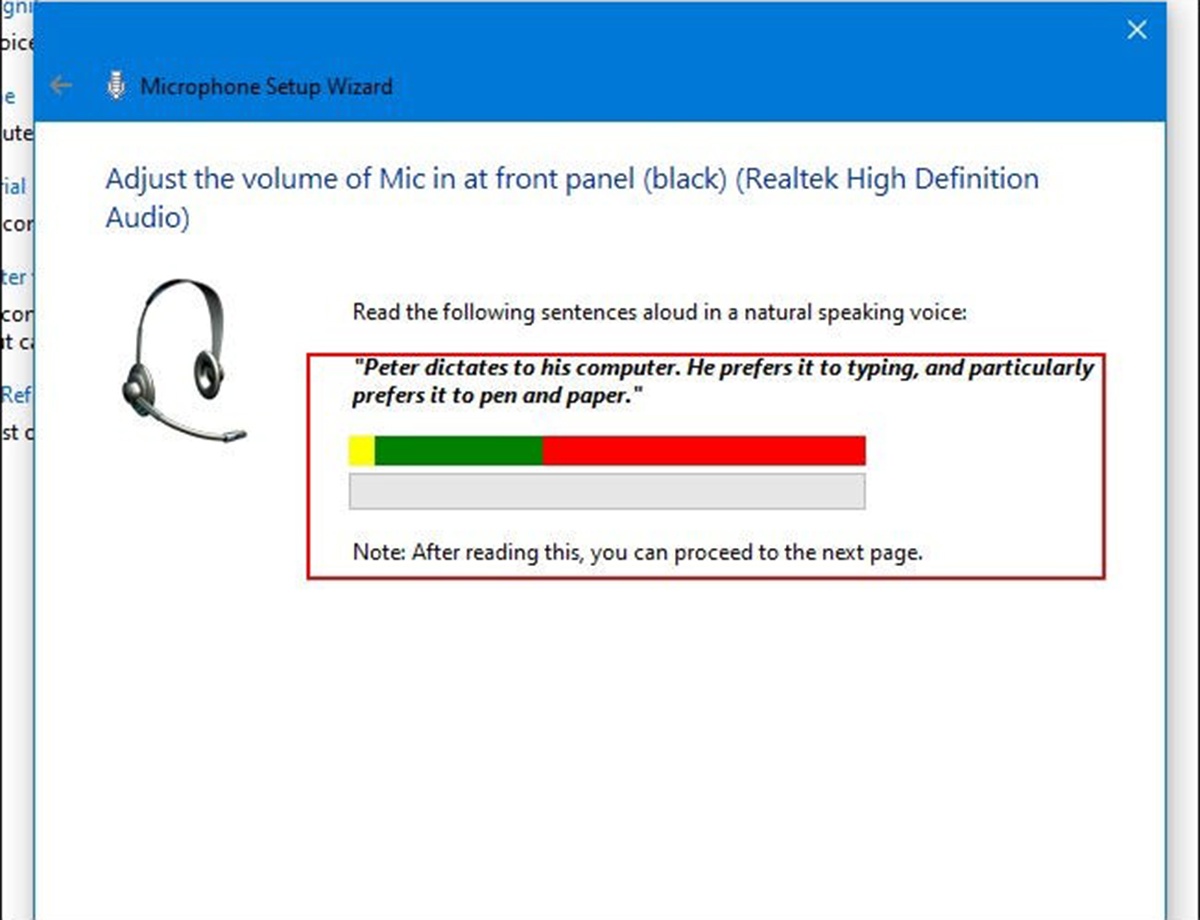
After Connecting The Headset, You Need To Read The On-Screen Phrases To Transmit Your Voice Microphone To The Device, And The System Will Record It. By Doing This, The System Can Detect Your Voice In The Future.
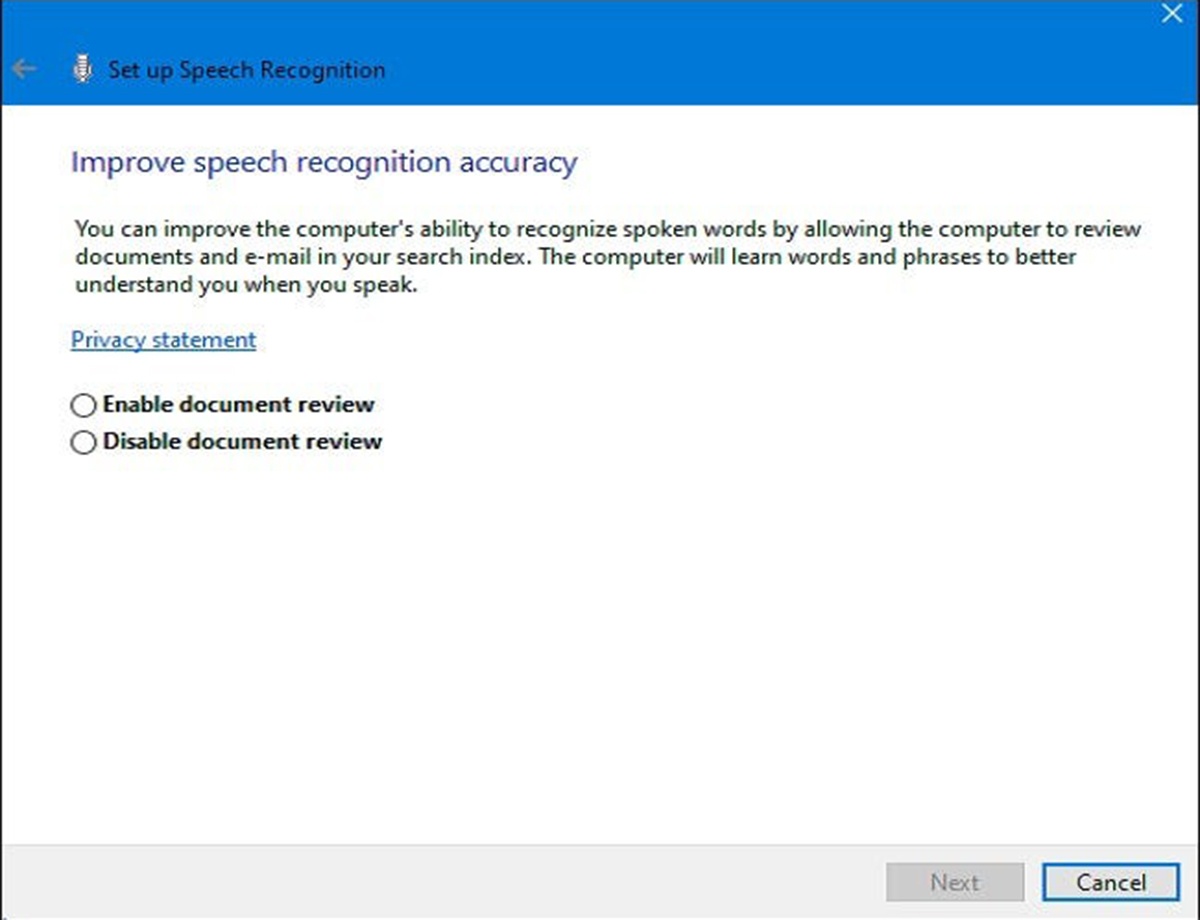
Finally, Help Improve The Accuracy Of Speech Recognition By Choosing Whether Or Not You Want To Allow Your Computer To Scan Documents And Emails Directly.
Once the setup process is complete, You Are Ready To Type With Your Voice!
Typing By Voice In Windows 10
Once you have set up your microphone, you can type using your voice. Each Time You Turn On The System, You Will Be Asked To Enable Speech Recognition.
If you want to use this feature, first open the page where you want the text to be written and use the Win + H Key combination to call the Audio-to-text Conversion feature. For Example, We Used A Blank Page To Do This. After Hitting Win + H, A Dictation Bar Will Appear At The Top Of The Screen.
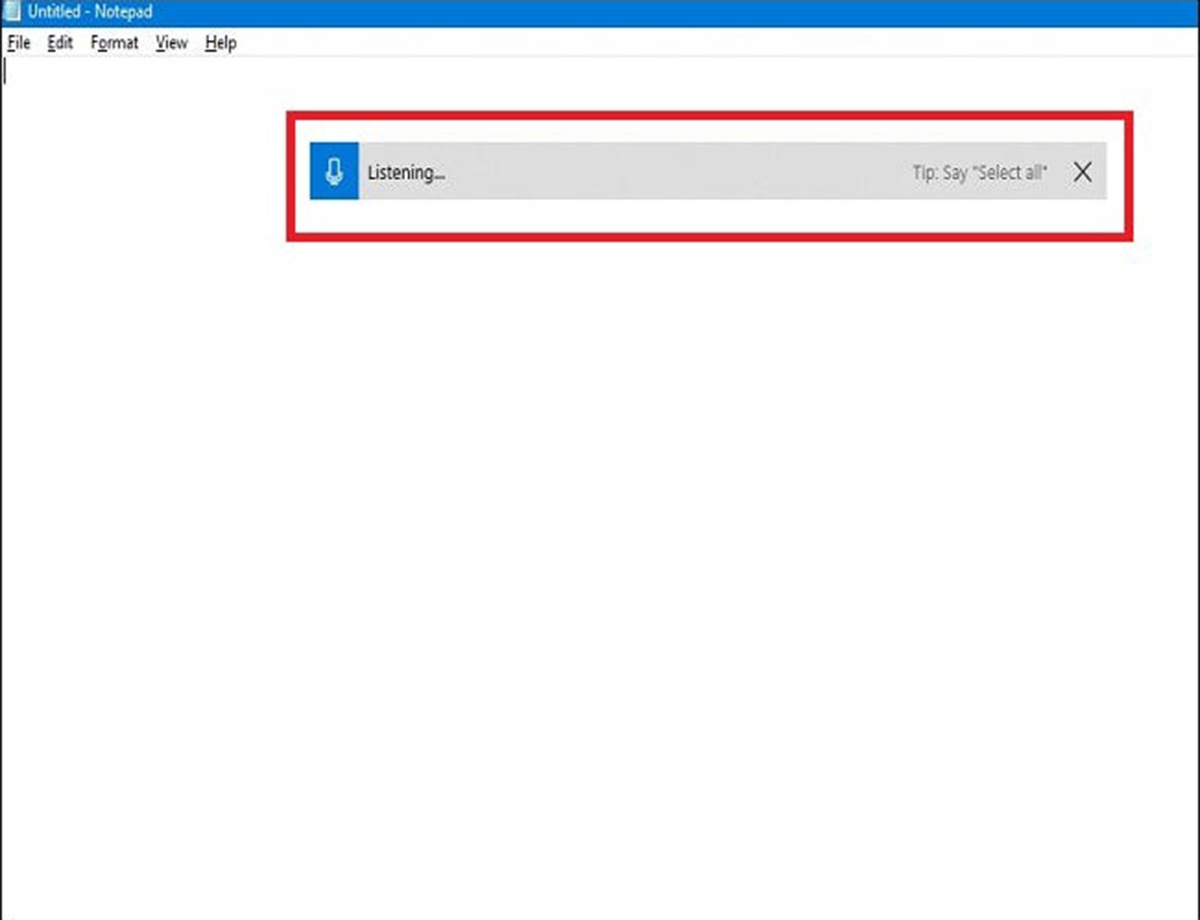
After the speech-to-text bar is activated, a prompt asking the User To speak appears. Of Course, if there is no such option, You Can Easily activate it by clicking on The Microphone Icon.
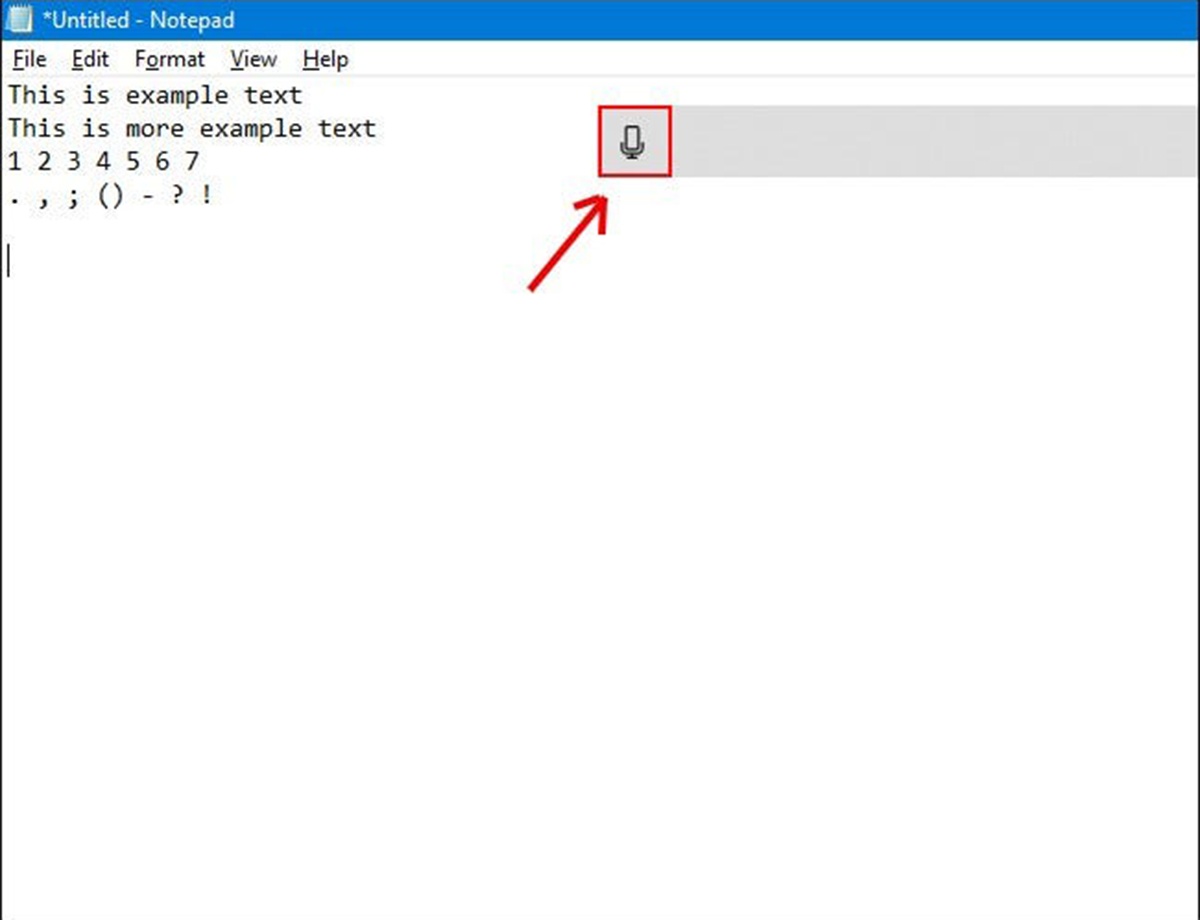
Start Talking And State Your Sentences In A Complete And Numbered Way. You Can Say Whatever You Like And See That The Device Is Typing. Here Are Some Things To Look For When Selecting Yours:
Punctuation: To Add Punctuation Marks, Say The Name Of The Option You Want To Use. For example, in the target language, you can add these items to your text by saying the equivalent of phrases such as period, Commas, semicolons, exclamation marks, and question marks.
Parentheses: For Parentheses, Say The Equivalent Of “Open Parentheses” To Start And “Closed Parentheses” To End.
Numerical Values: To Type Numeric Values, Say The Equivalent Of The Word “Numeric” And Then A Number.
Move-In Paragraphs: To Move To The Next Paragraph, They Are Equivalent To The Expressions “Next Line” Or “Next Paragraph.”
Delete Text: To Delete Words, Say The Equivalent Of “Delete” And Then The Word You Want To Delete. You Can Also Use The Equivalent Of “Delete The Previous Sentence” To Get Rid Of All The Sentences You No Longer Want In Your File.
Choice: To Select A Word, Say The Equivalent Of The Word “Select”, And Then The Word You Are Looking For.
Move To The Beginning Or End Of The Sentence: If You Want To Go To The Beginning Or End Of The Sentence, The Equivalent Of Two Sentences, “Go To The Beginning Of The Sentence” And “Go To The End Of The Sentence” Are Effective. This Command Is Also Useful For Navigating Paragraphs And Reaching The Beginning Or End Of Text Files.
Remember To Speak Clearly And Calmly When Using This Feature. Avoid TalkingFasts: The system cannot recognize words quickly, so it may approximate them.
Finally, Using The Stop Dictating Voice Command, You Can Close The Tape That You Called At The Beginning Of Your Work. To Turn It On Again (Or In The Event Of A Sudden Shutdown), Click On The Microphone In The Corresponding Bar To Reactivate It.
This Feature Allows You To Use Your Voice Instead Of Typing To Write A Variety Of Content. In Addition To Being Faster, it is attractive and fun.
How To Disable Speech Recognition Feature In Windows 10
This Feature Is Useful For Some Applications, But You May Disable It In Others. It is very easy to turn off if you have accidentally activated it or no longer want to use it. Just press Win + H Again To Disable It.
If You Want To Turn Off The Speech Recognition Feature Completely So That It Is Not Accidentally Activated When Working With The Device, Do So Using The Win + Ctrl + S Key Combination—this Completely Disables Speech Recognition.
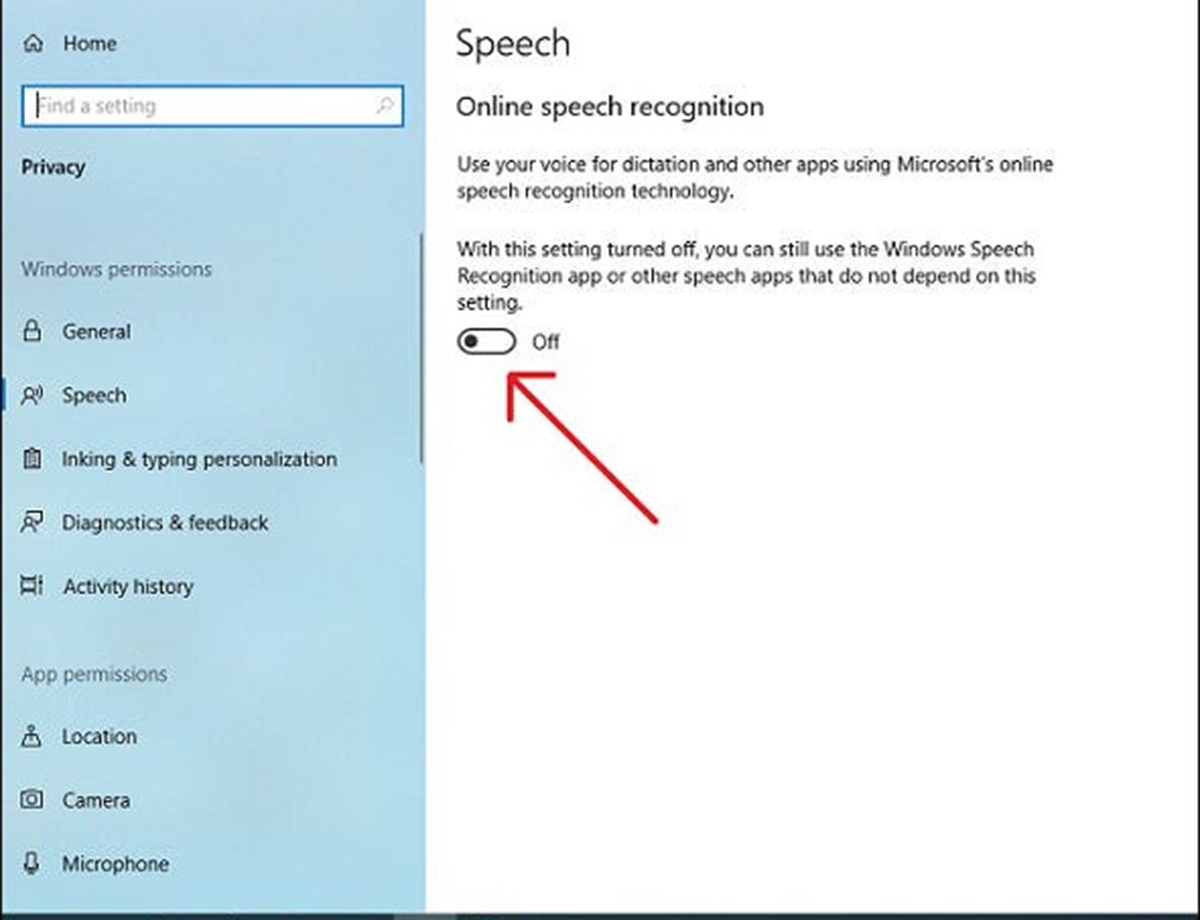
There is another way to turn off this section: Go Back To Windows Settings, Click Ease of Access Again, Find Speech, A, and Turn Off Speech Recognition.
Finally, It Should be noted that You Can Use The Win + H Key Combination at any time To Enable Voice Recognition And Start Converting Your Voice To Text.
FAQ
How do I activate voice typing in Windows 10?
Press Windows key + H to open the voice-typing panel, or go to Settings → Time & Language → Speech and enable online speech recognition.
What do I need for voice typing to work properly?
A working microphone and good internet connection (for speech recognition), plus mic permissions enabled in Privacy settings.
Is voice typing accurate and what can affect it?
Accuracy depends on microphone quality, background noise level, and clarity of your speech — speaking clearly helps improve results.