
How to Solve the Problem of Not Showing Dual Boot in Windows 10
After Installing The Two Operating Systems Side By Side, the Windows Boot Configuration may Have A Problem, Causing The User Trouble.
Dual Boot: In Windows 10, we will teach you three different ways to solve dual-boot issues.
If, after installing a new operating system such as Windows 11, dual boot options do not appear next to Windows 10, you are not alone.
These problems are usually caused by incorrect operating system configuration. Fortunately, there are many solutions to this problem in Windows. This article will point out some solutions to this problem, so stay with Zomit until the end.
Why is the dual boot feature not displayed when Windows 10 is booted?
The Dual Boot Manager or Windows Boot Manager option may not be displayed for some reason. Some of these reasons are:
- The boot menu is not activated.
- The system is in fast startup mode and directly runs the default operating system without displaying the dual boot menu.
- The operating system selection is incorrectly configured in the Startup and Recovery section.
- Some system files are corrupted, preventing dual-boot activation.
If you recently installed another operating system alongside Windows 10, but the dual boot is not displayed, follow the steps below.
Activate the boot menu via the Command Prompt.
If the boot menu is disabled for any reason, the dual boot option will not be displayed, and it will be disabled after upgrading to the new version of Windows. Fortunately, you can re-enable the boot menu in Windows from the Command Prompt.
Follow the steps below to activate the boot menu via Command Prompt.
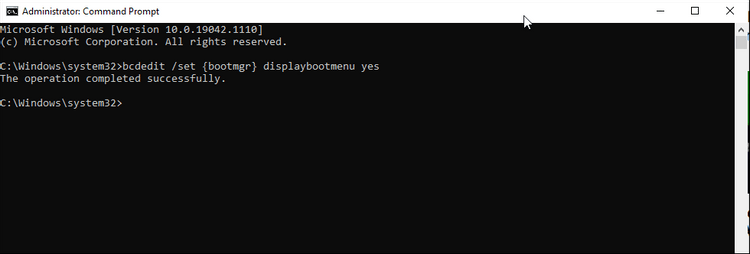
- Type cmd in the Windows search box, right-click on Command Prompt, and select Run as Administrator.
- In the Command Prompt window, type the following command and press Enter:
bcdedit / set {bootmgr} displaybootmenu yes
- If the boot activation operation is performed correctly, you will see the message “Successfully”.
Suppose you are curious about the BCDEdit command. In that case, you should know that it is a command-line tool for managing the BCD (Boot Configuration Data) menu. This command changes the boot configuration to activate the boot menu.
If you decide to disable or hide the boot menu in the future for any reason, you can use the following command:
bcdedit / set {bootmgr} displaybootmenu no
After executing this command, your operating system will boot with the default operating system without displaying the boot screen.
Configure the operating system through the Startup and Recovery section of Windows 10
The Advanced System Settings section of Windows 10 allows users to select the default operating system to boot and view the complete list of operating systems. Configuring these settings can help you troubleshoot a dual boot. With the following settings, you can change the default operating system at boot time.
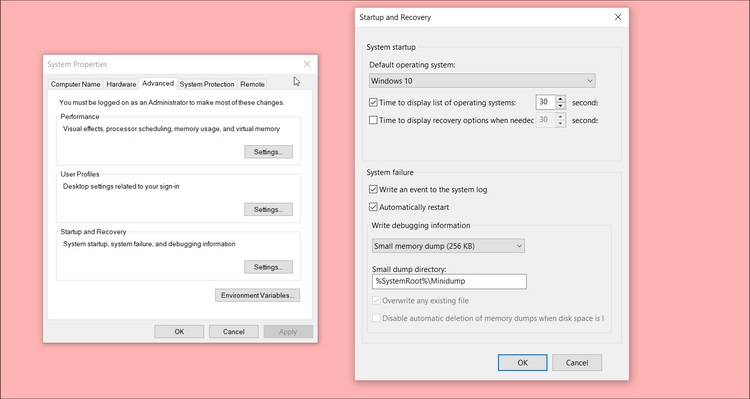
- Press Win + I to open the Settings section.
- Select the About option from the System section.
- On the right side of the open window, click Advanced System Settings.
- From the Startup and Recovery section, select Settings.
- From the Default operating system section, select Default Windows.
- Set the duration to display the list of operating systems, and set the time to display recovery options when needed to 30 seconds.
- OK, the settings are set, and the computer is reset. After the reset, the system will ask you to select an operating system. If you do not select any, the default operating system will boot.
Configure boot management with EasyBCD software
Sometimes, using the bcdedit command in CMD will not work, and even the boot menu will not activate after the bcdedit command is displayed. In this case, the EasyBCD program can manage the boot.
EasyBCD is a lightweight, low-volume, free application designed for non-commercial purposes. This program also has a paid version that is not needed.
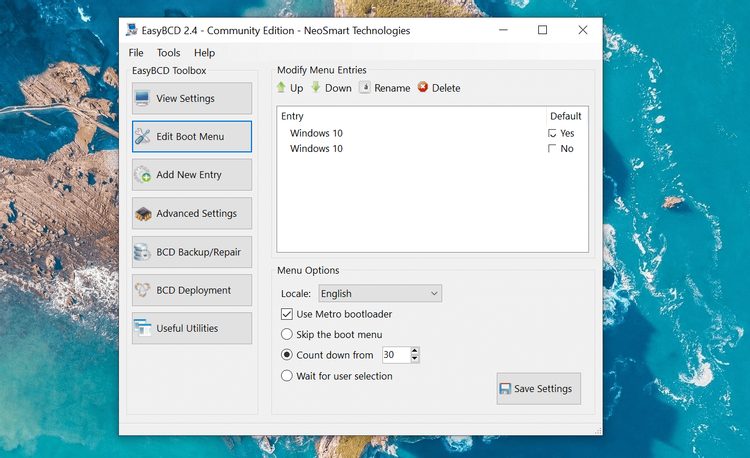
Follow the steps below to add and manage the boot menu in EasyBCD:
- To download EasyBCD, go to the Neo Brilliant EasyBCD website and select See More.
- EasyBCD is available in both commercial and non-commercial versions. To download the free version, click Register, enter your email address and username, and finally, download EasyBCD.
- Install EasyBCD on your computer using the default settings.
- After installing and running EasyBCD, click Edit Boot Menu.
- On the new page, you will see a list of operating systems for dual-booting. To change the default operating system, select the Default checkbox below.
- Activate the Use Metro bootloader option at the bottom of this page.
- Set the Select Countdown from section to 30 seconds.
- Click Save to save the settings and see the triumphant message for the steps.
Now close the EasyBCD program and restart your computer. When you reboot, you will see a dual-boot menu. If these changes do not display the dual boot menu together, try the EasyBCD settings again.
Disable Fast Startup in Windows 10
Fast Startup is a Windows 10 feature that helps the computer boot quickly after a restart. When this feature is enabled, Windows creates a hibernation file to speed up the Windows boot process.
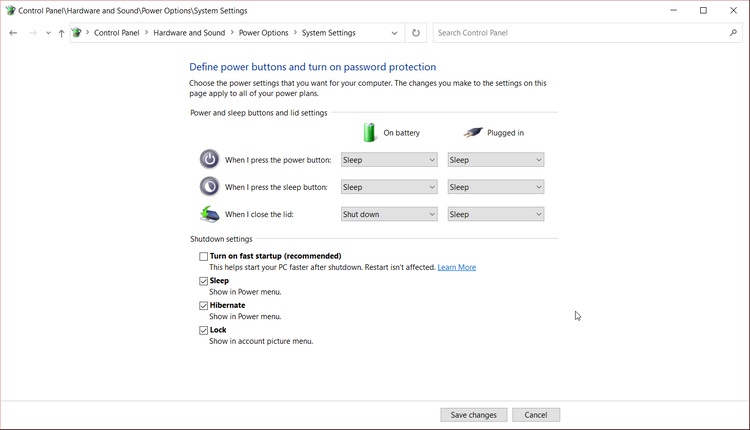
If you still do not see the dual boot option after the above settings, you should turn off Fast Startup as follows:
- In the Windows Search section, search for Control Panel and enter this section.
- Go to System and Security> Power Options> Choose what the power buttons do.
- Click Change settings that are currently unavailable.
- Turn off the “Turn on fast startup” option in the Shutdown settings section.
That way, with dual boot, you can use the trial version of Windows 11 alongside Windows 10.
FAQ
How can I make the dual-boot menu reappear?
Use system configuration tools or boot-loader repair utilities to restore the boot menu and ensure each OS is correctly registered.
Why might dual-boot not show up after updating Windows?
Because updates can overwrite or misconfigure boot settings, hiding alternative OS entries.
What should I check if dual-boot fails to appear?
Verify boot-loader configuration, confirm both OS partitions are intact, and ensure UEFI/BIOS settings allow multiple OS detection.