Run Multiple Programs with One Shortcut in Windows 10 — Simple & Efficient
If you think running multiple programs via a shortcut is an interesting idea, you should know it is possible to do this on Windows 10.
Some programs are highly interconnected and require one to run simultaneously with the other; this varies depending on the user’s needs. For example, if you are a gamer, you may need to connect to Discord while playing the game.
Isn’t it interesting that with just one click on a shortcut, you can launch both programs simultaneously and surprise yourself and others with the speed of your professional activities?
Continuing this educational article, you will learn how to set a batch file to run several programs through a shortcut.
Run multiple programs via one shortcut
1. Save app paths in Notepad
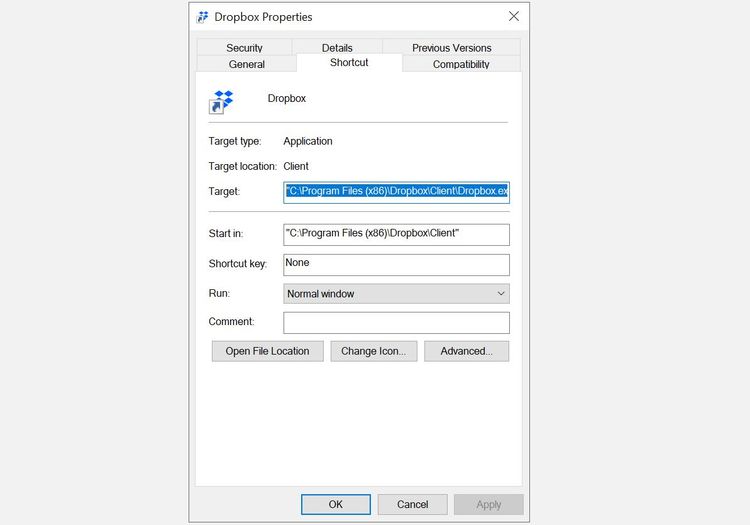
In the Notepad of the programs you are trying to run simultaneously. To see the application shortcut, right-click on it and select Properties. The path written in the Target box is what we are looking for; copy it.

Save the copied path to a Notepad file to easily access it. Do the same for all the apps you want.
2. Create a child file
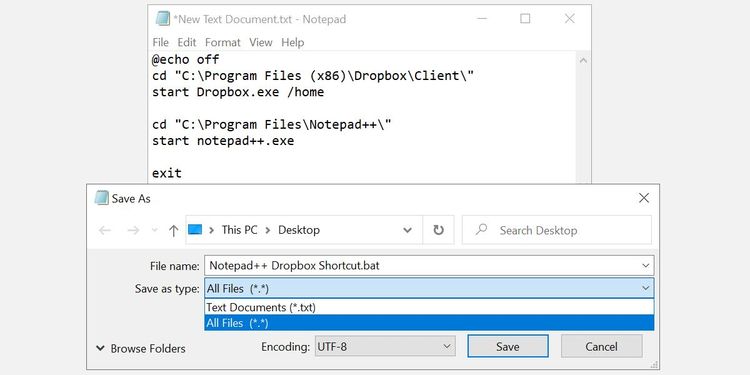
We need to create a batch file with all the saved paths. Open the Notepad file that contains the application path and set it to look like the following example:
| echo off @ “\ cd” C: \ Program Files (x86) \ Dropbox \ Clientstart Dropbox.exe”\ ++ cd” C: \ Program Files \ Notepadstart notepad ++. exeexit |
Above, you can see an example of a complete batch file script. In this example, two programs, Dropbox and Notepad++, open. However, you have to change the paths of these programs to the paths you want to open. In the following, we will analyze the script of this batch file together.
Batch file analysis
| echo off @ |
This line prevents commands from being displayed on the command line and executes the batch file.
| “\ ++ cd” C: \ Program Files \ Notepad |
This command changes the directory to a Notepad++ directory.
| Start Notepad++. Notepad launches the executable file from the directory we went to. Some applications, such as Dropbox, require a specific destination, such as the / home folder, visible in Properties. |
| exit |
This section also closes the window after executing the child file.
3. Save the batch file
To save the batch file in Notepad, use Notepad to All Files and save the file with the extension bat. Save. Remember the child file’s location; you will need it later.

4. Create a shortcut
You can now use the child file to launch your programs simultaneously. However, to make the work look a little more professional and beautiful, you can create a shortcut with an icon for the child.
Right-click on the desktop, hover over New, and select Shortcut. Select where the batch file is located and click the Next button. Choose a name for the shortcut and click Finish.

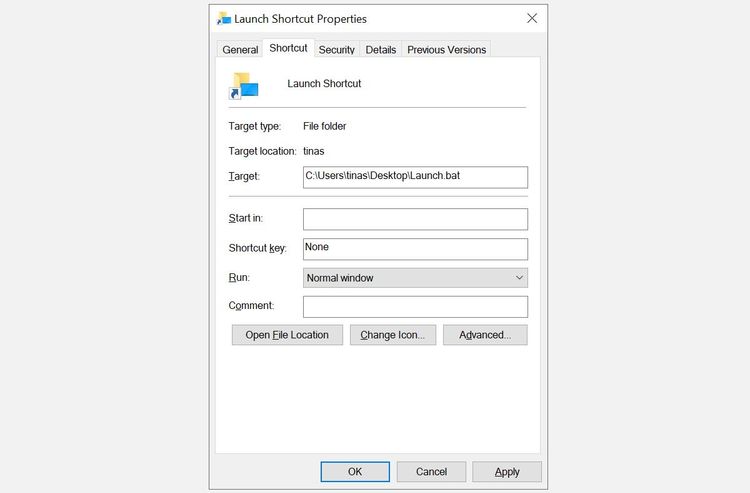
Now right-click on the shortcut you created and select Properties. Modify the Target section in the child file you created. Click Apply and then OK to save the changes.
5. Icon customization
This step is optional, but it is recommended that you right-click on the shortcut file you created. Go to the Shortcut tab and then click the Change Icon button. Windows will check your batch file icon and find no options; click OK.
You can now select an icon from the Change Icon menu. Click OK to confirm your selection, then click OK again to close the window.
![]()
6. Run the child file via shortcuts
Double-click the shortcut icon you created. The command line window will open and close immediately (due to forcing the last line into the file), and the selected programs will run on the screen simultaneously.
If everything is in order, move the shorts to where you like. Right-clicking on the icon will allow you to pin the shortcut to the Start menu or taskbar.
Automation starts with these little shortcuts. They not only save time but also speed up your desktop space and make everything look more professional.
FAQ
How do I make a batch file to open multiple apps?
List each app’s path in a .bat file using start commands line by line.
How do I turn that batch file into a desktop shortcut?
Right-click → New → Shortcut, point to the .bat file, then name and finish.
Can I assign a custom icon to that shortcut?
Yes — in shortcut Properties → Change Icon, pick or browse for any .ico file.
