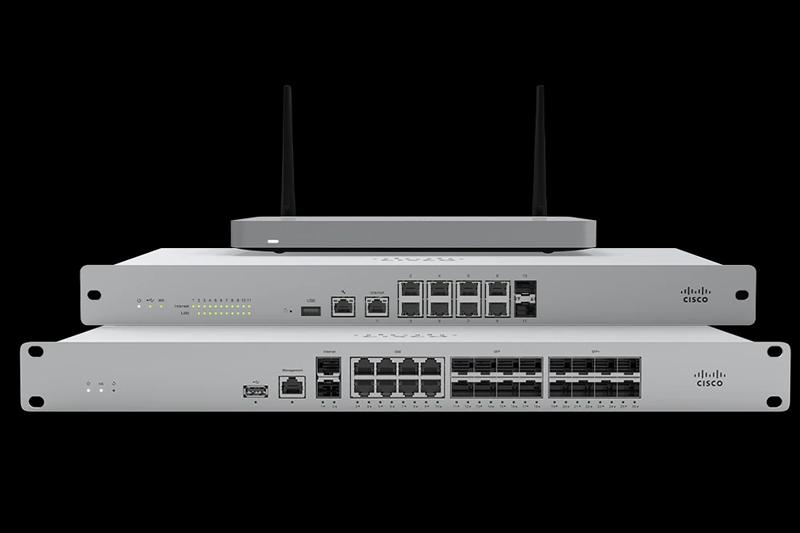
How to Install Meraki Cisco Wireless Access Points
Home And Business Users welcome Cisco Network Products, And We See this Company’s Routers, Switches, And Access Points Used in almost every large organization.
Cisco products implement a stable, secure, and low-latency network due to their high quality, extensive functionality, and good security, and Cisco continuously updates its firmware.
One crucial reason companies active in network services use Cisco wireless access points, such as Meraki, is their ease of use. The network technician connects the access point to the network at the installation site.
Next, all configurations and settings are automatically received from a central dashboard and applied to the access point without the technician having to configure it. However, it is possible to do this on-site.
The first thing we should mention about Meraki access points is their difference from AireOS access points.
These wireless access points do not require a separate wireless network controller or a built-in controller like Mobility Express. The controller of a Meraki access point is located in the cloud and the Meraki data center and can be accessed and managed through a web-based GUI dashboard.
This central dashboard can monitor and configure all Meraki devices in a network, such as access points, security equipment, switches, cameras, or Internet of Things devices equipped with intelligent sensors.
Network administrators can access this central dashboard through any device that can install a web browser and access the Internet. To do so, enter the address https://dashboard.meraki.com in the address bar, and the Meraki dashboard login page will appear.
The status of the access point lights
Meraki access points have LED lights, and for their correct configuration, you must be familiar with the operation of these lights. Their function is as follows:
- Orange: The access point is booting (solid orange indicates a hardware problem).
- Rainbow: The access point scans or initializes hardware components.
- Blinking blue: The access point firmware is being upgraded.
- Green: The access point is in the gateway state without a client.
- Blue: The access point is in gateway status, and clients are connected.
- Blinking orange: The access point is unable to find the uplink.
How much is the Meraki access point signal strength?
Typically, Meraki access points equipped with omnidirectional antennas have a range of 100 meters, but many variables affect the access point’s signal strength. Among these criteria, we should mention the following:
- The sensitivity of access point antennas
- Obstacles between the access point and the client equipment (walls, glass, doors, etc.).
- Transmission and reception power of the client device.
- The equipment emits radio waves, such as microwaves, that work near the access point.
- Any interference of radio waves with each other on the same channel that Xpoint uses.
What area are Meraki access points able to cover?
The only way to accurately determine the distance and area covered by an access point signal is to evaluate the environment using specialized tools. Ekahau and Netscout are two examples of software used to conduct wireless surveys.
These tools show detailed heat maps representing the signal strength received by client equipment in different locations. For example, Figure 1 shows the heat map of the signal reception situation on a yacht (the test was conducted passively).
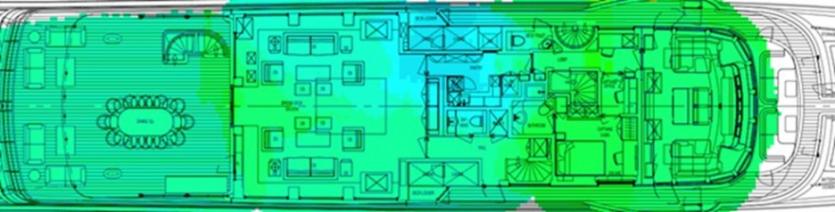
figure 1
A passive survey is performed when an access point is installed at a site. The network engineer wants to know what areas the access point has covered and identify any devices or sources causing radio frequency (RF) interference. Blue and green colors indicate areas with good signal coverage. Yellow areas indicate a weak signal, and orange areas indicate no motion.
Meraki Survey Mode
Meraki access points have a helpful feature called Survey Mode, which helps the network engineer install an access point correctly.
When you use Survey mode, the access point broadcasts an SSID on both 2.4 GHz and 5 GHz radio frequencies. This SSID does not need to be connected to the Moroccan cloud infrastructure, as it is only used for technical testing.
Survey mode allows the laptop and analyzer software to check the status of sending and receiving radio frequencies. The Meraki access point must be installed on a tripod, and its energy needs to be supplied by a battery.
It is better to place the tripod where the network engineer wants to set the access point. Next, the network engineer moves around the environment with his laptop to regularly check and measure the radio signal received from the access point.
When all the areas have been checked, the software will generate a heat map showing blue, green, yellow, and orange colors depending on the type of access point and its antenna (directional or omnidirectional). Next, the engineer moves the tripod to the planned location and performs the survey again.
It is repeated until the best place to place the point is found, and the heatmap is more blue. In this case, more hotspots may be necessary to cover the area better. To put the Meraki access point in Survey mode, go to the local access point page and click the Configuration tab.
On the configuration page, there is a section called Site Survey. Open the drop-down menu before the above field and change its value from disabled to enabled. Now, the access point creates an SSID and broadcasts its signals.
Types of antennas that can be used with Meraki Access Point
Meraki access points support different antennas. Six antennas that can be used by these access points in the open space are shown in Figure 2. Also, the four antennas shown in Figure 3 are suitable for deploying access points in indoor environments.
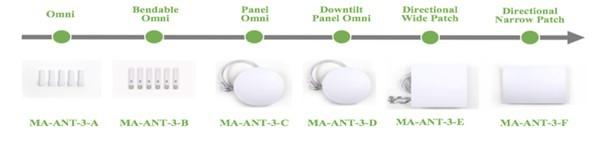
figure 2
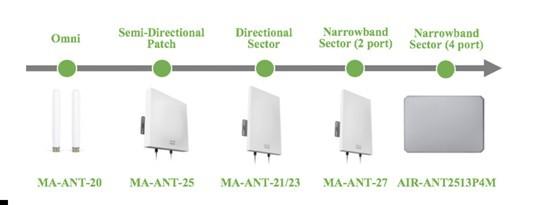
Figure 3
Cisco Meraki access point setup steps
1. Create a user account on the dashboard
Before setting up and managing Meraki access points or other Meraki products, you must create a user account on the Cisco Meraki dashboard.
When you run the address https://dashboard.meraki.com in your browser, you will see an image similar to Figure 4.
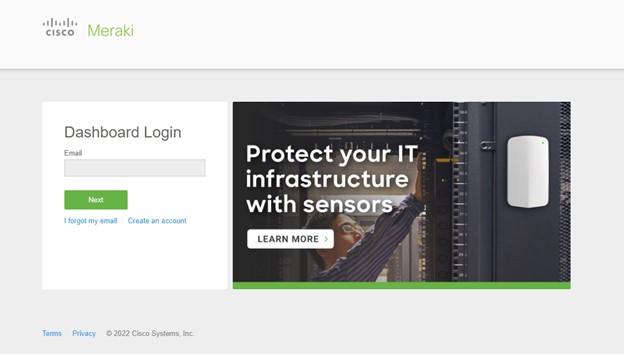
Figure 4
To create a new user account, click the Create an account option. On the next page, select the Asia region. Then, fill in the username, email, password, and company details, and click the Create Account button (Figure 5).
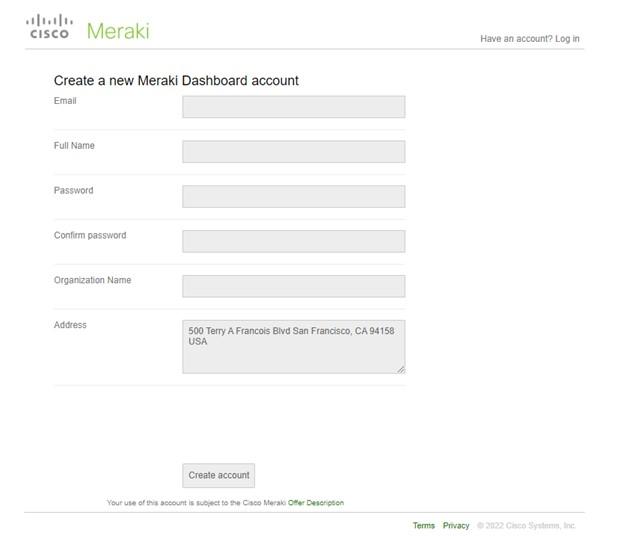
Figure 5
Next, a confirmation email will be sent to the email address you entered in the web form. After confirming the email, you can enter the dashboard. To improve security and protect against cyberattacks, we recommend enabling two-factor authentication (2FA) using Google Authenticator in the account tab at the top right of the dashboard.
2. Add a network to the dashboard
The next step is to add the network you want to manage through the dashboard. From the menu on the left side of the screen, click on the Organization option and then select the Create Network option (Figure 6).
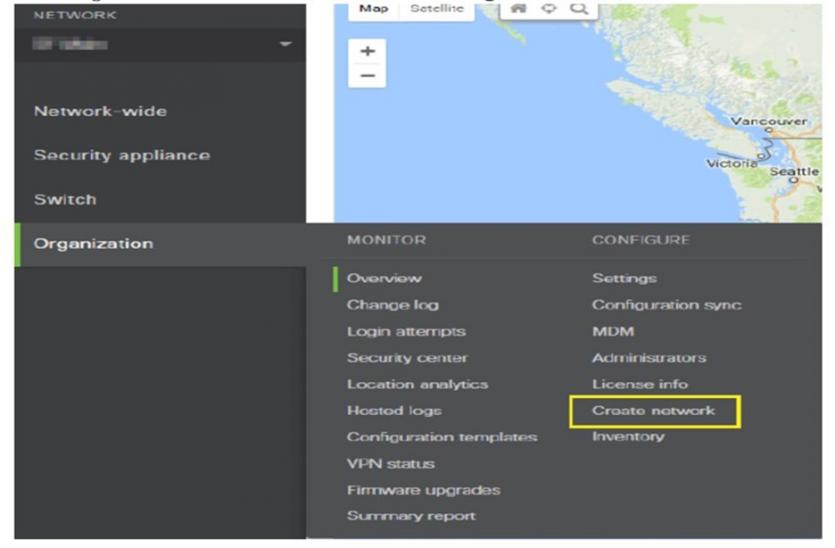
Figure 6
Next, determine an understandable name for the organization’s network, such as Headquarters or Branch Office. In this step, you must specify your network type and decide what devices will work on it. In this case, you can divide your network into several groups so that the access points and switches are placed in their groups.
You can also choose the hybrid hardware option. In this case, a combination of devices in the network is shown. If you have a small enterprise network, select the hybrid option. However, if you have a network that hosts hundreds of devices, you can use the dashboard more efficiently if you create a different network for each group of devices.
3. Adding devices to the dashboard
Before any device can be viewed and configured in the dashboard, it must first be added to the organization’s Inventory of assets. This mode is known as Claiming. To do so, select the organization option from the left menu and Inventory from the configuration menu (Figure 7).
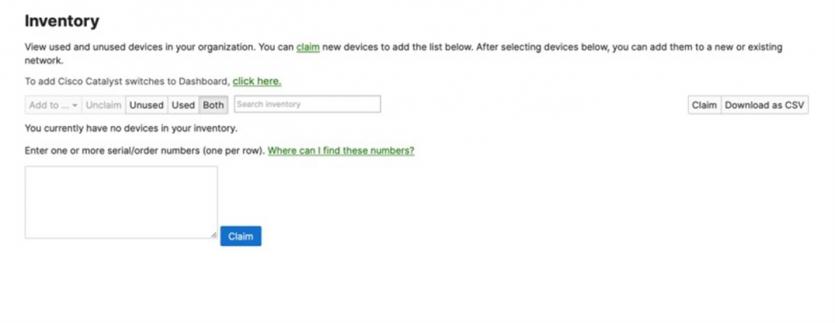
Figure 7
By entering the device’s serial number in the box next to the Claim button, the widgets will be added to the network inventory list. If many devices are configured, write their serial numbers in a row in the corresponding box and click the Claim button to enter them into the list of enterprise network entities.
Once the access point is added to your organization’s Inventory, you can add it to a new or existing network. The Meraki AP has been successfully added to the dashboard and can be fully configured for the wireless network. Still, the access point cannot be accessed or configured until it is physically connected to the network and has an Internet connection to communicate with Aber Meraki.
Fortunately, all the settings are configured in the dashboard and can be edited before connecting the access point. After the access point is connected to the Internet, the settings are downloaded from the cloud, and the access point settings are automatically updated.
One significant advantage of cloud-based controllers is that they can set configurations before the access point is connected to the Internet. In this case, all the settings are downloaded from the cloud and installed on the device without any additional work. In this case, all the network engineers must deploy the access point on-site and connect it to the network.
The physical connection of a Meraki access point to the network
A Meraki access point is connected to the network by an RJ45 Ethernet cable, and its energy is supplied through PoE+ technology and a switch that supports PoE technology. After the access point is powered, you will need an IP address and an internet connection to communicate with the Meraki Cloud dashboard and receive configurations.
By default, the Access Point uses the DHCP service to obtain an IP address from the network. However, in some situations, the access point may not receive an IP address from the DHCP protocol. In this case, a fixed IP address and gateway IP must be manually assigned to the access point through the local status page option.
Manual setting of IP address and gateway for Meraki access point
To manually configure and assign an IP address to a Moroccan access point, you need a computer and an Internet connection from a web browser to connect to the access point. Ensure that both the computer and the access point are connected to the Internet.
Of course, connecting a switch and a VLAN is better. The Meraki access point has a default SSID called Meraki Setup, which enables wireless connection to the access point.
For this purpose, type the address http://ap.meraki.com in the computer’s web browser so that the access point access page appears. To enter this page, enter the access point serial number in the username box and leave the password box empty (Figure 8).
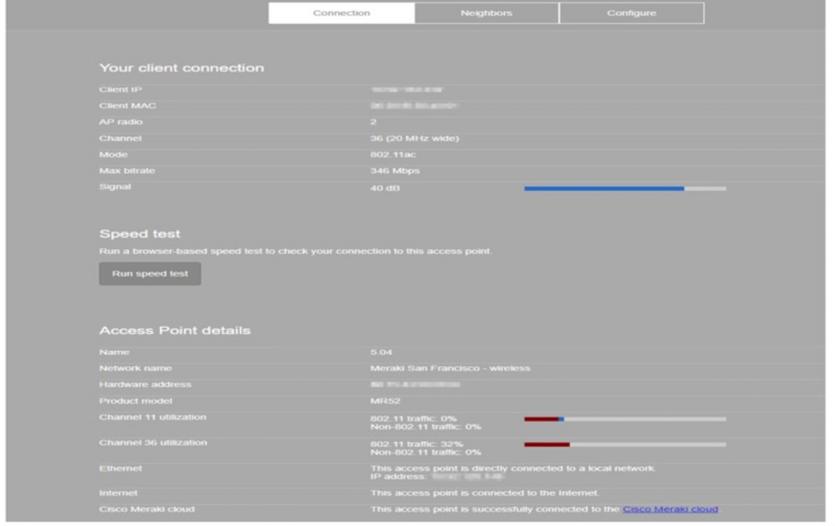
Figure 8
Select Configure from the window menu bar. The screen shown in Figure 9 will then appear.
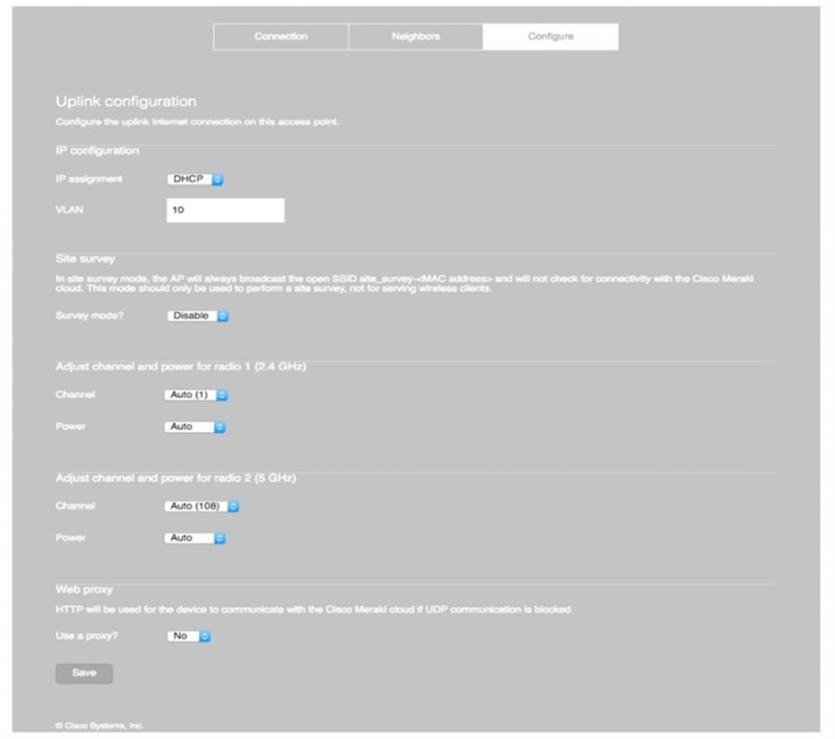
Figure 9
Click on the IP assignment drop-down menu and change its status from DHCP to Static. Enter the static IP address, subnet mask, and gateway address, and click save at the bottom of the menu.
Next, select Connect from the top menu to return to the home page. In this case, the option to successfully connect the access point to the Internet and Meraki cloud services will appear at the bottom of the access point details section.
Now that the access point is connected to the Internet, it is best to download and install the latest firmware. When you click on the firmware update option, the Blue LED will turn on, and the installation process will begin.
After this process is completed, the LED will show green. If the LED shows orange, the Xpoint will still wait to connect to the Meraki cloud. In this case, it is better to check the firewall rules to ensure they do not block the connection to the Meraki Cloud.
For this purpose, enable access to the address 209.206.48.0/20 and the following ports in the firewall:
- HTTPS port 443
- TCP port 7734
- UDP port 7351
FAQ
How do I add a Meraki AP to my Meraki Dashboard?
Log in to the Dashboard → Organization → Inventory → enter the serial number → click Claim, then assign it to a network.
Can I use DHCP or do I need to set a static IP for the AP?
You can use DHCP, but you also have the option to assign a static IP via the Meraki Setup SSID (ap.meraki.com) for manual configuration.
What firewall rules are needed to allow AP cloud-management?
Allow outbound connections to the Meraki cloud on TCP 443, TCP 7734, and UDP 7351.