
How to Install a LEMP Stack on Linux Operating Systems
The term MLEMP stands for Linux, Engine-X, MySQL, and PHP, and refers to the Linux operating system, Engine X, MySQL, and PHP, which are used to build dynamic web pages and applications.
The term LEMP describes the Linux operating system with the Nginx web server, where slow data is stored in a MySQL database and dynamic data processing is performed by the PhoC programming language.
To use this powerful combination in Linux, you need to know how to install these utilities. This article will show you how to install these utilities on your Ubuntu server.
Many developers choose Linux as their core infrastructure and use the Linux operating system to program or build web-based applications.
Developers who love open-source software and operating systems need a set of application tools known as LEMP to carry out their professional activities.
Prerequisites
Before we begin the discussion, note that you must have the Ubuntu Linux operating system installed before installing these components. In addition, make sure you have a regular non-root account on the server with sudo access. Once you have created the desired account, follow the steps below.
Install LEMP On Linux Operating Systems
Step 1: Install Nginx Web Server
To display web pages to visitors, we must use Nginx, a modern and efficient web server. Since all the software we intend to use comes from the default Ubuntu package repositories, we must use the apt package management system to install the necessary components.
Since this is our first time using apt, we must update the server package index and install the web server.
We use the following commands to update and install the server:
sudo apt update
sudo apt install Nginx
Once the Nginx installation process on Ubuntu is complete, it is usable. If the UFW firewall is active, you can connect to Nginx.
Fortunately, Nginx is mounted on the UFW firewall, so we don’t have much trouble. Typically, activating the most restricted profile is recommended because the firewall evaluates the traffic even in the minimal case. Since we have not yet configured SSL on the web server, we only need to allow traffic to pass through port 80.
The above situation is activated with the following command:
Sudo ufw allow ‘Nginx HTTP’
To confirm the above change, we use the following command:
Sudo ufw status
The output of the above command indicates that HTTP traffic and communication are allowed on the above protocol.
Output
Status: Active
To Action From
– —— —-
OpenSSH ALLOW Anywhere
Nginx HTTP ALLOW Anywhere
OpenSSH (v6) ALLOW Anywhere (v6)
Nginx HTTP (v6) ALLOW Anywhere (v6)
Once the new Rule has been added to the firewall, enter the domain name or public IP address of the server in the web browser to ensure the web server is working. If you have a domain name that points to the server, just run the following command to find out:
IP addr show eth0 | grep inet | awk ‘{print $ 2; } ‘| sed ‘s /\/.*$//’
The output of the above command shows several IP addresses you can check in a web browser. Alternatively, you can check which IP address is available and can be viewed from various locations on the Internet.
Use the following command for this purpose:
curl -4 icanhazip.com
Enter the address you want in your web browser to be redirected to the default Nginx Ford page.
http: // server_domain_or_IP
If the web server is installed and running correctly, you will see the output shown in Figure 1 when you enter the desired address. The output above indicates that Nginx has been successfully installed.
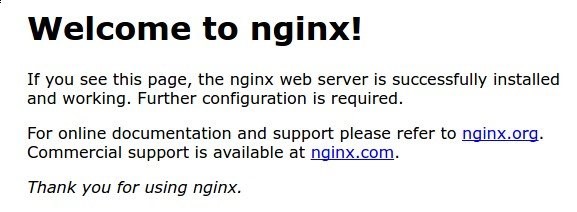
Figure 1
Step 2: Install MySQL to manage site data
Now that we have successfully launched the web server, the next step is to install MySQL as the database management system so that we can store and manage site data. To install MySQL, use the following command:
Sudo apt install MySQL-server
The above command installs MySQL database software, but its configuration is incomplete. To secure the installation, a script with MySQL asks you if you plan to edit some unsafe default values.
Activate the script with the following command:
sudo mysql_secure_installation
The above script asks you to enter a password to use the MySQL system and then asks if you have any configuration to configure the VALIDATE PASSWORD PLUGIN.
It should be noted that activating this feature sometimes causes problems because, after activating the above feature, MySQL rejects passwords that do not meet certain criteria.
As a result, using weak passwords with software that automatically handles MySQL user authentication information, such as Ubuntu packages for phpMyAdmin, may cause problems.
Turning off the plugin does not pose a Security risk as long as you use strong and unique passwords to authenticate the databases.
Pressing the Y key activates the above plugin; pressing any other key will not activate the above plugin.
If you enable authentication, the script will ask you to select a password authentication level.
Or does the value 2 mean the most substantial level, in which case, any code with no numeric values, uppercase or lowercase letters, no special characters, or simple dictionary words is used? Error message: You see.
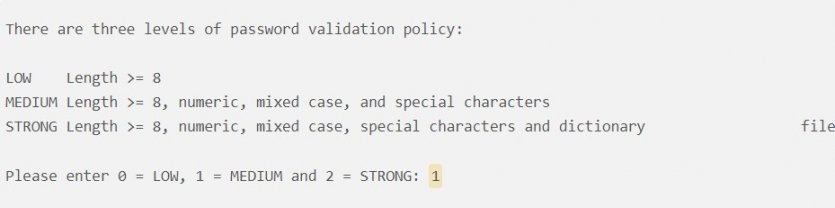
Figure 2
Shows selectable options:
If you enable password authentication, the power of the root user password will be displayed, and you will be asked if you intend to change it. If you are satisfied with your password, go through this step by pressing the N key in the command prompt. Regarding other questions, press the Y key and Enter in each notification.
In this case, anonymous (guest) users are removed from the test database, remote root inputs are disabled, and the new rules specified are loaded quickly to enable all changes we have made.
Note that on Ubuntu operating systems running MySQL version 5.7 or higher, the MySQL root user is configured to be authenticated by the auth_socket plugin by default instead of the password.
In this way, stronger and more integrated Security is created, and usability increases in different situations. To use a password as the root when connecting to MySQL, you must change the authentication method from auth_socket to mysql_native_password.
To do this, open the MySQL notification in the terminal window:
sudo MySQL
Check out the following authentication method for each of the MySQL accounts using the following notification:
SELECT user, authentication_string, plugin, host FROM MySQL.user;
Figure 3 shows the output of the above command. In this example, the root user is authenticated using the auth_socket plugin. We must use the ALTER USER command to configure the root account for authentication with a password.
In the following command, make sure you change the password to a strong one:
ALTER USER ‘root’ @ ‘localhost’ IDENTIFIED WITH mysql_native_password BY ‘password’;
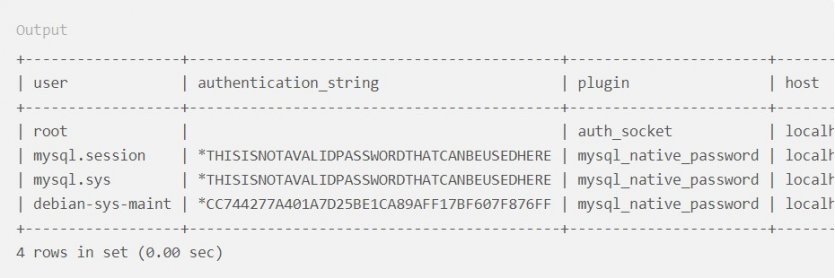
Figure 3
Then run the FLUSH PRIVILEGES command to allow servers to load grant tables twice and make new changes.
FLUSH PRIVILEGES;
Check each user’s authentication methods to ensure that no other root user is authenticated using the auth_socket plugin.
SELECT user, authentication_string, plugin, host FROM MySQL.user;
The output of the above command is shown in Figure 4.
In Figure 4, you can see that the root user of the MySQL database is authenticated using a password.
Once you confirm this status on the server, you can exit the MySQL environment by executing the exit command. The MySQL database system is now up and running, and we need to move on to installing PHP.
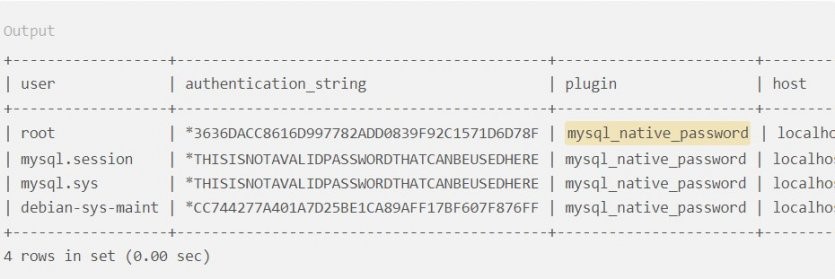
Figure 4
Step 3: Install PHP and configure Nginx to use the PHP processor
Now that we have Nginx for web page delivery and MySQL installed for data storage and management on the server, we need to generate dynamic content in the next step. We need a powerful programming tool to create dynamic web pages.
The best option in this area is PHP. Since Nginx, like other web servers, does not have a native PHP processor, we must first install the fast php-fpm processor, FastCGI process manager.
So, we use Nginx to send PHP requests to this software for processing. We install the above module and an additional help package, allowing PHP to communicate with the database.
In this process, the necessary PHP files are also downloaded. This is done by executing the following command:
sudo add-apt-repository universe
You are now ready to install all the components of the LEMP suite, but you still need to configure some settings to tell Nginx to use the PHP processor for dynamic content. This is done on the server block surface.
Server blocks in Nginx are like virtual hosts on the Apache web server. So, we need to create a new server block configuration file in the / etc / Nginx / sites-available directory.
In the example above, the new server block configuration file is called example.co; it’s better to choose a name you like.
sudo nano /etc/nginx/sites-available/example.com
Editing the server block configuration file instead of the default file allows the default configuration to be easily restored when needed.
Figure 5 shows the contents of the default block configuration file that has been edited and should now be added to the new server block configuration file. Each block and section shown in Figure 5 has a specific task to handle.
The description of each of these sections and blocks is as follows:
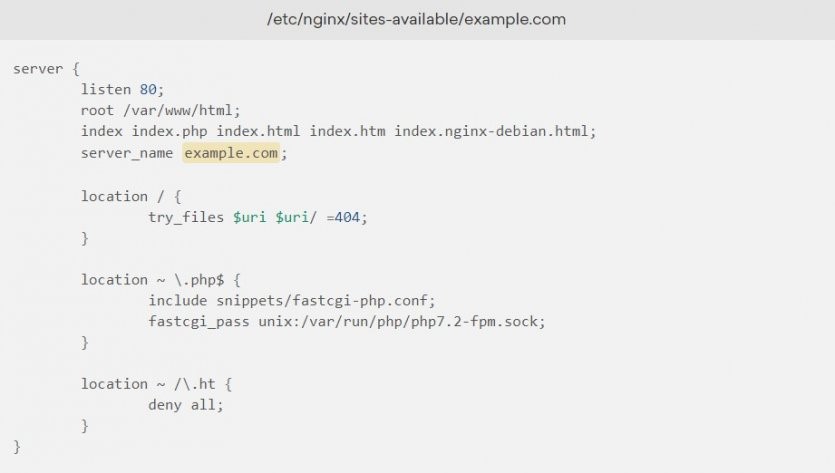
Figure 5
Listen Specifies which port Nginx should listen to. In the example above, it listens to port 80, the default HTTP traffic port.
Root: Specifies the document’s root, where the website files are stored for presentation.
Index specifies that Nginx prioritizes the display of the index.PGP file if it is required to exist.
Server_Name: Specifies which server block should be used for each possible sending request to the server.
This command must indicate the name of the server domain or public IP address.
/ Location: The first location block that contains the try_files command. The above command is used to evaluate the pattern of files that conform to the URI pattern. If Nginx fails to find the appropriate file, it returns a 404 error message.
$ Location ~ \ .php: This location block manages PHP operation by referring Nginx to the fastcgi-php.conf configuration file and the php 7.2-fpm.sock file, which declares the php-fpm-related socket.
Location ~ / \ .ht-: Specifies the last location block associated with the .htaccess file, but Nginx does not process it. By adding the deny all command, any .htaccess file in the path of the user request to the document’s root will not be shown to site visitors.
After adding the above content, please save the file and exit it. Then, enable the new server block by creating a symbolic link from the new server block configuration file in the / etc / Nginx / sites-available / folder to the / etc / Nginx / sites-enabled / folder.
To do this, run the following command:
sudo ln -s /etc/nginx/sites-available/example.com/etc/nginx/sites-enabled/
At this point, you may see structural errors in the new configuration file. To check this, run the following command: sudo nginx -t
If another error is reported, you should first check the file you created. When ready, reload nginx to make the necessary changes. To do this, run the following command:
Sudo systemctl reload nginx
The LEMP suite’s installation and configuration are now complete. However, it is better to consider the possibility of communication between all the components we have installed.
Step 4: Build a PHP file to test the configuration
The LEMP suite is now fully operational, but it is best to do some testing to ensure Nginx sends the .php files to the PHP processor correctly. To do this, use the text editor that exists at the root of the document to create a PHP test file called info.php:
sudo nano /var/www/html/info.php
Enter the following commands into this new file. The following commands are valid PHP code that retrieve information about the server:
<? PHP
phpinfo ();
Finally, save the file and exit.
You can now view this page in a web browser by referring to the server domain name, its public address, and the page info.php.
To do this, run the following command:
HTTP: //your_server_domain_or_IP/info.php
You should now see a web page created by PHP to provide information about the server (Figure 6). The above page shows that PHP is installed on Nginx without problems.
After confirming that Nginx processes pages correctly, it is a good idea to delete the file you created, as unauthorized people may gain information about the server configuration and use it to infiltrate it.
Note that this file can be recreated whenever you need it. Use the following command to delete the above file.
sudo rm /var/www/html/info.php
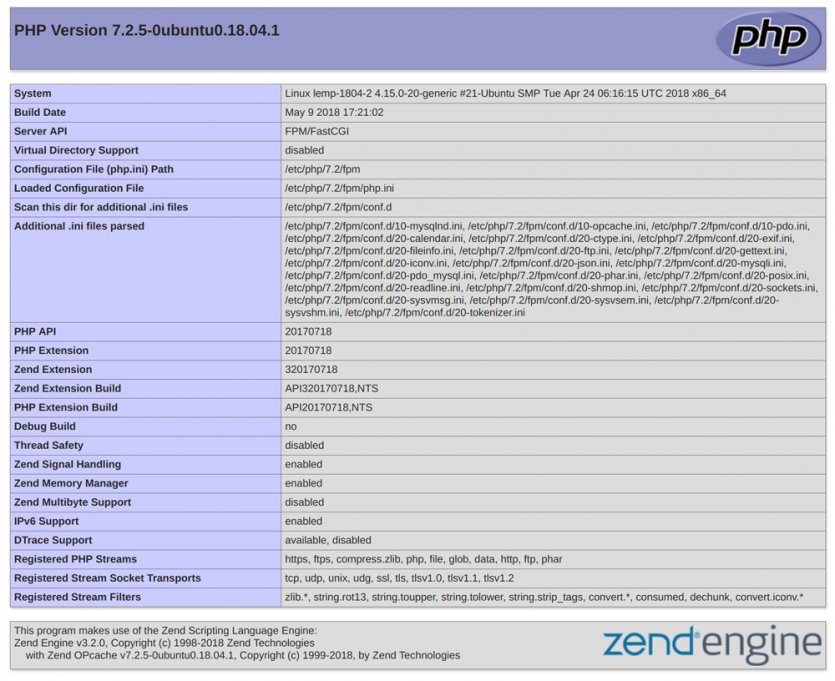
Figure 6
FAQ
What does “LEMP” stand for and why use it?
LEMP is an acronym for Linux (the operating system), Nginx (pronounced “Engine-X”, the web server), MySQL (or MariaDB, the database) and PHP (the server-side scripting language).
Which parts of LEMP must I install first and in what order?
You typically update your Linux system first, then install Nginx, then the database (MySQL/MariaDB), then PHP (and PHP-FPM) so that Nginx can correctly pass PHP requests to the PHP processor.
How do I secure and optimise my LEMP stack for production use?
Best practices include: enabling a firewall (e.g., ufw), securing MySQL root access, using strong passwords, enabling HTTPS (TLS/SSL) in Nginx, tuning PHP-FPM pools, and keeping software up to date.