How to Fix 13 Common Remote Desktop Connection Problems
If you work from home or use a remote desktop to connect to a Windows server or Desktop anywhere in the world, there are many reasons for connection issues, which we will discuss in detail.
There are various reasons for accessing a remote system, but when a connection problem arises, the root cause can lie in the brainstem, with its own solution.
There are many methods to solve remote desktop connection problems, but checking the firewall and removing the credentials are among the first steps that can solve the problem with three whistles:
Reasons for connection problems with Windows Remote Desktop
When you encounter problems connecting to Remote Desktop, first check your Internet connection; if that’s OK, check your firewall and login credentials. These 3 cases are the most common reasons for this problem. But among the other reasons for the issue of remote connection to the Windows system, the following can be mentioned:
- Remote Desktop (RDP) malfunction due to a Windows update or upgrade
- Blocking RDP due to the use of antivirus software
- Blocking RDP because the system is connected to a public network or network group
- Not being able to access the remote Windows system or server
- The remote system is off
- Incorrect authentication information (username and password)
Congratulations, you are halfway there if you have identified the cause of the problem. It is sufficient to connect to the remote Windows system as quickly as possible by following the steps to resolve that problem. Otherwise, there is no need to worry because the methods we will review in this article are arranged based on the most commoissuesms that if you try each of them in order, you will surely solve the problem of connecting to remote Des. p. Overall, it is your right not to get involved in such issues and instead move forward with a fast server connection.
13 solutions to fix the problem of connecting to a remote desktop in Windows
The methods we examine in this section are each for solving specific problems, starting with the most common ones:
* Before trying this method, ensure that your internet connection is stable. You need an Internet connection to remotely access the Windows system.
1. Change the firewall settings.
Windows Firewall is a common cause of remote desktop connection problems; if your system’s firewall blocks RDP, you will not be able to connect to the remote Windows system. Especially if you are using Remote Desktop for the first time, you must go through the steps in this procedure because Remote Desktop is disabled by default in the firewall. So do the following steps:
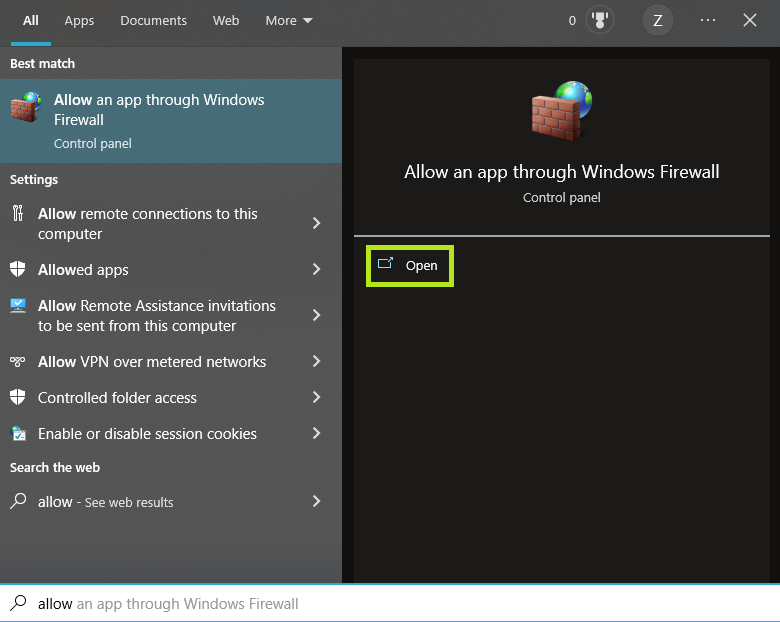
Open the Start menu and type “Allow an app through Windows Firewall.”
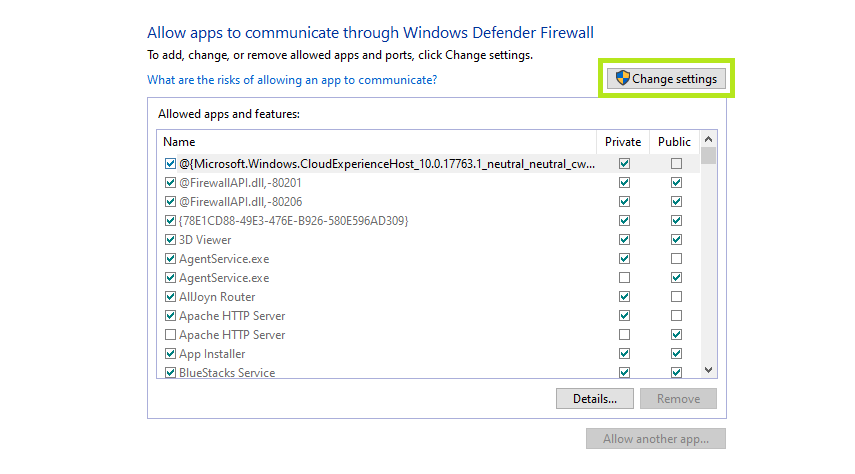
After opening it, click on Change Settings.
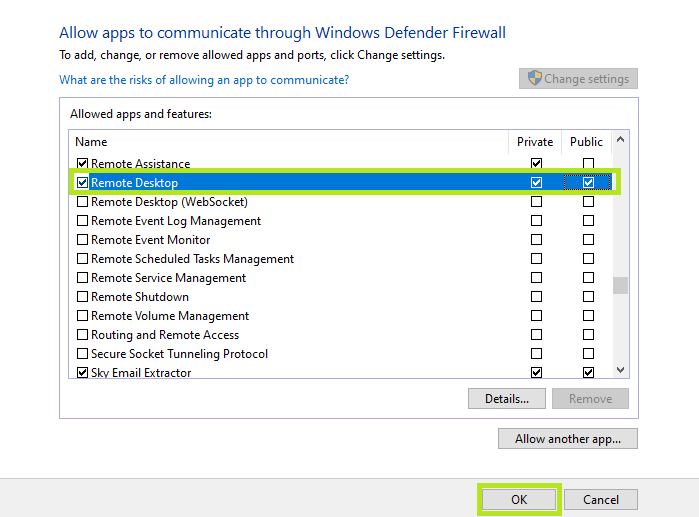
In the list of programs in this window, look for “Remote Desktop” and check the “Private” and “Public” checkboxes. Finally, click on OK and close the window.
Check whether the issue connecting to the Remote Desktop in Windows has been resolved.
Of course, sometimes antivirus software automatically blocks the Remote Desktop feature, and sometimes you may need to disable or remove it to resolve this issue.
If you are looking for an antivirus compatible with Remote Desktop, we recommend joining the ESET NOD32 camp. This antivirus protects your system without interfering with processes and programs.
2. Check the status of the RDP service.
If the RDP service is not enabled on the local or remote system, you cannot connect to the target system using Remote Desktop.
Follow the steps below to activate this service in your local system:
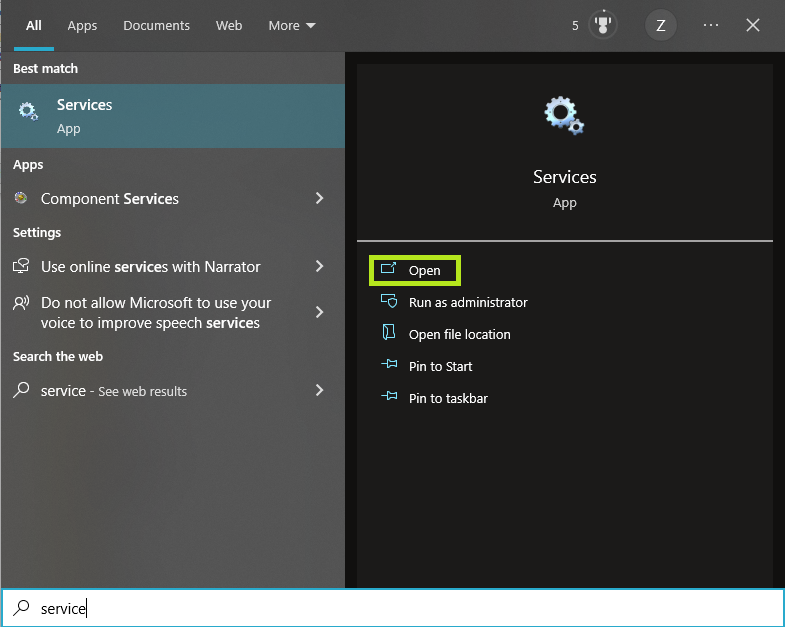
Open Start and type Services.
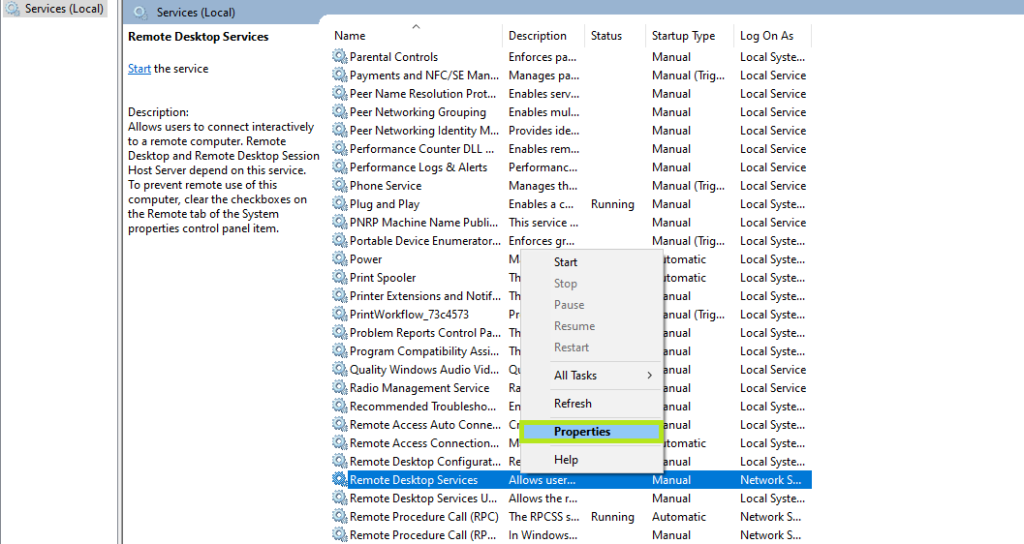
From the program’s list of services, locate Remote Desktop Services, right-click it, and select Properties.
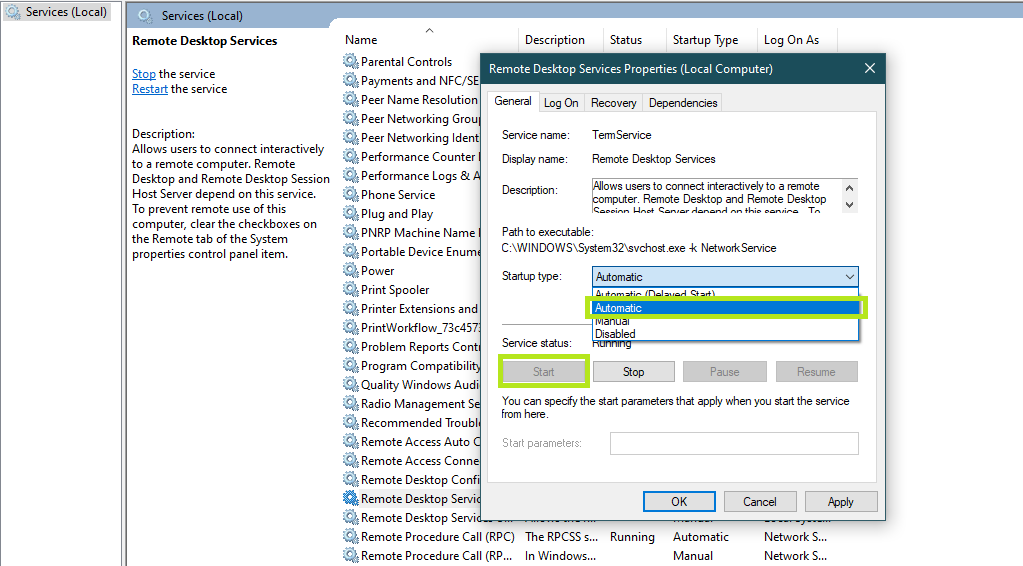
If RDP is stopped, click Start to bring it online. If you want the RDP service to start automatically when you power on the system, set it to Automatic and click OK.
If you think that this service is not active in the remote system, you can solve this problem by following the steps below:
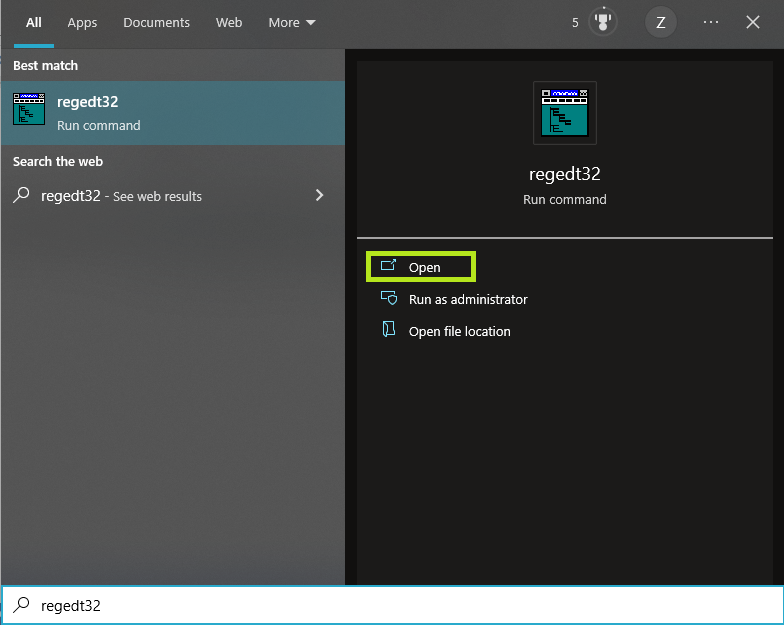
Open the Start menu, type regedt32, and open the corresponding program.
Click File and select Connect Network Registry.
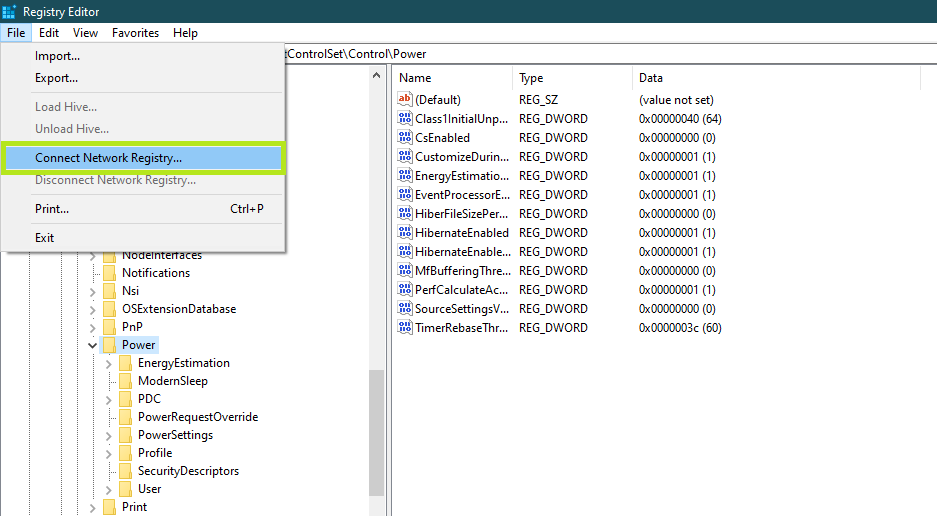
Enter the name of the desired remote system in the Enter the object name to select section.
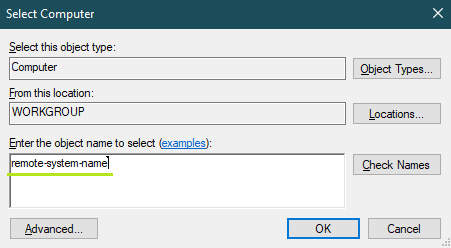
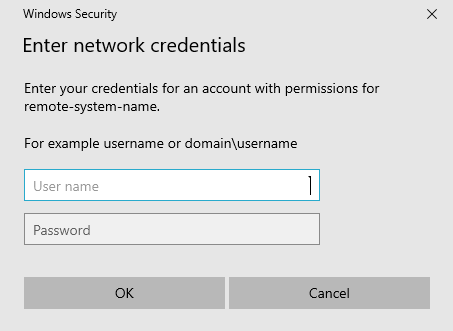
After you click OK, a new window will open. To complete the process successfully, you must enter the username and password of a remote system administrator account.
Then go to the following paths:
HKEY_LOCAL_MACHINE\SYSTEM\CurrentControlSet\Control\Terminal Server
HKEY_LOCAL_MACHINE\SOFTWARE\Policies\Microsoft\Windows NT\Terminal Services
Find the DenyTSConnections variable, click on it, and enter 1 in the corresponding value section.
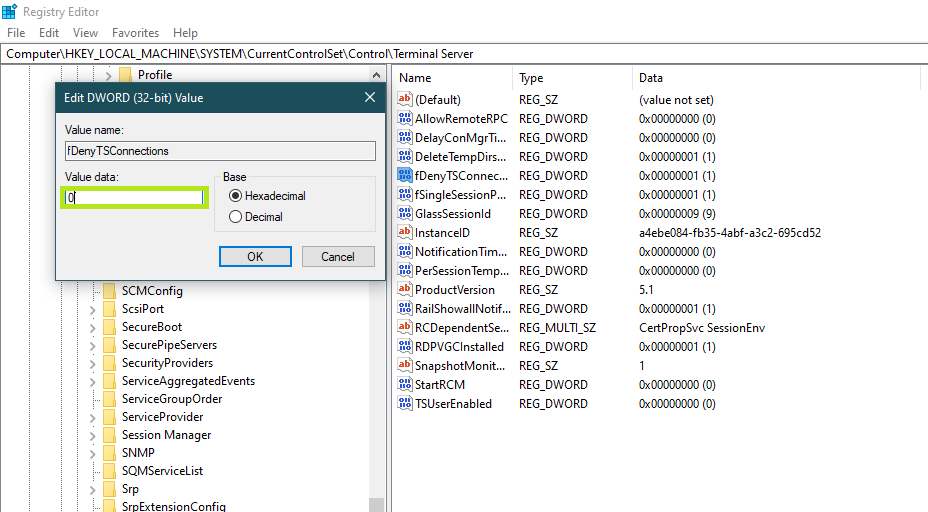
1 to 0: RDP activation
0 to 1: Disable RDP
After completing these steps, restart your system once and see if the issue is resolved.
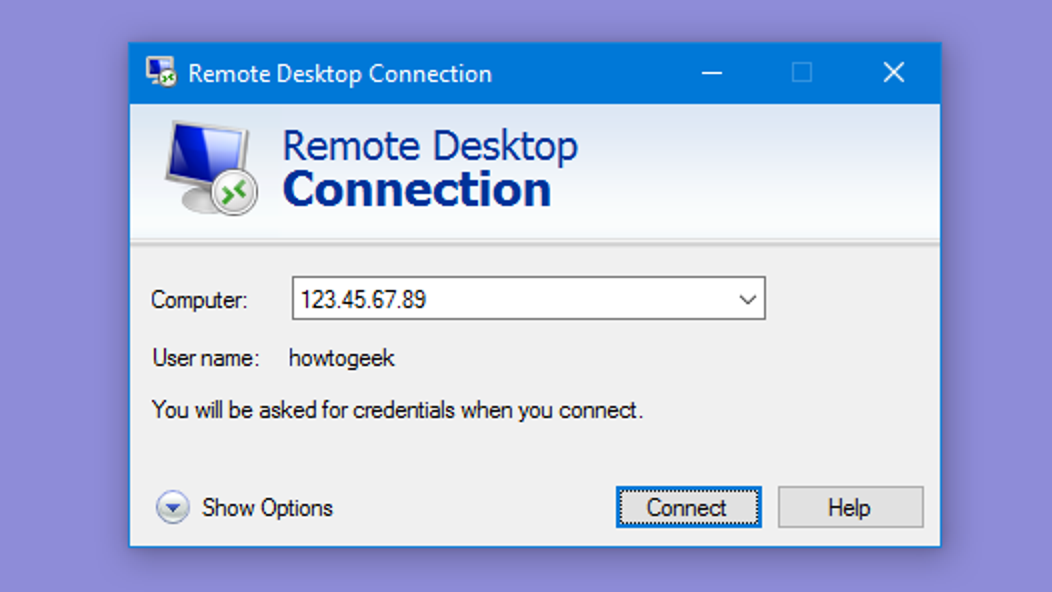
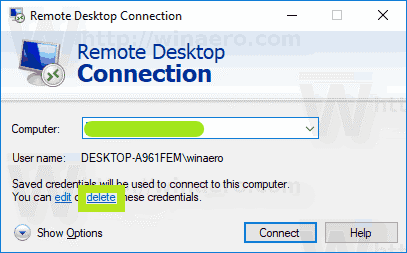
3. Reset RDP credentials.
Suppose you have activated and saved the Credentials feature to access or share remote desktops more efficiently. In that case, you should always use appropriate credentials for the computer to connect to the remote Desktop. Otherwise, there will be connection problems.
You can use the following method for desktop credentials:
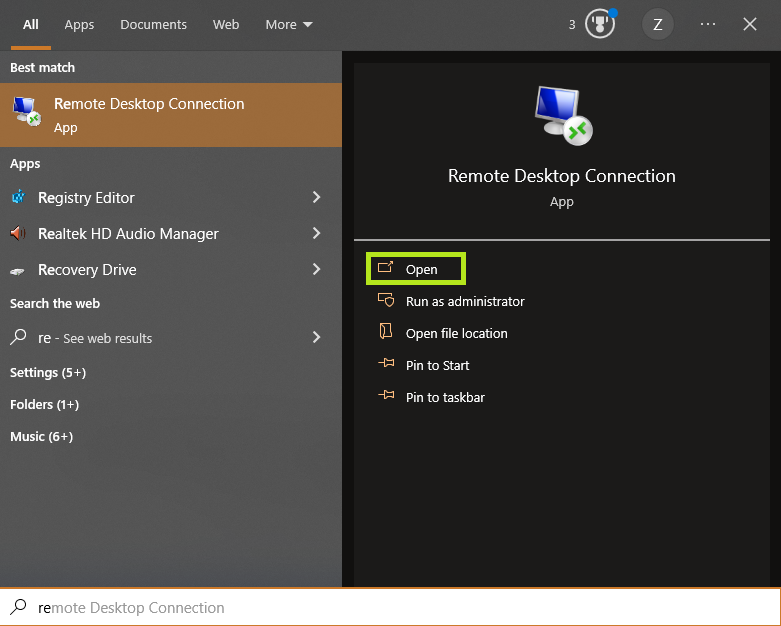
Open the Start menu and type Remote Desktop, and then open it.
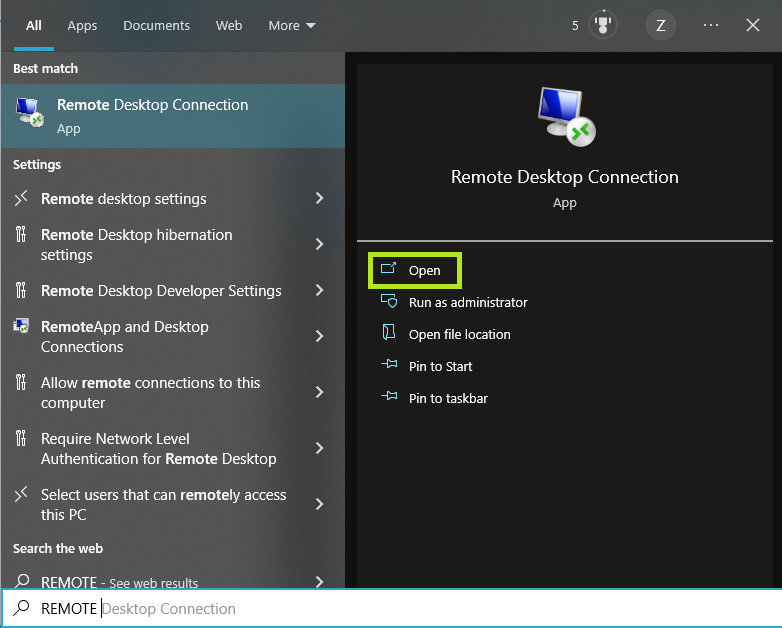
Please enter the desired Desktop’s IP address, then click Delete in the bottom section to remove its credentials.
4. Check the remote access permission.
Desktopers must have the necessary permissions to use Remote Desktop or Terminal Services. Otherwise, all their attempts to connect to the remote system will fail.
Follow the steps below to ensure that the Group Policy settings are correct:
Press Win+R and then type gpedi Mscsc.

Go to the Connection section:
Configuration > Administrative Templates > Windows Components > Remote Desktop Services > Remote Desktop Session Host > Connections.
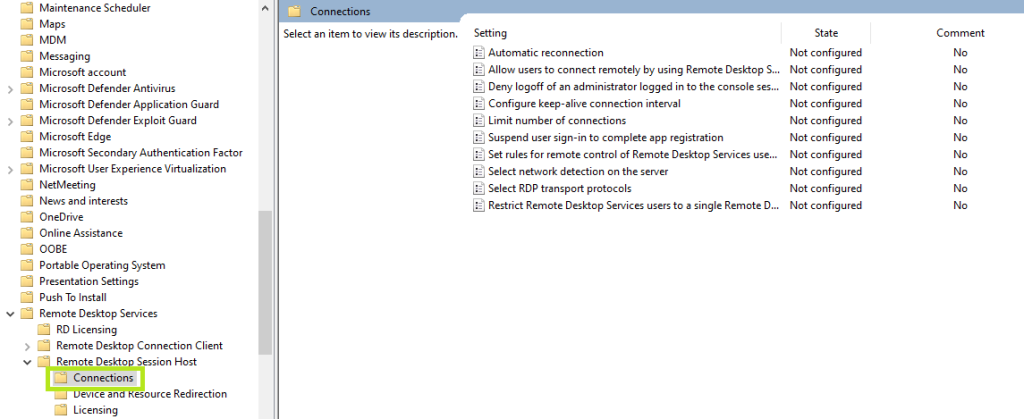
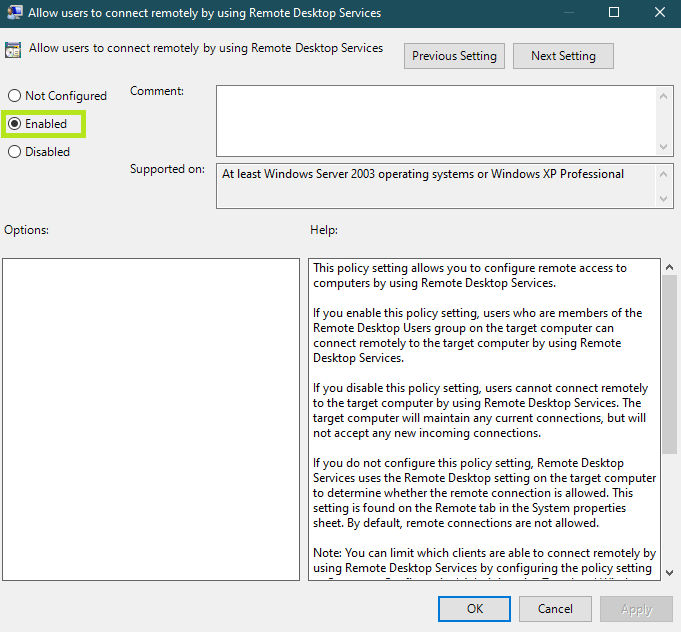
Click Allow users to connect remotely using Remote Desktop Services, set it to Enabled, and finally click OK.
5. Add the IP address of the remote system to your hosts File
The absence of the isolated system address in the host file is another reason for the problem of connecting to the remote Desktop, which you can solve with the following steps:
Open File Explorer and type the following path in the top bar to hit Enter.
C:/Windows/System32/Drivers/etc

Open the hosts file with your favorite editor.
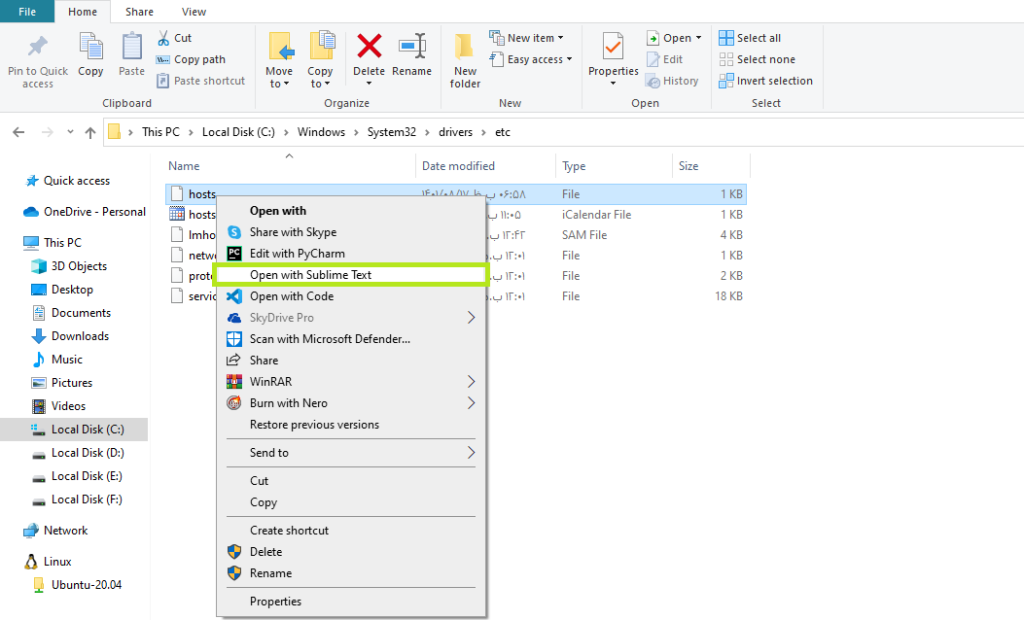
Enter the IP address of the remote system at the end of this file, then close it after saving.

Try again to see if the issue connecting to the Remote Desktop is resolved.
Restart the RDC service.
There are also cases where you can resolve the issue of connecting to a remote desktop by simply restarting.
For the, is it enough?
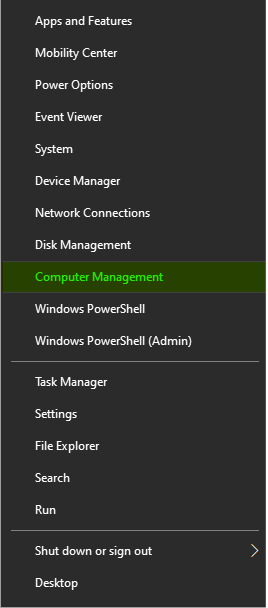
Right-click the Start button and open Computer Management.
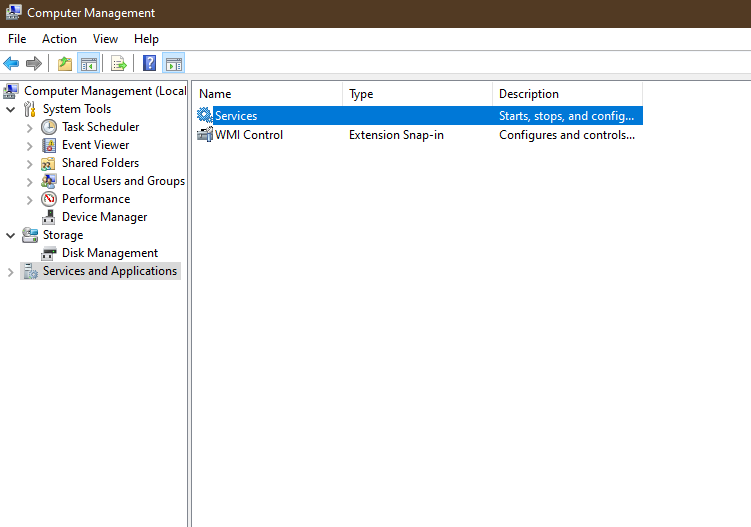
Then open Services and Applications, then click Services.
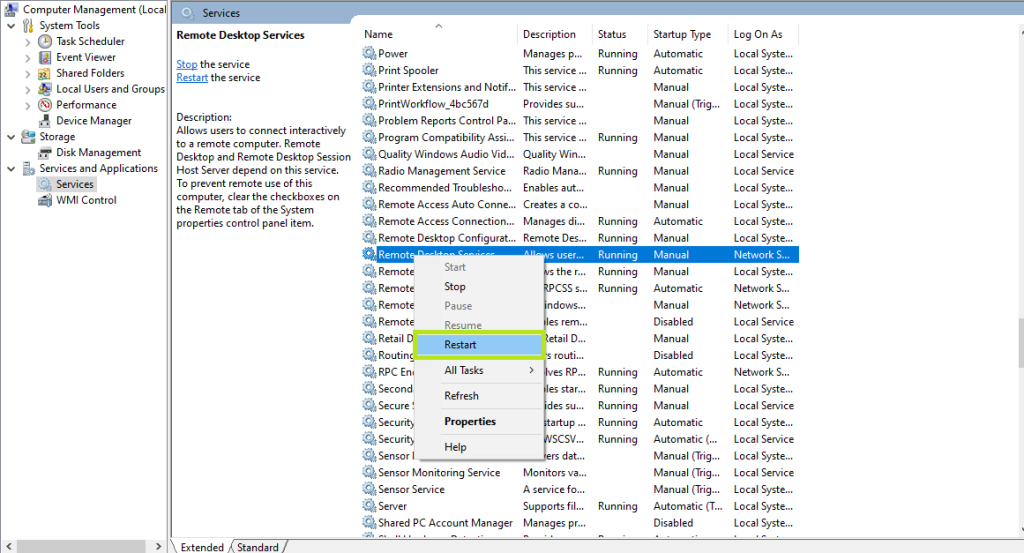
Find Remote Desktop Services and restart them.
Now you can test whether the remote access issue has been resolved.
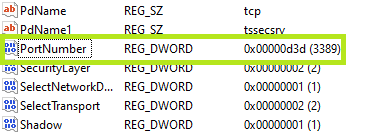
7. Check the RDP port.
The RDP service listens on port 3389 by default. If you haven’t changed it and another program is already using that port, you won’t be able to connect to Remote Desktop.
To check this issue, follow the steps below:
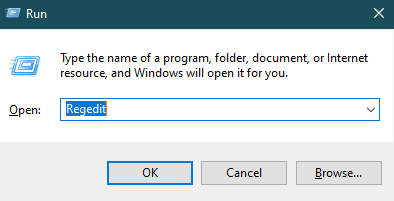
Press the Win+R key combination. Then type Regedit in the corresponding box and press Enter.
Go to the following path:
HKEY_LOCAL_MACHINE > System > CurrentControlSet > Control > Terminal Server > WinStations > RDP-Tcp
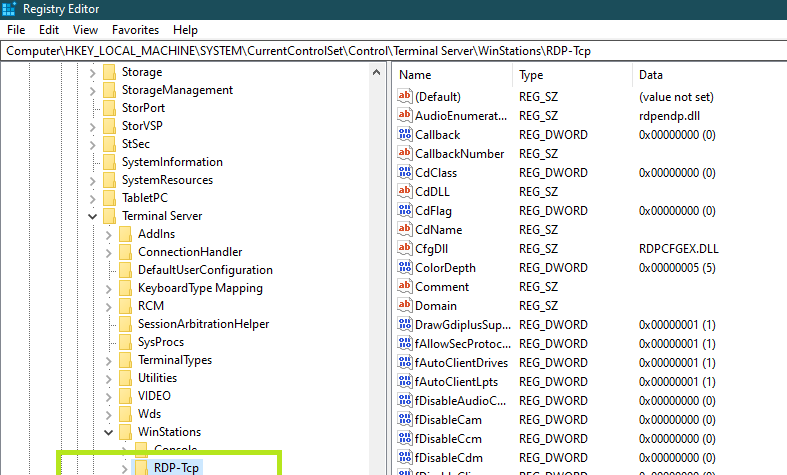
Look up the port number in the list on the right and verify its value.
You can use the net and tasklist commands to learn which services or programs are listening to this port.
But to solve this problem, you can try the following solutions:
- Change the port for another application or service.
- Delete the desired program or service.
- Change the RDP port and then restart Remote Desktop Services.
8. Add the RDGClientTransport key.
By doing this, you optimize the registry key so that RDP is forced to use the RPC/HTTP connection instead of the HTTP/UDP connection. However, since this work is considered a technical change, you should be careful.
To add this key, do the following steps:
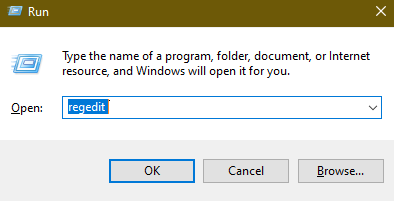
Press the Win+R key combination. Then, in the Run dialog box, enter Regedit and click OK.
Go to the following path:
HKEY_CURRENT_USER\Software\Microsoft\Terminal Server Client
And in the correct blank section, right-click and select New > DWORD (32-bit value).
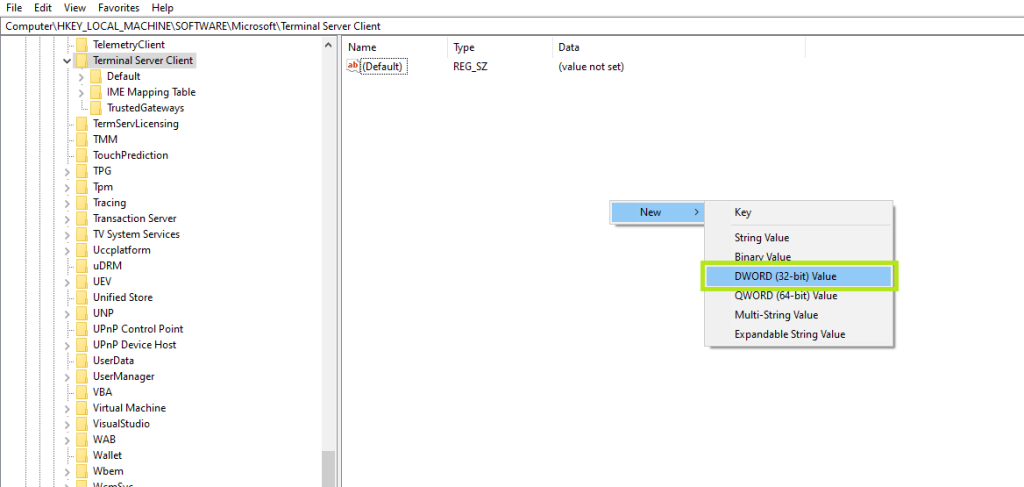
Name this new File RDGClientTransport.
Double-click on the File, set the value to 1, and click OK.
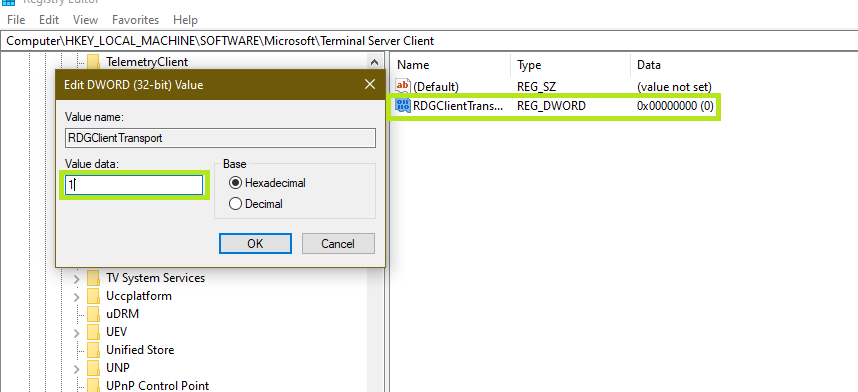
Finally, close the Registry window and reconnect to the remote system to see whether the Remote Desktop connection issue has been resolved.
9. Check Remote Desktop connections.
All remote connections are made through the target system’s Windows Remote Desktop Internet connection. If the RDC technology is not configured correctly, Internet connectivity to the remote system is blocked.
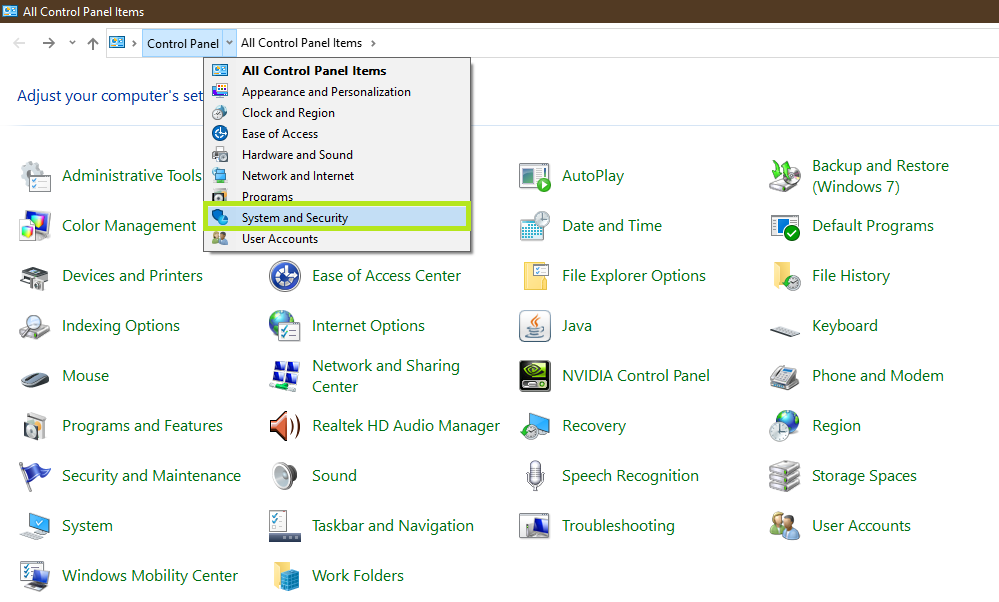
So, to check this issue, do the following steps:
Open the Control Panel and click on System and Security.
In the System section, click Allow remote access.
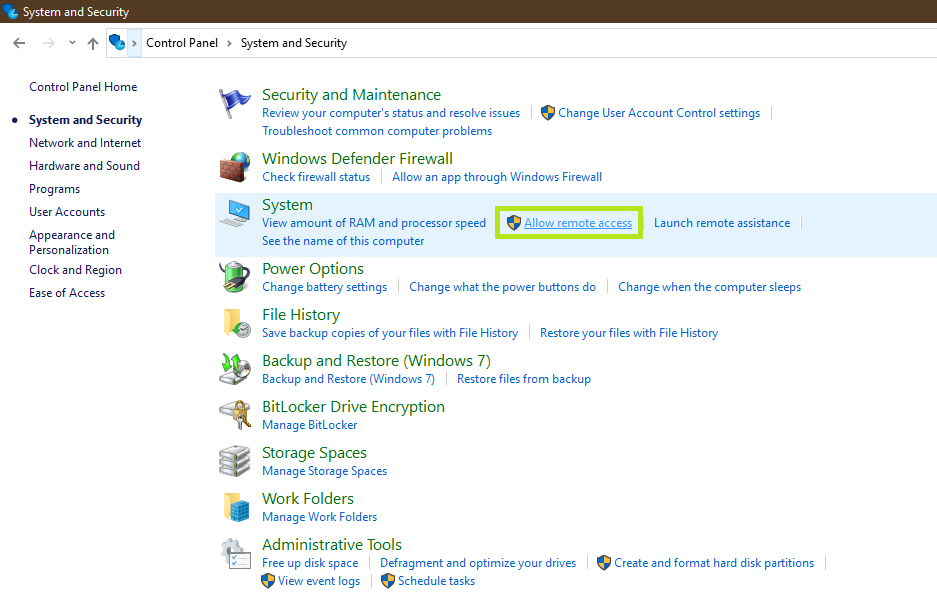
If this feature is already enabled, you will see a window like this:
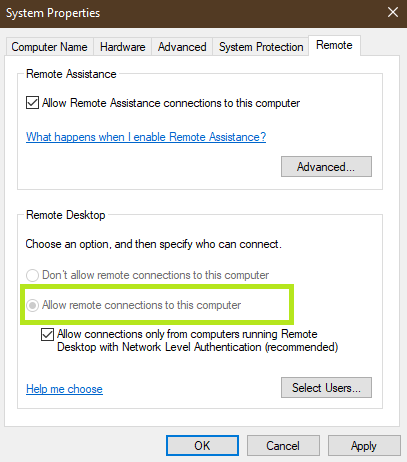
Otherwise, check the corresponding box, then click Apply and OK.
After completing these steps, you can connect to another remote system from your system, provided the issue with connecting to the remote Desktop is isolated to this issue.
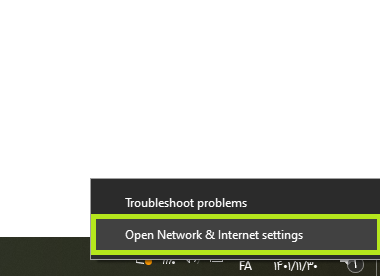
10. Change your internet connection from public to private.
Sometimes, Windows security settings block remote connections over the public network to protect the system, causing issues connecting to the remote Desktop. The best thing you can do is change the network from public to private.
So follow the steps below:
Right-click the network icon on the Desktop, then click Open Network & Internet Settings.
The network you are connected to is in the Status section. Just click on Properties.
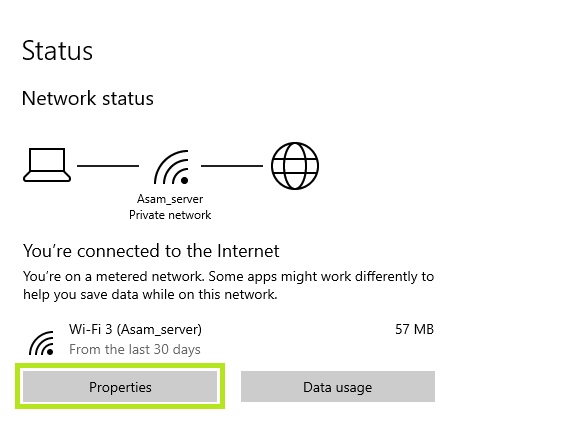
Check the Private option in the Network Profile section, then close the window.
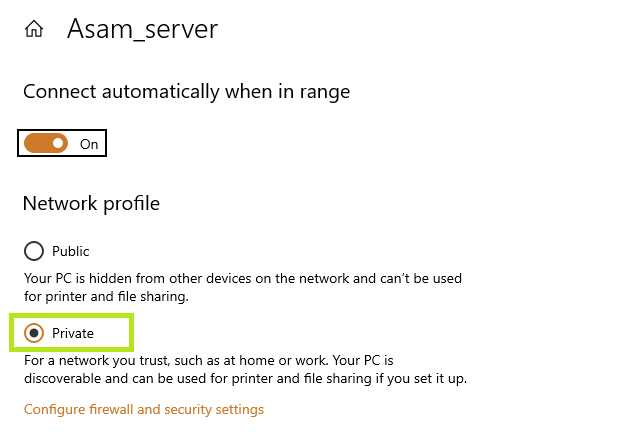
Try reconnecting to Remote Desktop to see if the issue is resolved.
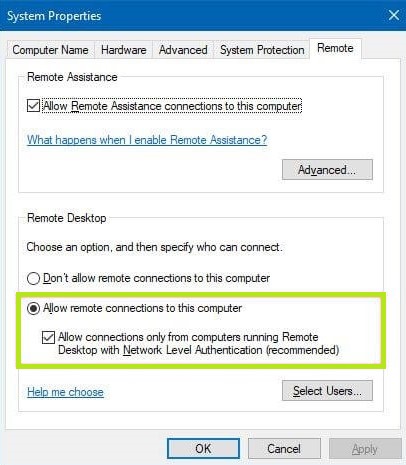
11. Change the RDP security level.
Sometimes, the Remote Desktop Protocol security settings interfere with its functionality. You can do the following to solve such problems.
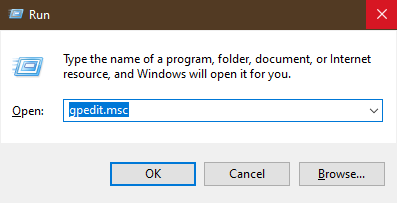
Press Win+R and type gpedit. MSc, and click OK.
Open gpedit
Go to the following path:
Computer Configuration -> Administrative Templates -> Windows Components -> Remote Desktop Services -> Remote Desktop Session Host -> Security
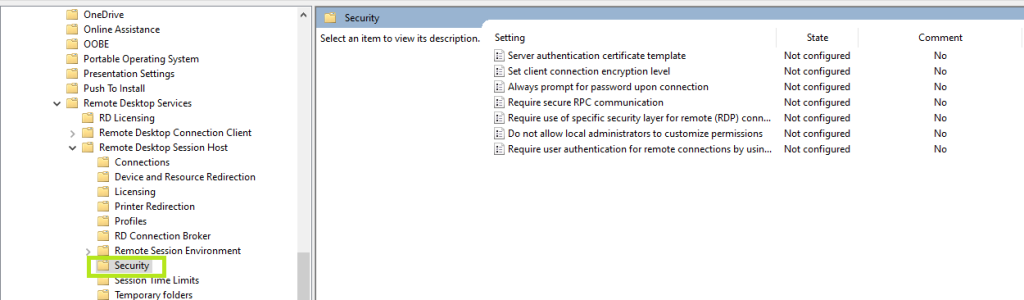
Look at “Require use of specific security layer for remote (RDP) connections” and change it to Enabled if it was in Not Configured mode.
Of course, you must also select the RDP option in the Security Layer section and click OK.
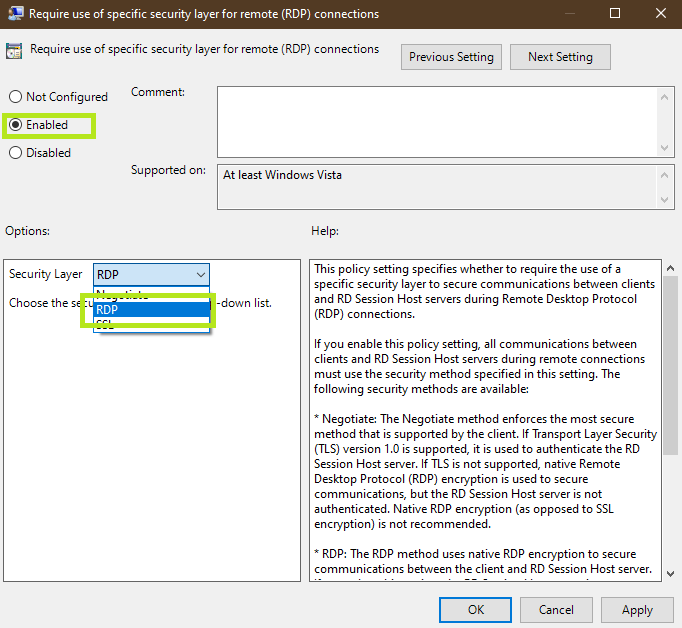
Close all programs and then restart your system.
12. Check the connection status.
Sometimes the client creates an RDP session, but the connection is disconnected due to insufficient bandwidth.
In general, if you encounter a black screen or a “Reconnecting” message, this is why you’re unable to connect to Remote Desktop.
To solve this problem, try closing additional bandwidth-intensive applications and turning off non-essential Internet-connected devices.
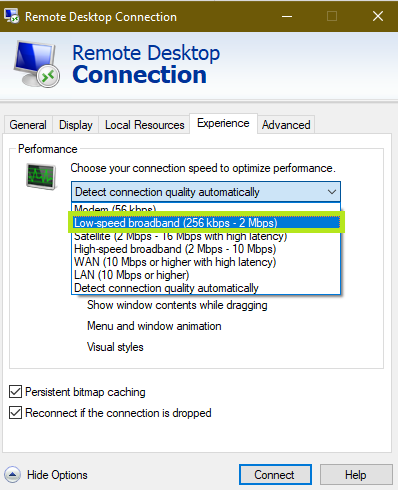
Of course, there is one more thing you can do. That is, the RDP program should use a lower resolution or color depth and disable other features, such as Windows background or font smoothing, to reduce RDP bandwidth consumption.
Of course, you can also use the following method to reduce bandwidth consumption:
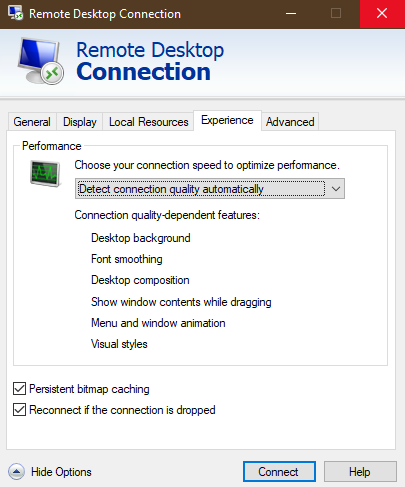
Open the RDP application.
Click Show Options and select the Experience tab.
From the Performance drop-down menu, select Low-speed broadband and click Connect.
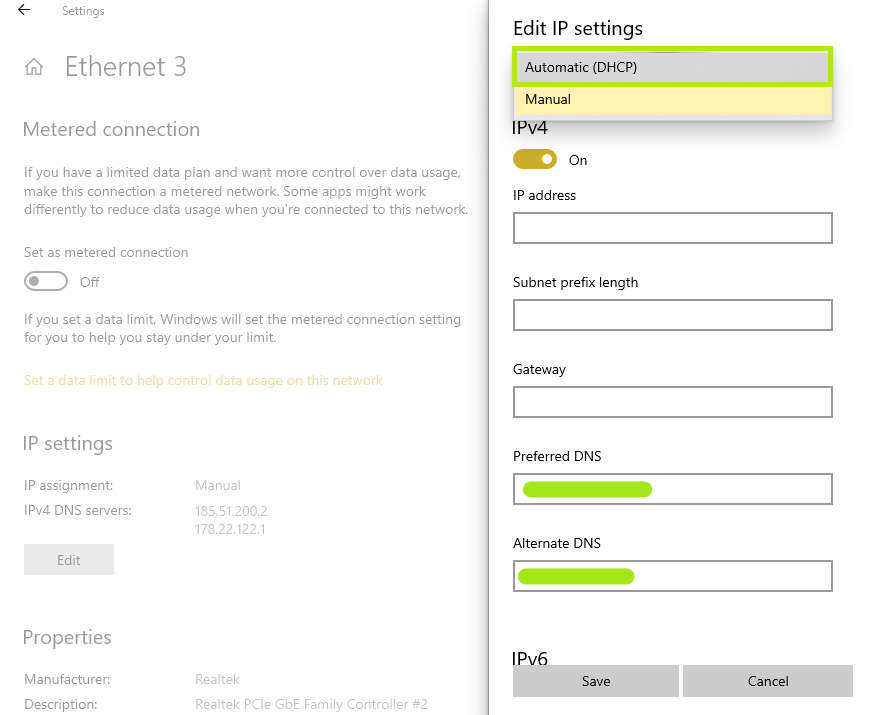
13. Disable static IP on your system.
It is also possible that your system uses a fixed IP address that is not in the network or subnet range covered by the remote system’s RDP connections. In this case, your connections will fail.
To solve this problem, you can change the static IP address to DHCP with the following steps:
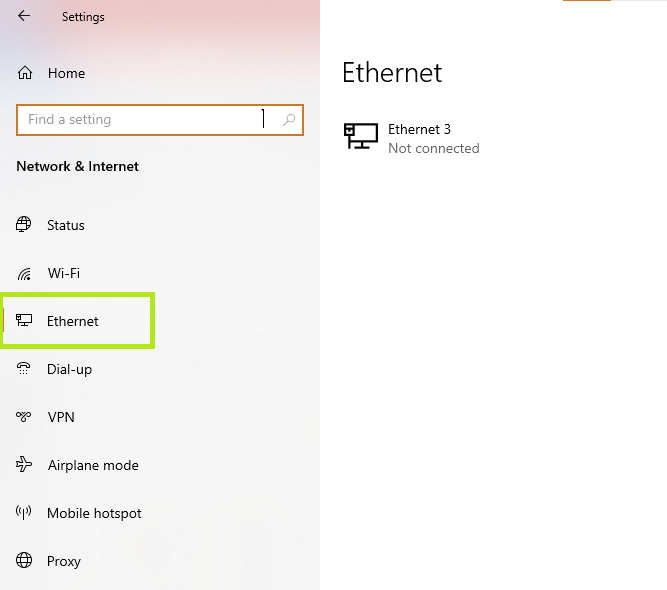
Open the Settings app, then click Network & Internet.

Click on Ethernet and then on Ethernet or any other name in this section.
Click Edit and select Automatic (DHCP) from the drop-down menu at the top of the Edit IP settings window. Finally, click Save to save the changes.
Conclusion
RDP is the most popular protocol for remote access to Windows systems, making it easy for everyone, especially programmers. There is a reason you cannot connect to the remote system, and an internet connection issue is one of the most common. If your problem is not related to the Internet, you will undoubtedly find a solution among those presented in this article. If you know of another solution, we will be happy to share it with you so that we can provide more comprehensive information to you, dear users.
Thank you for staying with us until the end of the article. We hope this article was helpful. If you have any questions or requests and need guidance, you can contact us by submitting your feedback so we can respond as soon as possible.
FAQ
Why won’t Remote Desktop connect?
Connection failures often stem from network issues, incorrect settings, or firewall restrictions.
How do you fix authentication errors?
Verify your username/password, enable Network Level Authentication, and check user permissions.
What solves common network-related problems?
Ensure both devices are on the same network, check IP addresses, and confirm port 3389 isn’t blocked.