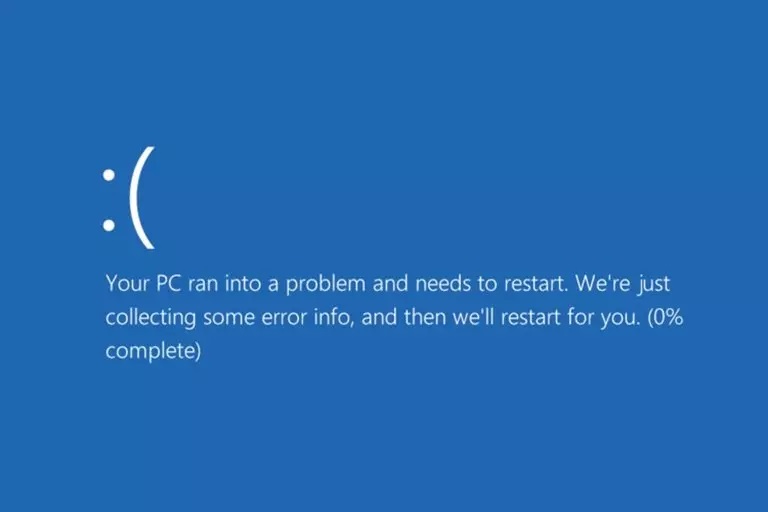
How to Prevent Your Computer from Automatically Restarting After the Blue Screen of Death
By Default, The Computer Restarts Without Your Permission After Encountering The Windows Blue Death Screen (BSOD). How Can We Prevent This?
You may wonder if the computer resets automatically after seeing the blue screen of death. So, why do we need to do this manually?
Suppose you turn on your computer overnight to download a large file, and tomorrow, when you wake up, you are faced with a restored computer.
If Windows displays a blue screen of death at night, and because it resets automatically, you will not notice the problem. Still, if the blue screen of death is reset manually, you will probably find a possible computer problem.
Windows Death Blue Screen Guide
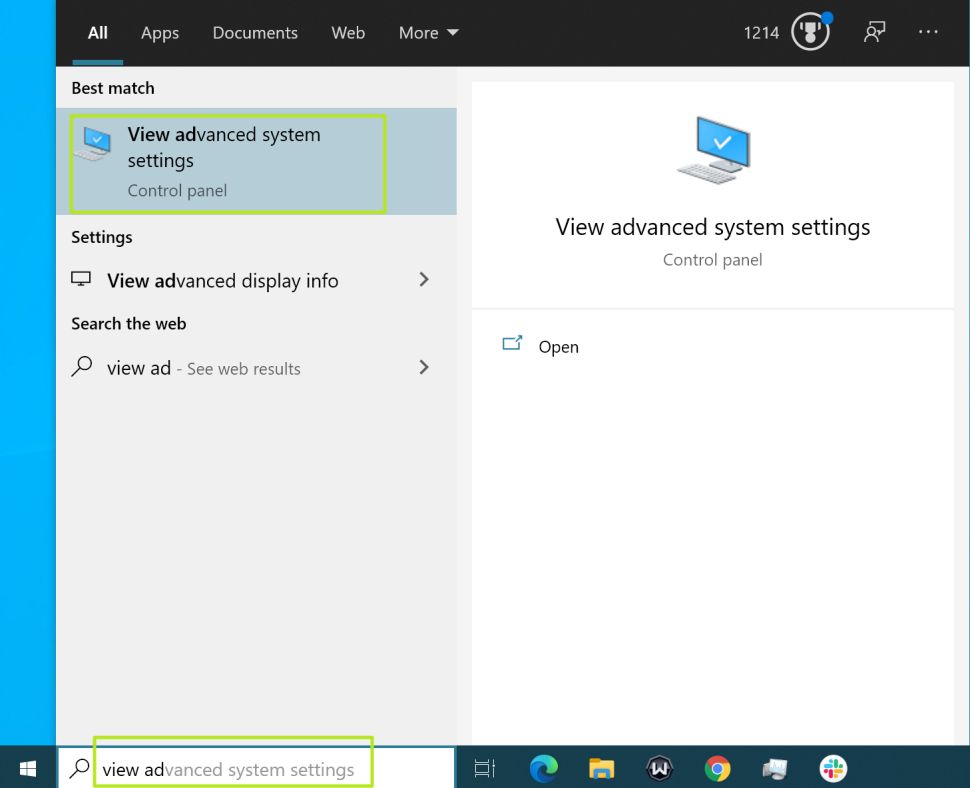
In the Windows search box, type View advanced system settings to open the following page.
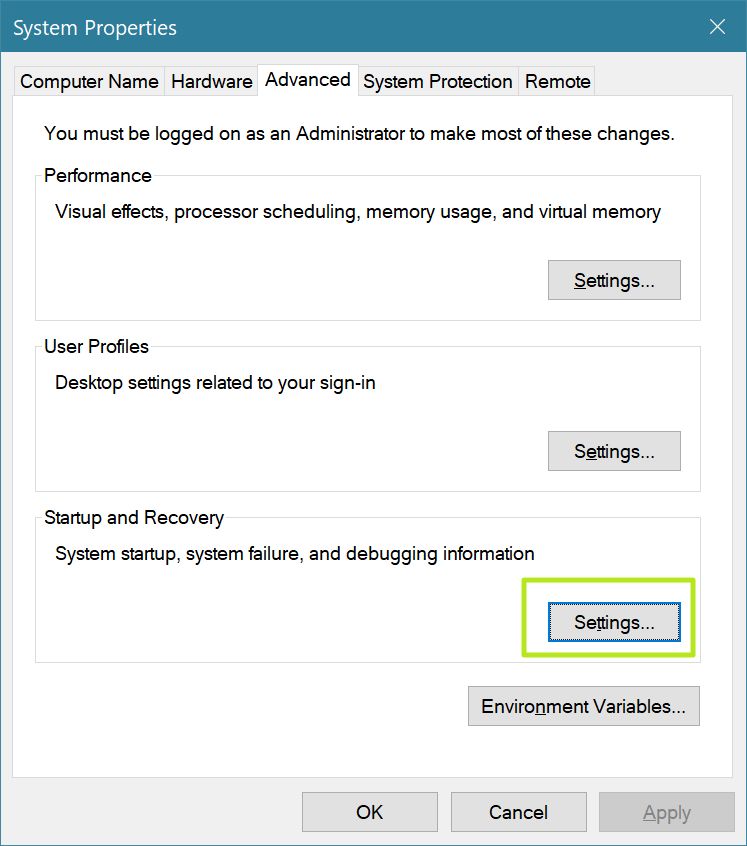
On the opened page, go to the Startup and Recovery section from the Advanced section and select the Settings option.
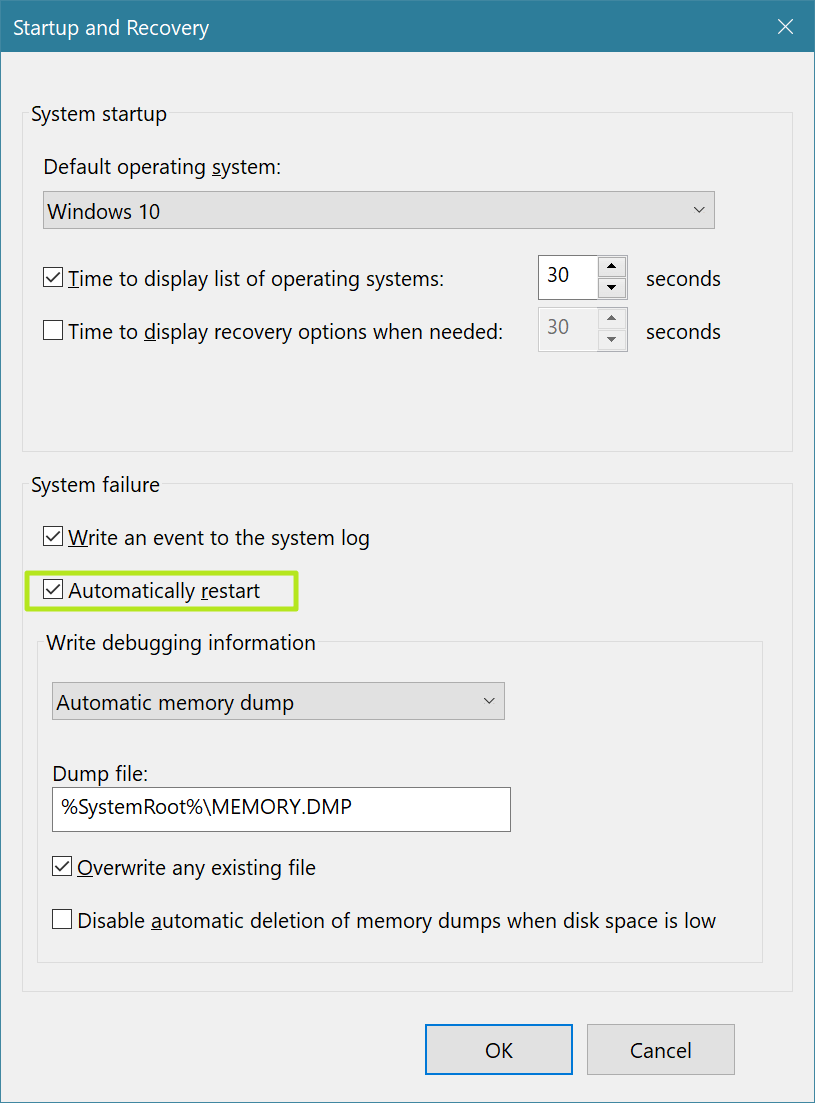
On the opened page, uncheck the Automatic Restart option and click OK. From now on, if your computer encounters a blue screen of death, it will not reset without your permission.
How to fix the blue screen of death error during an upgrade on Windows 10
When upgrading to a new version of Windows 10, you may see blue screen errors, which can happen for many reasons. It could result from a compatibility problem with an old program or security software. It could be because of corrupted files in the current installation or damaged installation media, to name a few.
Usually, when an error occurs, the setup will revert the changes to the previous installation without a reason.
If you encounter errors during the installation of Windows 10, uninstalling non-essential apps, clearing out corrupt downloads, disconnecting non-essential peripherals, or even performing a clean install of the OS may resolve the issue.
Uninstall the incompatible app.
To uninstall an app that may be conflicting with the installation of Windows 10, use these steps:
- Open Settings.
- Click on Apps.
- Click on Apps & features.
- Select the app that may be causing issues and click the Uninstall button.
- Click the Uninstall button again.
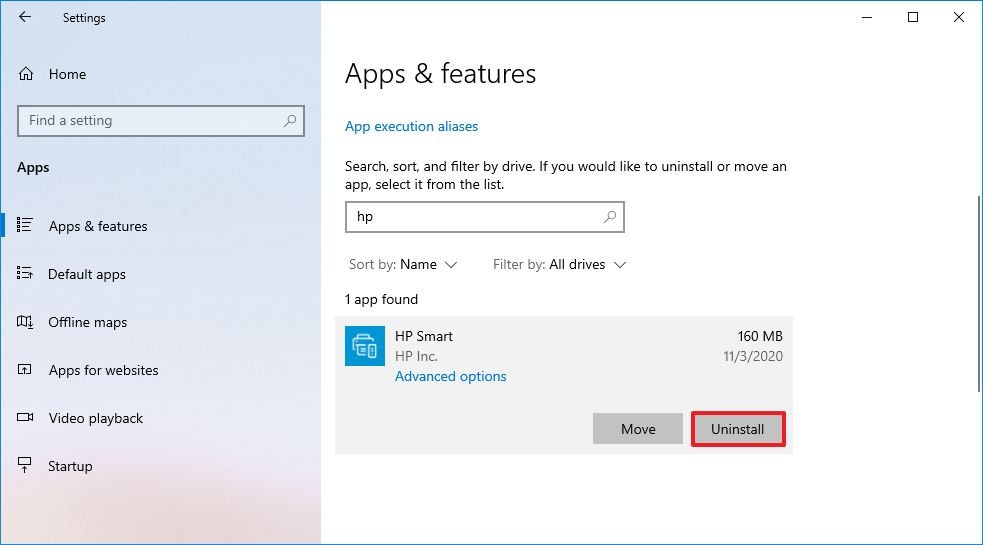
Note: If you’re removing a legacy desktop application, you may need to continue with the on-screen directions.
Once you complete the steps, you may need to repeat them to uninstall additional apps. Then, you can try the upgrade one more time. After the update, you can reinstall the apps.
Understanding and Resolving Blue Screen of Death (BSOD) Errors
Blue Screen of Death (BSOD) is a critical system error that causes Windows to shut down or restart unexpectedly, displaying a blue screen with a warning message. These errors can result from hardware and software issues and significantly disrupt system stability. This comprehensive guide will explore common causes of BSODs, troubleshooting steps, advanced diagnostics, and preventive measures to maintain a stable computing environment.
Common Causes of BSOD: Hardware and Software Issues
Hardware Issues:
- Faulty RAM: Memory malfunctions can lead to system crashes.
- Overheating Components: Excessive heat can cause thermal shutdowns.
- Hard Drive Failures: Corrupted or failing drives can trigger BSODs.
- Power Supply Problems: Inadequate or inconsistent power can destabilize the System.
- Incompatibility: Newly added components may not align with existing hardware or drivers.
Driver Problems:
- Outdated Drivers: Drivers that are not up-to-date can conflict with hardware.
- Corrupted Drivers: Faulty drivers can cause BSODs during startup or use.
- Incompatible Drivers: Drivers not designed for the OS version can destabilize the System.
Systemware Systems:
- Incompatible Software: New software installations may conflict with existing programs.
- Program Conflicts: Two or more programs trying to access the same resource can cause crashes.
- Poorly Written Software: Buggy or unoptimized software can result in BSODs.
- Code Errors: Unresolved coding errors can crash the System.
SystemingSystemm Corruption:
- Damaged System Files: Missing or corrupted OS files can trigger critical errors.
- Corrupted Registry Entries: Invalid registry entries can cause boot failures.
Malware Infections:
- Viruses and Trojans: Malicious software can corrupt system files.
- Malware Interference: Programs that interfere with system processes can cause crashes.
Overclocking:
- Hardware Overclocking: Pushing CPU, RAM, or GPU beyond stable limits can cause instability.
Disk Errors:
- Bad Sectors: Physically damaged sectors can cause read/write errors.
- File System Corruption: Errors in the file system can lead to data loss and crashes.
How to Troubleshoot BSOD Errors
- Identify the Error Message:
- Note the error code and error message displayed on the blue screen. Examples include 0x0000007E (SYSTEM_THREAD_EXCEPTION_NOT_HANDLED) and 0x00000050 (PAGE_FAULT_IN_NONPAGED_AREA).
- Boot in Safe Mode:
- Restart the PC and press F8 (or the specific key for Safe Mode) to boot with minimal drivers.
- Undo Recent Changes:
- Uninstall recent hardware or software that may have triggered the BSOD.
- Update Drivers:
- Use Device Manager or manufacturer websites to update all critical drivers.
- Run Windows Update:
- Ensure the OS is fully updated with the latest patches and security fixes.
- Check for Malware:
- Run a full system scan with a reputable antivirus program.
- Run System File Checker (SFC):
- Open Command Prompt as an administrator and run the command:
sfc /scannowTo repair corrupted system files.
- Open Command Prompt as an administrator and run the command:
- Use Blue Screen Troubleshooter:
- Open the ‘Get Help’ app and follow the troubleshooting steps for BSOD errors.
- Check Hardware:
- Test RAM with the Windows Memory Diagnostic tool.
- Run
chkdsk /fto scan and repair problematic drive errors.
- Restore System:
- Use System Restore to restore the System to a previous state.
- Reinstall Windows (Last Resort):
- If other methods fail, consider a clean installation of Windows.
Advanced Troubleshooting Techniques
- Analyze Minidump Files: Use tools like BlueScreenView or WhoCrashed to review crash logs and pinpoint the source of the error.
- Check for Hardware Conflicts: Use Device Manager to identify hardware with yellow exclamation marks.
- Update BIOS: Outdated BIOS firmware can cause compatibility issues and crashes.
- Monitor Temperatures: Use HWMonitor or Core Temp to track system temperatures and prevent overheating.
- Perform a Clean Boot: Disable non-essential startup programs to isolate software conflicts.
Preventing Blue Screens of Death
- Keep Systemd: Regularly install Windows updates and driver patches.
- Use Compatible Software: Avoid installing unsupported or incompatible programs.
- Monitor Hardware: Keep components clean and well-ventilated to prevent overheating.
- Maintain Regular Backups: Protect critical data from potential crashes.
- Avoid Overclocking: Use manufacturer-recommended settings to maintain system stability.
- Implement Antivirus Protection: Use comprehensive security software to detect and remove malware.
- Monitor Disk Health: Run periodic disk checks to detect and repair errors.
Understanding BSOD Error Codes
Some standard BSOD error codes and their meanings:
- 0x0000000A: IRQL_NOT_LESS_OR_EQUAL – Driver access to restricted memory.
- 0x0000001E: KMODE_EXCEPTION_NOT_HANDLED – Kernel-mode program error.
- 0x00000050: PAGE_FAULT_IN_NONPAGED_AREA – Memory access error.
- 0x000000D1: DRIVER_IRQL_NOT_LESS_OR_EQUAL – Faulty or incompatible driver.
- 0x0000007E: SYSTEM_THREAD_EXCEPTION_NOT_HANDLED – Unhandled system thread exception.
Conclusion: Ensuring System Stability
Blue Screen of Death errors can be daunting, but a systematic troubleshooting approach can resolve most issues effectively. Understanding common causes, maintaining hardware health, updating drivers, and implementing preventive measures can significantly reduce the occurrence of BSODs.
To ensure a stable computing environment, stay proactive by monitoring system performance, backing up data, and addressing potential conflicts promptly.
FAQ
How do I stop Windows from instantly rebooting after a BSOD?
In Windows, go to Control Panel → System → Advanced system settings → Startup and Recovery → Settings, and uncheck “Automatically restart” under System Failure.
Why is it useful to disable automatic restart on system failure?
Disabling the automatic restart gives you time to read the stop code, error message, or driver name on the blue screen, which helps you troubleshoot the root cause.
What should I do after disabling auto-restart and getting a BSOD message?
Note down the stop code or error message. Boot into Safe Mode if needed and uninstall recent drivers or software. Run system diagnostics like sfc /scannow and DISM /Online /Cleanup-Image /RestoreHealth. Update or roll back problematic drivers, and scan for malware.
