
Why Is the Hard Drive Not Recognized During Windows Installation
If you encounter a hard drive that does not recognize the error during Windows installation, follow this article.
Installing different versions of Windows is generally not a complicated task, and if the steps are followed correctly, even beginners can handle it. However, unwanted issues can make this process cumbersome and time-consuming.
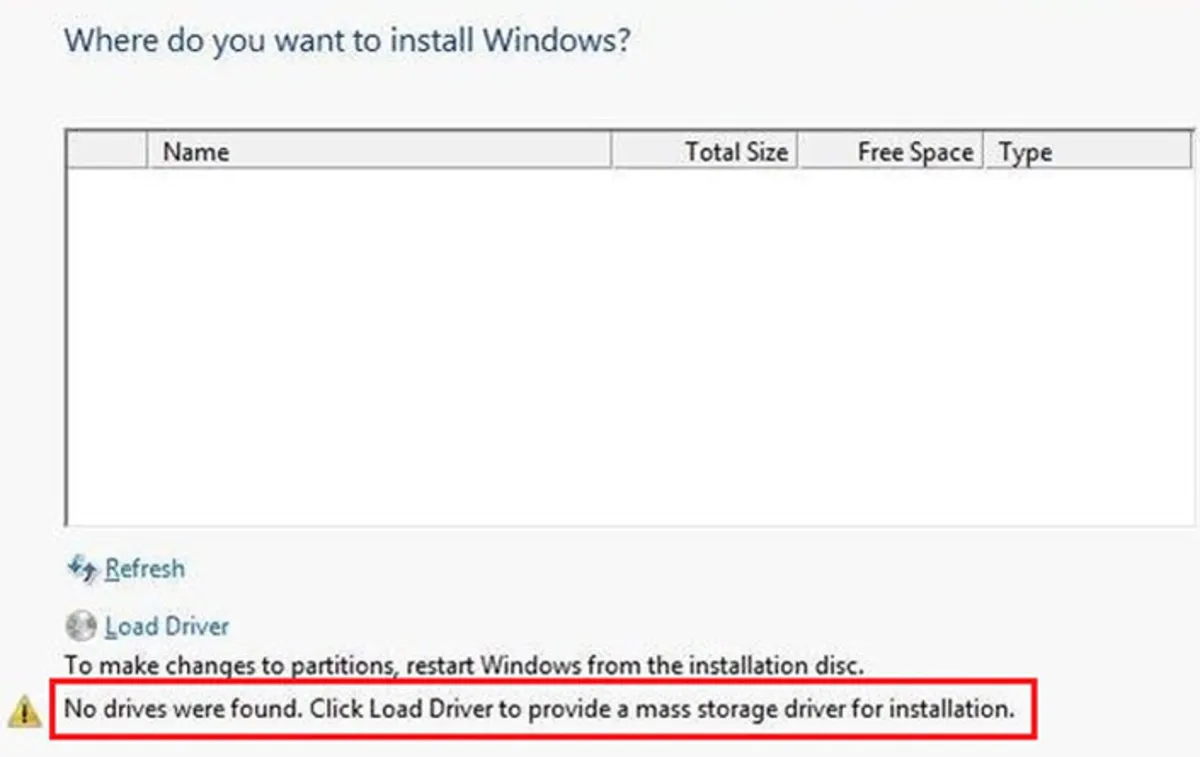
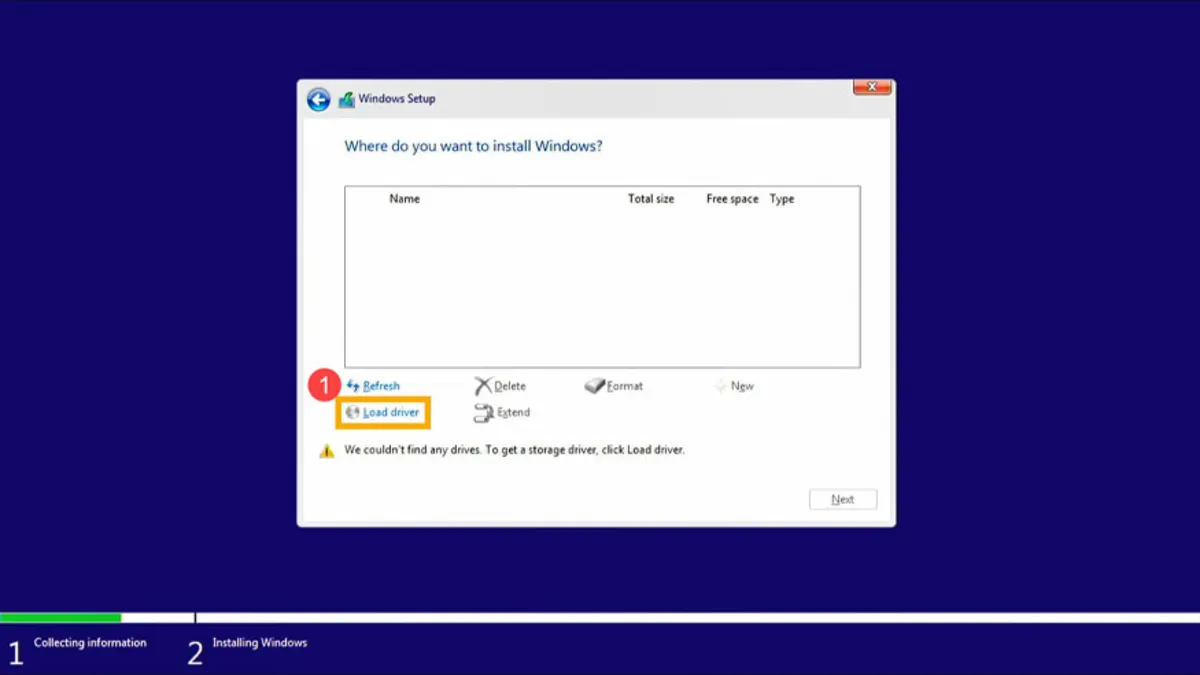
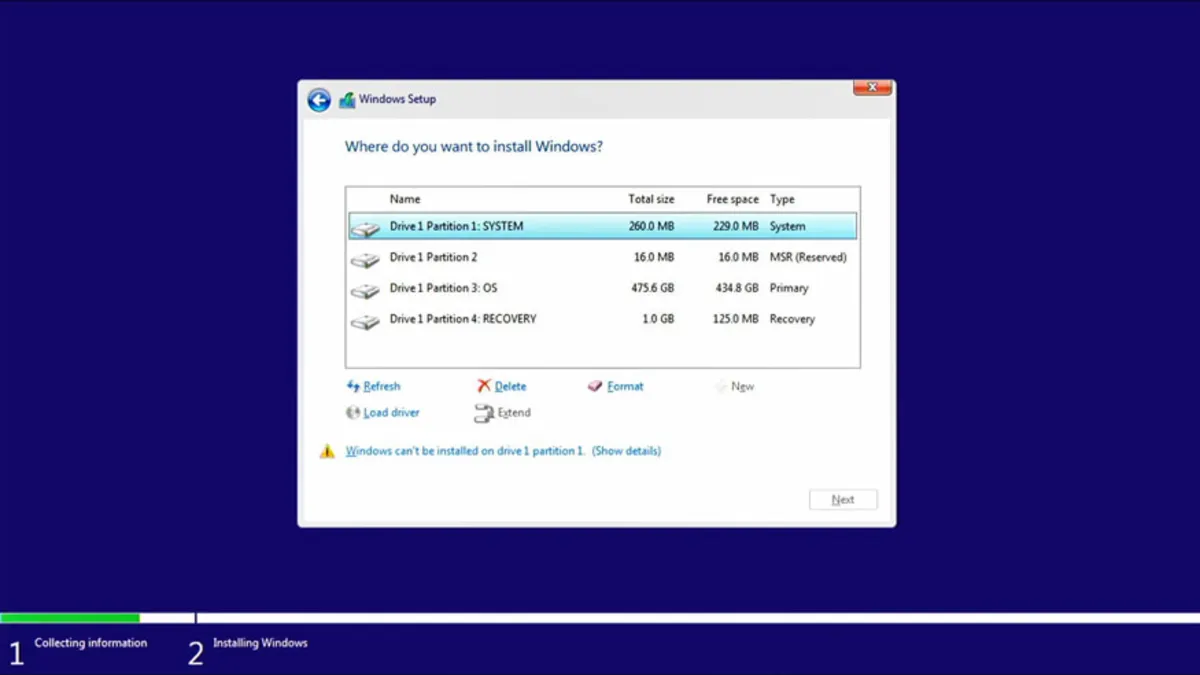
One of the problems that many people face when installing Windows is seeing the message “We couldn’t find any drives.” The system cannot detect the hard drive and asks you to click Load Driver. In most cases, even clicking this option will not resolve the problem.
Sometimes, no error is displayed, and no matter how many times you click the Refresh button, you still see the empty Windows Setup window. If on this page, when asked, “Where do you want to install Windows?” If no option is available, the Windows installation process will fail, and you should identify a solution to resolve this issue.
What should I do if the hard drive isn’t recognized during Windows installation?
When you encounter a “hard drive not recognized” error, first check whether the BIOS has recognized the hard drive.
On many new laptops, you can access the BIOS by pressing the F2 key during boot; on older systems, this key may not work. In the tutorial on different BIOS entry methods, you can find the BIOS keys for other manufacturers.
After entering the BIOS, locate the hard drive. If you notice that the BIOS is not detected by viewing Not seen or None, it can have several reasons:
- The channel of this hard drive is prohibited in BIOS, which usually happens after installing a second hard drive. You need to enable it to fix this problem.
- The data cable or power cable is damaged or not connected properly. Try reconnecting both cables or substitute other wires.
- The BIOS is outdated and cannot detect the hard drive. It is better to update its BIOS or driver to the latest version.
- The hard disk may be physically damaged, so download a test tool to verify the drive. If the tool is not detected or errors are found, you may need to contact the hard drive vendor. However, there is another way to check the hard drive’s status, which we will explain later.
The hard drive is usually seen in the BIOS; only Windows installation can’t detect it. To resolve it, follow the steps below. Before performing the following procedures, if you have critical data on your hard drive, make a backup copy.
Before doing anything, it is better to check the hard disk’s condition. Therefore, to ensure the hard drive is working correctly, in Windows, press and hold the Windows + R keys until the Run dialog appears.
- At this point, type the command devmgmt. msc and press Enter.
- Select the Disk Drives option in the Device Manager window and right-click on the hard drive.
- To check the hard disk status, select Properties.
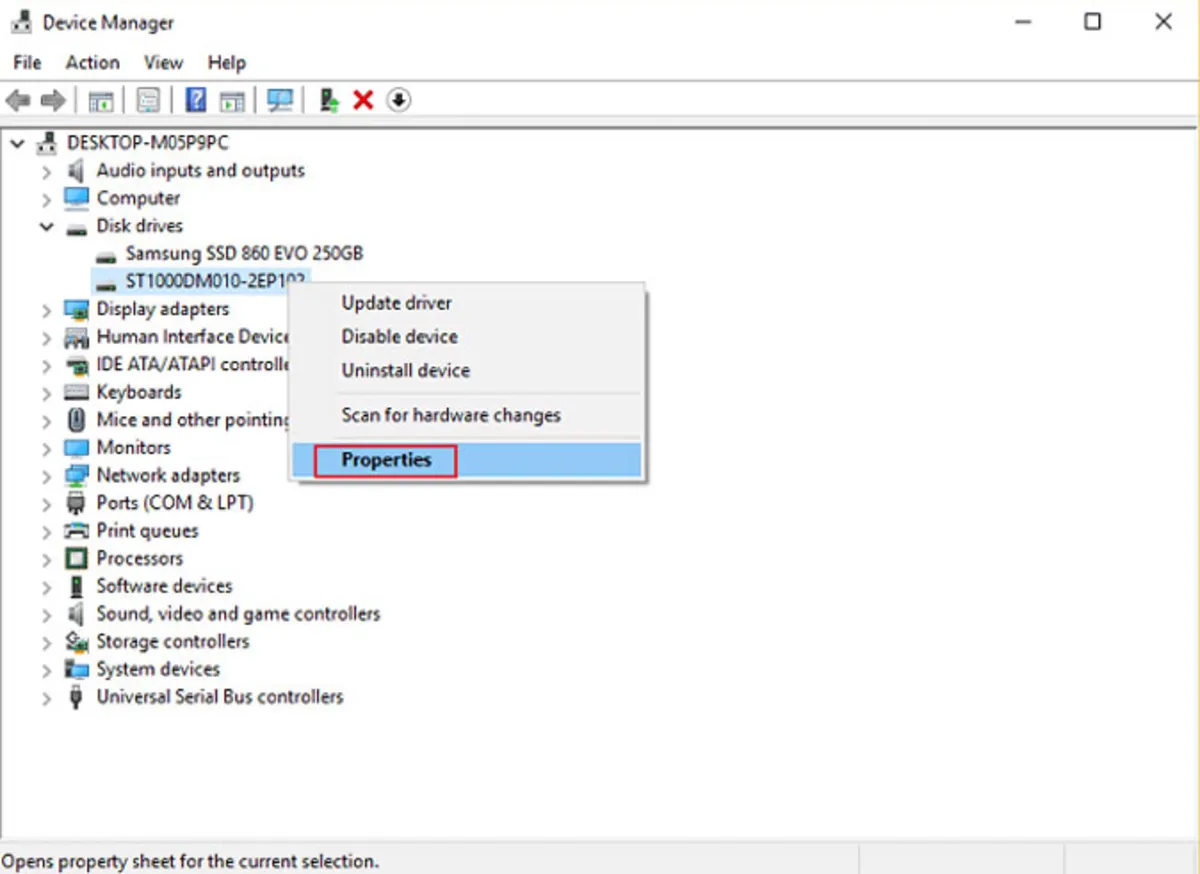
- You will see the message “This device works properly if the complex disk works correctly.”
After checking these steps, if the hard drive is physically intact, the BIOS will likely recognize it. Then, follow the steps to resolve the issue of not detecting the hard drive during Windows installation.
Update or reinstall the controller driver.
One solution to resolve the “No driver found” error is to install or upgrade the driver. To download the storage controller driver, determine the type of storage controller (IDE, SCSI, SATA, etc.) your system uses by checking the system specifications or visiting the manufacturer’s website. Download and transfer it to a USB flash drive, CD, or another removable device.
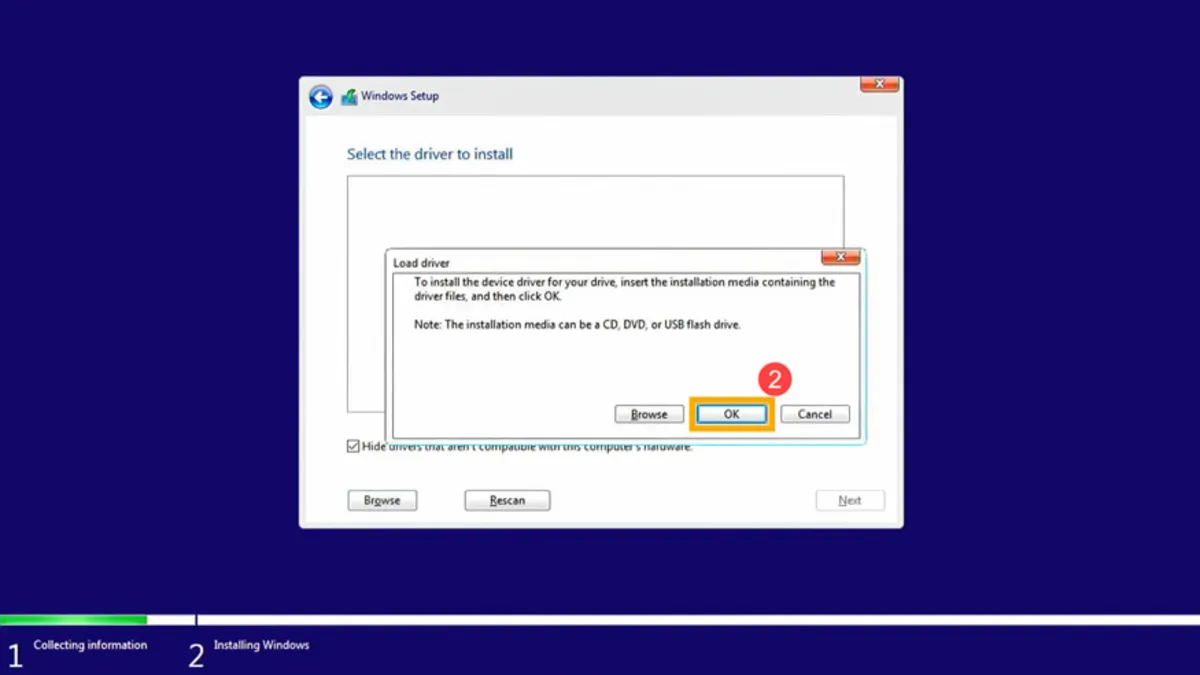
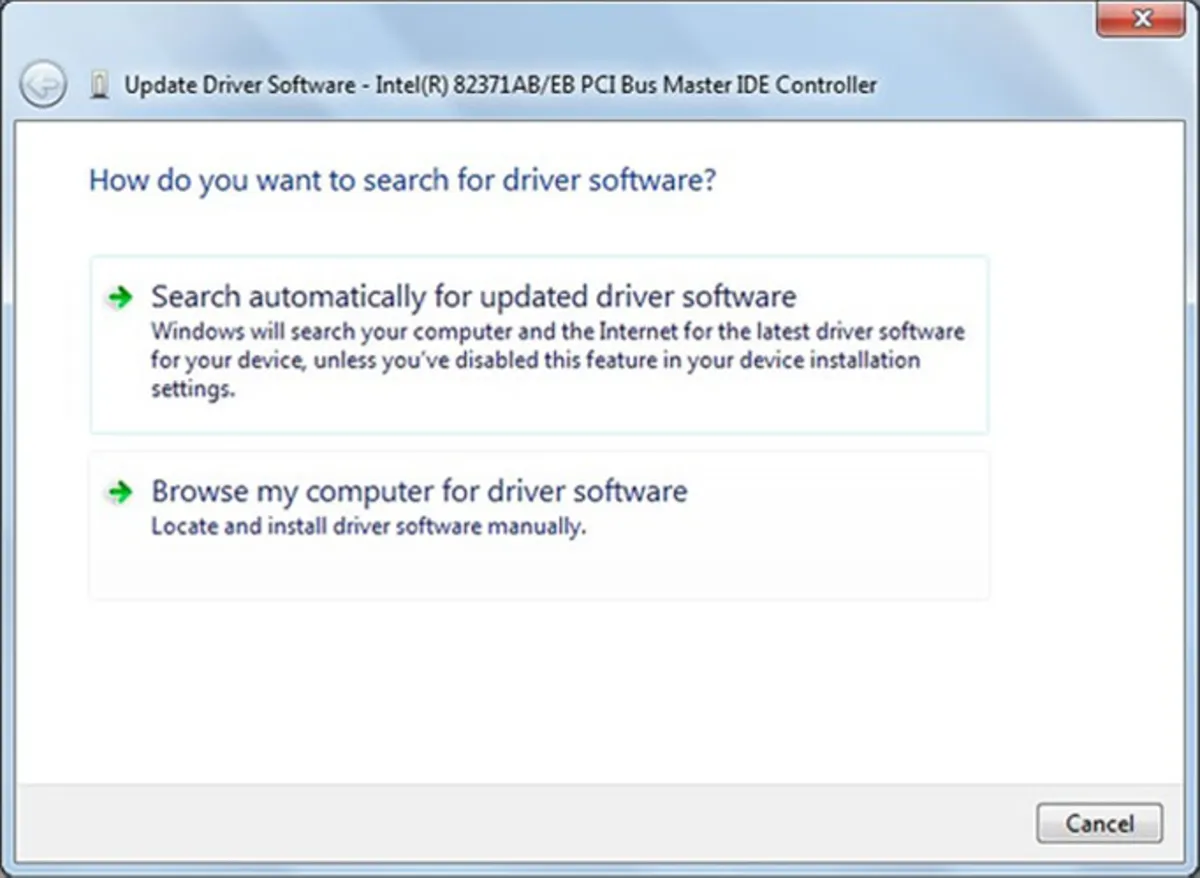
In most cases, you need to unzip the downloaded file before copying. After this, restart the Windows installation and click Load Driver on the “Where do you want to install Windows?” page. Then insert the USB drive containing the driver into the computer and click OK.
Windows will search for the driver across all connected devices and then list them. Select the driver for your hard disk, then press Next to continue.
Solving the problem of hard drives not being recognized in 11th-generation Intel processors
To better understand this issue, we explain how to install the driver on Intel processors in this section.
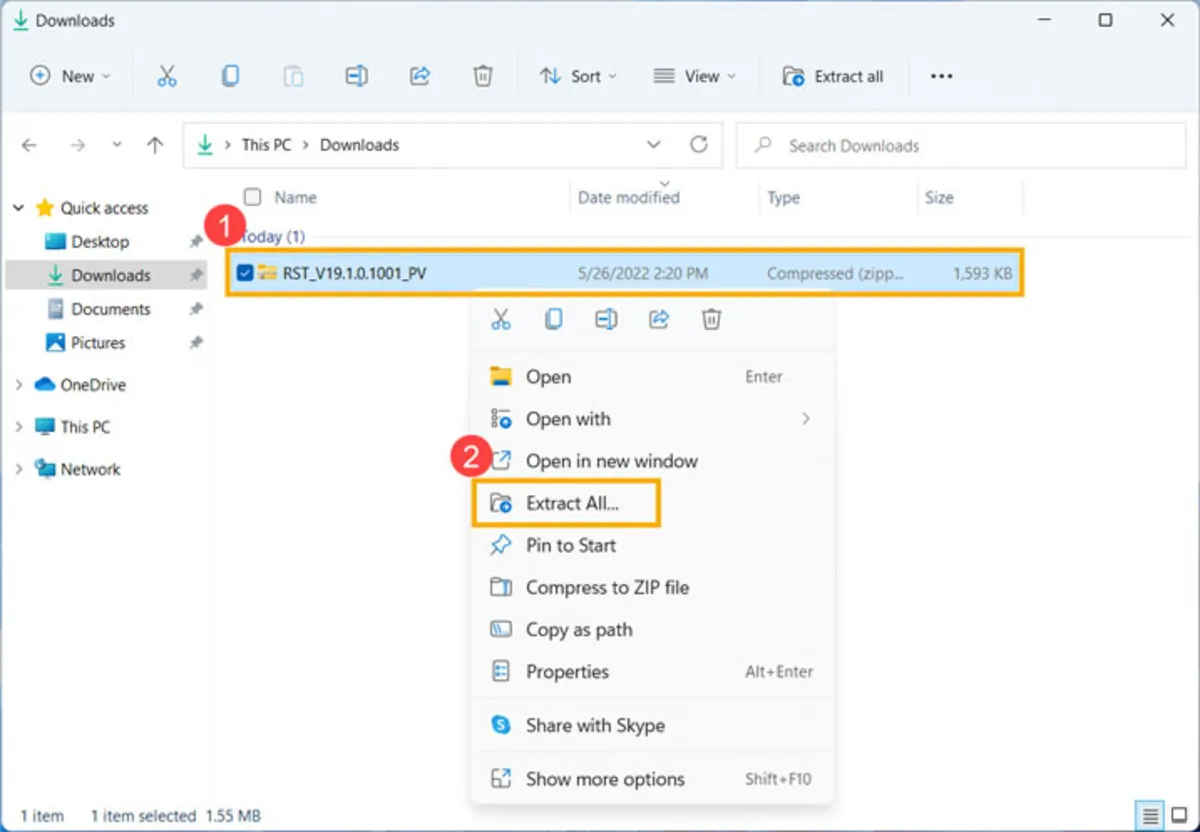
- On Intel processors, if the hard drive is not recognized, you can install the driver manually. In the first step, download the Intel Rapid Storage Technology (IRST) driver.
- After downloading, right-click on the IRST zip file and select Extract All.
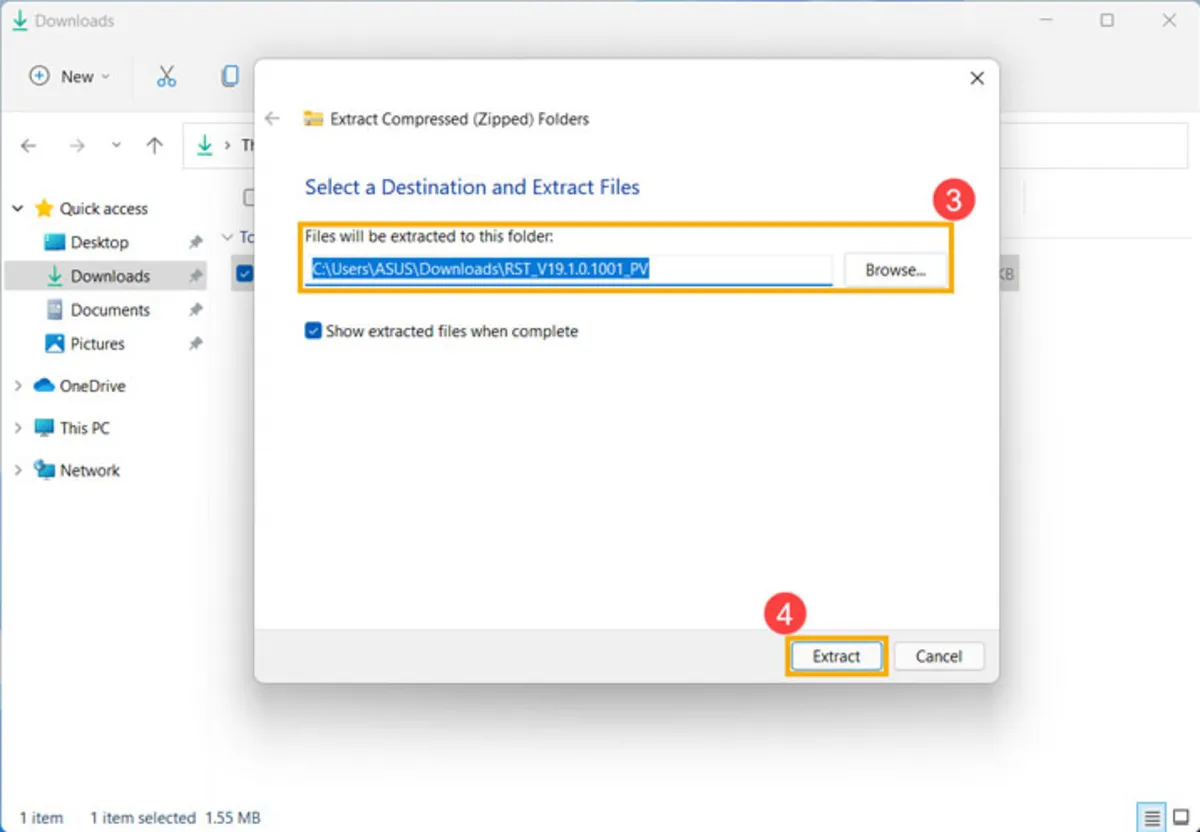
- Now select the desired folder and click on Extract.
- If you used a flash drive to install Windows 10 or 11, copy the IRST folder to the same flash drive as the Windows installation file.
IRST driver installation
Now connect the flash drive containing IRST and the Windows installation file to the computer, then continue the installation process. To learn how to install different versions of Windows, you can read the guide.
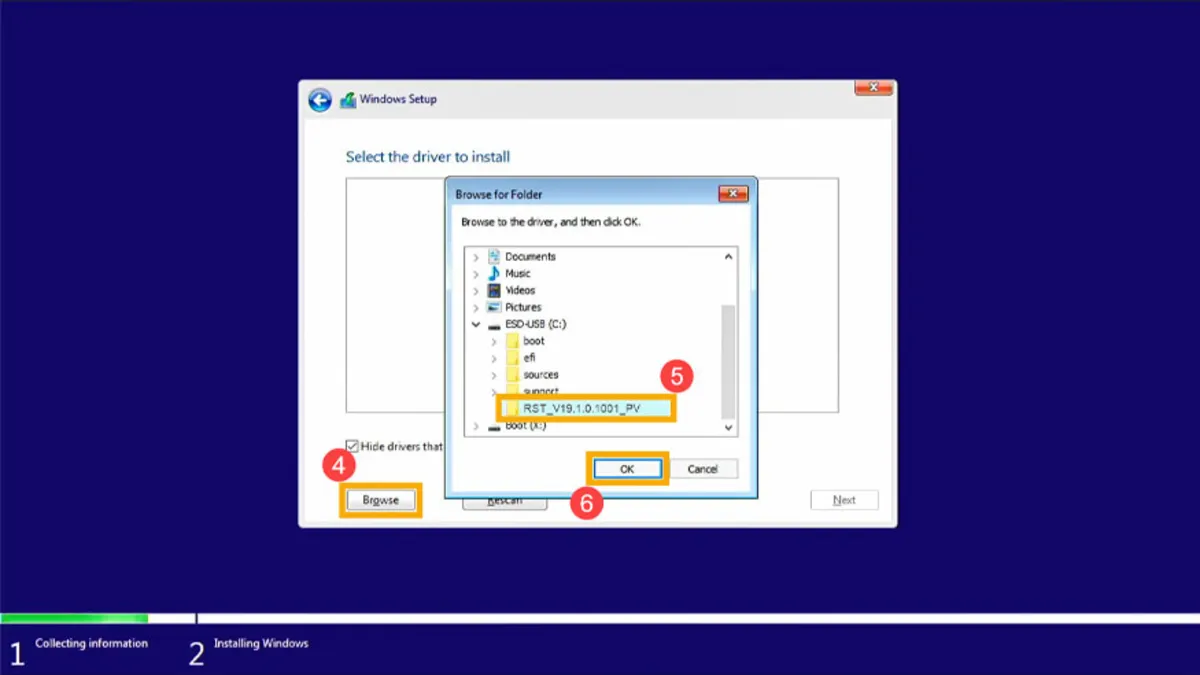
- On the “Where do you want to install Windows” page, click Load Driver, then click OK.
- Here, you will be asked to enter Flash. If you have already entered it, click OK.
- Now, click Browse, then locate the IRST folder.
- Select Intel RST VMD Controller 9A08 (TGL) in this window and click Next to install the driver.
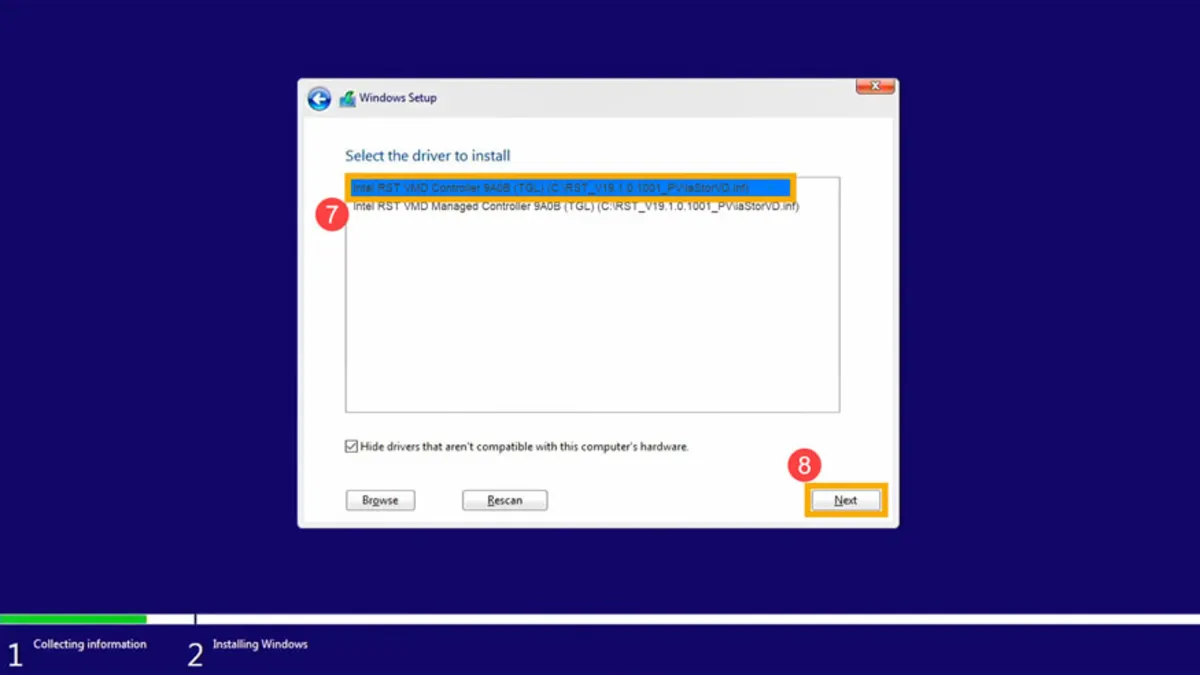
- After installation, the hard drive is recognized, and the drives are visible.
Update the storage controller driver.
To update the storage controller driver, follow these steps:
- First, right-click This PC on the desktop, then select Manage.
- Now, go to the Device Manager section.
- No, we will find the Storage Controller—Right-click on it. Then, select Upgrade Driver Software. This name may differ across Windows versions, such as “Update Drivers”.
- In the new window, select the first option to have the system automatically search for and download the latest version if available.
After completing these steps, you can resume the Windows installation process. However, if this method fails to identify the hard disk, organizing and partitioning it can help resolve the problem.
Delete hard disk partitions using Diskpart.
You must have made a backup copy of Ibn Bakhsh’s complex disk data, because all its data will be used by the methods we will use next.
If none of the abovementioned methods can detect the hard disk, another solution is to clean it using the Diskpart command. To do this, go through the following process:
- First, insert the flash drive containing the Windows installation file into the computer.
- Depending on the laptop model, press the appropriate key to enter the BIOS settings.
- Go to the Boot Menu and put the storage memory first.
- Save the changes in the Save and Exit section.
- When the Windows Setup Welcome screen appears, press Shift+F10 to open Command Prompt.
- In Command Prompt, type DiskPart and select the hard drive you want to clean.
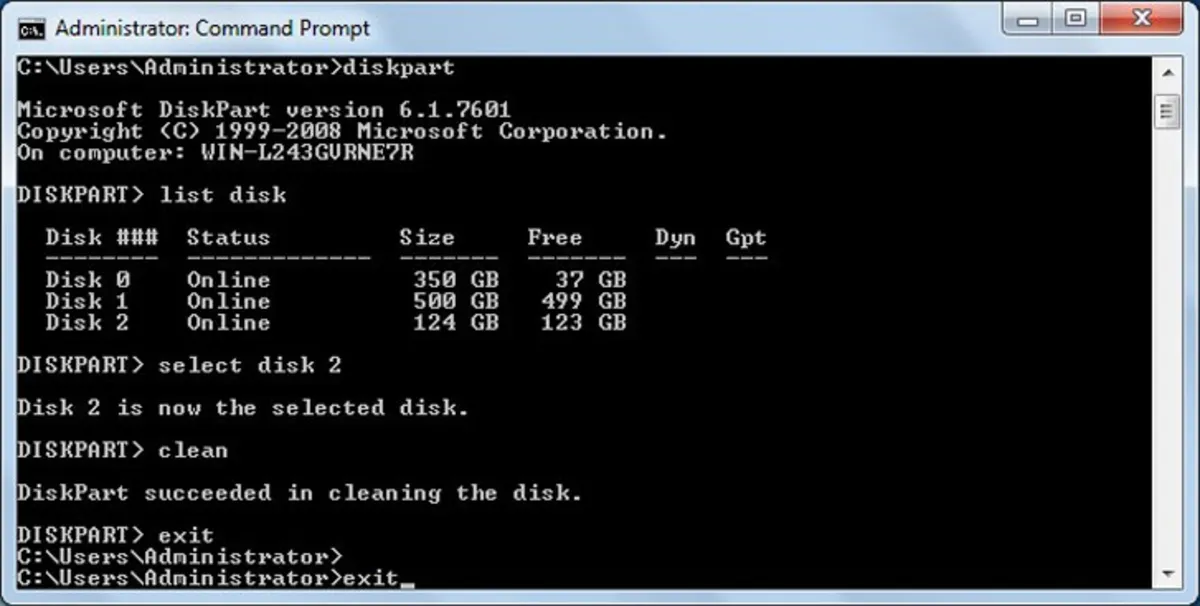
In the image above, disk two partitions have been deleted by running the following commands:
Diskpart
List disk
Select disk 2
Clean (using the Clean Power in diskpart, all sections of the selected disk will be deleted)
Exit (Exit from Diskpart)
Exit (Exit from Command Prompt)
Wiping the hard disk through MiniTool Partition Wizard
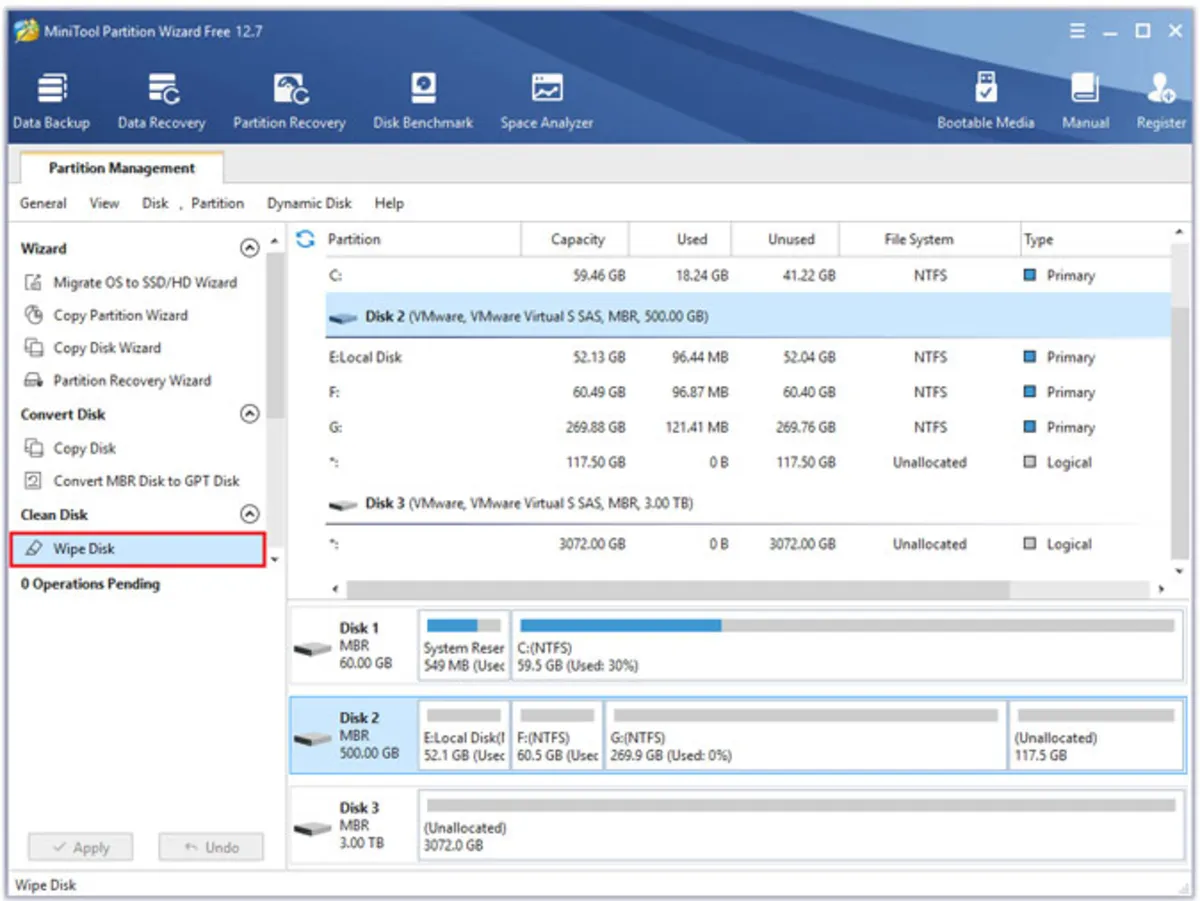
Suppose the previous method didn’t take you to your destination, and you couldn’t complete the Windows installation. In that case, the solution is to wipe the hard disk, which permanently erases the data and cannot be recovered. To wipe the hard drive, first install and run the MiniTool Partition Wizard software, and then follow the steps below:
- Select the hard disk to erase and click the Wipe Disk option in the left-hand bar.
- At this stage, three methods exist to erase the hard drive; we recommend the first because it takes less time than the others.
- Now click Apply to apply the changes.

Generally, hard disk wiping is time-consuming, so be patient with the changes. Once the software has successfully applied the changes, you can close the program, shut down the computer, and reinstall Windows. However, changing the disk controller mode is best if Windows Install still can’t find your hard drive after wiping the disk.
Change the disk controller mode from IDE to AHCI.
We recommend this method for users with SSDs, as AHCI plays a vital role in improving SSD performance.
If the hard disk is not detected during Windows installation on the existing system, you can change the disk controller mode from IDE to AHCI to resolve the issue. But before that, open Device Manager and check the controller. If it were in AHCI mode, you wouldn’t need to follow the steps, and this method wouldn’t apply.
Enable AHCI mode for SATA on a computer with Windows pre-installed
To do this, follow the steps below:
- First, press Win+R and type regedit to run the Registry Editor.
- Then go to HKEY_LOCAL_MACHINE\ SYSTEM\ CurrentControlSet\ Services\ iaStorV section.
- On the right side, click on Start and set its value to “0”.
- Now go to HKEY_LOCAL_MACHINE\ SYSTEM\ CurrentControlSet\ Services\ iaStorAV\ StartOverride and enter zero in the Value Data field.

- In the HKEY_LOCAL_MACHINE\ SYSTEM\ CurrentControlSet\ Services\ storage section, set the Start value to 0.
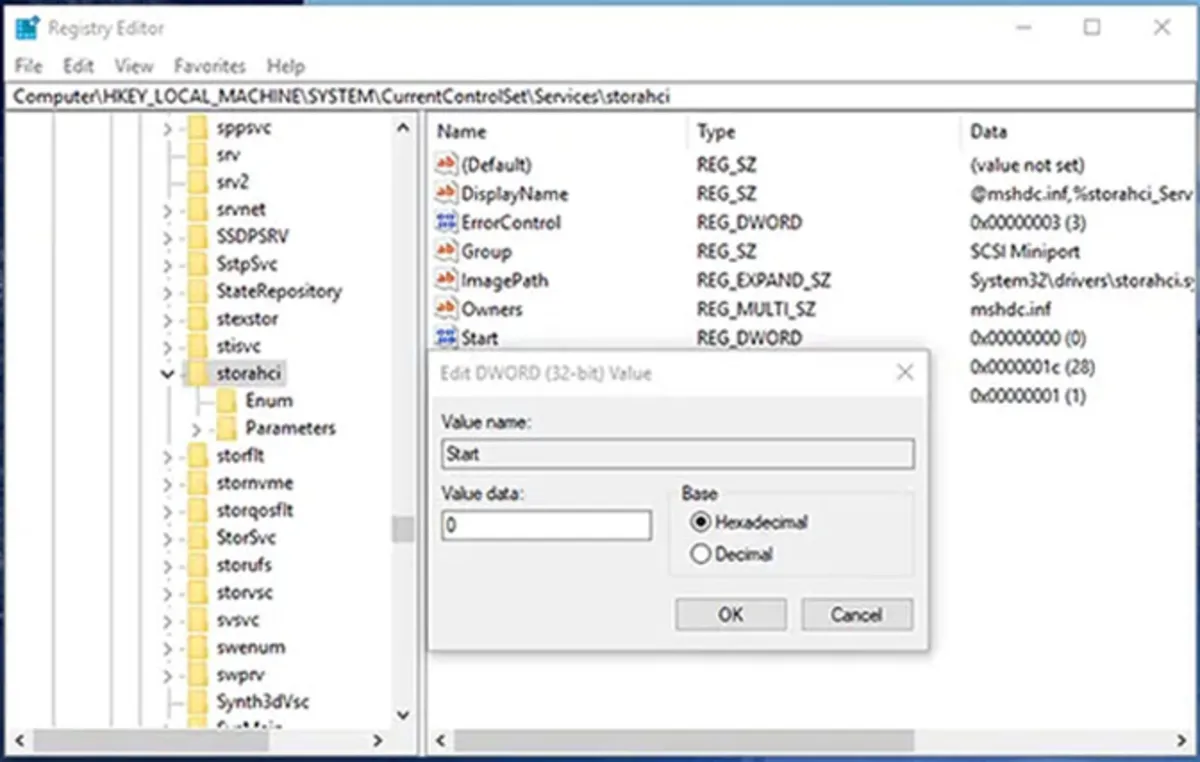
- Now go to HKEY_LOCAL_MACHINE\ SYSTEM\ CurrentControlSet\ Services\ storahci\ StartOverride and set the Value Data to zero again.
- Next, close the registry editor. Restart the computer and open the BIOS settings.
- Now, find the SATA settings and change the IDE mode to AHCI.
- Finally, save the changes, restart the device, and complete the Windows installation process.
Note: If you want to switch the IDE mode to AHCI while Windows is unavailable, change the BIOS settings, as you cannot run regedit.exe.
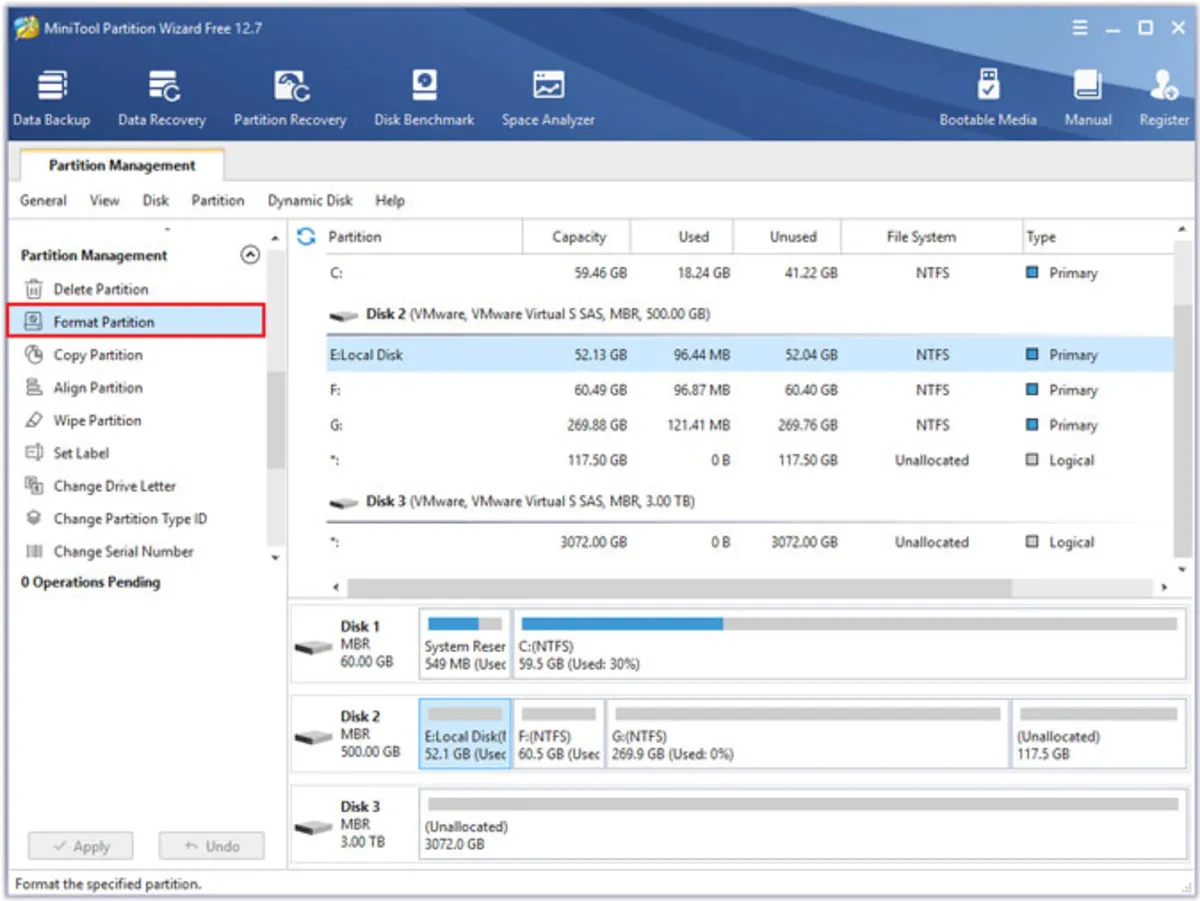
Format the hard disk.
If you have already formatted the hard drive with incompatible file systems, you may encounter errors such as the hard drive not being recognized during Windows installation. If you have downloaded the MiniTool Partition Wizard software in the previous steps, now you can use it to format the hard drive:
- After running the program, select the hard disk and click Format Partition on the left panel.
- Tap the down arrow next to File System and select a compatible file.
- Finally, click OK, then Apply, and Yes to apply the changes.
Disable Intel Volume Management Device (VMD)
The solution we present in this section will help if you have just bought a laptop and the hard drive is not being recognized. Next, we will look at how to disable VMD on Asus and Lenovo laptops. You have to go through the same process on other laptops.
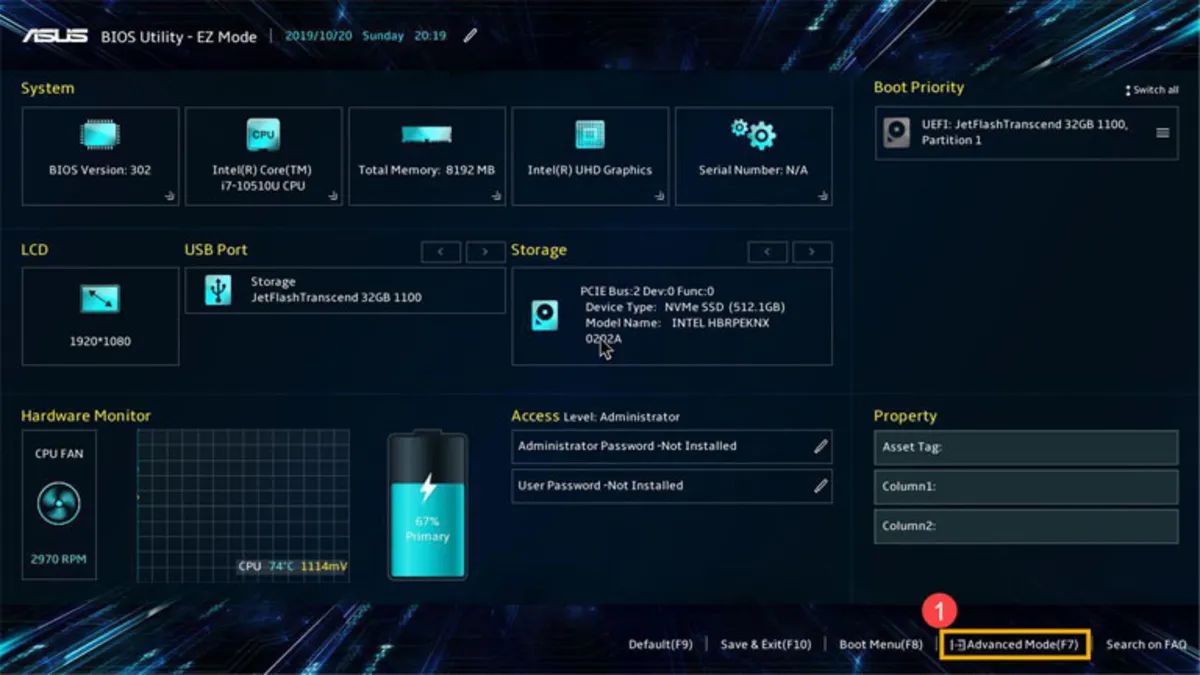
Disabling VMD on an ASUS laptop
- Press the F2 key to enter the BIOS settings on an Asus laptop.
- A screen like the one below will be displayed. In this section, you must press F7 to enter the Advanced settings.
- Go to the VMD Setup Menu section in the Advanced section and set the VMD Controller option to Disable.
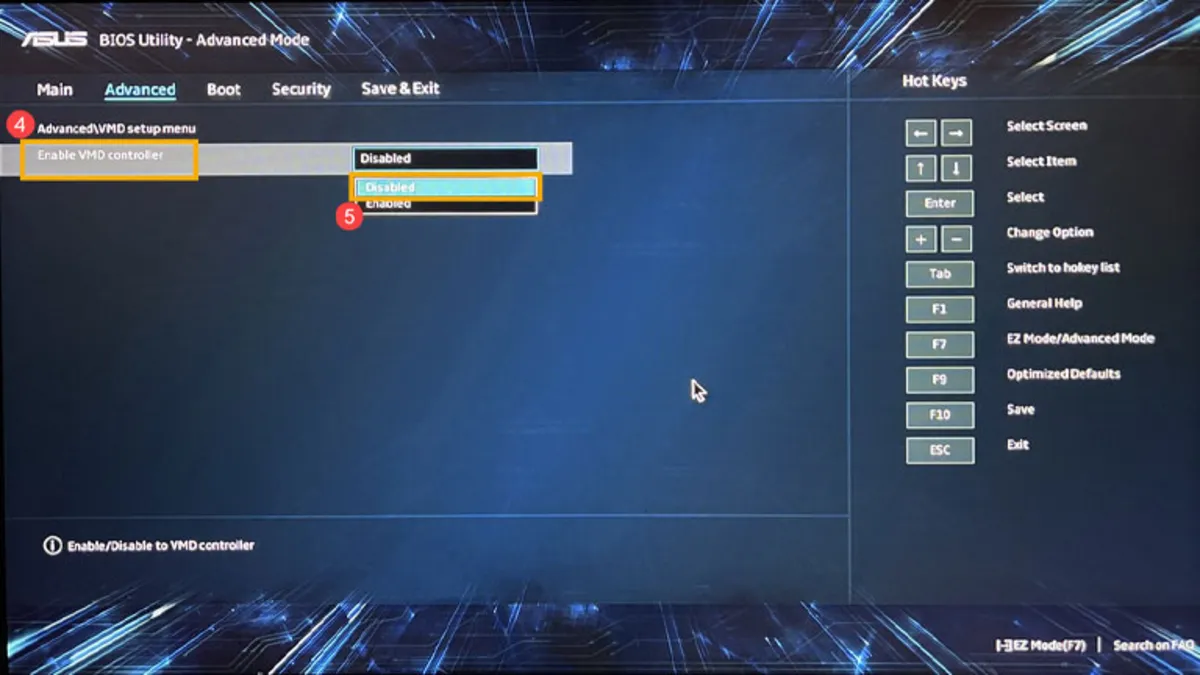
- In the Save and Exit section, select Save Changes and Exit and click OK to save the settings. You can also use the F10 key for this.

- Finally, restart the system and resume the Windows installation.
Disable VMD on the Lenovo laptop
Pressing F2 or Fn+F2 on Lenovo laptops to access the BIOS settings. If that doesn’t work, another way is to use the NOVO button or hole: a small opening on the laptop’s right side, with a downward arrow next to it. When booting up the device, press this hole with the tip of a needle to open the BIOS settings.
- Change the Security Boot option from Enable to Disable in the Security section.
- Go to the Configuration section and set the Intel VMD ControlThesable.
- The word SATA Co-herentroller appears here and should be in AHCI mode.
- Go to the Exit section, click Save Changes, and restart the laptop.
All the methods mentioned can be helpful for resolving a hard drive not being recognized during Windows installation, and the way to access each section’s settings may vary slightly.
If you know another solution for hard drives not being recognized during Windows installation, please share it in the comments.
FAQ
Why isn’t my hard drive detected during Windows setup?
It may be due to missing storage drivers, incorrect BIOS/UEFI settings, or incompatible controller modes.
Should I check BIOS/UEFI settings?
Yes, ensure the drive is enabled and the SATA mode (e.g., AHCI) is correctly configured.
Can missing drivers cause detection issues?
Yes, without proper storage drivers, Windows setup may not recognize the hard drive until they are loaded.