How to Turn a Router into an Access Point
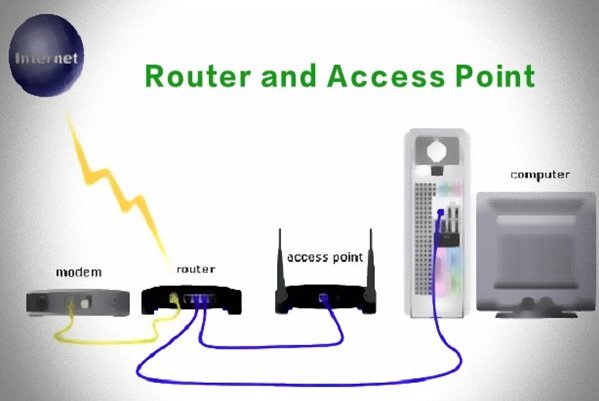
Some Users Think Of Routers and Access points as A Single Product, but this is not the case. An access point is a device to which other wireless devices are connected, while a router is one of the main pieces of equipment in a network, responsible for forwarding packets to destination nodes in an internal or external network.
What is an access point?
An access point is equipment that functions like a switch in cable networks, except that it operates in wireless networks. Expenditures allow connecting multiple computer systems over wireless networks and creating a wireless local area network (WLAN). Given that the primary function of the access point is to connect Wi-Fi devices, it is not much use on its own.
In other words, to connect devices within a wired network to each other and eventually to the Internet, we need to connect the access point to the router.
The router’s primary functions are to assign IP addresses to devices on the Network, receive data packets from devices such as access points, connect devices to the Internet, and provide a platform for implementing a wireless network. The access point creates a network name (SSID) so that other Wi-Fi devices can connect to it.
Devices that connect to the Expend are connected to a local network, so they will have trouble accessing networked services such as file sharing. In new wireless routers, routers and access points are provided to consumers as a single device, just as modems and routers are used as a single device today.
How to turn a router into an access point?
Many users put their old router aside after purchasing a new one, so it is possible to convert the second one to an access point without buying a new one. It would help if you did this. It is not very complicated and can be easily achieved.
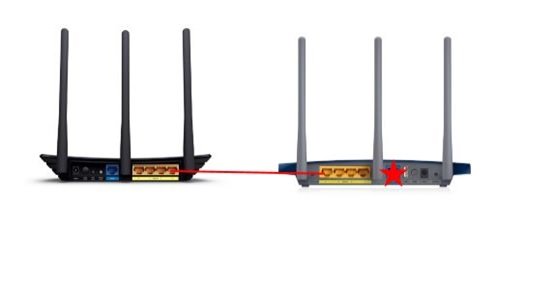
To do this, we use TP-Link routers. This method connects the main router to the N-series TP-Link router via a LAN port. Also, since many users’ devices may not support the 802.11ac standard, it’s fine if your second router only supports the N-series standard.
Note that we do not need the second router’s WAN port in this method. In the figure below, the router on the left is the primary router, and the router on the right is the access point.
Step 1:
Connect your computer to the second LAN port on the T-TypeLink router using an Ethernet cable. Type the router’s IP address into your browser so the user interface of the TP-Link web router appears. Then, enter the relevant password to display the router settings page. While it is impossible to do this using Wi-Fi, we do not recommend doing so.
Step 2:
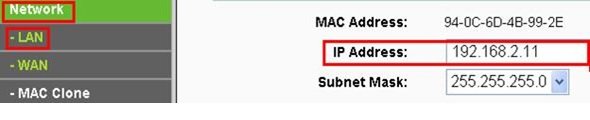
Go to Network> LAN from the menu on the left. In the LAN IP address field of the N-Series router, you must enter the same IP address as the original router. Note that this IP address must be outside the range used by the central router’s DHCP server.
For example, if the primary router’s DHCP server uses IP addresses in the range 192.168.2.100 to 192.168.2.199, you must specify the N-type router’s IP address, 192.168.2.x. The X character here must be outside the DHCP range. An address similar to 192.168.2.11 is appropriate.
After changing the LAN IP address, reboot the router to apply the changes. Note that you must connect to the NTypeLink router using the new IP address when you next visit.
Step 3:
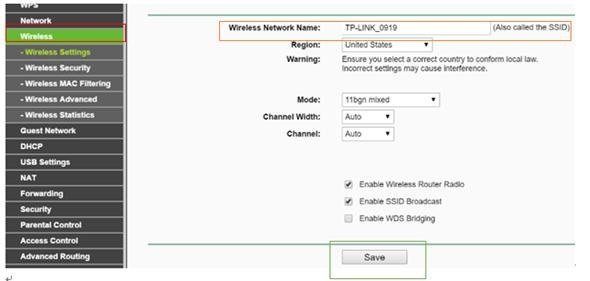
Go to Wireless> Wireless Settings and specify the network name (SSID). This name can be the same as or different from the original router’s name. After applying the change, click the Save button.
Step 4:
Go to Wireless> Wireless Security and specify the wireless network security mechanism. We suggest choosing the more secure WPA / WPA2-Personal option. After selecting the desired option, click the Save button to apply the changes.
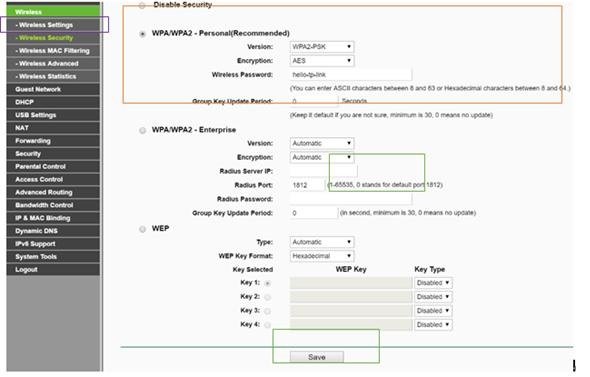
You must repeat the same process on the 5 GHz band using a dual-band router.
Step 5:
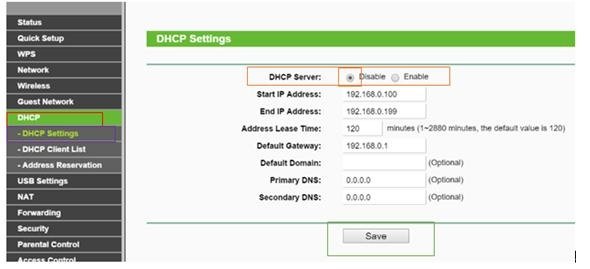
Go to DHCP> DHCP Settings, select Disable the DHCP Server, and click the Save button. If you do not turn off the above option, the second router will automatically assign IP addresses.
Step 6:
Go to System Tools > Reboot, then select Reboot to reboot the device.

Step 7: Connect the LAN ports of the main router to the NTypeLink router using an Ethernet cable. All LAN ports on the NTypeLink router now allow Internet access to the devices. Wi-Fi devices can also connect to the Internet via the NTiplink router using the network name and password you set earlier.
This way, you can use your second router as an access point to extend the Wi-Fi network’s range without buying one.
last word
The access point allows wireless devices to connect to the Network, while the router connects the access point to external networks such as the Internet. The access point cannot redirect packets, but the router’s primary function is to route packets to the destination node.
The router can send packets from various inputs to the intended outputs, but the access point only directs packets from the Wi-Fi receiver to the wired interface. Routers use unique routing algorithms, such as the routing table, while exponents do not.
FAQ
How do I change a router into an access point?
Connect the router to your main network via LAN, disable its DHCP server, set it to a unique IP in your network range, and enable Wi‑Fi.
Why disable DHCP on the second router?
To prevent IP conflicts and make sure your main router handles all address assignments.
When is using a router as an access point helpful?
When you need to extend Wi‑Fi coverage to hard‑to‑reach areas without buying a dedicated access point device.