
How to Configure Microsoft IIS as a Reverse Proxy Server on Windows Server
If you are thinking about maintaining the security and performance of your main website server, you can implement many security solutions by configuring a Reverse Proxy in a Windows IIS server.
Setting up a reverse proxy in IIS is completed in 3 main steps: installing URL Rewrite and ARR plugins, creating a reverse proxy rule, and activating the Reverse Proxy settings in IIS, but this simple process can have a great impact on the security, performance, and traffic management of your website.
Reverse proxies act like an interface. They are placed in front of the web server to communicate with users instead of the main Server. They intercept users’ requests at the edge of the network. Then, they act as mediators, forwarding these requests to the main Server and receiving the corresponding response.
In general, using a proxy server is associated with many advantages, such as balancing the site’s load and traffic, protecting the Server from attacks, keeping content in the cache, and providing SSL encryption, which are the main ones that most website owners use to improve their site’s performance. They are looking for these benefits. If you are one of these people, you can safely set up a Reverse Proxy.
So, if you use Windows Server and have chosen IIS to create, configure, and publish your site on the web, you can easily complete the process of installing and configuring Reverse Proxy in IIS by following the steps that we will review below. Let the.
After this, there is no need to worry because even though this process has its difficulties and can be associated with many challenges, but with our step-by-step guide, all these difficulties will be eased, but if you intend to buy a Windows server that has the potential and power necessary to host a website and set up a reverse proxy, we recommend that you visit the Windows virtual server purchase page and order your ideal plan.
What is a Reverse proxy?
The proxy server is an important computer network intermediary located in the server section. It mediates between the client and the Server.
Let’s go ahead with a real-world example:
Suppose you are an employee of a large company with a sensitive security system. To enter the office, rookies and new employees must first pass through a special entrance door monitored by a security guard (reverse proxy).
This is a proxy server that manages requests and performs the necessary actions in the field of responding to requests, such as intercepting requests and directing them to the main Server.
In general, this proxy performs several tasks to improve the network’s performance and security. The most important of these are mediation between client and server, network load reduction, content filtering, privacy protection, security tasks, and access control.
By performing these tasks, this Server helps to create a secure, controlled, and better-performing network environment.
Steps to set up a reverse proxy in IIS
To use IIS as a reverse proxy, you must use a Windows Server 2019 or above and have gone through the steps of installing the IIS web server.
Step 1: Install the required plugins
The IIS web server does not have a reverse server routing feature by default, and you need to enable it. To do this, you need to download and install a series of plugins manually.
One of these extensions is ARR (Application Request Routing), which is necessary to distribute web traffic between several servers. To install it, just go to the ARR download page, download the file, and install it.
The second plugin is URL-rewrite, and it allows IIS to act as a reverse proxy server. To install this plugin, just go to the URL-rewrite download page, download the file, and install it.
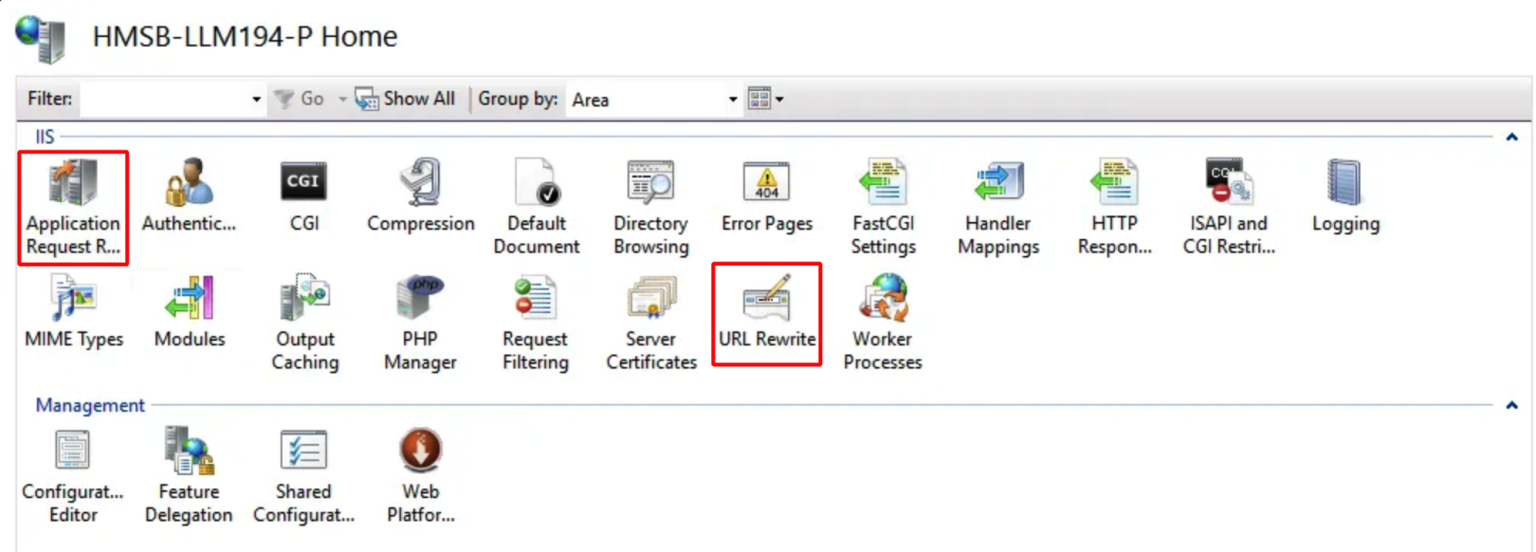
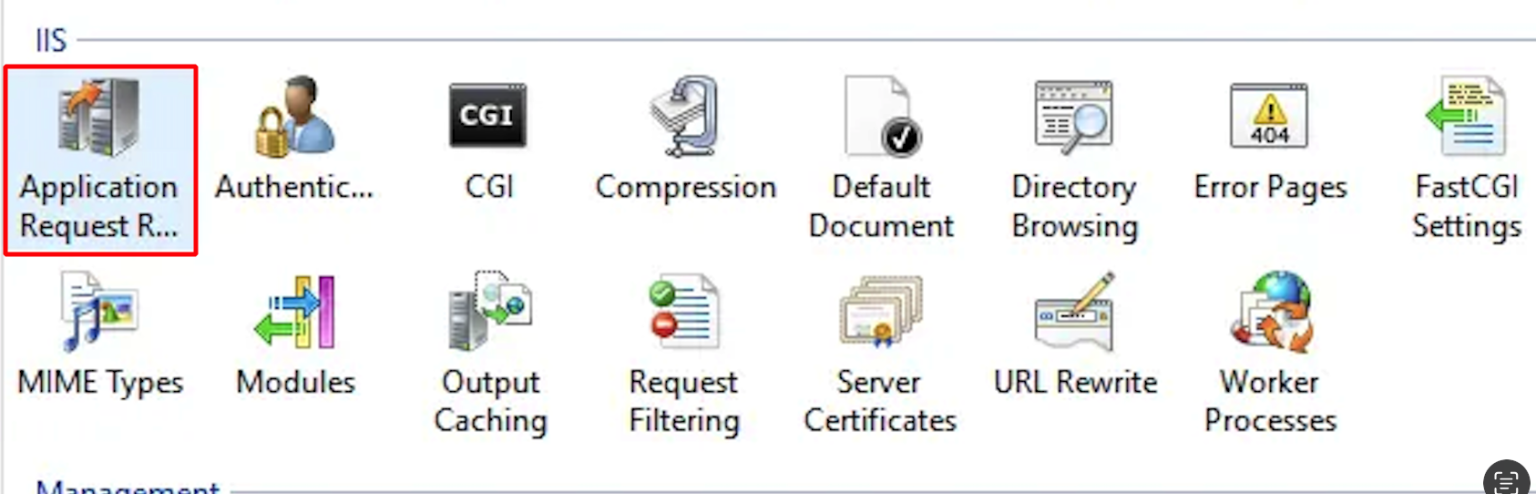
If you open the IIS web server after downloading and installing the plugins, you can see the Application Request Routine Cache and URL Rewrite options in the IIS dashboard.
Step 2: Add a reverse proxy rule
Now you can add the rule for adding the proxy server. So click on the URL Rewrite option.
From the right bar, click on the first option of the Actions section, i.e., add rules.
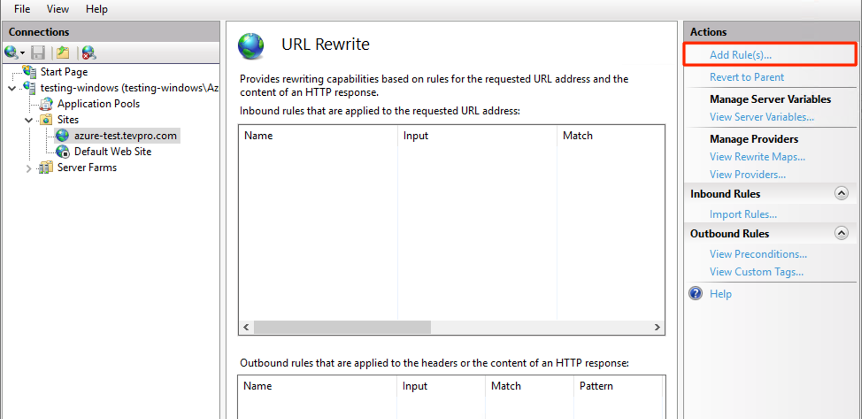
Then select Blank rule from the inbound rules section and click on Ok.
You will see the following window:
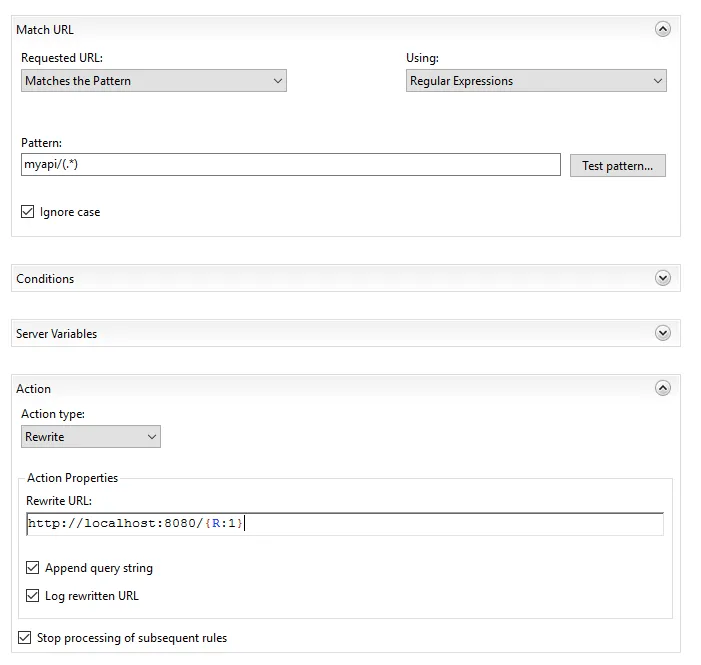
First, enter the name of this rule in the name field.
Then, enter a pattern in the pattern section. This pattern, which is in regex format, defines how incoming reverse proxy requests are handled or routed.
If you want this pattern to match all site URLs, set it to (.*). For example, to set this routing to apply to all URLs starting with myapi, enter the pattern as (*.)/myapi.
* If needed, you can use the test pattern tool available next to the pattern field to test your desired patterns.
The Conditions section can optionally be used to specify a series of specific conditions for the templates section.
When you reach the Action section, you must determine the desired action or activity when matching the pattern.
This way, if the requested URL is compatible with the pattern you specified in the pattern section, the desired URL will be directed to the correct path.
Step 3. Enable reverse proxy settings in IIS
As we mentioned earlier, the reverse proxy feature is not enabled by default in IIS, and you have to manually enable the IIS proxy settings. If you do the settings of step 2 and do not enable this feature, users and you will encounter a 404 Not Found error when visiting the address. For this, just follow the steps below:
Open IIS Manager and click Server.
Double-click on the Application Request Routing option.
From the right toolbar, click Server Proxy Settings.
Then, check the Enable proxy option to enable this feature on the web server.
Then set the HTTP Version to Pass through and check the Reverse rewrite host in response headers option.
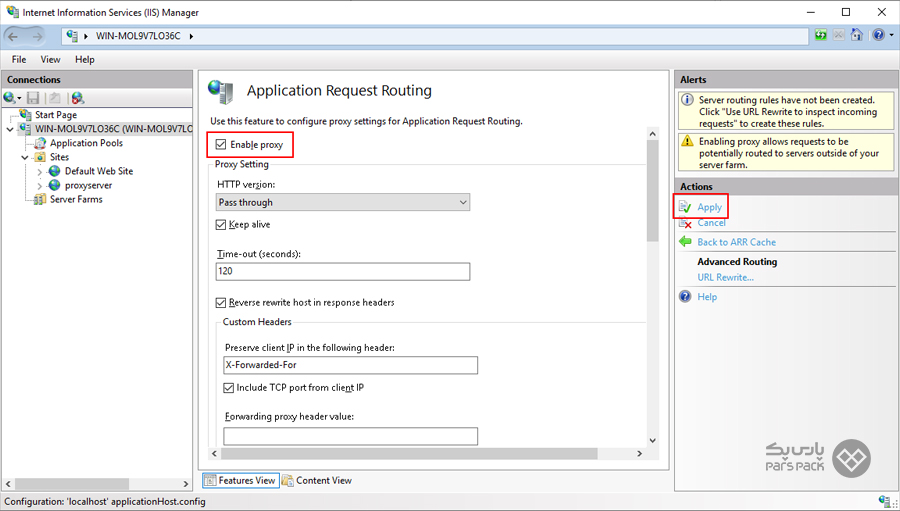
Finally, click Apply to save the change.
Yes, by following these steps, you have succeeded in setting up a reverse proxy in IIS.
Benefits of Configuring Reverse Proxy on Windows Server IIS
Load balancing
A popular website attracts millions of users daily and may not be able to handle all incoming server traffic. In such cases, the site can be distributed among a set of different servers that manage requests related to a website. This is where a reverse proxy can be used as a load balancer to distribute incoming traffic evenly between different servers. This work not only prevents the overload of the main Server and selects the closest Server when responding to requests, but if one Server fails, other servers can act as an alternative for traffic management.
Protecting the Server from attacks
With a proxy server, the IP address of the origin servers is not revealed. This prevents hackers from identifying the target and executing attacks such as DDoS.
cache memory
A reverse proxy can store content in its own cache and, if necessary, use the cache to respond to requests more quickly.
SSL encryption
Encrypting or decrypting communications for each client can be expensive for the main Server. A proxy server can be configured to encrypt all incoming requests and outgoing responses, freeing up valuable primary server resources.
Now that you are familiar with the main functions and benefits of a proxy server and have learned how to configure Reverse Proxy in Windows IIS Server, it is time to start setting up Reverse Proxy based on the following tips.
Important points about setting up a reverse proxy in IIS
- Ensure that the servers are ready to receive traffic from the reverse proxy.
- Don’t forget to enable the TLS certificate for the reverse proxy.
- Enable client-side authentication.
- To the pattern *. Don’t settle, and try using different mechanisms for things like authentication and return URLs.
- For each specific case, create separation rules and don’t forget to activate the Stop processing option because this option prevents conflicting URLs compatible with multiple patterns.
- Your rewrite is not limited to the root folder of the site, and you can send or redirect the input URL as a parameter.
- If you have an SSL certificate enabled, using the http prefix in the rewrite URL will add SSL to your reverse proxy. But if you want to keep the encryption, you should add a new condition under
- the format://?(https)^ from the condition section and start the rewrite URL with //:{C:1} prefix.
- Check the reports on the reverse proxy to make sure it is working properly.
- If you are using multiple destination servers for reverse proxy, make sure that the traffic is properly distributed between them.
- Do the necessary optimizations and updates to avoid security problems.
Conclusion
By configuring a Reverse Proxy in Windows Server IIS, you can create a gateway between your clients and your main servers so that requests can be handled and managed through it. This process is completed in several steps, the most important of which are installing the necessary plugins, creating a reverse proxy rule, and activating it. If you set up this proxy correctly and carefully perform SSL certificate and authentication, you can expect to improve your site’s performance and security.
FAQ
What modules must be installed in IIS to enable reverse-proxy functionality?
You must install the URL Rewrite module and the Application Request Routing (ARR) extension—ARR enables proxying capabilities and URL Rewrite manages the rules.
How do you enable the proxy and create routing rules in IIS?
In IIS Manager go to the server node → “Application Request Routing Cache” → “Server Proxy Settings” → check “Enable proxy”. Then under the target website use “URL Rewrite” → “Add Rule(s)…”, choose “Reverse Proxy” or “Blank rule”, define the match pattern and the rewrite destination.
What additional settings should you consider for host headers, SSL and request limits?
You may need to enable “Preserve host header” so backend services see the original host. For SSL you’ll add HTTPS bindings and certificates. Also increase request length/URL length limits in web.config if your requests are large or have double-escaping needs.